background image

Loading Media and Printing

Macintosh

Macintosh

Windows

Parts

95

3

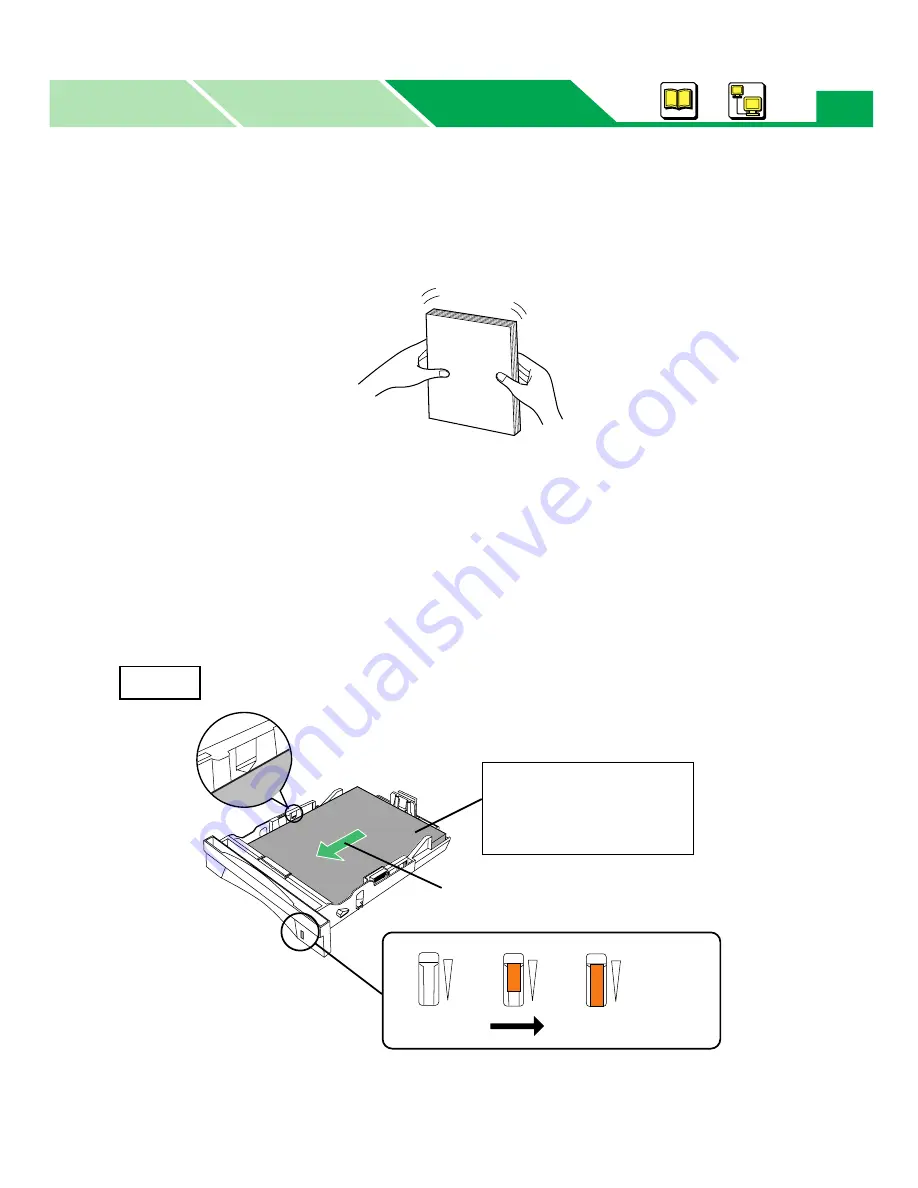
Tap the media stack on a level surface to avoid media jams or skewed
printing.

NOTE

• Be careful not to leave fingerprints on the media, which can result in smudged print.
• Reusing media (used paper or jammed paper) that has been fed through the printer once

can reduce the life of the consumables and paper path components.

4

Place the media with the print side down.

•Transparency, label or envelope cannot be loaded in the optional 2nd feeder.

The height of paper 
should not exceed the 
limit mark on the tray, or 
it may cause a jam.

Print side down

Media feed direction

Paper Full

Paper Low or Empty

Paper

Summary of Contents for KX-P7110

Page 1: ...Windows Section 7 About Media 9 Loading Media and Printing 11 Remote Control Panel 23 Setting the Printer Driver 38 Using the Special Print Features 68 Status Display 75 Index 87 Macintosh 90 Contents of Macintosh Section 90 Loading Media and Printing 91 Setting the Printer Driver for PostScript 106 Using the Special Print Feature 119 Index 121 ...

Page 2: ...may be wrapped around the fuser roller and cause damage Any toner other than genuine Panasonic toner it may damage the printer Unstable or unlevel surfaces Directly in front of air conditioning vents Liquids near the equipment Areas of poor ventilation Areas of high dust or chemical fume concentration solvent etc Direct exposure to sunlight Extremely high or low temperature temperature range 10 C ...

Page 3: ...ors parallel USB connector for 2nd feeder and network KX P7110 only Electrical components connectors inside the printer Interface Cable Always use a shielded interface cable Use of an unshielded cable can result in radio interference with data Power Source Do not use a line conditioner transient suppressor or surge protector as it may cause a machine error Ventilation Space The ventilation space i...

Page 4: ...y Front cover Paper level indicator see pages 15 95 USB interface connector see page 59 in Maintenance and Specifications Parallel interface connector see page 57 in Maintenance and Specifications Rear cover see pages 11 17 19 91 97 101 Jam release pan see Clearing a Jam on page 15 in Maintenance and Specifications AC inlet Power switch Network interface connector RJ 45 KX P7110 only Connector for...

Page 5: ...and back on again If the problem persists call for service on your printer Printer is receiving data printing or data remains in the memory Printer recoverable errors media jam media empty etc occurred See Maintenance and Specifications for the troubleshooting Drum unit is not installed in the printer Drum unit is wearing out Change the drum unit Toner is low Toner may be empty Life cycle of the d...

Page 6: ...demo page press the PRINT RESET button more than 5 seconds until the ERROR indicator blinks fast then release it The ERROR indicator is turned off and the demo page will be printed To print the remaining data press the PRINT RESET button less than 5 seconds To clear the remaining data press the PRINT RESET button more than 5 seconds until the READY and ERROR indicator blinks fast then release it T...

Page 7: ...he Settings 26 Tool Menus Tool Bar Icons 27 Tree Menus 29 Outline for Menus 32 Setting the Printer Driver 38 Displaying the Printer Properties Window 38 Details Tab Windows 95 Windows 98 Windows Me 41 Sharing Tab Windows 95 Windows 98 Windows Me 42 Page Setup Tab 43 Paper Tab in Advanced 46 Setup Tab in Advanced 47 Quality Tab in Advanced 49 Overlay Tab in Advanced 51 Watermarks Tab in Advanced 53...

Page 8: ...cial Print Features 68 Duplex Printing 68 Watermark Printing 70 Overlay Printing 71 Status Display 75 Status Display Icon on the Task Bar 75 Displaying the Status Display Window 76 Function of the Status Display 77 More Information Window 78 Setup for Status Display Window 83 Selecting the Printer to Get the Status 85 Index 87 ...

Page 9: ... page size can be set to custom size At that time set the paper size to letter or A4 on the printer s media size setting About Media Available Media and Media Size Media Media size Media tray Manual feed Duplex print 2nd feeder option Paper Cotton paper Letter 1 1 A4 1 1 Legal 1 1 B5 1 1 Executive 1 1 A5 A6 Available media size 2 Max 216 x 356 mm 8 5 x 14 216 x 356 mm 8 5 x 14 216 x 356 mm 8 5 x 1...

Page 10: ...ed 2nd feeder option Paper weights Plain paper 60 105 g m2 16 28 lbs 60 105 g m2 16 28 lbs 60 105g m2 16 28 lbs Thick paper 106 165 g m2 29 44 lbs Envelope 90 g m2 24 lbs 90 g m2 24 lbs Paper capacity Paper 250 sheets 75 g m2 20 lbs 1 sheet 550 sheets 75 g m2 20 lbs Transparency 20 sheets 1 sheet Label 1 sheet Envelope 30 sheets 1 sheet Recommended Media Media Media size Recommended media Paper Le...

Page 11: ...d it may be curled You can avoid this by opening the rear cover and the media is printed straight out However it needs to be removed after the media is printed out to avoid a media jam For available media see About Media on page 9 NOTE Be sure to use manual feed when printing a document on a thick paper 106 165 g m2 29 44 lbs or label Plain paper A4 Letter Legal B5 Executive can be loaded in the o...

Page 12: ...nt area is printed a bit smaller than the media size 4 2 mm 0 17 is required from the top bottom and sides margins You may need to adjust the page margins in the application software to match the print area Margins and Print Area 4 2 mm 0 17 4 2 mm 0 17 4 2 mm 0 17 4 2 mm 0 17 ...

Page 13: ...ng Media and Printing Macintosh Parts Windows Windows 13 1 Pull the media tray out of the printer 2 Pinch the media guides and slide them to the approximate width and length of the media Using the Media Tray ...

Page 14: ...l paper slide the length guide unit to extend while pressing the stop per If the media guide is removed slide it back in If the metal plate is in the up position the media tray cannot be inserted into the printer Push the metal plate down until it clicks locking it in place Media guide ...

Page 15: ...rint Reusing media used paper or jammed paper that has been fed through the printer once can reduce the life of the consumables and paper path components 4 Place media with the print side down Transparencies labels or envelope cannot be loaded in the optional 2nd feeder The height of paper should not exceed the limit mark on the tray or it may cause a jam Print side down Media feed direction Paper...

Page 16: ...the designated sheets may cause a media jam or shifting of print 5 Adjust the media guides to the media size Be sure that the stoppers of the media guides are put in the grooves of the media tray 6 Slide the media tray completely into the slot CAUTION Be sure to hold the media tray with both hands so you do not drop it especially when it is fully loaded Max 20 sheets Print side down Transparency M...

Page 17: ...or wrinkles if you print on an envelope Before printing a document specify the paper size media type and paper source from the printer driver following the steps below 8 Display the print window in the application software 9 Select Panasonic KX P7105 PCL6 or Panasonic KX P7110 PCL6 printer and click Properties The printer properties window is displayed Rear cover Open it when printing on an envelo...

Page 18: ...dded to Paper Source You cannot feed Thick Paper or Labels from the Media Tray Upper or Lower Paper Source You can only feed plain paper A4 Letter Legal B5 or Executive from the lower tray Also Cotton paper cannot be fed from the lower tray For detailed information to setup the printer driver see Setting the Printer Driver on page 38 11 Click and print a document If you opened the rear cover at st...

Page 19: ... m2 29 44 lbs or labels use the manual feed 1 Raise the paper support so that the media is not dropped from the output tray It is recommended to open the rear cover of the printer to avoid a curl or wrinkles if you print a document on thick paper 106 165 g m2 29 44 lbs or an envelope 2 Separate the media guides to the approximate width of the media Using the Manual Feed Rear cover Open it when pri...

Page 20: ...the manual feed while adjusting the media guides to the media width The inserted media is slightly fed into the manual feed automatically Be sure to insert a media into the manual feed one at a time Printing side up Paper Label Transparency Envelope Printing side up Flap International C5 Printing side up Flap ...

Page 21: ...nter and click Properties The printer properties window is displayed 6 Select the Manual Feed for Paper Source and specify the paper size and media type For the detailed information to setup the printer driver see Setting the Printer Driver on page 38 7 Click and print a document If you opened the rear cover at step 1 be sure to remove the media every time media is printed out OK ...

Page 22: ...fter the media has been fed from the manual feed insert media into the manual feed for the next printing If you delay inserting media into the manual feed when doing a multiple print job a media empty error may occur In that case insert the media into the manual feed ...

Page 23: ...twork KX P7110 only on page 34 System Requirement To use the Remote Control Panel the following system is required Operating system Windows 95 1 Windows 98 2 Windows Me 3 Windows NT 4 0 4 or Windows 2000 5 Interface Parallel interface or USB interface 1Microsoft Windows 95 operating system hereafter Windows 95 2 Microsoft Windows 98 operating system hereafter Windows 98 3 Microsoft Windows Millenn...

Page 24: ...Programs Panasonic and Panasonic KX P7105 and KX P7110 then click Remote Control Panel If more than one printer is connected to your computer the screen prompts to select the printer Click the desired then click Displaying the Remote Control Panel Window Start OK Tool menus Tree menus ...

Page 25: ... Quality see page 33 Font see page 33 Network 1 see page 34 Adjustment to Media see page 35 Others see page 36 Information see page 37 1If your printer is KX P7105 the Network menu is not displayed 1 Display the Remote Control Panel window see Displaying the Remote Control Panel Window on page 24 2 Click the button on the Information menu from the tree menu Or Double click the Information menu Dis...

Page 26: ...ick the button on the main menu from the tree menu Or Double click the main menu 3 Click the 2nd menu 4 Click the button and click the desired selection Or Click the or button to select the value Or Type the value 5 Click Tool menu and select Send to transfer the changed setting to the printer Changing the Settings ...

Page 27: ...d settings to the printer Factory Default Resets the printer s settings to the factory default settings Reset Restarts the printer Print Configuration Prints the current printer s settings Print Demo Page Prints the demo page Print PCL Font List Prints the font list for PCL Print PS Font List Prints the font list for PostScript Fuser Cleaning Prints the 5 blank sheets to clean the fuser unit Tool ...

Page 28: ...e If more than one printer are connected to the computer this menu is activated You can select the printer to use with Remote Control Panel Help menu About Displays the version of the Remote Control Panel software Help Displays the help menu how to use the Remote Control Panel ...

Page 29: ...lled on the printer Media tray is changed to Upper and Lower selection is added 2Default setting is different depending on the country Tree Menus Menu Selection 1 Information Selection 2 Paper Paper Source Auto Tray Manual Feed Media tray Upper 1 Lower 1 Media Type Plain Paper Thick Paper Transparency Label Cotton Paper Envelope Media Size Letter 2 Legal Executive A4 2 A5 Com 9 Env Com 10 Env Mona...

Page 30: ...htest Darkest Font Font Number 0 0 54 Font pitch 10 00 0 44 99 99 Font height 12 00 4 00 999 75 Symbol set PC8 Network KX P7110 only MAC address xx xx xx xx xx xx Printer name Protocol TCP IP On Off DHCP On Off IP address 0 0 0 0 Subnet mask TCP IP 0 0 0 0 Gateway address 0 0 0 0 Protocol Apple talk On Off Protocol Netware On Off Protocol SMB On Off Adjustment to Media Plain paper front side 0 3 3...

Page 31: ...ode On Off Auto continues On Off Page Protection Auto Off On I O timeout setting 60 5 300 Printer Emulation Auto PCL Language English French German Italian Spanish Information Controller FW x xx xx Engine FW Vxxx Page Styler2 Not installed x xx xx Memory Size 16 MB installed memory Option Cassette Not installed Installed Menu Selection 1 Information Selection 2 ...

Page 32: ...er of text lines that are enabled to print on each page Copies Sets the number of copies to be printed Orientation Selects the print orientation Duplex Selects either to Flip on long edge or to Flip on short edge when printing a document on both sides of paper Front Top Calibration Adjusts the top margin of printing Front Left Calibration Adjusts the left side margin of printing Back Top Calibrati...

Page 33: ...ing Font Font number Selects a font to print by selecting the font number Font pitch Selects the font pitch Font height Selects the font height Symbol set Selects a symbol set used for the selected font A symbol set is a collection of alphabetic characters punctuation marks numeric and special symbols ...

Page 34: ... Displays the printer name Protocol TCP IP Enables TCP IP by selecting On DHCP Enables DHCP by selecting On The printer s IP address is assigned by the DHCP server on the network when the DHCP is enabled IP address Subnet mask TCP IP Gateway address Enables to manually set each item to use with TCP IP Protocol AppleTalk Enables AppleTalk by selecting On Protocol Netware Enables Netware by selectin...

Page 35: ...djustment to the printer s setting corresponding to the condition of media To get better print quality If media has high moisture set it for value 1 2 or 3 If media has low moisture set it for value 1 2 or 3 When performing duplex printing set up Plain paper front side side that prints first and Plain paper back side side that prints last ...

Page 36: ...rocessor has finished imaging the entire page The page then prints correctly although it takes slightly longer to print Selecting Auto menu analyzes each page If a page is complex page protection in turned on automatically I O timeout setting Automatically prints the remaining data in memory when the computer does not send data to the printer during the set time Printer Emulation Upgrade Kit for P...

Page 37: ...e version Engine FW Displays the engine firmware version Page Styler2 Displays the software version if the optional Upgrade Kit for PostScript is installed in the printer Memory Size Displays the total memory size installed in the printer Option Cassette Displays whether the optional 2nd feeder has been installed ...

Page 38: ...dows is shutdown and restarted 1 Click move the pointer to Settings then click Printers The Printers window is displayed 2 Click the Panasonic KX P7105 PCL6 or Panasonic KX P7110 PCL6 icon 3 Click the File menu then click the following menu depending on the operating system Properties Windows 95 Windows 98 Windows Me Document Default Windows NT 4 0 Printing Preferences Windows 2000 The printer pro...

Page 39: ...ws 95 Windows 98 Windows Me Page Setup Tab see page 43 Profiles Tab see page 56 Device Tab see page 58 tab in Windows 98 Tabs are different in Windows NT 4 0 Windows 2000 For Windows NT 4 0 Windows 2000 it enables you to set another items by selecting Properties of the File menu see page 60 For Windows 95 Windows 98 Windows Me Windows NT 4 0 Windows 2000 For Windows 95 Windows 98 Windows Me ...

Page 40: ...98 perform the following steps 1 Click select Programs select Accessories then click WordPad The WordPad window is displayed 2 Click the File menu then click Print The Print window is displayed 3 Select Panasonic KX P7105 PCL or Panasonic KX P7110 PCL in the Name box 4 Click Properties The printer properties window is displayed 5 Click a tab to view the features Page Setup Tab see page 43 Profiles...

Page 41: ...in Windows 95 Windows 98 and Windows Me Print to the following port Enables the port where the interface cable Parallel or USB is connected Parallel interface LPT1 USB interface USBXXX Details Tab Windows 95 Windows 98 Windows Me For the functions of other buttons refer to the Help menu in Windows ...

Page 42: ...dows Windows 42 Shared As Enables you to share the printer over the network For detailed information refer to the Help menu in Windows When shared for other PCs to print the printer driver must be loaded Sharing Tab Windows 95 Windows 98 Windows Me ...

Page 43: ... Driver Macintosh Parts Windows Windows 43 Paper Size Enables selecting a different paper size Letter Legal Executive A4 A5 Envelope 9 Envelope 10 Envelope Monarch B5 A6 International DL or International C5 Page Setup Tab ...

Page 44: ...ction is added AutoSelect Tray The printer picks media from the tray loaded with the media that is selected in the Paper Size The printer automatically feeds in the order of manual feed media tray upper lower Media Tray Upper Prints on the media loaded in the standard tray of the printer Thick paper 106 165 g m2 29 44 lbs or label cannot be printed using the media tray Their media can be printed u...

Page 45: ...per or Lower tray option Pages Per Sheet Specifies how many pages of a document to print on one piece of paper The page border will be printed by clicking on the Print Page Border check box when selecting 2up or 4up Advanced The following tabs are displayed when is clicked For detailed information on each tab see the pages shown below Paper Tab see page 46 Setup Tab see page 47 Quality Tab see pag...

Page 46: ... printed NOTE The number of copies can also be determined using some application software However it is recommended to set the number of copies using one method either from this driver or from an application software to avoid having a printing problem For the other menus see Page Setup Tab on page 43 Paper Tab in Advanced ...

Page 47: ...ows 47 Duplex See Page Setup Tab on page 43 Pages Per Sheet Specifies how many pages of a document to print on one piece of paper The page border will be printed by clicking on the Print Page Border check box when selecting 2up or 4up Setup Tab in Advanced ...

Page 48: ... overrun error may occur Error Reporting When the print command error has occurred the printer prints the error report by checking on the Error page check button Auto Continue With this feature turned on the printer automatically continues the current print job in the case of certain non fatal errors Metafile Spooling Windows NT 4 0 and Windows 2000 only Enables to select the print data format to ...

Page 49: ...bles to reduce the amount of toner used to print Off The toner save feature is turned off This is the default setting and is recommended for the high print quality On The toner save feature is turned on Black areas and text are replaced by light gray shading Quality Tab in Advanced ...

Page 50: ...mmended to use this option if you have a small number of TrueType fonts on your page and the character size selections are very large The printing speed will be up Send TrueType Fonts as Bitmaps TrueType character will be sent as an individual bitmap font to the printer Use this option if you have a large number of TrueType fonts on your printed page Use Device Fonts Enables to use printer s resid...

Page 51: ...eature enables overlaying a file images or characters over a document see Overlay Printing on page 71 Make Overlay Cover Trailer Page File Enables you to save a file for graphics and or characters that you wish to overlay on before after a document Overlay Tab in Advanced ...

Page 52: ...es to use overlay feature Overlay 1st Page Enables to incorporate your letterhead on the first page of a business letter Overlay All Pages Enables to overlay the word Confidential on every page of an important document Print Cover Page Enables to print a cover page on a separate page before the document Print Trailer Page Enables to print a trailer page on a separate page after the document ...

Page 53: ... The selected watermark is printed over a document Click the Watermark box and select the desired one TOP SECRET CONFIDENTIAL DRAFT ORIGINAL and COPY are registered by default You can also create a new watermark To perform watermark printing see Watermark Printing on page 70 Watermarks Tab in Advanced Preview box ...

Page 54: ... Specify the font font size angle font color etc 4 Click 5 Click to save the setting Update Enables to edit the registered watermark To edit a watermark 1 Select a desired watermark from Watermark box 2 Edit font size etc of the watermark 3 Click 4 Click to overwrite the setting Delete Enables to delete a registered watermark To delete a watermark 1 Select the name from the Watermark box and click...

Page 55: ...k is printed in the center of page by default The position can be adjusted by dragging the slider left or right or clicking or To specify the position of watermark it enables to select the unit inch or mm by clicking on the check button Center Watermark Enables to reset the position of the watermark to the center of the page by clicking On First Page Only The watermark is printed on the first page...

Page 56: ...ample printing on a label or envelope etc using the Profile tab and retrieve it when necessary Profile Name Displays the saved profile names Profiles DEFAULT and DRAFT are registered by default and cannot be changed or deleted You can set the driver by selecting the profile name saved in advance Profiles Tab ...

Page 57: ...will change the profile the confirmation window appears to overwrite the profile Click Delete Enables to delete a profile selected in the Profile Name box except DEFAULT and DRAFT 1 Click the profile then click Click Different settings s from DEFAULT Displays the difference between the default settings and the selecting profile Comment Displays a comment you entered when registering a new profile ...

Page 58: ...printer you must define it using this tab It is recommended to change the Option s setting by using the printer properties window under Windows to retain the setting see page 38 To define an installed option click that option in the Available Options box and then click The option is moved from Available Options box to the Installed Options box If an option in the Installed Options box is needed to...

Page 59: ...Setting the Printer Driver Macintosh Parts Windows Windows 59 Restore Defaults Resets the Device tab s settings to the default settings About Displays the program version and copyright information ...

Page 60: ...ttings then click Printers The Printers window is displayed 2 Click the Panasonic KX P7105 PCL6 or Panasonic KX P7110 PCL6 icon 3 Click the File menu then click Properties The printer properties window is displayed Displaying the Printer Properties Windows for Windows NT 4 0 Windows 2000 Start ...

Page 61: ...k a tab to view the features Ports tab see page 62 Sharing tab see page 63 Device Settings tab see page 66 tab in Windows NT 4 0 Tabs are different in Windows 2000 NOTE The separator page cannot be printed from the General tab Windows NT 4 0 or Advanced tab Windows 2000 ...

Page 62: ... Macintosh Parts Windows Windows 62 tab in Windows NT 4 0 Checked port Documents will be printed to the selected port Parallel interface LPT1 LPT2 LPT3 USB interface USBXXX only Windows 2000 Ports Tab Windows NT 4 0 Windows 2000 ...

Page 63: ...red as Windows 2000 It enables you to share the printer over the network For the setup operation refer to Sharing the printer with a client computer see page 64 Alternate Drivers Windows NT 4 0 Additional Drivers Windows 2000 It enables you to install an alternate driver Sharing Tab Windows NT 4 0 Windows 2000 ...

Page 64: ...red printer is used through Windows 95 or Windows 98 the printer name must not exceed 12 characters 3 Click Or If you want to install the alternate driver proceed to the next steps The following is the example of installing an alternate driver for Windows 95 in Windows NT 4 0 To install the additional drivers in Windows 2000 click Additional Drivers 4 Select Windows 95 then click The Insert Disk w...

Page 65: ...k 7 Click The Locate File window is displayed 8 Insert the supplied Printer CD ROM into the CD ROM drive 9 Select CD ROM drive 10 Open Win9x then select Kx p7105 or Kx p7110 file Click The Printer Drivers for Window 95 window is displayed 11 Click Browse Cancel Open OK ...

Page 66: ... or manual feed If the Hold mismatched documents check box is checked on in the Scheduling tab Windows NT 4 0 or Advanced tab Windows 2000 it will be displayed that paper size is different in the spooler window on Windows when you print a document on the different size paper with the Form To Tray Assignment Device Settings Tab Windows NT 4 0 Windows 2000 ...

Page 67: ...r Windows see Displaying the Printer Properties Window on page 38 This menu cannot be displayed in the printer properties window from an application To define an installed option For Windows NT 4 0 1 Click the option in the Install Options and then select Installed Not installed or installed memory in the Change Setting box For Windows 2000 1 Click the underlined selection ex Not Installed of the ...

Page 68: ... is available Lay the paper straight if the paper is curled 2 Open a document to perform duplex printing and display the print window in your application 3 Select Panasonic KX P7105 PCL or Panasonic KX P7110 PCL printer and click Properties The printer properties window appears The operation for displaying the printer properties window may be different depending on the application software 4 Chang...

Page 69: ...cial Print Features Macintosh Parts Windows Windows 69 5 Click on the Flip on long edge or Flip on short edge check button for Duplex menu 6 Click 7 Print the document Flip on long edge Flip on short edge A A A A OK ...

Page 70: ... and display the print window 2 Select the Panasonic KX P7105 PCL or Panasonic KX P7110 PCL printer 3 Click Properties to display the printer properties window 4 Click then click the Watermark tab 5 Click the Watermark box and select COPY If needed you can change the watermark setting see Watermarks Tab in Advanced on page 53 6 Click 7 Print the document Watermark Printing Advanced OK ...

Page 71: ...the word Confidential on every page of an important document Print a special cover page or trailer page for each print job Main steps for overlay printing 1 Create an overlay file and store it 2 Select overlay option Overlay 1st Page Overlay All Pages Print Cover Page Print Trailer Page 3 Print a document you want to overlap an overlay file Overlay Printing ABC Company ABC Company ABC Company 3 AB...

Page 72: ...you want to overlap on a document 2 Verify the overlay data by printing it 3 Display the print window and select the Panasonic KX P7105 PCL6 or Panasonic KX P7110 PCL6 printer 4 Click Properties or to display the printer properties window 5 Click in the Page Setup tab then click Overlay tab 6 Click on the Make Overlay Cover Trailer Page File check box Advanced ...

Page 73: ...8 Click 9 Print the overlay file to the printer The confirmation window to make an overlay file is displayed 10 Click The printer will not print the overlay file at this time The file will be saved on your computer as an overlay file 11 Minimize or close the application 12 Open a document to print with the overlay file and display the print window 13 Select the Panasonic KX P7105 PCL6 or Panasonic...

Page 74: ... all pages Overlay All Pages of a document Print Cover Page The overlay file is printed as the cover page before the document Print Trailer Page The overlay file is printed as the trailer page after the document NOTE If the Make Overlay Cover Trailer Page File check box is checked remove the check 17 Click the box under the selection and select the overlay file named at step 7 18 Click 19 Print th...

Page 75: ...is blinking on the task bar or a Printer Status Display window is displayed The Status Display icon is different depending on the printer error If the startup setting is set to Stay the Status Display icon is blinking on the task bar when the system is started see Setup for Status Display Window on page 83 When a printer error has occurred the Status Display icon is blinked on the task bar To disp...

Page 76: ... is displayed Proceed to the following steps For the detailed information of the window see Selecting the Printer to Get the Status on page 85 3 Click The search Result is displayed 4 Click the printer you want to get the printer information for then click The Status Display window is displayed When displaying the Status Display window next time the processes to search printers steps 3 and 4 will ...

Page 77: ...aded media printer s information error recovery and network information KX P7110 only are displayed by clicking on the More Information check box see More Information Window on page 78 The status display is closed by clicking Setup window appears by clicking see Setup for Status Display Window on page 83 The printer status is updated by clicking This box shows the print mode warning or error messa...

Page 78: ...ore Information window consists of two tabs Information and Recovery Information Information tab Shows the media information that set with the Remote Control Panel see Remote Control Panel on page 23 Opens the window to display the following information by clicking Printer Information see page 79 Network Information see page 80 More Information Window Detail ...

Page 79: ...r s controller board Engine ROM Version Displays version of the engine ROM Memory Size Displays memory size installed in the printer Total Page Displays the total number of printed pages Density Displays the density setting Power Save Displays the Power Save feature is turned on or off Auto Continue Displays the Auto continues setting is turned on or off Time Out Displays the time of I O time out ...

Page 80: ...t pane The information appears in the right pane by clicking the option menu General MAC Address Mac address of the network card TCP IP Protocol TCP IP protocol is enabled or disabled IP Address IP address of the network card Subnet Mask Subnet mask for the TCP IP setting Default Gateway Default gateway of the TCP IP setting DHCP DHCP is enabled or disabled Banner Page Separater page is inserted E...

Page 81: ...nter name displayed in Windows WorkGroup Name 1 Workgroup name displayed in Windows 1To display the computer name and workgroup name Client for Microsoft Networks and NetBEUI protocol must be installed in Windows Netware Information Protocol IPX SPX protocol is enabled or disabled Frame Types Type of layer for data link Poling Interval Timer Transmission interval time between the printer and the N...

Page 82: ...ror with animation Shows corrective instructions or status Clicking this button starts the animation When the animation is started the start button is changed to button Clicking button will stops the animation Clicking the button steps backwards Clicking the button exits the animation Clicking the button steps forward ...

Page 83: ...lay window click the blinking icon The Status Display window is automatically displayed when a printer error has occurred by clicking on the Auto PopUp check button Event The Status Display window is displayed when a printer error has occurred After the error has recovered the window is closed NOTE If the printer is connected to the network certainly set the Status Display Type to Stay Beep Checki...

Page 84: ...address or computer name is entered in the Server Name box NOTE If the printer is not selected to get the printer status by using the Setup for Status Display window the Search Device window will be displayed to select the printer when the status display is displayed for the first time Port Check Updates the port information by clicking Restore Default Resets the Status Display s settings to the f...

Page 85: ...Status Display Macintosh Parts Windows Windows 85 1 Click in the Setup for Status Display window Search Device window appears Selecting the Printer to Get the Status Select ...

Page 86: ...s to search by performing the above steps IP address Searches printers by entering the IP address of the server or printer 1 Click on the IP address check button and type the IP address in the box 2 Click to enter the name in the right box To cancel the selection select the name in the right box and click It enables you to enter IP address to search for 3 Click The search result is displayed It ma...

Page 87: ... 34 Download 27 Duplex printing 30 32 43 45 47 68 Flip on long edge 45 Flip on short edge 45 E Emulation 31 Envelope 9 10 16 20 ERROR indicator 5 Error Reporting 47 48 F Font 30 33 Height 30 33 Number 30 33 Pitch 30 33 Symbol set 30 33 Front cover 4 Front Left Calibration 30 32 Front Top Calibration 30 32 Fuser Cleaning 27 G Gateway address 30 34 I I O Timeout setting 79 I O timeout setting 31 36 ...

Page 88: ...pport 4 17 19 Paper tab 46 Paper weights 10 Parallel interface 4 Part names 4 Portrait 43 44 46 Ports tab 62 Power save 31 36 79 Power source 3 Power switch 4 Print area 12 Print Cover Page 51 52 Print Page Border 43 45 47 Print Trailer Page 51 52 Print With Overlay 51 52 PRINT RESET button 5 6 Printer driver 38 Printer name 30 34 Printer panel 4 5 Printer properties window 38 60 Printer setting 2...

Page 89: ...information 79 Recovery information 82 Setup 83 Subnet mask 30 34 Symbol set 33 T Toner Save mode 49 TONER DRUM UNIT indicator 5 Tool menus 27 Total page 79 Transparency 9 10 16 20 Tree menus 29 TrueType 49 50 U USB interface 4 V Ventilation space 3 Version Controller 31 37 Engine 31 37 Page Styler2 31 W Watermark printing 70 Watermark tab 53 ...

Page 90: ... the Printer Driver for PostScript 106 Selecting the Printer in the Chooser A 106 Selecting the Printer Connected with USB B 107 Setting the Page Setup Window 107 Displaying the Print Window 109 Setting the General Menu 110 Setting the Layout Menu 112 Setting the Printer Specific Options 114 Setting the Installable Options 116 Using the Special Print Feature 119 Duplex Printing 119 Index 121 Conte...

Page 91: ...6 165 g m2 29 44 lbs or an envelope is printed it may be curled You can avoid it by opening the rear cover the media is printed out straight Remove each media printed out to avoid a media jam For available media see About Media on page 9 in Windows section NOTE Be sure to use manual feed when printing a document on thick paper 106 165 g m2 29 44 lbs or a label Loading Media and Printing A B Normal...

Page 92: ...int area is printed a bit smaller than the media size 4 2 mm 0 17 is required for the top bottom and sides margins You may need to adjust the page margins in the application software to match the print area Margins and Print Area 4 2 mm 0 17 4 2 mm 0 17 4 2 mm 0 17 4 2 mm 0 17 ...

Page 93: ...g Media and Printing Macintosh Macintosh Windows Parts 93 1 Pull the media tray out of the printer 2 Pinch the media guides and slide them to the approximate width and length of the media Using the Media Tray ...

Page 94: ...gal paper slide the length guide unit to extend while pressing the stop per If the media guide is removed slide it back in If the metal plate is in the up position the media tray cannot be inserted into the slot Push the metal plate down until it clicks locking it in place Media guide ...

Page 95: ...int Reusing media used paper or jammed paper that has been fed through the printer once can reduce the life of the consumables and paper path components 4 Place the media with the print side down Transparency label or envelope cannot be loaded in the optional 2nd feeder The height of paper should not exceed the limit mark on the tray or it may cause a jam Print side down Media feed direction Paper...

Page 96: ...t one time this may cause a jam Loading media exceeding the designated sheets may cause the media jam or shifting of print 5 Adjust the media guides to the media size Be sure that the stoppers of the media guides are put in the grooves of the media tray 6 Slide the media tray completely into the slot Max 20 sheets Print side down Transparency Max 30 sheets Print side down Flap Flap International C...

Page 97: ...e paper support so that the media is not dropped from the output tray It is recommended to open the rear cover of the printer to avoid the curl or wrinkles if you print a document on an envelope Before printing a document specify the paper size media type and paper source from the printer driver following steps below Rear cover Open it when printing on an envelope Paper support ...

Page 98: ...u 10 Select your printer from the Printer menu 11 Select the media size loaded in the tray from the Paper and click For the detailed information see Setting the Page Setup Window on page 107 12 Select Print from the application s File menu NOTE Screen shots in Mac OS 8 6 are used in this Operating Instructions They may be different depending on the version of Mac OS OK ...

Page 99: ...ll pages from of Paper Source in the General menu When selecting the Auto be sure that the media is not inserted in the manual feed Otherwise the media may be fed from the manual feed If the optional 2nd feeder is installed in the printer Option Cassette can be available Auto Select is invalid selection ...

Page 100: ...t feed Thick Paper or Label from the Media Tray You can only feed Plain Paper from the Option Cassette option Cotton paper cannot be fed from the Option Cassette For the detailed information see Setting the Printer Specific Options on page 114 16 Click to print the document If you opened the rear cover at step 7 be sure to remove the media every time the media is printed out Print ...

Page 101: ...g m2 29 44 lbs or label use the manual feed 1 Raise the paper support so that the media is not dropped from the output tray It is recommended to open the rear cover of the printer to avoid the curl or wrinkles if you print a document on thick paper 106 165 g m2 29 44 lbs or an envelope 2 Separate the media guides to the approximate width of the media Using the Manual Feed Rear cover Open it when p...

Page 102: ...nto the manual feed while adjusting the media guides to the media width The inserted media is slightly fed into the manual feed automatically Be sure to insert a media into the manual feed one by one Paper Label Transparency Printing side up Envelope Printing side up Flap International C5 Printing side up Flap ...

Page 103: ...the application 5 Select Page Setup from the application s File menu 6 Select your printer from the Printer menu 7 Select the media size loaded in the tray from the Paper and click For the detailed information see Setting the Page Setup Window on page 107 8 Select Print from the application s File menu OK ...

Page 104: ... Media and Printing Macintosh Macintosh Windows Parts 104 9 Select Manual Feed from the All pages from of Paper Source in the General menu For the detailed information see Setting the General Menu on page 110 ...

Page 105: ...t Printer Specific Options menu 11 Select the media type from the Media Type For the detailed information see Setting the Printer Specific Options on page 114 12 Click to print the document If you opened the rear cover at step 1 be sure to remove the media every time the media is printed out Print ...

Page 106: ...ce select the printer icon on the desktop screen 1 Select Chooser from the Apple menu 2 Ensure AppleTalk is active 3 Click the LaserWriter 8 printer icon 4 Select the correct AppleTalk zone if necessary 5 Select the name of KX P7110 from the scroll list If an icon is not displayed on the left of the printer name you selected follow the instructions below 1 Click 2 Select Panasonic KX P7110 and cli...

Page 107: ...e Connecting the Printer Using the USB Port in the Setup Guide To select the printer connected with USB 1 Click the KX P7105 or KX P7110 icon 2 Click Printing menu and select Set Default Printer 1 Open the file you want to print from within the application 2 Select Page Setup from your application s File menu Selecting the Printer Connected with USB B Setting the Page Setup Window ...

Page 108: ...or Select the printer to specify the printer driver Paper Selects a different paper size Letter Legal A4 B5 ISO Executive A5 A6 Com9 Envelope 9 Com10 Envelope 10 Monarch DL International DL or C5 International C5 Orientation Selects Portrait or Landscape Scale Enables to reduce or enlarge output on the printed page from 25 to 400 ...

Page 109: ...plication 2 Select Print from the application s File menu 3 Select the KX P7105 or KX P7110 printer from the Printer menu 4 Click General menu and select the desired menu General menu see page 110 Layout menu see page 112 Printer Specific Options menu see page 114 For other menus refer to the balloon help Displaying the Print Window ...

Page 110: ...icking on this check box prints the copies of the entire document a number of times from 1st page to the last page If you print 3 copies of a 5 pages document printer prints page 1 through page 5 three times Removing the check prints the copies of the 1st page then the copies of the next page and so on Pages Specifies the range of pages Setting the General Menu ...

Page 111: ...cally feed media in the order of Manual Feed Media Tray Upper Lower Manual Feed Enables to print on any type of media one by one from the manual feed It cannot be selected when performing the duplex printing Media Tray Enables to print on media loaded in the standard tray of the printer Thick paper 106 165 g m2 29 44 lbs or label cannot be printed with the media tray Their media can be printed wit...

Page 112: ...cintosh Windows Parts 112 Pages per sheet Specifies number of pages of your document to print on one piece of paper Layout direction Specifies the layout of the pages per sheet Border Sets the type of line to appear around the page Setting the Layout Menu ...

Page 113: ...he binding style To perform the duplex printing the following media and paper source must be set To perform duplex printing see Duplex Printing on page 119 Paper size Letter Legal A4 B5 or Executive in the Page Setup window see page 107 Media Type Plain Paper in the Printer Specific Options menu see page 114 Paper Source Media Tray or Option Cassette in the General menu see page 110 ...

Page 114: ...ion provides better print quality However the throughput speed is diminished Toner Save Mode Enables to reduce the amount of toner used to print Off The toner save feature is turned off This is the default setting and is recommended for the high print quality On The toner save feature is turned on Black areas and text are replaced by light gray shading Setting the Printer Specific Options ...

Page 115: ...he type of media loaded in the media tray manual feed or 2nd feeder Option Cassette When the Label or Thick Paper is selected Manual Feed must be set for Paper Source Cotton Paper cannot be used for duplex printing and printing from 2nd feeder Fit to Page Document is printed in the size fitted to the media size ...

Page 116: ...After installing an option in the printer you must define whether an option is installed or not with Chooser or printer icon for USB Setting the options with Chooser 1 Select Chooser from the Apple menu and ensure AppleTalk is Active 2 Click the LaserWriter 8 printer icon 3 Select the name of KX P7110 from the scroll list 4 Click 5 Click in this window Setting the Installable Options A Setup Confi...

Page 117: ...Setting the Printer Driver for PostScript Macintosh Macintosh Windows Parts 117 6 Click the option installed in your printer and select Installed or total installed memory 7 Click 8 Click OK OK ...

Page 118: ... select Change Setup If Change Setup menu does not appear see the note below 3 Select the installed option from Change 4 Select Installed or installed memory from To 5 Click NOTE If Change Setup menu does not appear in the Printing menu follow the instructions below 1 Click Edit menu and select Preferences 2 Remove the check of the Simple Finder check box on the General tab 3 Close the Preferences...

Page 119: ...tter Legal A4 B5 or Executive size paper can be available Make the paper straight if the paper is curled 2 Open a document to perform duplex printing 3 Select Page Setup from your application s File menu 4 Select your printer from the Printer menu 5 Select the paper size Letter Legal A4 B5 or Executive from Paper for the proper paper loaded in the media tray 6 Click 7 Select Print from the applica...

Page 120: ...0 10 Select Plain Paper from Media Type 11 Click Printer Specific Options menu and select Layout menu 12 Click on the Print on Both Sides check box and click your desired binding style icon 13 Click The document will be automatically printed on both sides of paper Print ...

Page 121: ...108 Front cover 4 G General menu 110 I Indicators 5 Installable Options 116 J Jam release pan 4 L Label 102 Landscape 108 Layout direction 112 Layout menu 112 M Manual feed 4 101 111 Margin 92 Media tray 4 93 110 111 Media Type 114 115 Memory 116 N Network interface 4 O Option Cassette 111 116 Orientation 108 Output tray 4 P Page Setup window 107 Pages 110 Pages per sheet 112 Paper 95 102 108 Pape...

Page 122: ...RINT RESET button 5 6 Printer Driver 106 Printer panel 4 5 Printer Specific Options menu 114 Printing Duplex 119 Using manual feed 101 Using media tray 93 R READY indicator 5 Rear cover 4 91 97 101 Remaining from 110 111 Resolution 114 S Scale 108 Selecting printer 106 107 T Toner Save Mode 114 TONER DRUM UNIT indicator 5 Transparency 96 102 U USB interface 4 V Ventilation space 3 ...

Reviews: