background image

CS

CS

CS

Primary or 
Secondary 
CS

Area where the radio signal strength 
level of CS      is "03".

When Installing Additional CSs

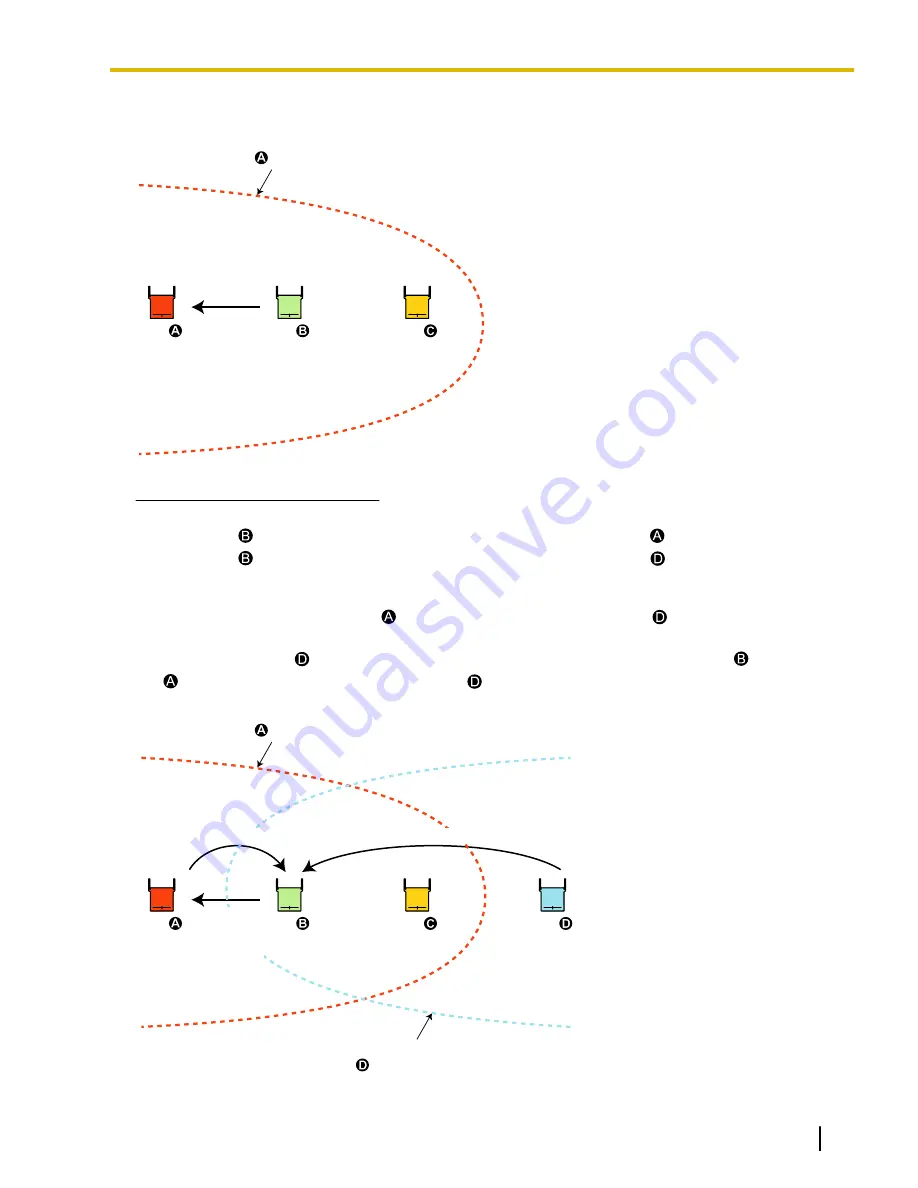
Ensure that the following conditions are met when installing additional CSs.

Locate CS 

 within the area where the radio signal strength level of CS 

 is "08".

Locate CS 

 within the area where the radio signal strength level of CS 

 is "03".

[Result]
X = radio signal strength level of CS 

, Z = radio signal strength level of CS 

.

X is much greater than Z.

The radio waves of CS 

 are not a source of interference since the radio waves that CS 

 receives from

CS 

 are stronger than those received from CS 

.

CS

CS

CS

CS

Area where the radio signal strength 
level of CS      is "03".

Area where the radio signal strength 
level of CS      is "03".

Primary or 
Secondary 
CS

Z: Level 03

X: Level 08

Document Version  2009-12  

Quick Installation Guide

23

3 Site Planning

Summary of Contents for KX-NCP0158

Page 1: ... Quick Installation Guide Document Version 2009 12 Thank you for purchasing a Panasonic DECT 6 0 8 Channel IP Cell Station Unit Please read this manual carefully before using this product and save this manual for future use www voicesonic com Phone 877 289 2829 ...

Page 2: ... dealer if The AC adaptor cord AC cord AC plug or DC extension cable PQJA10200 becomes damaged or frayed The unit is exposed to rain water or any other liquid The unit is dropped or damaged Internal components are exposed due to damage The unit does not operate properly Performance deteriorates Disconnect the unit from the AC adaptor DC extension cable PQJA10200 and LAN cable if the unit emits smo...

Page 3: ...hen the unit receives power from a PoE power supply disconnect the LAN cable Medical consult the manufacturer of any personal medical devices such as pacemakers to determine if they are adequately shielded from external RF radio frequency energy The unit operates in the frequency range of 1920 MHz to 1930 MHz and the output peak power level is less than 0 12 W Do not use the unit in health care fa...

Page 4: ...rotect your privacy confidentiality we recommend that you initialize the product to erase all user data and restore the factory default settings before you dispose transfer or return the product 4 Quick Installation Guide Document Version 2009 12 Important Information ...

Page 5: ...ate the receiving antenna Increase the distance between the equipment and receiver Connect the equipment to an outlet on a circuit different from that to which the receiver is connected Consult the dealer or an experienced radio TV technician for help Some wireless telephones operate at frequencies that may cause interference to nearby TVs and VCRs To minimize or prevent such interference the base...

Page 6: ...3 Initializing the IP Cell Station 64 A Step by step Instructions for Easy Installation 65 A 1 Importance of Site Survey for Air Synchronization 65 A 2 Case 1 One Master CS Slave CSs are Synchronizing with the Master CS only 65 A 3 Case 2 One Master CS Slave CSs are Synchronizing with the Master CS and Other Slave CSs 77 B Network Management 78 C Packet Control Features 79 D Guidance for VoIP Inst...

Page 7: ...ons by long distance installation on larger premises Reliable wireless communication using DECT 6 0 technology over an IP network Note In this manual the illustrations of the PBX and screen shots of the Maintenance Console are based on the KX NCP500 The following is an example of IP CS installation using an IP network Handover is working Switching Hub Switching Hub Router Remote Office 2 Remote Of...

Page 8: ...ters Headquarters Air Synchronization is required Air Synchronization is not required CSs are classified into one of the following three classifications for implementing air synchronization CS Class Description Master CS1 synchronization source clock Generates clock signal Master CS2 backup for Master CS1 Receives clock signal from Master CS1 can also generate clock signal if Master CS1 malfunctio...

Page 9: ...ork Switching Hub PBX IP CS IP CS IP CS IP CS Need to conduct site planning and site survey for air synchronization Using multiple IP CSs and traditional CSs When adding IP CSs to an existing wireless network Switching Hub PBX IP CS IP CS IP CS IP CS Traditional CS Traditional CS Need to conduct site planning and site survey for air synchronization Need to update the software version of traditiona...

Page 10: ...as CS ID Number ID xxxxxxxxxx DIP Switch RJ45 Modular DC Jack Unpacking Unpack the box and check the items below Cell Station 1 Wall Mounting Plate 1 Screws 2 Washers 2 10 Quick Installation Guide Document Version 2009 12 1 Overview ...

Page 11: ...y 1 unstable synchronization CS status indication during the site survey Moderate Red Flashing Starting up Amber ON Radio signal is being transmitted Slow Amber Flashing Radio signal is interrupted CS status indication while restarting the CS Moderate Red Flashing The CS is restarting Note LED flashing patterns are as follows Slow Flashing 60 times per minute Moderate Flashing 120 times per minute...

Page 12: ...tion The distance may vary depending on the environment Equipment Distance CS and office equipment such as a computer telex fax machine etc More than 2 m 6 ft 7 in CS and PS More than 1 m 3 ft 3 in Each CS More than 3 m 10 ft Each PS More than 0 5 m 1 ft 8 in PBX and CS More than 2 m 6 ft 7 in Notice If multiple CSs cover the same area the phone connection may become noisy or the number of possibl...

Page 13: ...f in the transmitter Data Coding for Modulator Differential Coding Voice Codec 32 kbps ADPCM CCITT G 726 CAUTION The CS should be kept free of dust moisture high temperature more than 40 C 104 F low temperature less than 0 C 32 F and vibration and should not be exposed to direct sunlight The CS should not be placed outdoors use indoors The CS should not be placed near high voltage equipment The CS...

Page 14: ... account of distance building materials etc 2 Prepare for site survey Refer to 4 Before Site Survey a Check and assign the CS ID number to the PS b Assign a channel number to each CS by setting the DIP switches on the back of the CS c Supply electricity to each CS using an AC adaptor or by connecting them to a PoE hub PoE adaptor d Install each CS temporarily as planned Note Install at least 2 m 6...

Page 15: ...aster CSs and set the synchronizing CS search order using the Maintenance Console 7 Confirm the status of Air Synchronization for the CS Refer to 9 Confirming the Status of Air Synchronization for IP Cell Stations a Check the status of air synchronization for the CS using the Maintenance Console b If the monitoring results are not satisfactory relocate the CS or change the CS that it is currently ...

Page 16: ...aves are reflected by objects made of materials such as metal 2 Radio waves are diffracted by objects such as metallic columns 3 Radio waves penetrate objects made of materials such as glass CS Column 3 Penetration 2 Diffraction 1 Reflection Relationships Between Radio Waves and Building Structure and Materials The CS coverage area is affected more by the building materials and their thickness tha...

Page 17: ...indows Floor Ferroconcrete Radio waves can penetrate them but the more iron there is the more radio waves are reflected Partition Steel Radio waves are reflected and rarely penetrate them Plywood Glass Radio waves usually penetrate them Column Ferroconcrete Radio waves can penetrate them but the more iron there is the more radio waves tend to be reflected or diffracted Metal Radio waves tend to be...

Page 18: ...on will be intermittent Out of Service Cannot make receive calls Good Coverage Area Radio signal strength level is greater than 08 About 20 m to 30 m 65 ft to 98 ft Good sound quality can be maintained Coverage Area Radio signal strength level is greater than 03 About 40 m to 50 m 131 ft to 164 ft Radio Signal Strength Levels Better Good May receive noise Receives noise easily or disconnects Out o...

Page 19: ... 49 ft to 65 ft Good synchronization quality can be maintained Coverage Area Radio signal strength level is between 03 about 40 m to 50 m 131 ft to 164 ft and 11 about 15 m to 20 m 49 ft to 65 ft Radio Signal Strength Levels Level 12 Up to 2 CSs Good More than 2 CSs May be reset due to synchronization failure of CSs Level 09 to 11 Level 08 Level 07 Good Better Good Level 03 to 06 Air synchronizati...

Page 20: ...ster CS2 Slave CSs Slave CS Master CS1 Master Clock Signal Master CS2 Slave CSs Slave CS Radio Link Loss CSs stop working Search Order Primary Secondary The search order used for synchronizing CSs must be set If the CS cannot synchronize with the Primary CS for some reason it will try to synchronize with the Secondary CS CS Class Primary CS Secondary CS Master CS1 None None Master CS2 Master CS1 N...

Page 21: ... in the same area make sure that you do not create a Master CS2 When synchronizing CSs do not create loops as in the examples below Examples It is recommended that the number of levels in the synchronization hierarchy is minimized for stable air synchronization The maximum number of levels is 4 Note For your convenience IP CSs are automatically classified according to the order of their registrati...

Page 22: ...s 03 Conditions X radio signal strength level of CS Y radio signal strength level of CS Y is greater than X X and Y are nearly equal Result CS loses air synchronization since the radio waves of CS interfere with the radio waves of CS received by CS CS CS CS Area where the radio signal strength level of CS is 03 X Y Primary or Secondary CS Solution Move CS to within the area where the radio signal ...

Page 23: ...ignal strength level of CS is 03 Result X radio signal strength level of CS Z radio signal strength level of CS X is much greater than Z The radio waves of CS are not a source of interference since the radio waves that CS receives from CS are stronger than those received from CS CS CS CS CS Area where the radio signal strength level of CS is 03 Area where the radio signal strength level of CS is 0...

Page 24: ...ve CS1 Slave CS2 Slave CS4 Slave CS3 Slave CS5 Slave CS6 or or or or or or or or Hierarchy levels e g Master CS2 1st hierarchy level Note Ensure that the Slave CSs in the first column are located within the area where the radio signal strength level of the respective CSs in the second column is 03 Slave CS3 and Slave CS4 Master CS2 Slave CS5 and Slave CS6 Master CS1 24 Quick Installation Guide Doc...

Page 25: ...ter CS1 A Slave CS1 Master CS1 B Slave CS2 Slave CS3 Slave CS4 Slave CS6 Slave CS5 Slave CS7 Slave CS8 or or or or or or or or or or or or Note Ensure that the Slave CSs in the first column are located within the area where the radio signal strength level of the respective CSs in the second column is 03 Slave CS3 Master CS1 B Slave CS4 Master CS1 A Document Version 2009 12 Quick Installation Guide...

Page 26: ...r CS1 A and Master CS1 B Slave CS6 both Master CS1 A and Master CS1 B Slave CS7 both Master CS1 A and Slave CS1 Slave CS8 both Master CS1 B and Slave CS2 26 Quick Installation Guide Document Version 2009 12 3 Site Planning ...

Page 27: ...establishing conversations using PSs Draw the coverage area around a CS Extend the coverage area 20 m to 50 m 65 ft to 164 ft in each direction depending on the materials of the building structures and obstacles in the installation site c If one CS cannot cover the entire service area install additional CSs as required Overlap the coverage areas of adjacent CSs Where CS coverage areas overlap the ...

Page 28: ...fore you will need 6 CSs to cover the entire room Area Coverage Example for Air Synchronization Slave CS1 Slave CS3 Slave CS2 Slave CS4 Master CS2 Master CS1 100 m 328 ft 50 m 164 ft Note Make sure that Master CS2 is within the area where the radio signal strength levels of Slave CS3 and Slave CS4 are 03 28 Quick Installation Guide Document Version 2009 12 3 Site Planning ...

Page 29: ...Conversations Using PSs Slave CS1 Slave CS3 Slave CS2 Slave CS4 Master CS2 Master CS1 Slave CS1 Primary CS Secondary CS Slave CS3 Slave CS2 Slave CS4 Master CS2 Master CS1 Document Version 2009 12 Quick Installation Guide 29 3 Site Planning ...

Page 30: ...ree Primary CS Secondary CS Hierarchy levels e g Master CS2 1st hierarchy level Master CS1 Master CS2 Slave CS1 Slave CS2 Slave CS4 Slave CS3 or or or or 30 Quick Installation Guide Document Version 2009 12 3 Site Planning ...

Page 31: ...or the On line Help for your PBX Assigning the CS ID Number to the PS Using the KX TD7685 KX TD7695 KX TD7696 Press 1 9 and POWER for more than 2 seconds 0 to 7 0 to 9 and A to F CS No CS ID No 1 9 9 2 ABC To enter letters A To the initial display To the Desired CS No 3 DEF 4 GHI 0 1 5 JKL 2 ABC C E B D F Note To clear the CS ID number assigned to the PS follow the procedure below Press 1 9 and PO...

Page 32: ... Note If more than one CS is in Radio Signal Test mode each CS must have a unique channel number For details about the Initialized Mode Switch refer to 13 Initializing the IP Cell Station 3 After setting the DIP switches connect the CS to an AC adaptor battery PoE hub or PoE adaptor Connecting the AC Adaptor WARNING When installing or testing a product with an external AC adaptor the AC adaptor sh...

Page 33: ...hoking hazard Keep the DC jack cover out of reach of children Use only the specified battery and battery cable PSJS02P57 for the CS Make sure that the battery cable is securely fastened to both the battery and the CS Make sure that the polarities of the battery and wiring are correct Notice Be sure to comply with applicable local regulations e g laws guidelines Note The battery cable should not be...

Page 34: ...P57 Fuse Battery 12 V DC Red Black Power Supply Duration Battery Conditions 12 V DC 2 5 Ah to 28 Ah Example Battery Capacity Power Supply Duration 1 4 Ah 10 hours when conducting the site survey 1 The duration may vary depending on the conditions 34 Quick Installation Guide Document Version 2009 12 4 Before Site Survey ...

Page 35: ...arily for the site survey Install the CS at least 2 m 6 ft 7 in above the floor and place the antennas so that they are pointing in directions that are 90 degrees apart for antenna diversity as follows At least 2 m 6 ft 7 in 45º 45º 90º Document Version 2009 12 Quick Installation Guide 35 4 Before Site Survey ...

Page 36: ...hrough 4 1 Enter Radio Signal Test mode Using the KX TD7685 KX TD7695 KX TD7696 0 to 9 Log No To store the scan data Press 1 9 and POWER for more than 2 seconds 1 9 9 Previous or Next 0 to 4 Channel No To survey other slots To survey specific channel RADIO STRENGTH MEASURING RADIO STRENGTH CH0 1 SLOT 06 2 SYNC 3 L 12 4 0000 0100 5 6 CS ID 9005301234 0 Display example 1 Channel number 2 Slot number...

Page 37: ...s been lost In this case re perform the procedure in step 1 starting from The above is a rough standard and may vary depending on the environment When deciding where to install the CS priority should be given to an error rate rather than a radio signal strength level After installing the CS according to the results of the survey confirm that calls can be made and received and conversations can be ...

Page 38: ...e status of synchronization using the Maintenance Console This is necessary because IP CSs may be reset due to synchronization failure if the radio signal strength fluctuates depending on changes in the installation environment such as opening closing doors Level 00 to 02 May be reset due to synchronization failure of CSs 3 Repeat steps 1 and 2 for other CSs and relocate the CSs when necessary a P...

Page 39: ...nel is set the results of measurement for the 24 slots on the channel are saved each time If the same channel is set the new results override the previous ones Therefore a measurement of 5 channels 24 slots in total can be made If correct results cannot be obtained e g there are many frame errors change the location of the CS and repeat the site survey to select the best location Document Version ...

Page 40: ...e KX TD7685 KX TD7695 KX TD7696 Press 1 9 and POWER for more than 2 seconds 0 to 9 Log No 1 9 9 1 Previous or Next 0 to 4 Channel No To go to other slots To go to specific channel A a Clearing the Stored Scan Data When CLEAR SCAN DATA is displayed after turning on the PS you are required to clear the scan data Using the KX TD7685 KX TD7695 KX TD7696 Press 1 9 and POWER for more than 2 seconds 1 9 ...

Page 41: ...he CS from the AC adaptor battery PoE hub or PoE adaptor to stop supplying electricity Disconnecting the AC Adaptor or Battery Notice Be sure to attach the cover to the DC jack after disconnecting the CS from the AC adaptor or battery To AC Adaptor KX A421 PSLP1662 Battery Cover Disconnecting the PoE Hub or PoE Adaptor Ethernet Straight Cable To PoE Hub PoE Adaptor Document Version 2009 12 Quick I...

Page 42: ...3 Switch all DIP switches on the CS from ON to OFF 1 2 3 4 5 6 7 8 OFF ON 42 Quick Installation Guide Document Version 2009 12 6 After Site Survey ...

Page 43: ...s 192 168 2 xxx xxx 1 254 except 101 Subnet mask address 255 255 255 0 1 Start the Maintenance Console from the Start menu Information before programming appears 2 a Carefully read this important additional information which includes updates to this and other manuals b Click OK to close this window 3 a Enter the Installer Level Programmer Code default INSTALLER CAUTION To avoid unauthorized access...

Page 44: ... DHCP Client setting b Click Next A dialog box will appear When not using a DHCP server a Select Disable for the DHCP Client setting b In the IP Address box type the IP address of the IP CS 1 c In the Subnet Mask box type the subnet mask address of the network 2 d In the Default Gateway box type the IP address of the default gateway 1 e Click Next A dialog box will appear 11 Click Yes If the assig...

Page 45: ...t be 6 5 mm or less It is possible to connect the IP CS to the LAN while registering the IP CS to the PBX For details refer to 8 Registering IP Cell Stations 1 Connect the cable to the IP CS Ethernet Straight Cable 2 Pass the cable through the groove of the IP CS in one of the following three ways To a Switching Hub To a Switching Hub To a Switching Hub 1 2 3 1 3 Connect the other end of the cable...

Page 46: ...tor may cause it to become disconnected CAUTION The DC jack cover poses a choking hazard Keep the DC jack cover out of reach of children Note Use only the optional AC adaptor KX A421 PSLP1662 for the IP CS If the AC adaptor cord is not long enough for installation use the DC extension cable PQJA10200 If the AC adaptor cord is long enough it is not necessary to use the DC extension cable PQJA10200 ...

Page 47: ...hree ways To AC Adaptor KX A421 PSLP1662 To AC Adaptor KX A421 PSLP1662 To AC Adaptor KX A421 PSLP1662 1 2 3 1 4 Connect the AC cord to the AC adaptor then connect the AC cord to an AC outlet Document Version 2009 12 Quick Installation Guide 47 7 Connecting IP Cell Stations ...

Page 48: ...et b Changing your password regularly c Selecting a complex random password that cannot be easily guessed e Click Connect 4 a Under Configuration click Slot b For the KX NCP500 KX NCP1000 move the mouse pointer over the PBX image of IPCMPR Virtual Slot at the top of the screen and click Select Shelf For the KX TDE100 KX TDE200 KX TDE600 move the mouse pointer over the white PBX image of IPCMPR Vir...

Page 49: ...ion Completed Click Close Once the IP CS is successfully registered the status of the IP CS will update to show Registered Note When you need to change the Master CSs Master CS1 and Master CS2 to different CSs refer to Assigning the Synchronizing CSs Assigning the Synchronizing CSs Assigning the Master CSs Note When using IP CSs and traditional CSs in the same area the traditional CSs must be clas...

Page 50: ...ommand to return the status of the port to INS Setting the Synchronizing CS Search Order Primary Secondary The search order of each CS can be set by the following procedure 1 Under Maintenance click Air Synchronization 2 Select the desired cell in the Connection column and then click Command to change the status of the port to OUS 3 Select the desired CS number in the Index column for each Primary...

Page 51: ...move the mouse pointer over the PBX image of IPCMPR Virtual Slot at the top of the screen and click Select Shelf For the KX TDE100 KX TDE200 KX TDE600 move the mouse pointer over the white PBX image of IPCMPR Virtual Slot for the KX TDE100 KX TDE200 IPCEMPR Virtual Slot for the KX TDE600 at the bottom of the screen and click Select Shelf Move the mouse pointer over the V IPCS4 card A menu will be ...

Page 52: ...f the screen and click Select Shelf Move the mouse pointer over the V IPCS4 card A menu will be shown under the mouse pointer c Click Port Property 2 Click Forced De registration A dialog box will appear Registered IP CSs are displayed on the left 3 a Highlight IP CSs and click the right arrow to select them for de registration b Click Next A dialog box will appear c Click OK A dialog box will app...

Page 53: ...the status of air synchronization Note For details about other parameters on this screen refer to the PC Programming Manual or the On line Help for your PBX 4 Confirm the value in the Monitored Level column The monitored level is indicated as follows Monitored Level Description 12 Up to 2 CSs Good More than 2 CSs May be reset due to synchronization failure of CSs 09 to 11 Good 08 Better 07 Good 03...

Page 54: ...fer to Assigning the Synchronizing CSs 5 If you want to collect the monitored data click Capture A dialog box will be displayed 6 Navigate to the folder in which you want to save the file 7 Enter a file name 8 Click Save 9 Click Start to collect the monitoring data 10 Click Stop to finish collecting the monitoring data 11 Click Close The dialog box will close 54 Quick Installation Guide Document V...

Page 55: ...ng PBX a PIN for PS registration can be set to the PBX Before registering the PS to the PBX enter the PIN set to the PBX into the PS By doing so the PS will only be registered to the PBX with the matching PIN CAUTION To avoid unauthorized access and possible abuse of the PBX we strongly recommend a Keeping the password PIN for PS registration secret b Not using the default password and changing th...

Page 56: ...anguage for the display You do not need to enter the PS system programming mode when registering for the first time Using the KX TD7685 KX TD7695 KX TD7696 Press POWER for 2 seconds Select the desired language Press F for 2 seconds C Tone C Tone If required When the PS has already been registered to another PBX One PS can be registered to a maximum of 4 different PBXs Using the KX TD7685 KX TD7695...

Page 57: ...7696 4 digits 4 digits On Off C Tone System Lock Password System Lock Password Select System Lock Choose On Off If required 4 digits System Lock Password Select Setting Handset Select System Option Press POWER for 2 seconds PS Termination Confirm the following before cancelling the PS registration The PS is turned on The PS is within range 691 001 to max no of PSs 3 digits PS No ENTER ENTER END HO...

Page 58: ... Handset Select System Option If required 4 digits System Lock Password Testing the Operation Walk around the service area while having a conversation using a registered PS If noise is frequent or conversations disconnect relocate the CSs or install an additional CS 58 Quick Installation Guide Document Version 2009 12 10 Registering Portable Stations ...

Page 59: ...ant or fireproof The CS and the cables should never be placed near or over a radiator or other heat source Do not bundle cables that are connected to the CS with the AC power cords of machines located nearby Make sure the cables are securely fastened to the wall 1 Place the reference for wall mounting on the wall to mark the 2 screw positions 2 Install the 2 screws and washers included into the wa...

Page 60: ...sher Drive the screw to this point 6 Place the antennas so that they are pointing in directions that are 90 degrees apart for antenna diversity as follows 45º 45º 90º 60 Quick Installation Guide Document Version 2009 12 11 Wall Mounting ...

Page 61: ...screw here 83 mm 3 1 4 in 100 mm 3 15 16 in Note Make sure to set the print size to correspond with the size of this page If the dimension of the paper output still deviates slightly from the measurement indicated here use the measurement indicated here Document Version 2009 12 Quick Installation Guide 61 11 Wall Mounting ...

Page 62: ...ear the scan data by following the procedure described in Clearing the Stored Scan Data in 5 Site Survey Using the KX TD7685 KX TD7695 KX TD7696 Cannot register the CS even when maximum number of CSs is not exceeded The information of traditional CSs that are not currently used is left on the system Change the Air Synchronization Group No to None using the Maintenance Console refer to 3 24 1 1 Slo...

Page 63: ...Ss are assigned as Master CSs IP CSs reset frequently The software version of the traditional CSs is old Update the traditional CSs to version 5 000 or later PS stays out of service when the CS status is changed from Out of Service to In Service It may take about 20 s for the CS to start up after the status has been changed to In Service Wait until the CS starts up IP CSs are installed at a remote...

Page 64: ...nce Console While initializing the IP CS calls cannot be made or received and ongoing conversations will be disconnected 1 Switch the Initialized Mode switch from OFF to ON DIP Switch 1 2 3 4 5 6 7 8 OFF ON Initialized Mode Switch 2 Supply electricity to the IP CS using an AC adaptor PoE hub or PoE adaptor turn on the IP CS 3 While the LED indicator flashes red Moderate Flashing 120 times per minu...

Page 65: ...ey and plan the location of IP CSs with extreme care A 2 Case 1 One Master CS Slave CSs are Synchronizing with the Master CS only Step 1 Site Planning 1 Obtain a site map from your customer 2 Plan the location of each IP CS a Locate the Master CS at the center of the installation site b Locate the Slave CSs around the Master CS 3 Give a name to each IP CS and write it down in the map 100 m 328 ft ...

Page 66: ...wer supply CAT 5 or higher required IP CS 1 KX NCP0158 PS 1 KX TD7685 KX TD7695 or KX TD7696 2 Switch the Radio Signal Test switch from OFF to ON Channel Number Switch DIP Switch 1 2 3 4 5 6 7 8 OFF ON Radio Signal Test Switch Keep this switch at the default OFF position Otherwise the CS will not function Initialized Mode Switch Fixed IP Setting Mode Switch CS ID Number 3 Turn on the IP CS by conn...

Page 67: ...A To the initial display 3 DEF 4 GHI 0 0 1 5 JKL 2 ABC C E B D F Step 4 Site Survey 1 Enter Radio Signal Test mode Press 1 9 and POWER for more than 2 seconds 1 9 9 0 RADIO STRENGTH MEASURING RADIO STRENGTH CH0 SLOT 06 SYNC L 12 0000 0100 CS ID 9005301234 Display example Error Rate Frame error Frame counter 100 Radio Signal Strength Level Note When the error rate is 3 or more measure the error rat...

Page 68: ...lost In this case enter 0 again and retry measuring the error rate and the radio signal strength The above is a rough standard and may vary depending on the environment 2 Walk around the Master CS to identify the coverage area within which the radio signal strength level is between 07 and 11 3 Draw the coverage area on the map S1 S2 S5 S4 M S3 Level 07 to 11 4 When necessary relocate Slave CSs so ...

Page 69: ...lowing items Item Description Power Supply AC Adaptor KX A421 PoE Hub IEEE802 3af certified PoE Adaptor IEEE802 3af certified Switching Hub Use a 10BASE T 100BASE TX hub LAN cable CAT 5 or higher required IP CS KX NCP0158 PC Maintenance Console Latest version 2 Assign the following IP address and subnet mask address to the PC IP address 192 168 2 xxx xxx 1 254 except 101 Subnet mask address 255 25...

Page 70: ...P switch no 7 Fixed IP Setting Mode switch to the ON position 4 Connect the IP CS to the PC and then turn it on 70 Quick Installation Guide Document Version 2009 12 A Step by step Instructions for Easy Installation ...

Page 71: ...ce Assign IP addressing information to other IP CSs Main Screen Return to the main screen 4 Turn off the IP CS 5 Return DIP switch no 7 to the OFF position 6 Return the IP address and subnet mask address of the PC to their original values Step 7 Registering IP CSs to the PBX 1 In addition to the items you prepared in Step 6 prepare the following items Item Description PBX KX TDE series MPR Softwar...

Page 72: ... Model Your PBX s model IP Address Your PBX s IP address Enter Password 1234 default 3 4 5 6 Four ports are added 72 Quick Installation Guide Document Version 2009 12 A Step by step Instructions for Easy Installation ...

Page 73: ... are added 9 10 A B C CS Name The name you gave each IP CS in Step 1 Site Planning 11 A B Repeat for S1 through S5 12 Document Version 2009 12 Quick Installation Guide 73 A Step by step Instructions for Easy Installation ...

Page 74: ...or each IP CS turn on the next IP CS in the following order S2 S3 S4 S5 Identify each IP CS by its CS name e g by attaching a name label to the IP CS 15 Step 8 Air Synchronization Settings Follow the directions indicated on the PC Maintenance Console 74 Quick Installation Guide Document Version 2009 12 A Step by step Instructions for Easy Installation ...

Page 75: ... B C D CS Class Sync Slave CS Index 1 5 6 7 8 A B C Select blank for the Index setting for the Secondary CS Document Version 2009 12 Quick Installation Guide 75 A Step by step Instructions for Easy Installation ...

Page 76: ...If the monitored level is not between 7 and 11 relocate the IP CS Step 11 Registering PSs Refer to 10 Registering Portable Stations Step 12 Testing PS Operation Walk around the service area while having a conversation using a registered PS If noise is frequent or the conversation is disconnected relocate the IP CS or install an additional IP CS Step 13 Wall Mounting Refer to 11 Wall Mounting 76 Qu...

Page 77: ...on M S5 S1 S4 S2 S3 S6 Level 03 Radio signal strength level of the Master CS M Primary CS Secondary CS Radio Signal Strength Level Chart for Air Synchronization M L 07 10 L 07 10 L 07 10 L 07 10 L 07 10 L 07 10 L 07 10 L 07 10 L 07 10 L 03 06 L 03 06 L 03 06 M A B S1 S2 S3 S4 S5 S6 S1 S2 S3 S4 S5 S6 B is NOT synchronizing with A B is synchronizing with A by receiving the clock signal from A The ra...

Page 78: ...o the network Request IP address information 1 Assign IP address information to the IPCMPR DSP cards 2 Request IP address information 3 4 IP CS DHCP Server IPCMPR DSP Cards Note The PBX is not able to act as a DHCP server To use the DHCP client function of IP CSs a separate DHCP server is required on the network as shown above An IP CS cannot request IP addresses from a DHCP server on another LAN ...

Page 79: ...P Option in the PC Programming Manual or the On line Help for your PBX Voice Activity Detection VAD The VAD conserves bandwidth by detecting silent periods during a call and suppressing the packets of silence from being sent to the network This feature can be enabled or disabled for codec G 711 To configure the VAD feature refer to 3 21 1 1 Slot Port Property Virtual IPCS Voice Activity Detection ...

Page 80: ...lower codec For example if the caller prefers G 711 while the called party prefers G 729A the call will be established using G 729A Codec Packet Sending Interval 20 ms 30 ms 40 ms 60 ms G 711 87 2 kbps 79 5 kbps G 729A 31 2 kbps 23 5 kbps 19 6 kbps 15 7 kbps Required Bandwidth for Each Virtual IP CS Card To allow all IP CSs to handle calls simultaneously it is necessary to keep available the bandw...

Page 81: ...ter can be used as an access point to the network Therefore in the diagram below if router A whose IP address is assigned as the default gateway IP address of the PBX and the IP CSs fails VoIP communications are no longer possible they are not able to switch their default gateway from router A to router B to access the IP network IP Network Router A Router B Default gateway of the PBX Router A Def...

Page 82: ... the VoIP network contains a firewall the firewall must be configured appropriately to allow VoIP packets listed in the table below to pass through the network without being blocked by filtering For more information consult your network administrator IP Packets from IPCMPR IPCEMPR Card and IP CSs Protocol Description TCP UDP Default Port No RTP IP CS Real time Transport Protocol Used for voice dat...

Page 83: ...ty use only layer 2 or higher switches Use of layer 2 or higher switches is also strongly recommended for connecting IP CSs Note Note that the port of the switching hub that connects to the IPCMPR IPCEMPR card should be set to operate under Auto Negotiation mode Are Category 5 CAT 5 or higher cables used When connecting network devices make sure to use CAT 5 or higher cables If other types of cabl...

Page 84: ...uch as Frame Relay Leased Line or IP VPN Virtual Private Network The IPCMPR IPCEMPR card is not intended for use on the Internet including an Internet VPN Yes No Type of IP network p 80 2 b Is it possible to have static IP addressing Yes No p 80 2 c Does only a single router provide access to the IP network Yes No p 81 2 d Are the network devices located appropriately for effective VoIP communicat...

Page 85: ...twork load Also note that the port of the switching hub that connects to the IPCMPR IPCEMPR card should be set to operate under Auto Negotiation mode Yes No Model of switch p 83 3 c Are Category 5 CAT 5 or higher cables used Yes No p 83 Document Version 2009 12 Quick Installation Guide 85 D Guidance for VoIP Installation ...

Page 86: ...Port No 1024 65535 PTAP Client Port No 1024 65535 DHCP Server Port No 67 1024 65535 DHCP Client Port No 68 1024 65535 FTP Server Control Port No 21 1024 65535 FTP Client Control Port No 0 1024 65535 FTP Client Data Port No 0 1024 65535 Quality of Service Parameter Value Range Diffserv Disable Enable Diffserv DS Field 0 7 0 7 Version Parameter Value Range MAC Address 00 00 00 00 00 00 FF FF FF FF F...

Page 87: ...Document Version 2009 12 Quick Installation Guide 87 Notes ...

Page 88: ...p www panasonic com csd This material is copyrighted by Panasonic System Networks Co Ltd and may be reproduced for internal use only All other reproduction in whole or in part is prohibited without the written consent of Panasonic System Networks Co Ltd www voicesonic com Phone 877 289 2829 See More Panasonic Manuals ...

Reviews: