background image

2. How to Use

17

Detailed operating instructions are on the CD-ROM.

2 How  to  Use

2Detailed operating instructions are on the CD-ROM.

Printer

2.1 Printing from Windows 
applications

You can print a file created in a Windows application. For 
example, to print from WordPad, proceed as follows.

1

Open the document you want to print.

2

Select 

[

Print...

]

 from the 

[

File

]

 menu.

3

Select the unit’s name as the active printer.

4

Click 

[

Print

]

 or 

[

OK

]

.

L

The unit will start printing.

Scanner

2.2 Scanning from the unit (Push 
Scan)

You can easily scan the document by using the operation 
panel on the unit.

2.2.1 Scan to Multi-Function Viewer

1

Set the original (page 14).

2

{

Scan

}

3

Press 

{V}

 or 

{^}

 repeatedly to select 

PC

i


{

Set

}

4

For USB connection:

Press 

{V}

 or 

{^}

 repeatedly to select 

USB Host

i


{

Set

}

For LAN connection:

Press 

{V}

 or 

{^}

 repeatedly to select the computer to 

which you want to send the scanned image. 

i


{

Set

}

5

Press 

{V}

 or 

{^}

 repeatedly to select 

Viewer

i


{

Set

}

6

If necessary, change the scanning settings. Press 

{V}

 or 

{^}

 repeatedly to select the desired setting, 

then press 

{

<

}

 or 

{

>

}

i


{

Set

}

7

{

Black

}

/

{

Colour

}

2.3 Scanning from a computer 
(Pull Scan)

2.3.1 Using Multi-Function scan 
application

By clicking an application icon, the selected application 
starts automatically after scanning.

1

Set the original (page 14).

2

Start Multi-Function Station. 

i


[

Scan

]

3

Click the desired application icon.

Copy

2.4 Making a copy

2.4.1 Using the scanner glass

1

If the 

{

Copy

}

 light is OFF, turn it ON by pressing 

{

Copy

}

.

2

Set the original (page 14).

3

If necessary, change the copy settings according to 
the type of document.

4

{

Black

}

/

{

Colour

}

L

The unit will start copying.

5

After you finish copying, press 

{

Stop

}

 to reset the 

settings you set in step 3.

2.4.2 Using the automatic document feeder

1

If the 

{

Copy

}

 light is OFF, turn it ON by pressing 

{

Copy

}

.

2

Set the original (page 14).

3

If necessary, change the copy settings according to 
the type of document.

4

{

Black

}

/

{

Colour

}

L

The unit will start copying.

5

After you finish copying, press 

{

Stop

}

 to reset the 

settings you set in step 3.

Sending Faxes

2.5 Sending a fax manually

Important:

L

You can only send faxes in monochrome.

2.5.1 Using the scanner glass

1

If the 

{

Fax

}

 light is OFF, turn it ON by pressing 

{

Fax

}

.

2

Set the original (page 14).

3

If necessary, change the resolution and contrast 
according to the type of document.

4

Dial the fax number.

L

To send a single page, go to step 7.

L

To send multiple pages, go to the next step.

5

Press 

{V}

 or 

{^}

 repeatedly to select 

Quick 

Scan

, then press 

{

<

}

 or 

{

>

}

 repeatedly to select 

On

i


{

Black

}

L

Wait until 

Scan: Press <Set>.


Send: 

Press <Start>.

 is displayed.

L

Press 

{

<

}

 or 

{

>

}

 repeatedly to change the 

resolution during scanning, and then press 

{

Set

}

. The setting will be applied starting with the 

next page.

6

Place the next page on the scanner glass. 

i


{

Set

}

L

To send more pages, repeat this step.

7

{

Black

}

MC6260E-PNQW1386ZA-QRG-en.book  Page 17  Friday, September 19, 2008  3:14 PM

Summary of Contents for KX-MC6260E

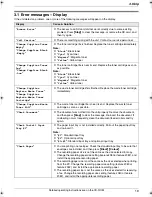
Page 1: ...description on how to use the unit Adobe Reader is required to view them Quick Reference Guide Colour Laser Multi Function Printer Model No KX MC6260E Do NOT connect the unit to a computer with the U...

Page 2: ...nment L Panasonic s strategic direction incorporates concern for the environment into all aspects of the product life cycle from product development to energy saving designs from greater product reusa...

Page 3: ...unit If you are not sure of the type of power supplied to your home consult your dealer or local power company For safety purposes this unit is equipped with a grounded plug If you do not have this ty...

Page 4: ...y of the following conditions occur L If the mains lead is damaged or frayed L If liquid has been spilled into the unit L If the unit has been exposed to rain or water L If the unit does not work norm...

Page 5: ...SE INSTRUCTIONS For best performance Moving the unit The unit weighs approximately 30 kg It is highly recommended that two people handle this unit When moving the unit hold both of the side grips 1 Du...

Page 6: ...n the European Union If you wish to discard electrical and electronic equipment please contact your dealer or supplier for further information Information on Disposal in other Countries outside the Eu...

Page 7: ...lier of the apparatus should be consulted for an up to date list of PBX s with which the apparatus is compatible It cannot be guaranteed that the apparatus will operate under all possible conditions o...

Page 8: ...T OFF PLUG IS INSERTED INTO ANY 13 AMP SOCKET If a new plug is to be fitted please observe the wiring code as shown below If in any doubt please consult a qualified electrician WARNING THIS APPLIANCE...

Page 9: ...er accessories 2 Preparation L Main settings prior to activating the unit such as Multi function software information 3 Printer L More ways to use the printer such as printing on special media 4 Scann...

Page 10: ...Date and time 15 1 10 Your logo 15 1 11 Your fax number 15 1 12 Configuring the unit to access the LAN 15 1 13 Installing Multi Function Station 15 2 How to Use Printer 2 1 Printing from Windows appli...

Page 11: ...tation of the unit L After unpacking the product take care of the power plug cap and or packing materials appropriately L Do not remove the drum cartridges and toner cartridges from the unit when repa...

Page 12: ...Internet is direct shopping for a wide range of finished products take a browse on our website for further details Replacement accessories Toner cartridge L Prints about 2 000 sheets of A4 size pages...

Page 13: ...e network environments Consult your network administrator for firewall settings etc L The warranty does not cover damage due to security problems or any disadvantages relating to it 1 5 Turning the po...

Page 14: ...with the corner to which the m mark points 3 Close the document cover 1 7 2 Using the automatic document feeder 1 Insert the document up to 50 pages FACE UP into the feeder until a single beep is hear...

Page 15: ...ed to set the IP address subnet mask and default gateway for the unit Important L Consult your network administrator when setting the IP address subnet mask and default gateway 1 12 1 Setting up autom...

Page 16: ...ist and select the unit from the list 3 Next 4 Click Install then follow the on screen instructions L The files will be copied to your computer To view or install the operating instructions data 1 Sta...

Page 17: ...ation i Scan 3 Click the desired application icon Copy 2 4 Making a copy 2 4 1 Using the scanner glass 1 If the Copy light is OFF turn it ON by pressing Copy 2 Set the original page 14 3 If necessary...

Page 18: ...rinted documents print the colour test then clean or change the drum cartridge 1 Menu 2 Press V or repeatedly to select Print Report 3 Press or repeatedly to select Colour Test 4 Press Set to start pr...

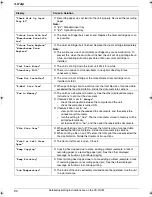
Page 19: ...ge Supplies Waste Toner Full L The waste toner cartridge life is near its end Replace the waste toner cartridge as soon as possible Check Document L The document was not fed into the unit properly Rem...

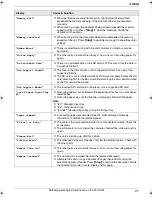
Page 20: ...The unit has a document in memory See the other displayed message instructions to print out the document L If feature 442 is set to Always check the connection between the computer and the unit check...

Page 21: ...ard all data stored on the SD card will be erased Not Support Media L The inserted SD card could not be read Use a supported SD card Out of Paper Input Tray 1 L Recording paper is not installed or the...

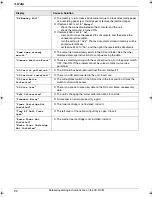
Page 22: ...tion Error L There is something wrong with the scanner position Turn the power switch OFF then ON If the problem cannot be solved contact our service personnel SD Card is pulled out L The SD card has...

Page 23: ...for fax machine 01 2898255 for MFP 7 In the event the helpline cannot resolve the problem a like for like exchange FAX MFP will be despatched The helpline operator will give you specific instructions...

Page 24: ...0 0682 Sales Department Panasonic Business Systems U K Panasonic House Willoughby Road Bracknell Berkshire RG12 8FP Manufacturer 1 62 4 chome Minoshima Hakata ku Fukuoka 812 8531 Japan Global web site...

Reviews: