background image

55

Sending Faxes

Fax/Copy

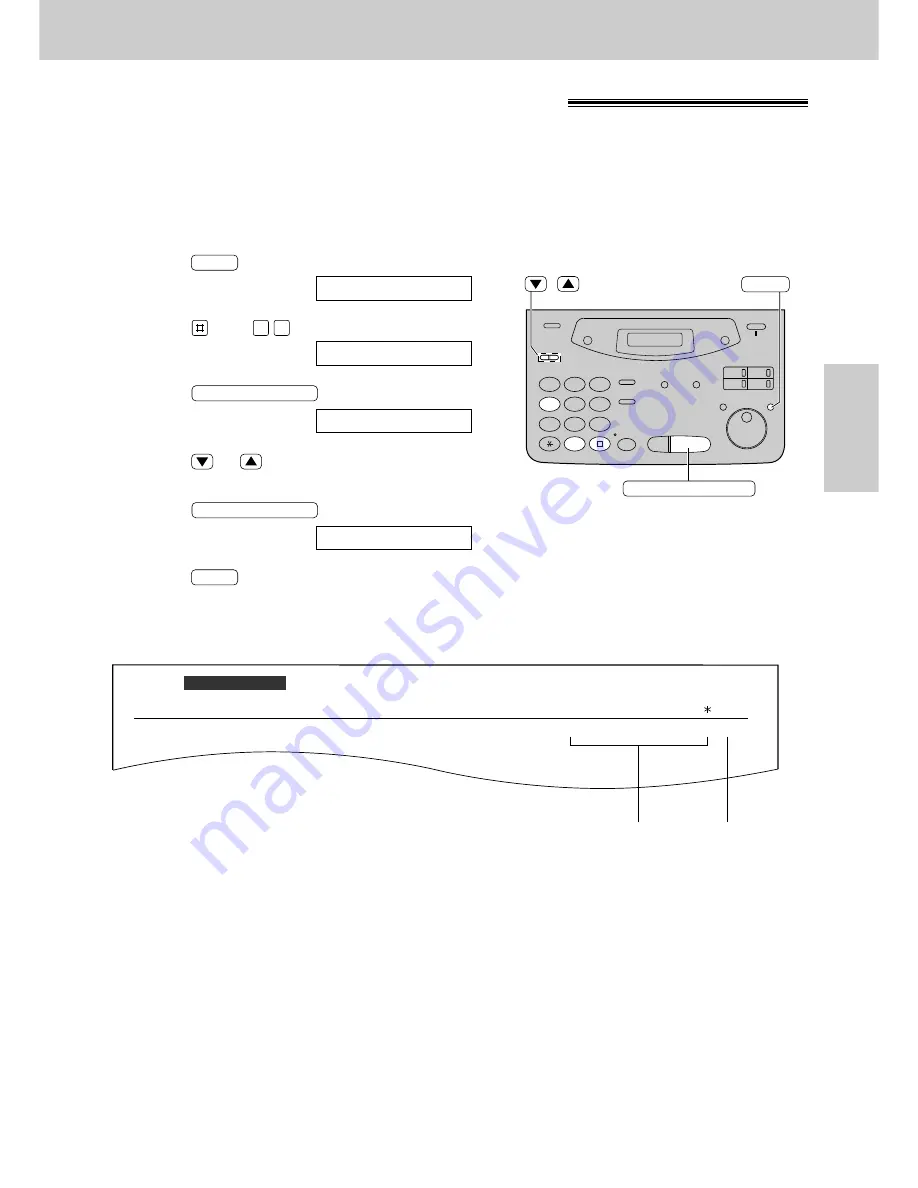
Sending report for confirmation

The sending report will provide you with a printed record of fax transmission results.
One of the following choices is available.

ERROR:

The sending report will print out only when fax transmission fails (pre-selected setting).

ON:

The sending report will always print out, indicating whether fax transmission is successful or not.

OFF:

The sending report will not print.

1

Press 

.

Display:

2

Press 

, then 

.

3

Press 

.

4

Press 

or 

to select the desired setting.

5

Press 

.

6

Press 

.

MENU

SETUP ITEM [  ]

START/SET/COPY

MODE=ERROR

▼▲

START/SET/COPY

SENDING REPORT

0 4

1.SYSTEM SET UP

MENU

1

2

3

4

5

6

7

8

9

0

/

START/SET/COPY

MENU

Sample of a sending report

01

2345678

00'51

SND

00

COMMUNICATION ERROR  (43)

Jan. 20 1999 01:19PM

Jan. 20 01:18PM

SENDING REPORT

CODE

NO.

USAGE TIME MODE

PAGES

START TIME

RESULT

OTHER FACSIMILE

Communication
message
(p. 112)

Error code 
(for service 
personnel 
use only)

Summary of Contents for KX-FM131AL

Page 1: ...tarted please read the Quick Start section p 4 11 Compact Plain Paper FAX Model No KX FP101AL OPERATING INSTRUCTIONS Please read these Operating Instructions before using the unit and save for future reference Multi Function Plain Paper FAX Model No KX FM131AL This pictured model is KX FP101 KX FP121AL ...

Page 2: ...maximize the effectiveness of this unit For your future reference Date of purchase Serial number found on the rear of the unit Dealer s name and address Dealer s telephone number Model difference Features Model KX FP101 Available Available Not available Available Not available Not available KX FP121 Facsimile Telephone and Copier Answering Device Scanner PC Fax and Printer Available Available Avai...

Page 3: ...e unit 12 To reduce the risk of electric shock do not disassemble this unit Take the unit to an authorised service centre when service is required Opening or removing covers may expose you to dangerous voltages or other risks Incorrect reassembly can cause electric shock when the unit is subsequently used 13 Unplug this unit from the wall outlet and refer servicing to an authorised service centre ...

Page 4: ... B Pull the tension bar forward and hold open while inserting the paper Insert the two tabs on the paper tray into the slots on the back of the unit 2 A4 paper guides p 24 Install the A4 paper guides 3 Paper stacker p 25 Remove the shipping tape and install paper stacker Cover open button Leaflet Shipping tape B Open the cover remove the leaflet under the film cartridge and close the cover Film ca...

Page 5: ... handset Telephone line cord 2 A Connect to LINE on the unit B Connect to a single telephone line jack To the single telephone line Telephone plug To the power outlet 220 240 V 50 60 Hz Power cord 3 A Connect to the unit B Connect to a power outlet For further details see page 28 ...

Page 6: ...king replace the handset For further details see page 35 If you are having trouble see page 114 Voice calls making answering Voice calls making 1 Lift the handset 3 When finished talking replace the handset 2 Dial the number For further details see page 34 If you are having trouble see page 114 ...

Page 7: ...cument feeder tray Insert the document until a single beep is heard and the unit grabs the document Adjust the width of the document guides to the size of the document 1 2 3 Press START SET COPY Dial the fax number 4 5 For further details see page 50 If you are having trouble see page 115 ...

Page 8: ...eception is required a fax calling tone slow beep is heard or no sound is heard press START SET COPY For further details see page 70 You can select the way to receive calls according to your needs See pages 66 and 67 for KX FP101 See pages 68 and 69 for KX FP121 KX FM131 If you are having trouble see page 115 ...

Page 9: ...T SET COPY Open the document feeder tray Insert the document until a single beep is heard and the unit grabs the document Make sure the handset is on the cradle Adjust the width of the document guides to the size of the document 1 2 3 4 5 6 For further details see page 90 If you are having trouble see page 116 ...

Page 10: ...ress The AUTO ANSWER light comes on AUTO ANSWER AUTO ANSWER TAD FAX ON ON TAD FAX MODE If the display does not show this message the setting needs to be changed to the TAD FAX mode p 73 Operating the answering device Setting the unit to receive voice and fax messages automatically KX FP121 KX FM131 only ...

Page 11: ...en the PLAY MESSAGES indicator flashes PLAY MESSAGES PLAY MESSAGES Press All messages will be played When the PLAY MESSAGES indicator lights PLAY MESSAGES Press while listening to the message you want to erase ERASE Erasing a specific message 1 Press after listening to all of the messages ERASE STOP 2 Press Erasing all the messages 3 Press again START SET COPY START SET COPY To stop erasing press ...

Page 12: ...one numbers in the EASY DIAL directory 40 Making a voice call using the EASY DIAL directory 42 Caller ID service from your phone company 43 Viewing the Caller ID list on the display 44 Calling back from the Caller ID list 45 Storing telephone numbers in the One Touch Dial and EASY DIAL directory from the Caller ID list 46 Erasing a name number from the Caller ID list 47 Automatic Caller ID list 48...

Page 13: ...vice and receiving voice and fax calls automatically 92 Pre recorded greeting messages 93 Recording your own greeting messages 94 Checking your own recorded greeting messages 95 Erasing your own recorded greeting messages 95 Recording time for the TAD FAX greeting message 96 Listening to recorded messages 97 Erasing recorded messages 98 Functions while playing a message repeating skipping and stop...

Page 14: ...ment feeder 126 Thermal head and black bar 126 General Information Print Reports Fax Voice Guidance Original Mode Display Contrast Reset Specifications Important Information Index Features Summary Printing the feature settings telephone numbers journal printer test list broadcast list and Caller ID list 127 Fax voice guidance KX FP121 KX FM131 only 128 Original mode 129 Changing the display contra...

Page 15: ... purchase at any computer supply store Telephone plug 1 The film cartridge is pre installed Panasonic PC software for KX FM131 CD ROM 1 PANA LINK Software Guide 1 Accessory order information Note The film cartridge is not reusable Do not rewind and use the film again The free starter film cartridge is only 20 meters long We recommend that you buy regular film cartridge 100 m for continuous use of ...

Page 16: ... 1 How to program your unit 2 How to store names in the EASY DIAL directory and how to dial them 3 Help with problems receiving faxes 4 How to use the copier function 5 List of available reports 6 How to use the Caller ID service 3 Press PRINTING START SET COPY 6 CALLER ID 5 REPORTS 4 COPIER 3 FAX RECEIVING 2 EASY DIAL 1 HOW TO SET UP PRESS SET HELP START SET COPY HELP For KX FP101 ...

Page 17: ...our unit 3 How to store names in the EASY DIAL directory and how to dial them 4 Help with problems operating answering device 5 Help with problems receiving faxes 6 How to use the copier function 7 List of available reports 8 How to use the Caller ID service 3 Press PRINTING START SET COPY 8 CALLER ID 7 REPORTS 6 COPIER 5 FAX RECEIVING 4 TAD OPERATION 3 EASY DIAL 2 HOW TO SET UP 1 SEND GUIDE PRESS...

Page 18: ...djust volumes p 33 To select feature settings during programming To scan and store a document into memory and then transmit or copy the stored document p 58 90 To select a resolution p 50 To redial the last number dialled p 34 50 To insert a pause during dialling p 36 To dial without lifting the handset To stop an operation or cancel programming To change from pulse to tone during dialling p 36 To...

Page 19: ...ng programming p 31 To select the basic features during programming p 135 To select an enlargement reduction rate in the copy mode p 90 91 To initiate or exit programming To confirm a stored telephone number p 42 To select stations 4 6 for the One Touch Dial p 38 39 51 To keep the telephone number secret p 38 40 To insert one character or one space p 30 31 To insert a hyphen p 31 38 For the Caller...

Page 20: ...elect feature settings during programming To scan and store a document into memory and then transmit or copy the stored document p 58 90 To select a resolution p 50 To redial the last number dialled p 34 50 To insert a pause during dialling p 36 For speakerphone operation For slow playback p 99 For quick playback p 99 To stop an operation or cancel programming To change from pulse to tone during d...

Page 21: ...ages p 95 To search for a stored name p 42 52 To select characters during programming p 31 To select the basic features during programming p 137 To skip and or repeat recorded messages in the answering device p 99 To select an enlargement reduction rate in the copy mode p 90 91 To initiate or exit programming To confirm a stored telephone number p 42 To select stations 4 6 for the One Touch Dial p...

Page 22: ...rophone KX FP121 KX FM131 only To talk with the other party when using the speakerphone To record greeting messages and memo Serial interface connector KX FM131 only To connect your PC with a RS232C cable For system requirements see the PANA LINK Software Guide Note The document and recording paper will be ejected from the front of the unit Install the unit on a desk or floor with a smooth surface...

Page 23: ...essing the cover open button 3 Lift the film cartridge remove the leaflet and replace the film cartridge 4 Close the cover securely by pushing down on the dotted area at both ends Dotted area Cover open button Leaflet Film cartridge 1 Remove the shipping tape Shipping tape ...

Page 24: ...1 Insert the bottom tab on the A4 paper guide left into the lower slot Press the guide into the upper slot If the A4 paper guide cannot be installed make sure the paper tray has been installed correctly B A A4 paper guide left Upper slot Lower slot Bottom tab B A Paper tray 2 Insert the bottom tab on the A4 paper guide right into the lower slot Press the guide into the upper slot B A A4 paper guid...

Page 25: ...um sheet up to prevent it being bent by the paper stacker while inserting the paper stacker into the side slots Paper stacker Shipping tape Side slots Bottom Aluminum sheet 3 Confirm that the paper stacker is locked into the center slots and slide back Center slots Paper stacker 4 Slide the paper stacker forward until it stops Paper stacker ...

Page 26: ...aper jam 2 Pull the tension bar forward and hold open while inserting the paper The height of the stack of the paper should not exceed the upper limit on the paper tray otherwise the paper may jam or multi feed The paper should not be over the tab If the paper is not inserted correctly readjust the paper or the paper may jam Incorrect Correct Stack of paper Paper tray Upper limit Tension bar Tab ...

Page 27: ...ad paper or paper used for resumes Do not use different types or thicknesses of paper in the paper tray at the same time This may cause a paper jam Avoid extremely smooth or shiny paper that is highly textured Also avoid paper that is coated damaged or wrinkled Avoid double sided printing Do not use paper printed from this unit for double sided printing with other copiers or printers or the paper ...

Page 28: ...hone line Telephone plug Connections 1 Connect the handset cord 2 Connect the telephone line cord 3 Connect the power cord When the power is turned on for the first time the unit will print some basic information Note When you operate this product the power outlet should be near the product and easily accessible ...

Page 29: ...6 Enter the correct hour minute by selecting each 2 digits using the dial keypad Press to select AM or PM Example 3 15PM 1 Press 2 Press until PM is displayed TIME 03 15PM TIME 03 15AM 1 5 0 3 TIME 12 00AM START SET COPY M 08 D 10 Y 99 0 0 1 9 8 9 M 01 D 01 Y 99 START SET COPY SET DATE TIME 0 1 1 SYSTEM SET UP MENU 7 Press 8 Press MENU SETUP ITEM START SET COPY 1 2 3 4 5 6 7 8 9 0 STOP START SET C...

Page 30: ... 0 2 1 SYSTEM SET UP MENU 1 2 3 4 5 6 7 8 9 0 STOP START SET COPY MENU INSERT HYPHEN Delete EASY DIAL To correct a mistake Press or to move the cursor to the incorrect character then make the correction To delete a character Move the cursor to the character you want to delete and press STOP To insert a character 1 Press or to move the cursor to the position to the right of where you want to insert...

Page 31: ...r the next character Display order of characters EASY DIAL Capital alphabet Lower case alphabet Number Symbol Rotating to the right Rotating to the left 1 2 3 4 5 6 7 8 9 0 EASY DIAL Keys Characters 1 2 3 4 5 6 7 8 9 0 1 2 STOP 1 _ A B C a b c 2 D E F d e f 3 G H I g h i 4 J K L j k l 5 M N O m n o 6 P Q R S p q r s 7 T U V t u v 8 W X Y Z w x y z 9 0 HYPHEN key To insert a hyphen INSERT key To in...

Page 32: ...ENU HYPHEN EASY DIAL To correct a mistake Press or to move the cursor to the incorrect number then make the correction To delete a number Move the cursor to the number you want to delete and press STOP Note You can enter your facsimile telephone number by rotating If using press to move the cursor The button replaces the digit with a and the button replaces it with a space Example using the dial k...

Page 33: ...g and will display the following Handset receiver volume 3 levels high to low are available While using the handset press or Monitor Speaker volume 8 levels high to low are available While using the monitor speakerphone press or Fax voice guidance volume KX FP121 KX FM131 only 9 levels high to off are available While listening to the fax voice guidance press or Answering device volume KX FP121 KX ...

Page 34: ... other party cannot hear you but you can hear them 2 To resume the conversation press again For KX FP121 KX FM131 You can also mute your voice to the other party when using DIGITAL SP PHONE MUTE HANDSET MUTE MUTE MUTE HANDSET MUTE REDIAL PAUSE Hints for the speakerphone operation KX FP121 KX FM131 only Use the speakerphone in a quiet room If you have difficulty hearing the other party adjust the v...

Page 35: ...me the conversation press again For KX FP121 KX FM131 You can also mute your voice to the other party when using DIGITAL SP PHONE MUTE HANDSET MUTE MUTE MUTE HANDSET MUTE Helpful hint You can press instead of using the handset KX FP121 KX FM131 only DIGITAL SP PHONE Hints for the speakerphone operation KX FP121 KX FM131 only Use the speakerphone in a quiet room If you have difficulty hearing the o...

Page 36: ...an overseas transmission add two pauses at the end of the telephone number REDIAL PAUSE REDIAL PAUSE 9 PAUSE Line access code Telephone number International access code Country code PAUSE PAUSE Telephone number Note TONE RECALL and PAUSE can be stored into a telephone number in the One Touch Dial and the EASY DIAL directory 1 2 3 4 5 6 7 8 9 0 TONE RECALL REDIAL PAUSE RECALL button The button func...

Page 37: ...ialling mode setting to PULSE by following the instructions below 1 Press Display 2 Press then 3 Press 4 Press or to select the desired setting 5 Press 6 Press MENU SETUP ITEM START SET COPY MODE TONE START SET COPY DIALING MODE 1 3 1 SYSTEM SET UP MENU 1 2 3 4 5 6 7 8 9 0 START SET COPY MENU Dialling mode touch tone or pulse ...

Page 38: ... functions cannot be used at the same time For the broadcast function see pages 59 to 62 1 Press Display 2 For stations 1 3 Press one of the One Touch Dial keys Press to go to the next prompt For stations 4 6 Press then press one of the One Touch Dial keys 3 Enter the station name up to 10 characters by following the instructions on page 31 Example 4 Press Example 5 Enter the telephone number up t...

Page 39: ...f using the handset DIGITAL SP PHONE MONITOR EASY DIAL Making a voice call using the One Touch Dial Before using this feature program the desired names and telephone numbers into the One Touch Dial p 38 1 Lift the handset Display Confirm that there are no documents in the document feeder tray 2 For stations 1 3 Press the desired One Touch Dial key For stations 4 6 Press then press the desired One ...

Page 40: ...6 Press To program other items repeat steps 3 to 6 7 Press to exit the program DIRECTORY PROGRAM NAME REGISTERED START SET COPY HYPHEN NO 5552233 NO START SET COPY NAME Alice NAME EASY DIAL USE EASY DIAL PRESS STATION DIRECTORY PROGRAM 1 2 3 4 5 6 7 8 9 0 HYPHEN START SET COPY STOP SECRET DIRECTORY PROGRAM EASY DIAL Note When the following message is displayed in step 6 you can only store 5 items ...

Page 41: ...her details see page 40 7 Press REGISTERED START SET COPY Erasing a stored name and number 1 Rotate until the desired name is displayed Example 2 Press 3 Press to select DELETE If you do not want to erase the item press 4 Press The stored name and number are deleted DELETED START SET COPY STOP YES PRESS SET DELETE OK EDIT DELETE DIRECTORY PROGRAM Smith EASY DIAL 1 2 3 4 5 6 7 8 9 0 START SET COPY ...

Page 42: ...en the other party answers For KX FP121 KX FM131 You can press instead of using the handset DIGITAL SP PHONE MONITOR Note If the desired name has not been stored press and dial the number manually STOP To search for a name by initial Example When you want to search for the name Lisa 1 Rotate until any name is displayed Example 2 Press repeatedly until any name with the initial L is displayed see t...

Page 43: ...lly see page 127 Note If the unit is connected to a PBX system you may not receive the caller s information Consult your PBX supplier Caller s name may not be available on some services The Caller ID service is currently provided in calling areas by caller identification technology If the caller s information cannot be received the display will show as follows Display The caller dialled from an ar...

Page 44: ...O CALLER DATA and a beep sounds the Caller ID list is empty Caller s name may not be available on some services EASY DIAL STOP NAME TEL NO CALLER ID SEARCH EASY DIAL 1 Press Example Display 2 Rotate to search the Caller ID list see below 3 If you want to know the caller s phone number and the date time of the call press repeatedly while the display is showing the desired name The display will alte...

Page 45: ...al the number 4 When finished talking replace the handset ALLAN STONE EASY DIAL USE EASY DIAL 2 NEW CALLS CALLER ID SEARCH Note You can send a fax by pressing with a document on the document feeder tray after step 3 If a telephone number is not displayed when pressing you cannot call back that caller Caller s name may not be available on some services NAME TEL NO START SET COPY Helpful hints For K...

Page 46: ...not be used for this feature You can only store a name up to 10 characters long To edit the name and number see the instructions on page 41 S06 1233453809 START SET COPY NAME WENDY ROBE LOWER S02 1233453809 START SET COPY NAME WENDY ROBE START SET COPY DIAL MODE USE EASY DIAL PRESS STATION DIRECTORY PROGRAM WENDY ROBERTS EASY DIAL USE EASY DIAL 2 NEW CALLS CALLER ID SEARCH b To store in the EASY D...

Page 47: ...rmation repeat steps 2 and 3 4 Press to exit the program STOP ALLAN STONE DELETED ERASE WENDY ROBERTS EASY DIAL USE EASY DIAL 2 NEW CALLS CALLER ID SEARCH You can erase some or all of the entries in the Caller ID list 1 Press three times Display 2 Press 3 Press If you do not want to erase the information press 4 Press 5 Press to exit the program STOP ERASE COMPLETED START SET COPY STOP ALL ERASE O...

Page 48: ...M START SET COPY MODE ON START SET COPY AUTO CALL LIST 2 6 1 SYSTEM SET UP MENU 1 2 3 4 5 6 7 8 9 0 START SET COPY MENU The NAME TELEPHONE NUMBER TIME OF CALL information is received through a Caller ID service ANSWER How the call was received by the unit TEL Telephone FAX Facsimile TAD Telephone answering device KX FP121 KX FM131 only If the unit did not respond to the call the ANSWER column will...

Page 49: ... ring after all of the documents have been transmitted If you initiate voice contact during reception the unit will call you with a distinctive ring after the current page of the document is received Receiving a request for voice contact 1 If the other party initiates voice contact your unit will sound a distinctive ring and the following will be displayed Display 2 Lift the handset within 10 seco...

Page 50: ...sized characters For originals with small printing For originals with minute printing For originals containing photographs shaded drawings etc Sending a fax manually 1 Open the document feeder tray 2 Adjust the width of the document guides to the size of the document 3 Insert the document up to 15 pages FACE DOWN until a single beep is heard and the unit grabs the document Display 4 If necessary p...

Page 51: ... Helpful hints You can confirm the stored items on the display p 42 or on the telephone number list p 127 You can use the EASY DIAL directory to select the station name instead of using the One Touch Dial keys Rotate until the desired name is displayed then press The connecting tone will be heard during dialling to tell you the status of the other party s machine p 65 START SET COPY EASY DIAL Fax ...

Page 52: ...N STANDARD FACE DOWN Document feeder tray Document guides STOP START SET COPY RESOLUTION NAME TEL NO EASY DIAL Before using this feature program the desired names and telephone numbers into the directory p 40 Helpful hints You can confirm the stored items on the display p 42 or on the telephone number list p 127 The connecting tone will be heard during dialling to tell you the status of the other ...

Page 53: ...abs the document 4 Press 5 Dial the fax number 6 When a fax tone is heard press START SET COPY DIGITAL SP PHONE START SET COPY 1 SEND GUIDE HELP FACE DOWN START SET COPY DIGITAL SP PHONE HELP To transmit insert the document face down until you hear the beep Voice guide Press the speaker phone button then dial the phone number When the fax tone is heard press the start button Start transmission Not...

Page 54: ... as carbon or carbonless duplicating paper Electrostatically charged paper Heavily curled creased or torn paper Paper with a coated surface Paper with a faint image Paper with printing on the opposite side that can be seen through the front e g newspaper 600 mm Paper width Minimum size 128 mm 128 mm Maximum size 216 mm 208 mm Effective scanning area 4 mm Scanned area 216 mm Document weight Single ...

Page 55: ...ission is successful or not OFF The sending report will not print 1 Press Display 2 Press then 3 Press 4 Press or to select the desired setting 5 Press 6 Press MENU SETUP ITEM START SET COPY MODE ERROR START SET COPY SENDING REPORT 0 4 1 SYSTEM SET UP MENU 1 2 3 4 5 6 7 8 9 0 START SET COPY MENU Sample of a sending report 01 2345678 00 51 SND 00 COMMUNICATION ERROR 43 Jan 20 1999 01 19PM Jan 20 01...

Page 56: ...o select the desired setting If this feature is not required select OFF 5 Press 6 Press MENU SETUP ITEM START SET COPY MODE ON START SET COPY AUTO JOURNAL 2 2 1 SYSTEM SET UP MENU 1 2 3 4 5 6 7 8 9 0 START SET COPY MENU Sample of a journal report NO 01 02 03 04 05 3332222 9998765 John 555556677 USAGE TIME 00 45 00 58 00 48 02 45 03 50 MODE SND RCV RCV SND SND RCV PAGES 01 02 01 03 05 03 OK OK OK C...

Page 57: ...sert the document FACE DOWN until a single beep is heard and the unit grabs the document Display 2 Press 3 Press then 4 Press 5 Press or to select ON 6 Press 7 Enter the fax number using the dial keypad One Touch Dial or 8 Press 9 Enter the transmission start time Press to select AM or PM Example 11 30PM Press then press until PM is displayed Press Press At the programmed time the unit will automa...

Page 58: ...ument The amount of memory used will be shown as a percentage on the display Display Amount of memory used PAGES 01 05 QUICK SCAN FACE DOWN QUICK SCAN STOP Transmitting documents from memory Note The stored document will be automatically erased after transmission To cancel the memory transmission press during or after scanning the document If you select the fine super fine or half tone resolution ...

Page 59: ...ress the preset One Touch Dial key For stations 4 6 press then press the preset One Touch Dial key Example b Using the EASY DIAL directory Rotate until the desired name is displayed Example Press Example To enter other stations repeat this step up to 20 stations DIR Glen 002 START SET COPY Glen 001 EASY DIAL DIR Margy 001 LOWER BROADCAST DIR 000 START SET COPY BROADCAST 1 DIAL MODE BROADCAST USE E...

Page 60: ...ple 4 Rotate until the desired name is displayed Example 5 Press Example To add other stations repeat steps 4 and 5 up to 20 stations 6 Press to exit the program DIRECTORY PROGRAM Sara REGISTERED START SET COPY Rick EASY DIAL Cathy ADD DELETE DIRECTORY PROGRAM BROADCAST1 EASY DIAL 1 2 3 4 5 6 7 8 9 0 START SET COPY DIRECTORY PROGRAM EASY DIAL ...

Page 61: ...l the desired name is displayed Example If you do not want to erase the item press 5 Press 6 Press Example To delete other stations repeat steps 4 to 6 7 Press to exit the program DIRECTORY PROGRAM Bob DELETED START SET COPY YES PRESS SET DELETE OK START SET COPY STOP Dick EASY DIAL Bob ADD DELETE DIRECTORY PROGRAM BROADCAST1 EASY DIAL 1 2 3 4 5 6 7 8 9 0 START SET COPY DIRECTORY PROGRAM STOP EASY...

Page 62: ...super fine or half tone resolution the number of pages that the unit can transmit will decrease If one of the stations is busy or does not answer the station will be skipped All skipped stations will be redialled up to 2 times after all of the other stations have been called To cancel the broadcast setting 1 Press while the unit displays BROADCASTING Display 2 Press START SET COPY YES PRESS SET SE...

Page 63: ...as mode You may experience difficulty when transmitting documents overseas This feature makes sending documents easier as the transmission speed is slowed down Before starting transmission follow the steps below 1 Press Display 2 Press then 3 Press 4 Press or to select ON If this feature is not required select OFF 5 Press 6 Press MENU SETUP ITEM START SET COPY MODE ON MODE OFF START SET COPY OVERS...

Page 64: ...ions with ECM communication pre selected setting OFF The unit does not function with ECM communication 1 Press Display 2 Press then 3 Press 4 Press or to select the desired setting 5 Press 6 Press MENU SETUP ITEM START SET COPY MODE ON START SET COPY ECM SELECTION 6 8 1 SYSTEM SET UP MENU 1 2 3 4 5 6 7 8 9 0 START SET COPY MENU Note You cannot change the setting of this feature if there are stored...

Page 65: ...his tone continues the other party s machine may not be a facsimile or may have run out of paper Check with the other party Busy tone The other party s machine is busy Let the unit continue redialling or press and try again later This feature is set to ON as a pre selected setting If this feature is not required you may turn it off STOP 1 Press Display 2 Press then 3 Press 4 Press or to select the...

Page 66: ...t answer all calls If you hear a fax calling tone slow beep or no sound is heard press START SET COPY You have a separate telephone line just for fax calls Fax call FAX ONLY mode p 71 72 The AUTO ANSWER light should be OFF If the AUTO ANSWER light is on press to turn it off AUTO ANSWER The AUTO ANSWER light should be ON If the AUTO ANSWER light is off press to turn it on AUTO ANSWER All incoming c...

Page 67: ...oice mail If you have a voice mail service from your telephone company you also need to subscribe to a Distinctive Ring service p 75 TEL FAX mode p 76 The AUTO ANSWER light should be ON If the AUTO ANSWER light is off press to turn it on AUTO ANSWER When receiving voice calls The unit will ring When receiving fax calls The unit will receive fax documents without ringing To receive fax calls withou...

Page 68: ...receiving fax calls The unit will activate the fax function to receive documents FAX ONLY mode p 73 74 All incoming calls will be answered as faxes and the unit will try to receive a fax Hi this is Mike For KX FP121 KX FM131 The AUTO ANSWER light should be ON If the AUTO ANSWER light is off press to turn it on AUTO ANSWER The AUTO ANSWER light should be ON If the AUTO ANSWER light is off press to ...

Page 69: ... a computer attached to the same telephone line see page 83 Option C TEL mode p 70 Ring Ring Ring TEL FAX mode p 76 When receiving voice calls The unit will ring When receiving fax calls The unit will receive fax documents without ringing Hi this is Mike The AUTO ANSWER light should be ON If the AUTO ANSWER light is off press to turn it on AUTO ANSWER The AUTO ANSWER light should be OFF If the AUT...

Page 70: ...ss 3 Replace the handset The unit will start reception CONNECTING START SET COPY START SET COPY STOP Handset OFF AUTO ANSWER FAX ON DIGITAL SP PHONE KX FP121 KX FM131 Microphone KX FP121 KX FM131 To stop receiving the document Press Friendly reception feature When you answer a call and hear a fax calling tone slow beep the unit will automatically start receiving If this feature is not required set...

Page 71: ...t be used with a telephone line which is used for both voice and fax calls When the unit answers the call fax communication is attempted with the other fax machine even if someone is trying to call you If you have a telephone line just for receiving faxes we recommend the following setup Line 1 Voice calls Line 2 Fax calls Only a fax machine is connected Example One telephone line is used for voic...

Page 72: ...ulty receiving faxes the other parties may have tried to send faxes before confirming if your unit answered or not Decrease the number of rings 1 Press Display 2 Press then 3 Press 4 Press or to select the desired number or enter the number using the dial keypad 5 Press 6 Press MENU SETUP ITEM START SET COPY RING 2 START SET COPY FAX RING COUNT 0 6 1 SYSTEM SET UP MENU 1 2 3 4 5 6 7 8 9 0 START SE...

Page 73: ...5 6 7 8 9 0 START SET COPY MENU ON AUTO ANSWER TAD FAX ON 1 Press Display 2 Press then 3 Press 4 Press or to select FAX ONLY 5 Press 6 Press 7 If the AUTO ANSWER light is off turn it on by pressing FAX ONLY MODE AUTO ANSWER MENU SETUP ITEM START SET COPY MODE FAX ONLY MODE TAD FAX START SET COPY AUTO ANSWER 7 7 1 SYSTEM SET UP MENU For KX FP121 KX FM131 If you have a telephone line just for receiv...

Page 74: ... other parties may have tried to send faxes before confirming if your unit answered or not Decrease the number of rings 1 Select FAX ONLY in step 4 of feature setting 77 p 73 2 Press Display 3 Press then 4 Press 5 Press or to select the desired number or enter the number using the dial keypad 6 Press 7 Press MENU SETUP ITEM START SET COPY RING 2 START SET COPY FAX RING COUNT 0 6 1 SYSTEM SET UP ME...

Page 75: ... to use the additional phone number as a facsimile telephone number set the ring pattern detection feature to ON When the unit detects a call matching the distinctive ring pattern it will activate the fax function 1 Press Display 2 Press then 3 Press 4 Press or to select ON If this feature is not required select OFF 5 Press 6 Press MENU SETUP ITEM START SET COPY MODE ON MODE OFF START SET COPY RIN...

Page 76: ...l The unit will automatically receive documents without ringing Ring Ring Ring The following message will be played after the TEL FAX delayed rings KX FP121 KX FM131 only Hello To send a fax start transmission To speak with someone please wait If the call is not answered the following message will be played KX FP121 KX FM131 only No one is available to take your call right now Please try again lat...

Page 77: ...yed KX FP121 KX FM131 only No one is available to take your call right now Please try again later Thank you The following message will be played after the TEL FAX delayed rings KX FP121 KX FM131 only Hello To send a fax start transmission To speak with someone please wait TEL FAX delayed ring count Up to 9 ring signals will be generated before the unit answers depending on feature setting 78 on pa...

Page 78: ...X MODE AUTO ANSWER MENU SETUP ITEM START SET COPY MODE TEL FAX MODE FAX ONLY START SET COPY AUTO ANSWER 7 7 1 SYSTEM SET UP MENU 1 2 3 4 5 6 7 8 9 0 START SET COPY MENU ON AUTO ANSWER FAX ON Changing the AUTO ANSWER setting to the TEL FAX mode Note To return to the FAX ONLY mode select FAX ONLY in step 4 We recommend the following setup Only a fax machine is connected and you are always near the f...

Page 79: ...t on by pressing Display The unit will play the TEL FAX greeting message TEL FAX MODE AUTO ANSWER 1 2 3 4 5 6 7 8 9 0 ON AUTO ANSWER TAD FAX ON Changing the AUTO ANSWER setting to the TEL FAX mode We recommend the following setup Only a fax machine is connected and you are always near the fax machine For KX FP121 KX FM131 ...

Page 80: ... If the number of rings is increased you may not be able to receive document from some older model fax machines which do not send a fax calling tone When the unit detects a voice call in the TEL FAX mode it will ring up to 3 times The number of rings can be changed up to 6 1 Press Display 2 Press then 3 Press 4 Press or to select the desired number or enter the number using the dial keypad 5 Press...

Page 81: ...es using an extension telephone see above Important This code should be different from auto disconnection code p 85 and the remote operation ID p 102 1 Press Display 2 Press then 3 Press 4 Press or to select ON If this feature is not required select OFF 5 Press The display will show the pre selected code 6 Enter the new code This code can be from 2 to 4 digits in length using 0 9 and 7 Press 8 Pre...

Page 82: ... x 279 mm Legal 216 mm x 356 mm 1 Press Display 2 Press then 3 Press 4 Press or to select the desired setting If this feature is not required press to select 100 5 Press 6 Press MENU SETUP ITEM START SET COPY MODE 92 START SET COPY RCV REDUCTION 3 6 1 SYSTEM SET UP MENU 1 2 3 4 5 6 7 8 9 0 START SET COPY MENU Note Document usually has a heading on the top of each page which contains the sender s n...

Page 83: ... select OFF 5 Press 6 Press MENU SETUP ITEM START SET COPY MODE ON START SET COPY RECEIVE ALERT 4 4 1 SYSTEM SET UP MENU 1 2 3 4 5 6 7 8 9 0 START SET COPY MENU Wall jack Computer Wall jack Fax machine We recommend you use separate wall jacks for the unit and the computer If you use the Multi Function software PANA LINK follow the instructions on PANA LINK Software Guide KX FM131 only Note Set the...

Page 84: ... you have to press to receive fax document each time you answer a fax call START SET COPY 1 Press Display 2 Press then 3 Press 4 Press or to select the desired setting If this feature is not required select OFF 5 Press 6 Press MENU SETUP ITEM START SET COPY MODE ON START SET COPY FRIENDLY RCV 4 6 1 SYSTEM SET UP MENU 1 2 3 4 5 6 7 8 9 0 START SET COPY MENU START SET COPY ...

Page 85: ...you can talk with the other party Important This code should be different from the fax activation code p 81 0 1 Press Display 2 Press then 3 Press 4 Press or to select ON If this feature is not required select OFF 5 Press The display will show the pre selected code 6 Enter the new code This code can be from 2 to 4 digits in length using 0 9 and 7 Press 8 Press MENU SETUP ITEM START SET COPY CODE 0...

Page 86: ...ENU How your unit and pager work When your unit receives a fax document it will call your pager company Your pager company will call your pager Pager company Pager 5 5 5 5 A few minutes later your pager will display the same message you entered in step 6 above For example 5555 If you have subscribed to a Caller IDservice and the Caller ID information telephone number is received your pager will di...

Page 87: ...ge it will call your pager company Your pager company will call your pager A few minutes later your pager will beep and display as follows 11 when your unit received a voice message 22 when your unit received a fax document If you have subscribed to a Caller ID service and the Caller ID information telephone number is received your pager will display the telephone number before the number 11 or 22...

Page 88: ...regular film cartridge with 100 m roll p 15 when the above message is displayed the unit will also print a report FILM NEAR EMPTY 1 Press Display 2 Press then 3 Press 4 Press or to select the desired setting If this feature is not required select OFF 5 Press 6 Press MENU SETUP ITEM START SET COPY MODE ON START SET COPY FILM DETECTION 7 9 1 SYSTEM SET UP MENU 1 2 3 4 5 6 7 8 9 0 START SET COPY MENU...

Page 89: ...arty the call charge Make sure that no documents are fed into your unit and that the other party s machine is ready for your call 1 Press four times Display 2 Press 3 Dial the fax number Example 4 Press The unit will start reception CONNECTING START SET COPY FAX 3331111 FAX START SET COPY 4 POLLING MENU MENU START SET COPY retrieving a fax placed on another party s machine ...

Page 90: ...the document and scan it into memory then start printing QUICK SCAN START SET COPY COLLATE ON COLLATE EASY DIAL NUMBER 1 100 START SET COPY RESOLUTION STANDARD Note If a resolution is not selected FINE resolution will be selected automatically You can make or receive a voice call while making copies After copying the enlargement reduction rate setting will return to 100 START SET COPY COLLATE FACE...

Page 91: ...t on two pages See the examples below Sample of an enlarged copy EASY DIAL To reduce a document When you copy document that is longer than the recording paper the unit can reduce the original document by programming a suitable reduction rate The reduction rate is determined by the size of the recording paper and original document Select from 92 86 and 72 by rotating to the left Recommended reducti...

Page 92: ...sage p 93 or your own greeting message p 94 Note Each incoming message recording time can be set p 110 For the total recording time see Memory Capacity on page 131 When the remaining time is low erase unnecessary messages from memory p 98 104 While an incoming call is being recorded you can monitor it through the speaker If this feature is not required set to OFF p 111 1 2 3 4 5 6 7 8 9 0 ON AUTO ...

Page 93: ... 113 and 114 Hello We are unable to answer right now To send a fax please start transmission To leave a voice message please speak after the beep Thank you When you record your own greeting message p 94 Your own TAD FAX greeting message MESSAGE FULL FAX MEMORY FULL and FAX MEMORY FULL MESSAGE FULL Hello We are unable to answer right now To send a fax please start transmission To leave a voice mess...

Page 94: ...FAX greeting Display For the TEL FAX greeting 3 Press A long beep will sound The display will show one of the following according to your selection in step 1 For the TAD FAX greeting For the TEL FAX greeting T F REC 16s TAD REC 16s START SET COPY PRESS START 2 T F GREETING PRESS START 2 TAD GREETING RECORD 4 Speak clearly about 20 cm away from the microphone The display will show the remaining rec...

Page 95: ...ART SET COPY PRESS START 2 T F GREETING PRESS START 2 TAD GREETING ERASE STOP START SET COPY ERASE Erasing your own recorded greeting messages Checking your own recorded greeting messages To check your TAD FAX greeting message 1 Select TAD FAX in step 4 of feature setting 77 p 73 2 If the AUTO ANSWER light is off turn it on by pressing If the AUTO ANSWER light is on turn it off once then on again ...

Page 96: ...ess 9 before starting fax transmission If you change the greeting message time to 16 seconds from 60 seconds your own recorded TAD FAX greeting message will be deleted and return to the pre recorded message If necessary re record your own greeting message p 94 1 Press Display 2 Press then 3 Press 4 Press or to select the desired setting 5 Press 6 Press MENU SETUP ITEM START SET COPY MODE 16s START...

Page 97: ...s Press Only the new recorded messages will be played When the PLAY MESSAGES indicator lights Press All messages will be played Note During playback the display shows the recorded order of the messages You can adjust the speaker volume using or The number of calls in the call counter will not decrease until you erase the recorded messages PLAY MESSAGES PLAY MESSAGES Voice time day stamp During pla...

Page 98: ... 1 Press after listening to all of the messages Display 2 Press To stop erasing press 3 Press ERASE COMPLETED ERASING START SET COPY STOP YES PRESS SET ERASE MESSAGES START SET COPY PRESS START 1 ALL MESSAGES ERASE MESSAGE ERASED ERASING ERASE STOP START SET COPY ERASE Erase unnecessary messages to prevent memory from becoming full Erasing recorded messages ...

Page 99: ... rotate to the left until you hear the message you want to repeat Skipping a message Rotate one click to the right to play the next message Changing the playback speed Press to play messages at one and a half times the original speed Press 0 to play messages at half the original speed To return to the original speed press or again during quick or slow playback Stopping playback Press To resume pla...

Page 100: ...s STOP MEMO RECORDING START SET COPY PRESS START 1 MEMO MESSAGE RECORD Microphone STOP START SET COPY RECORD Telephone conversation You can record a telephone conversation 1 During the telephone conversation press Display 2 To stop recording press or replace the handset STOP 2WAY RECORDING RECORD STOP RECORD Note There may be legal restrictions in your state on recording two way telephone conversa...

Page 101: ...ages 8 4 8 3 8 2 8 1 8 0 5 4 104 104 105 105 105 105 105 Remote operation card Please cut out and carry this card for assistance when using the remote operation Answering Device Remote Operation Notice of Remote Operation Fold here 1 Call your unit 2 Enter the remote operation ID during the greeting message The new recorded messages will be played automatically 3 Press the remote command key s see...

Page 102: ...evice Choose any 3 digit number except a number using digits 0 or 7 Important This code should be different from Fax activation code p 81 1 Press Display 2 Press then 3 Press 4 Enter the desired number 5 Press 6 Press MENU SETUP ITEM START SET COPY ID 111 START SET COPY REMOTE TAD ID 1 1 1 SYSTEM SET UP MENU 1 2 3 4 5 6 7 8 9 0 START SET COPY MENU Erases a specific message Erases all messages Chan...

Page 103: ...messages press 5 4 During playback Repeating a message Press to play the current message If you press within 5 seconds of the beginning of a message the previous message will be played Skipping a message Press 2 1 1 Remote Operation KX FP121 KX FM131 only Answering Device 3 new messages 5 messages Voice guide example No new messages When there are no new recorded messages The voice guide will be h...

Page 104: ...essage 3 Leave a message after the beep Please leave your name and message after the beep Other remote operations Monitoring the room Press to monitor the sound in the room where the unit is installed You can monitor the room sound for about 30 seconds After 30 seconds a beep sounds To continue monitoring press again within 10 seconds 6 6 Recording a marker message After playing back the recorded ...

Page 105: ...efore using this feature Pager call is off Press to turn OFF the pager call 8 4 If a pager number is not programmed you cannot turn this feature ON The voice guide will prompt you Pager number is not set Skipping the greeting message Press during the greeting message playback The unit will skip the rest of the greeting message 0 Returning the receive mode to the TAD FAX mode You can change the set...

Page 106: ...peration This feature operates in the TAD FAX mode For details on the remote operation see page 101 Use a touch tone telephone to access your unit An incoming voice message is recorded in memory Your unit calls the transfer telephone number The transfer telephone rings then answers the call Your unit will play the message transfer greeting message Enter the remote operation ID p 102 Retrieve the m...

Page 107: ...eature is not required select OFF 5 Press 6 Enter the transfer telephone number Example 7 Press 8 Press MENU SETUP ITEM START SET COPY NO 3331111 NO START SET COPY MODE OFF START SET COPY MESSAGE TRANS 6 0 1 SYSTEM SET UP MENU 1 2 3 4 5 6 7 8 9 0 START SET COPY MENU Note This feature can be turned on off remotely from a touch tone telephone p 105 ...

Page 108: ...show the remaining recording time Example 7 When finished recording press The unit will repeat your message You can adjust the volume using or 8 Press MENU STOP TRNS REC 15s TRNS REC 16s START SET COPY RECORD CHECK START SET COPY TRNS GREETING 6 1 1 SYSTEM SET UP MENU Microphone STOP START SET COPY MENU To check your message 1 Press then 2 Press or to select CHECK in the display 3 Press The unit w...

Page 109: ...ll charges for the call hang up immediately when you hear the third ring The third ring indicates that there are no new recorded messages RINGER OFF The unit will answer without ringing Helpful hints To answer a call before the unit does increase the number of rings If you have difficulty in receiving faxes from machines that have an automatic transmission feature decrease the number of rings 1 Se...

Page 110: ...P ITEM START SET COPY MODE VOX START SET COPY RECORDING TIME 1 0 1 SYSTEM SET UP MENU 1 2 3 4 5 6 7 8 9 0 START SET COPY MENU Incoming message recording time When this feature is on the unit will let you know with slow beeps that a caller s message has been recorded 1 2 3 4 5 6 7 8 9 0 START SET COPY MENU Message alert 1 Press Display 2 Press then 3 Press 4 Press or to select ON If this feature is...

Page 111: ...RT SET COPY REC TIME ALERT 4 3 1 SYSTEM SET UP MENU beeps when memory is almost full When a call is received with the answering device the incoming messages ICM will be heard from the speaker during the call If you do not want the messages to be heard by other persons who share your unit set this feature to OFF 1 Press Display 2 Press then 3 Press 4 Press or to select the desired setting If this f...

Page 112: ... out of recording paper Try again The document was not fed properly Reinsert the document and try again The other party s fax machine rings too many times To send a fax manually dial the number confirm the fax tone and press The other party s machine is not a facsimile Check with the other party The number you dialled is not in service The PC cannot control the fax functions The printer cable is n...

Page 113: ...nsmission The film is empty Replace the film or film cartridge p 123 125 The film is slack Tighten it see step 3 on page 123 and step 8 on page 125 and install again The remaining film can print about 10 pages of A4 size documents Prepare a new film or film cartridge p 15 The free starter film is empty Replace the film or film cartridge p 123 125 There is no space to store new stations in the EASY...

Page 114: ...nge the setting p 37 Disconnect the unit from the telephone line and connect the line to a known working telephone If the working telephone operates properly contact our service personnel to have the unit repaired If the working telephone does not operate properly contact your telephone company The ringer volume is set to off Adjust it to a suitable level p 33 The paper is inserted halfway Insert ...

Page 115: ...are dirty Clean them p 126 Use the overseas transmission mode p 63 Add two pauses at the end of the telephone number p 36 or dial manually START SET COPY Fax receiving Problem Cause Remedy I cannot receive document automatically The display shows CONNECTING but faxes are not received The recording image is faint The printing quality is poor A blank sheet is ejected after the received document is p...

Page 116: ...copy during programming Make the copy after programming or stop the programming The glass or rollers are dirty Clean them p 126 The center rib is dirty Clean it p 126 The thermal head is dirty Clean it p 126 Some paper has instructions recommending which side to print on Try turning the paper over You may have used paper with a cotton and or fiber content that is over 20 such as letterhead or resu...

Page 117: ... down report will be printed out stating which contents in memory have been erased Power down report The power down report will be automatically printed out after power is restored The report will not be printed out if there are no documents stored in memory Sample of a power down report NO 01 FAX NOT AVAIL MODE RCV PAGES 01 MEMORY RECEIVE POWER DOWN AT Jan 05 1999 04 30AM RESTARTED AT Jan 05 1999...

Page 118: ...n the cover by pressing the cover open button 2 Remove the film cartridge 5 Replace the film cartridge by first placing the front of the cartridge into the unit and then lowering the back of the cartridge where there is an attached sticker into place 6 Close the cover securely by pushing down on the dotted area at both ends 3 Remove the jammed recording paper 4 If the film is slack tighten it by w...

Page 119: ...ve the jammed paper as follows PRESS START CHECK PAPER START SET COPY Tension bar Confirm the recording paper exit If there is any jammed paper remove it as follows When paper has not been ejected even though PAPER JAMMED or CHECK PAPER is not displayed 1 Tilt the unit up and pull the jammed recording paper out of the recording paper exit 2 Remove the jammed recording paper from the recording pape...

Page 120: ...ing remove the jammed document 1 Open the cover by pressing the cover open button 2 Remove the jammed document carefully 3 Close the cover securely by pushing down on the dotted area at both ends Cover open button Note Do not forcibly pull out the jammed paper before opening the cover ...

Page 121: ...g an instrument with a pointed end such as a paper clip Left When document multiple feed Center Standard position pre selected Right When document does not feed 3 Close the cover securely by pushing down on the dotted area at both ends Cover open button Green lever Left Right Sending document does not feed or multi feeds Note When shifting the green lever do not touch the surrounding parts ...

Page 122: ...lay FILM E F FILM E F When the film indicator points to this position the remaining film will print up to 20 pages of A4 size document Prepare a new film cartridge for replacement 1 Press Display 2 Press then 3 Press Example 4 Press 5 Press MENU SETUP ITEM STOP FILM E F START SET COPY FILM REMAIN 1 8 1 SYSTEM SET UP MENU 1 2 3 4 5 6 7 8 9 0 START SET COPY MENU STOP ...

Page 123: ... cartridge Changing the film cartridge KX FA137A 3 Remove the film stopper from the new film cartridge by pressing it up Turn the film cartridge over so that the attached sticker is facing up If the film is slack tighten it by winding the gears 4 Replace the film cartridge by first placing the front of the cartridge into the unit and then lowering the back of the cartridge where there is an attach...

Page 124: ...and green gears forward and lifting up the bottom side gears green gears Remove the used film B A A B Blue gear Top side gears Green gear Bottom side gears Green gear Green gear A B 4 Remove the four gears from the used film cores Caution The film is not reusable To order a new film see page 15 Gears Film cores Gears 5 Insert the blue gear into the blue core of the new film Blue core Blue gear Gui...

Page 125: ...lack tighten it by winding the bottom side gears B A Top side gear Bottom side gears Bottom side gear Top side gears A B 9 Replace the film cartridge by first placing the front of the cartridge into the unit and then lowering the back of the cartridge where there is an attached sticker into place Close the cover securely by pushing down on the dotted area at both ends The unit will check that the ...

Page 126: ...tissues to clean the inside of the unit Thermal head and black bar If dirty patterns or black or white bands appear on a copied or received document clean the thermal head and black bar 1 Disconnect the power cord and the telephone line cord 2 Open the cover by pressing the cover open button 3 Clean the thermal head and black bar with a cloth moistened with isopropyl rubbing alcohol and let it dry...

Page 127: ...quality of your unit If the test print has a dirty pattern or blurred points or lines clean the thermal head p 126 Broadcast list provides you with names and telephone numbers which are stored in the BROADCAST keys p 59 62 Caller ID list keeps records of the last 35 callers after subscribing to a Caller ID service This report will be printed automatically after every 35 callers p 48 1 Press two ti...

Page 128: ... Press or to select the desired setting 5 Press 6 Press MENU SETUP ITEM START SET COPY MODE ON START SET COPY FAX GUIDANCE 4 7 1 SYSTEM SET UP MENU 1 2 3 4 5 6 7 8 9 0 START SET COPY MENU Start transmission Fax transmission start If friendly reception p 84 is activated the following messages will also be heard Transmission is complete Transmission has failed Transmission has been interrupted Fax t...

Page 129: ...re when you need to transmit or copy a document with faint or dark writing The following choices are available NORMAL Used for a document with normal writing Pre selected setting LIGHT Used for a document with faint writing DARKER Used for a document with dark writing Set this feature before starting transmission or copying Note This feature will return to the normal mode after transmission or cop...

Page 130: ...when the display contrast is too light 1 Press Display 2 Press then 3 Press 4 Press or to select YES 5 Press If this feature is not required press 6 Press again for confirmation 7 Press MENU SETUP ITEM RESET COMPLETED START SET COPY STOP RESET OK START SET COPY RESET YES RESET NO START SET COPY SET DEFAULT 8 0 1 SYSTEM SET UP MENU 1 2 3 4 5 6 7 8 9 0 START SET COPY MENU STOP Resetting the advanced...

Page 131: ...Mass Weight Approx 4 0 kg Power Consumption Standby Approx 6 5 W Transmission Approx 15 W Reception Approx 42 W When receiving a 20 black document Copy Approx 45 W When copying a 20 black document Maximum Approx 150 W When copying a 100 black document Power Supply 220 240 V AC 50 60 Hz Memory Capacity Voice memory KX FP121 KX FM131 only Approx 18 minutes of recording time including the greeting me...

Page 132: ...w A See Fig 4 SOCKET SCREW A PLUG Fig 1 TELEPHONE CORD Connect to the PLUG as shown in Fig 1 SCREW B Fig 2 SCREW B Fig 3 SOCKET SCREW A Fig 4 If you are satisfied with the operation of your telephone service after plugging in your Permitted Attachment your installation is completed You will be unable to connect this Permitted Attachment if your telephone service consists only of a wall phone or an...

Page 133: ...ing the recorded messages 99 Selecting characters 31 Sending faxes 52 Skipping the recorded messages 99 Storing 40 41 ECM communication 64 Enlarge Reduce copy 90 91 ERASE button 11 47 95 98 Error messages 112 114 Extension telephone 77 81 F Facsimile telephone number 32 Fax activation code 81 Fax auto redial 51 FAX ONLY mode 71 74 FAX ONLY ring count 72 74 Fax pager 86 87 Fax voice guidance 128 Fe...

Page 134: ... 102 Report Broadcast 62 127 Caller ID 48 127 Feature setting 127 Journal 56 127 Printer test list 127 Sending 55 Telephone numbers 127 Reset 130 RESOLUTION button 50 52 Ring count FAX ONLY 72 74 TAD FAX 109 TEL FAX 80 Ring pattern detection 75 Ringer volume 33 S SECRET key 38 40 Sending Broadcast 59 62 EASY DIAL 52 From memory 58 Manually 7 50 One Touch Dial 51 Sending document Does not feed or m...

Page 135: ...04 Printing the sending report SENDING REPORT ERROR ON OFF If transmission fails Activate Deactivate 55 TONE PULSE Sets to TONE Sets to PULSE 37 18 The pre selected setting is in bold Advanced features Code Feature Display Available settings Meaning Page 22 Setting the journal report to print automatically AUTO JOURNAL ON OFF Activate Deactivate 56 23 Sending documents overseas OVERSEAS MODE ON OF...

Page 136: ...it receives a fax FAX PAGER CALL ON OFF 76 Setting the connecting tone CONNECTING TONE ON OFF Activate Deactivate 65 77 Changing the AUTO ANSWER setting AUTO ANSWER FAX ONLY TEL FAX Facsimile only mode Telephone Facsimile mode 78 79 Setting the film detection FILM DETECTION ON OFF Activate Deactivate 88 80 Resetting the advanced features SET DEFAULT YES NO Reset Will not reset 130 78 Setting the T...

Page 137: ...to TONE Sets to PULSE 37 18 Note You can display basic features in the order above by rotating instead of entering the code number 01 02 etc EASY DIAL The pre selected setting is in bold VOX 1 MIN Unlimited 1 minute 11 Setting the remote operation ID REMOTE TAD ID ID 111 Any 3 digit number except a number using digits 0 or 7 102 06 Setting the ring count in the TAD FAX mode TAD RING COUNT 2 3 4 5 ...

Page 138: ...n 92 reduction 86 reduction 72 reduction 82 31 Setting the Distinctive Ring pattern RING DETECTION 75 NORMAL DARKER Normal contrast Darker contrast 39 Changing the display contrast LCD CONTRAST 130 30 Setting the silent fax recognition ring count SILENT FAX RING 3 4 5 6 3 to 6 rings 80 ON CODE 9 OFF Activate Deactivate 41 Changing the fax activation code FAX ACTIVATION 81 ON OFF Activate Deactivat...

Page 139: ...AD FAX greeting message GREETING TIME 16s 60s 16 seconds long 60 seconds long 96 60 Setting the message transfer call MESSAGE TRANS ON OFF Activate Deactivate 107 61 Recording the message transfer greeting message TRNS GREETING CHECK RECORD ERASE Checks the greeting message Records the greeting message Erases the greeting message 108 67 Setting the incoming message monitor ICM MONITOR ON OFF Activ...

Page 140: ...ss occurring during or associated with transit Unless otherwise specified to the consumer the benefits conferred by this express warranty are additional to all other conditions warranties guarantees rights and remedies expressed or implied by the Trade Practices Act 1974 and similar consumer protection provisions contained in legislation of the States and Territories and all other obligations and ...

Reviews: