1. Introduction and Installation
17
1.7 Output tray
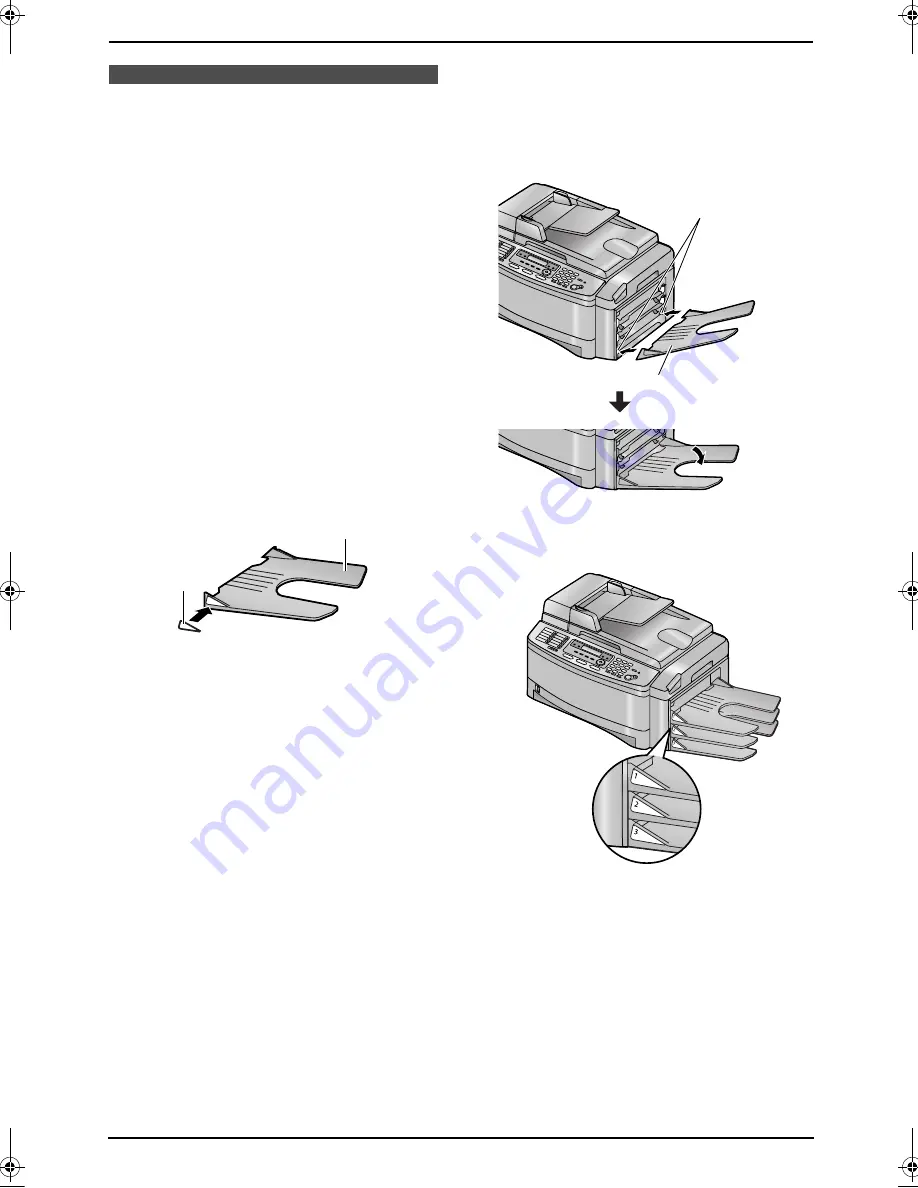
This unit has 3 pieces of output tray. As a default
setting, printed paper is stacked on the output
tray as follows.
–
Upper output tray (
“
#1
”
): Printed document
by using the computer and copied document.
–
Lower output tray (
“
#3
”
): Received fax
document.
L
You can change the output tray setting for
faxing (feature #441 on page 68) and for
copying (feature #466 on page 70). You can
also select the middle output tray (
“
#2
”
).
To change the output tray from the computer,
set the printer properties. See page 53, 59 for
details.
1.7.1 Attaching the tray label
Attach the tray label (
1
) to the output tray (
2
).
L
Label 1 to the upper output tray (
“
#1
”
)
L
Label 2 to the middle output tray (
“
#2
”
)
L
Label 3 to the lower output tray (
“
#3
”
)
Note:
L
Instead of the label 1, 2, 3, you can also
attach other labels for print, copy or fax
according to the usage. For a blank label, this
is convenient if the optional LAN board is
installed. You can write the user name on the
blank label and attached it to the selected
output tray.
1.7.2 Installing the output tray
Insert the output tray (
1
) into the slots (
2
), then
push the tray down until it latches into place.
L
Repeat this step to install other output trays.
L
Make sure that the number on the label and
the tray position match.
Note:
L
Do not place the unit in an area where the
output tray may be easily bumped into.
L
The upper output tray can hold up to
approximately 100 sheets of printed paper.
The other output trays can hold up to
approximately 50 sheets of printed paper.
Remove the printed paper before the output
tray becomes full.
1
2
2
1
FLB853EX-PFQX2373ZB-en.book Page 17 Tuesday, February 21, 2006 7:09 PM
Summary of Contents for KX-FLB853EX
Page 110: ...11 Index 108 Toner save Feature 482 15 66 Transparency 53 U USB cable 50 V Volume 26 ...
Page 111: ...109 Notes ...
Page 112: ...110 Notes ...
Page 113: ...111 Notes ...


