background image

E
N

G

L

I

S
H

20

CQ-DF802W

35

E
N

G

L

I

S
H

19

CQ-DF802W

34

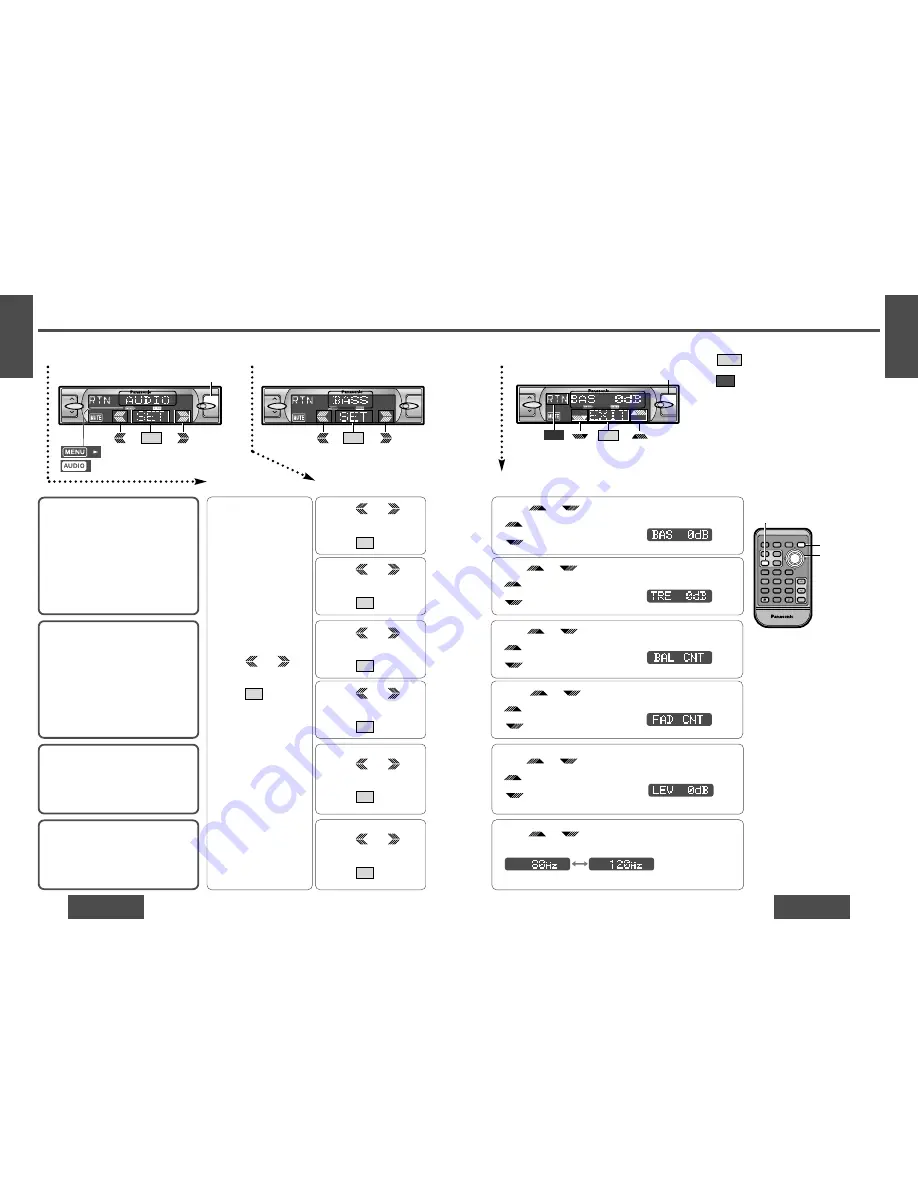
Audio and Sound Settings [AUDIO] 

(Continued)

Bass and Treble

You can adjust the bass and treble sound.

Default:  BAS (Bass) 0 dB

TRE (Treble) 0 dB

Setting range: 

j

12 dB to 

i

12 dB 

(by 2 dB)

Balance and Fader

You can adjust the sound balance among
the front, rear, right and left speakers.

Default: BAL (Balance) CNT (Center)

FAD (Fader) CNT (Center)

Setting range: 15 levels each

Subwoofer Level

You can change the subwoofer volume level.
Default: 0 dB
Setting range:

j

(subwoofer mute),

j

6 dB to 

i

6 dB (by 2 dB)

Subwoofer Low Pass Filter

Select the upper limit frequency of the
sound from subwoofer.
Default: 120 Hz
Setting range: 120 Hz/80 Hz

1

2

Menu

Submenu

1

Press [MENU].

2

Press 

/

[

%

or [

$

to select

“AUDIO”.

3

Press 

/[SET] to set.

SET

1

Press 

/

[

%

or [

$

to select

“BASS”.

2

Press 

/[SET] to set.

SET

1

Press 

/

[

%

or [

$

to select

“TREBLE”.

2

Press 

/[SET] to set.

SET

1

Press 

/

[

%

or [

$

to select

“BALANCE”.

2

Press 

/[SET] to set.

SET

1

Press 

/

[

%

or [

$

to select

“FADER”.

2

Press 

/[SET] to set.

SET

1

Press 

/

[

%

or [

$

to select

“SUB-W LEV”.

2

Press 

/[SET] to set.

SET

1

Press 

/

[

%

or [

$

to select

“SUB-W FRQ”.

2

Press 

/[SET] to set.

SET

3

Setting

Press  

/[

"

or [

#

to adjust the level.

/[

"

: Increase the bass.

/[

#

: Decrease the bass.

Press  

/[

"

or [

#

to adjust the level.

/[

"

: Increase the treble.

/[

#

: Decrease the treble.

Press  

/[

"

or [

#

to adjust the level.

/[

"

: Right enhanced.

/[

#

: Left enhanced.

Press  

/[

"

or [

#

to adjust the level.

/[

"

: Front enhanced.

/[

#

: Rear enhanced.

Press  

/[

"

or [

#

to adjust the level.

/[

"

: Increase the level.

/[

#

: Decrease the level.

Press  

/[

"

or [

#

to change the setting 120 Hz

or 80 Hz.

or

or

or

or

or

or

or

or

or

or

or

or

or

Note:

Press 

/[MENU]/[MENU], [DISP] (display) to

return to the regular mode.

Press 

/[RET] (RETURN) to return to the previ-

ous display.

RTN

EXIT

: Lights during menu play setting.

: Lights during AUDIO mode.

[

%

] [

$

]

(Menu/submenu)

[

"

] [

#

]

(Setting)


[SET] 

[MENU] 

[DISP] 

(Display)

RANDOM

SCAN

REPEAT

Car Audio

PWR

DISP

NUMBER

1

2

3

4

5

6

7

8

9

0

DIM

BAND

RET

MENU

SET

SOURCE

FACE

S • A

MUTE

VOL

RETURN

DIMMER

VOL

MENU

SET

(Submenu)

VOL

MENU

SET

MOSFET

 50W 

4

[MENU]

(Menu)

BAND

APM/ 

;

1

BAND

APM/ 

;

1

1

2

2

3

2

1

1

MOSFET

 50W 

4

VOL

MENU

EXIT

MOSFET

 50W 

4

[MENU]

RTN

(Setting)

BAND

APM/ 

;

1

1

Menu

2

Submenu

3

Setting

Summary of Contents for CQDF802

Page 1: ... side Lithium battery included Battery holder Position A Position B Do not disassemble or short the battery Do not throw a battery into a fire Keep batteries away from children to avoid the risk of accidents Be careful to observe proper local disposal rules when you dispose of batteries Caution Improper use of batteries may cause overheating an explosion or ignition resulting in injury or a fire B...

Page 2: ... 22 25 29 Returns to the previous display DISPLAY Note Press the Spectrum Analyzer display to active the cursor of the touch panel on VOL CQ DF802W MENU OPEN BAND APM 1 MOSFET 50W X 4 Display next page on Source display Indicates Switches off the power page 20 Press and hold Selects a source page 20 Radio CD player mode CD changer control SOURCE Spectrum Analyzer S A display page 36 Clock basics p...

Page 3: ... control unit Power off Press and hold on the main unit again for more than 1 second Press and hold PWR SOURCE on the remote control unit again for more than 1 second SOURCE 1 Source Press SOURCE to change the source SOURCE 2 Note The sound level for each source is stored in memory There is one volume setting for AM radio band and one volume setting for FM radio band Decrease the volume to 1 10 Cl...

Page 4: ... for tuning in the preset station Press 1 to 6 on the remote control unit P SET TUNE Note Frequency setting can be performed even after selecting a preset num ber 1 Select a band and frequency steps 1 2 and 3 on the previous page 2 Press and hold the Spectrum Analyzer display for more than 2 seconds until the preset number blinks 3 Press or to select a preset number 1j6 4 Press and hold preset for...

Page 5: ... not touch anything here except eject The disc insertion slot and its vicinity become hot but this is not an indication of any problem Be care ful when inserting a disc or pressing eject Track Selection Advance to the next track Back to the beginning of the current track Back to the previous track Press twice Pause Press BAND 1 Press BAND 1 again to cancel Listening to a CD Track Search Press and ...

Page 6: ...onds Note Press MENU MENU DISP display to return to the regular mode Press RET RETURN to return to the previ ous display REP Lights during repeat play RAND Lights during random play RTN EXIT or or Only for the remote control unit Press 5 SCAN to change setting On The first 10 seconds of each track plays in sequence Off Cancel or Lights during menu play setting Lights during CD player menu mode Men...

Page 7: ...ISP Display Track Disc SET NUMBER 0 to 9 Disc number RANDOM SCAN REPEAT Car Audio PWR DISP NUMBER 1 2 3 4 5 6 7 8 9 0 DIM BAND RET MENU S E T SOURCE FACE S A MUTE VOL RETURN DIMMER CD changer mode display 2 Lights when the changer magazine is con nected Lights when the disc is played Track Selection Advance to the next track Back to the beginning of the current track Back to the previous track Pre...

Page 8: ...seconds Press and hold 4 RANDOM for more than 2 seconds to change setting On RAND blinks Off Displayed for 2 seconds Press 6 REPEAT to change setting When you press a button the screen on the left is displayed for 2 seconds Press and hold 6 REPEAT for more than 2 seconds to change setting When you press a button the screen on the left is displayed for 2 seconds Note Press MENU MENU DISP display to...

Page 9: ...s of the speakers are moder ately emphasized lights The sounds of the subwoofer can be heard clearly S HDB is non active Direct setting on the re mote control unit when the menu is not displayed Press S HDB to change setting When you press a button the screen on the left is dis played for 2 seconds or or Note Press MENU MENU DISP display to return to the regular mode Press RET RETURN to return to ...

Page 10: ...r to select FADER 2 Press SET to set SET 1 Press or to select SUB W LEV 2 Press SET to set SET 1 Press or to select SUB W FRQ 2 Press SET to set SET 3 Setting Press or to adjust the level Increase the bass Decrease the bass Press or to adjust the level Increase the treble Decrease the treble Press or to adjust the level Right enhanced Left enhanced Press or to adjust the level Front enhanced Rear ...

Page 11: ...utton the screen on the left is dis played for 2 seconds Press S A to change setting When you press a button the screen on the left is dis played for 2 seconds or or or or or or or Bright Medium Dark Note Press MENU MENU DISP display to return to the regular mode Press RET RETURN to return to the previ ous display Press Spectrum Analyzer display on S A setting to return to the previous display RTN...

Page 12: ...ange setting No sound Decrease the volume to 1 10 Attenuation Operation sound beep is on Operation sound beep is off Security function is active Security function is non active Black display Demonstration display Clock display is on Security function When the key in the ignition is turned OFF Security message will be active The panel removable alarm will be active When the removable face plate is ...

Reviews: