


E
N
G
L
I
S
H
8
CQ-DF802W
23
E
N
G
L
I
S
H
7
CQ-DF802W
22
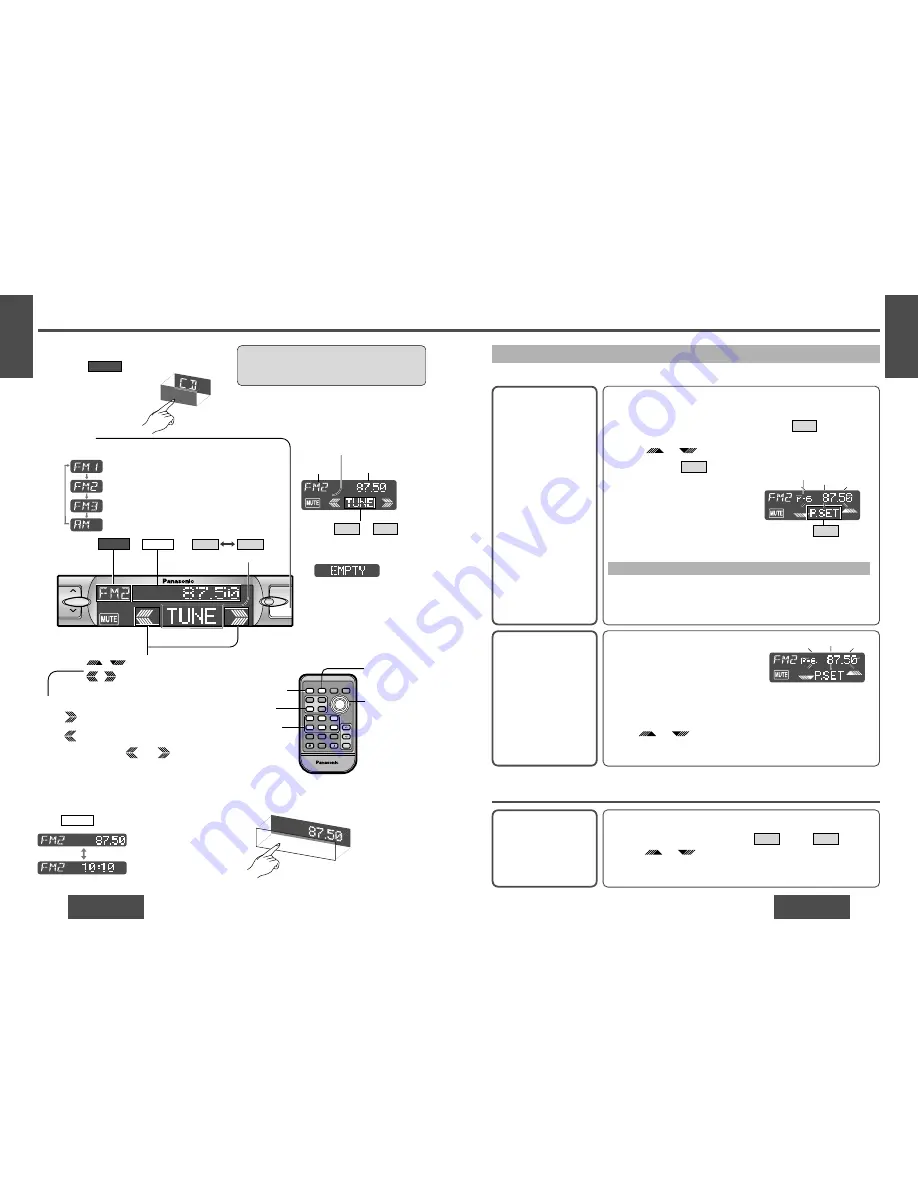
Radio
Band
Press [BAND] to change the band.
2
Radio Mode
Press
/[SOURCE] to change to
the radio mode.
SOURCE
1
Tuning
/[
$
]: Up
/[
%
]: Down
Press and hold
/[
%
] or [
$
] for
more than 0.5 seconds, then release.
Seeking will start.
3
ST
Radio mode display
FM stereo indicator
or
Display Change
Press
/[DISP] (display) to change the display.
DISPLAY
Radio mode display
(Default)
Clock display
One-Touch Selection of a Station
Up to 6 stations each can be saved in the FM1, FM2, FM3 and AM preset station memories.
Manual Preset
Memory
Manually save a station in
the preset memory.
Entering numbers directly on the remote control unit
1
Select a band and frequency (step
1
,
2
and
3
on the previous
page).
2
Press and hold [1] to [6] for more than 2 seconds to memorize.
Auto Preset
Memory (APM)
Automatically save rela-
tively strong stations in
the preset memory.
1
Select a band (steps
1
and
2
on the
previous page).
2
Press and hold [BAND] (APM) for
more than 2 seconds.
Note:
≥
Existing saved stations are overwritten with new stations after following this procedure.
Preset Station
Calling
1
Select a band (steps
1
and
2
on the previous page).
2
Press the Spectrum Analyzer display
to show
(preset).
3
Press
/[
"
] or [
#
] to select the preset number for tuning
in the preset station.
(Press [1] to [6] on the remote control unit.)
P.SET
TUNE
Note:
≥
Frequency setting can be performed even after selecting a preset num-
ber.
1
Select a band and frequency (steps
1
,
2
and
3
on the previous
page).
2
Press and hold the Spectrum Analyzer display
for more than
2 seconds until the preset number blinks.
3
Press
/[
"
] or [
#
] to select a preset number (1
j
6).
4
Press and hold
(preset) for more than 2 seconds to memo-
rize.
P.SET
TUNE
Scanning:
≥
The display blinks once, and a re-
ceiving station is saved in the
memory.
Preset number
≥
The 6 strongest available stations will be automatically saved in the
memory under preset number 1 to 6.
≥
Once set, the preset stations are sequentially scanned for 5 seconds
each. (Scanning)
≥
Press
/[
"
] or [
#
] for the broadcast you want to listen
to.
(Press [1] to [6] on the remote control unit.)
or
or
or
Band
(SOURCE)
[DISP]
(Display)
[
%
] [
$
]
(Tune)
[
"
] [
#
]
(Preset station/
select)
[BAND]
(Auto preset
memory)
[1]
to
[6]
(Preset station)
RANDOM
SCAN
REPEAT
Car Audio
PWR
DISP
NUMBER
1
2
3
4
5
6
7
8
9
0
DIM
BAND
RET
MENU
SET
SOURCE
FACE
S • A
MUTE
VOL
RETURN
DIMMER
Frequency
VOL
MENU
SOURCE
DISPLAY
P.SET
(Preset)
(Preset station/select)
(Tune)
BAND
APM/
;
/
1
MOSFET
50W
X
4
TUNE
Caution:
≥
To ensure safety, never attempt to preset sta-
tions while you are driving.
P.SET
Note:
≥
:
Displays when not have any
menu settings. Radio and AUX-
IN mode do not have any menu
settings.
≥
Press or to
change the cursor.
P.SET
TUNE
Spectrum Analyzer display
SOURCE
DISPLAY


