❐
You can operate this unit by pressing buttons on the main unit and the remote control unit, and touch pan-
els on the main unit.
≥
Some operations can be activated by pressing buttons only on main unit or remote control unit.
Those cases are described in the instructions.
Example: Press [OPEN] on the main unit.
≥
These instructions describe buttons that are concerned with operations as follows.
Example: Press [VOL
"
] or [VOL
#
]/[
"
] or [
#
].
E
N
G
L
I
S
H
4
CQ-DF802W
19
(Display)
E
N
G
L
I
S
H
3
CQ-DF802W
18
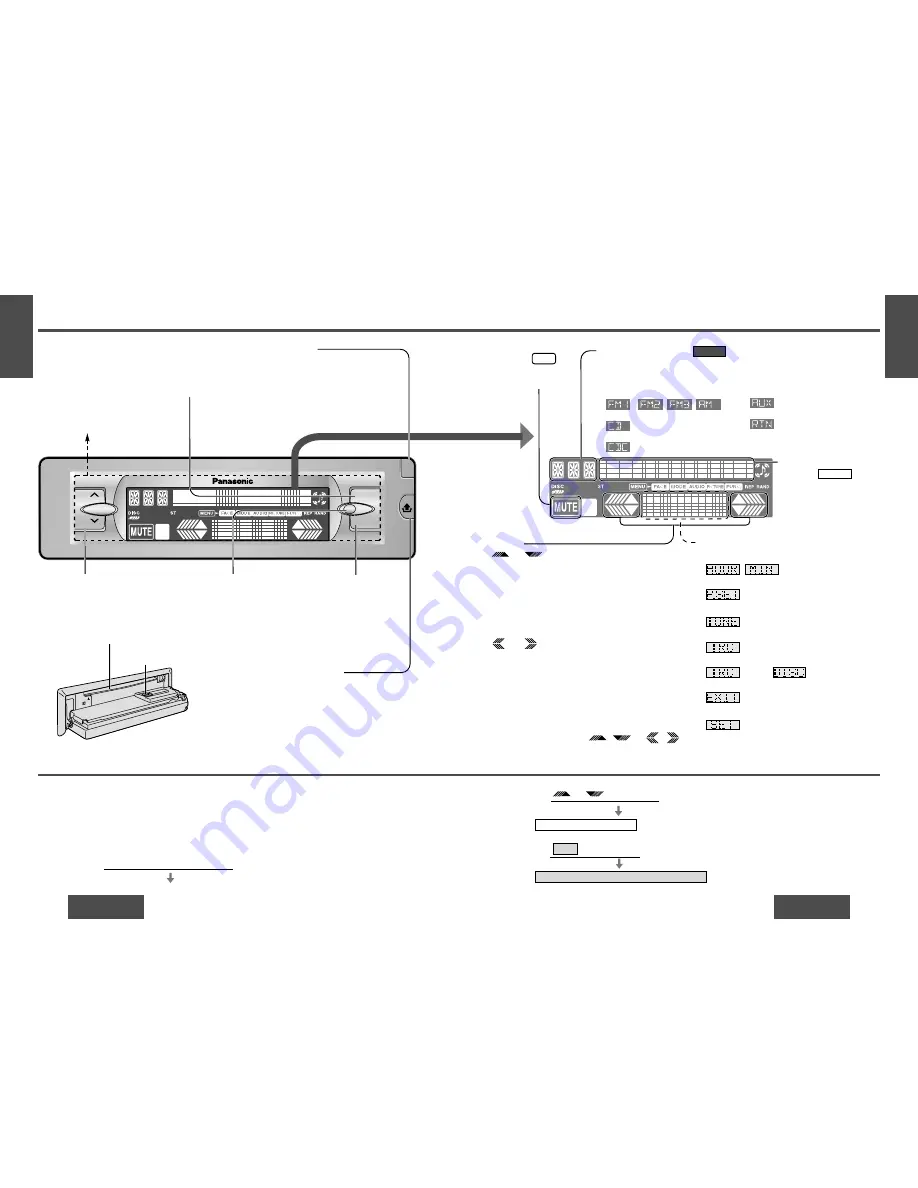
Name of Controls Functions
(Main Unit and Touch Panel)
Example: Press
/[
"
] or [
#
].
Example: Press
/[MENU]/[DISP].
EXIT
[buttons on the main unit]/[remote control unit]
/[remote control unit]
(
➡
above.)
cursor on the touch panel
or
/[buttons on main unit]/[remote control unit]
(
➡
above.)
Spectrum Analyzer display on the touch panel
[
"
] [
#
] VOL (Volume)
≥
Adjusts the sound volume.
(
➡
page 21)
[MENU]
≥
Enters the menu setting
mode.
≥
Returns to the regular
mode during menu setting.
[BAND] (APM/
;
/
1
)
(Auto Preset Memory/Pause)
≥
Selects a band. (
➡
page 22)
≥
Pause CD playing.
(
➡
page 25)
≥
Sets the auto preset memory
(APM) mode. (
➡
page 23)
[OPEN]
≥
Opens the front panel.
(
➡
page 21)
[
'
] (Release)
≥
Releases the front panel.
(
➡
page 52)
MUTE
(Indicates
. )
≥
Lowers the volume.
(
➡
page 21)
Dot display
(Indicates .)
≥
Changes the display.
(
➡
pages 22, 25, 29)
≥
Returns to the previous
display.
DISPLAY
Note:
≥
Press the Spectrum Analyzer display to active the
cursor of the touch panel
on
VOL
CQ-DF802W
MENU
OPEN
BAND
APM/
;
/
1
MOSFET
50W
X
4
Display (
➡
next page)
on
Source display (Indicates
.)
• Switches off the power. (
➡
page 20)
(Press and hold.)
• Selects a source. (
➡
page 20)
≥
Radio
(
)
≥
CD player mode
≥
CD changer control
SOURCE
Spectrum Analyzer (S·A) display (
➡
page 36)
≥
Clock basics (
➡
page 21)
,
(Minute)
≥
Radio mode (
➡
page 22)
(Preset)
• Enters a preset memory mode. (
➡
page 23)
≥
CD player mode (
➡
page 24)
(Track)
≥
CD changer control (
➡
page 28)
(Track),
≥
Menu setting mode
• Returns to the previous display.
• Determines an operation or item in menu set-
ting mode.
Cursors
(Hour/minute/preset/disc/menu/submenu)
≥
Selects (vertically) or adjusts an operation or
item.
≥
Adjusts the clock. (
➡
page 21)
≥
Selects a preset memory. (
➡
page 23)
≥
Selects disc. (
➡
page 28)
(Tune/track/setting)
≥
Selects (horizontally) or adjusts an operation or
item.
≥
Selects or searches frequency/track.
(
➡
pages 22, 25, 28)
or
or
Disc slot
≥
Loading the disc. (
➡
page 24)
[
<
] (Eject)
≥
Ejects the disc. (
➡
page 24)
MUTE
Touch panel
≥
Switches on the power.
(
➡
page 20)
Remote control sensor
Note:
≥
Operations can be performed no
matter which part of the touch
panel is pressed BUT ONLY
WHEN THE POWER IS ON.
§
The brightness of the screen illustrations in this manual is different from the actual screen brightness.
≥
AUX-IN setting
≥
Menu setting mode
• Returns to the previous display in
menu setting mode.
or
.


