background image

35

VCR Operation

Copying Your Tapes  (Dubbing)

1

Insert a pre-recorded tape.

2

Insert a blank tape with record tab.

Press REC

, then 

STILL/PAUSE

immediately to enter REC/PAUSE
mode.

3

Press INPUT

 to set DECK Input mode

to LINE for Video Input.

(See “Selecting the Input Mode” below.)

4

Press PLAY

 to start dubbing.

Playing VCR starts playback.

Press STILL/PAUSE

 to start dubbing.

DECK starts recording.

Press STOP

 to stop dubbing.

Caution:

• Unauthorized exchanging and/or copying of copyrighted recordings may be copyright

infringement.

• Please note that some tapes cannot be dubbed on DECK.

Also, it is not possible to dub DVD/ Video CD/ CD to VHS tapes using DECK.

• When   appears on the screen while a button is being operated, it means that the corresponding

operation is prohibited by DECK or the disc.

Playing (Source) VCR

Recording (Editing) DECK

5

To Monitor Dubbing on TV

1

Turn TV on and tune to the Recording
VCR channel (CH 3 or CH 4).

2

If Auto VCR/TV (see p. 34) is set to
“OFF,” press VCR/TV on the remote for
VCR mode.

• Dubbing tapes protected with Copy

Guard will result in poor quality
recordings.

Connection

Press STOP

 to stop dubbing.

Press PLAY

, then 

PAUSE

immediately to enter PLAY/PAUSE
mode.

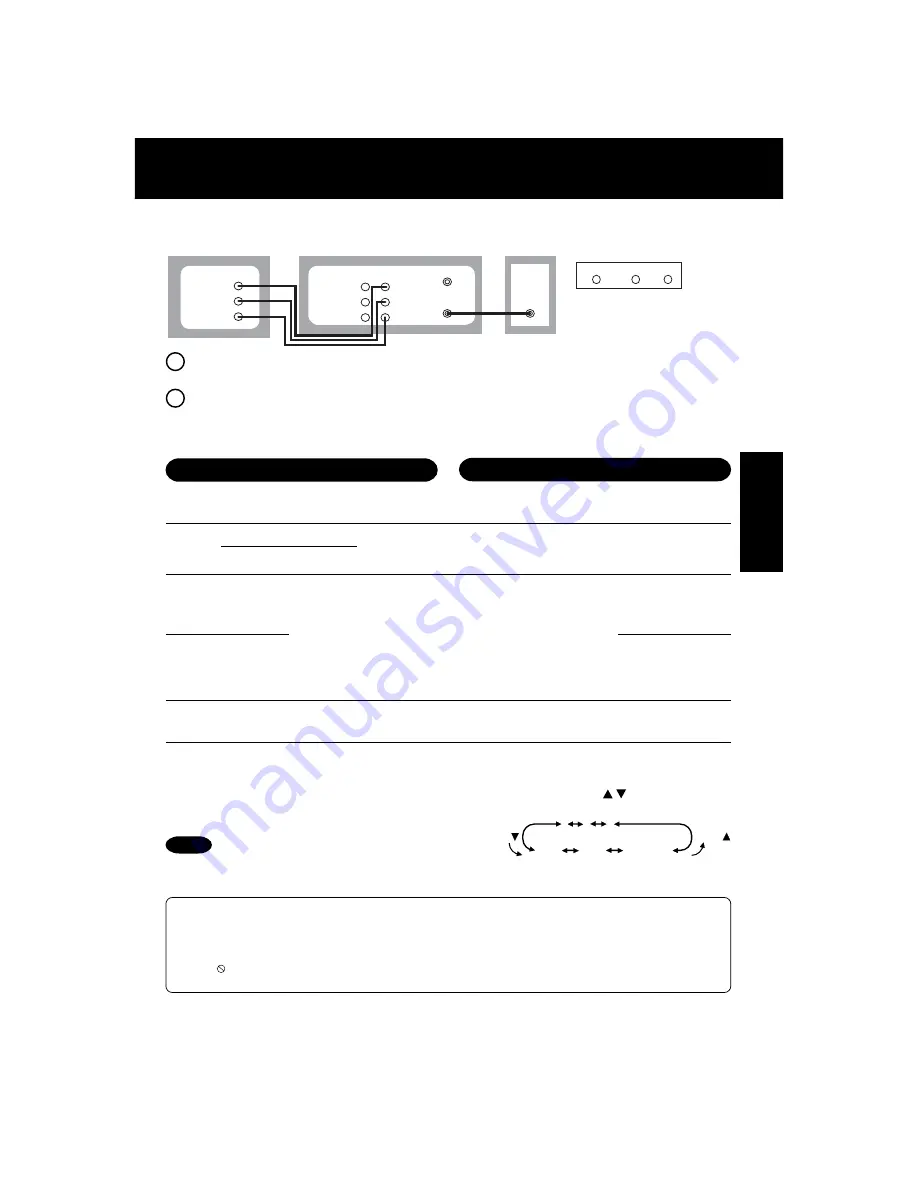
Connect VIDEO OUT terminal on Playing VCR to VIDEO IN terminal on DECK.
To monitor the dubbing, also connect TV as shown.

Connect “L” and “R” AUDIO OUT terminals on Playing VCR to “L” and “R” AUDIO IN
terminals on DECK.

In place of Playing VCR, you can use other equipment, such as a Camcorder.
Simply connect the unit’s Audio/Video outputs to DECK.

Selecting the Input Mode

Method 1:

Press INPUT

 repeatedly.

Channel Number 

 LINE1 

 LINE2

Method 2:

Press CH 

/ .

Display will change as below.

• LINE1:  For rear audio/video connection.

LINE2:  For front audio/video connection.

The operation of steps 4 and 5 must be done on the

playing and recording VCRs at the same time.

1

2

3

125

LINE1

(CABLE)

69

(TV)

or

LINE2

Press

Press

Front of DECK

(Audio/Video In Terminals
on the front of DECK are
available)

R

AUDIO

VIDEO

L

OUT

IN FROM ANT.

VHF/UHF

OUT TO TV

OUT IN1

VIDEO IN2

L-AUDIO

IN2-R

R

AUDIO1

VIDEO

L

VHF/

UHF

TV

DVD/VCR DECK

VCR/ Camcorder (Hi-Fi)

1

2

Note

Summary of Contents for AGVP320 - DVD/VCR DECK

Page 1: ...ust this product Please save this manual LSQT0966 A MULTI FORMAT PLAYBACK Ability to play back may depend on recording conditions As an ENERGY STAR Partner Panasonic Corporation of North America has determined that this product or product model meets the ENERGY STAR guidelines for energy efficiency Initial Setup Basic Operation VCR Operation DVD Operation For Information Professional Industrial Vi...

Page 2: ...walking traffic If an extension cord is used make sure it also has either a polarized or grounded plug and that the cords canbesecurelyconnected Frayedcords damagedplugs and damaged or cracked wire insulation are hazardous and should be replaced by a qualified service technician Overloaded outlets and extension cords are fire hazards and shouldbeavoided 4 DO NOT BLOCK VENTILATION HOLES Ventilation...

Page 3: ...ELF REFER SERVICING TO QUALIFIED PERSONNEL CAUTION LASER RADIATION WHEN OPEN DO NOT STARE INTO BEAM ATTENTION RAYONNEMENT LASER EN CAS D OUVERTURE NE PAS REGARDER DANS LE FAISCEAU Inside of product FCC NOTE This equipment has been tested and found to comply with part 15 of the FCC Rules These limits are designed to provide reasonable protection against harmful interference when operated in a resid...

Page 4: ... for optimum picture quality Manual Tracking Control to reduce picture noise Use during Playback and Slow Motion mode to reduce picture noise Press CH TRACKING on the remote control or on DECK until the picture clears up To return to Auto Tracking press POWER off then on again a few seconds later Features for a Quality Picture VCR Cleaning DECK Use a soft cloth or dusting attachment of a vacuum cl...

Page 5: ...Displays Light up Indicators 11 Connections 12 15 Initial Setup for Basic Connections Ready to Play 16 17 Reset Language Channels Clock VCR s Output Channel 18 19 Playback Record on a Tape 20 21 VCR DVD Basic DVD Operation 22 23 Disc Operation 36 41 DVD RAM Operation DVD RAM only 42 43 DVD Operation using On Screen Displays 44 48 MP3 JPEG Playback Operation 49 51 Settings for DVD Operation 52 55 L...

Page 6: ...l side of disc Never use record cleaning sprays benzine thinner static electricity prevention liquids or any other solvent Disc tray Disc DECK can play back discs bearing any of the following marks Discs which cannot be played DVD with Region No other than 1 or ALL PAL discs DVD ROM DVD Audio DVD RW DVD R DVD RW CD ROM CDV CD G CVD SVCD SACD CD TEXT Divx Video Disc Photo CD and MPEG4 Video Disc Di...

Page 7: ...iscs feature scenes simultaneously shot from different angles The ANGLE button can be used to view the scene from different angles Chapter Number Titles are subdivided into numbered sections You can quickly search for a favorite scene using these numbers DVD A high density optical disc on which high quality pictures and sound have been digitally recorded DVD incorporates video compression technolo...

Page 8: ...talic DVD Function Normal Others CHANNEL TRACKING V LOCK 10 pp 4 21 22 VOLUME p 28 MENU PLAY LIST p 41 43 DVD mode p 28 ACTION pp 18 52 SET VCR mode p 28 STOP pp 20 22 ADD DELETE CLEAR pp 19 38 40 NUMBER keys REWIND SEARCH SLOW pp 20 23 FAST FORWARD SEARCH SLOW pp 20 23 PAUSE STILL pp 20 23 Virtual Surround Sound V S S ENTER pp 23 28 TITLE DIRECT NAVIGATOR p 41 42 AUDIO SAP Hi Fi pp 27 36 INPUT p ...

Page 9: ...d wire e g an extended paper clip and applying moderate force insert it straight into the hole at the base of the tray The tray will eject a little Now pull the tray all the way out and remove the disc Over 2 inches Returns to factory setting Use if relocating DECK or if Initial Setup needs to be redone Make sure a tape is not inserted in the DECK Reset All Memory Functions Press and hold both VCR...

Page 10: ...vision is not progressive compatible a progressive scan picture is not available Connect the Video Output or S Video Output connector see p 12 13 and set PROGRESSIVE OUT to OFF in the DVD Main Menu See p 55 Rear View of DECK AC Power Plug While plugged into an AC outlet this DECK consumes 0 9 W of electrical power in off mode S Video Out Connector DVD Only pp 10 13 Component Video Output Connector...

Page 11: ... output selection is DVD mode Light up Indicators Timer Indicator Lights up when DECK is set for Timer Recording or when One Touch Recording OTR is used Flashes when Timer Recording is set but a tape has not been inserted into DECK and when a power interruption occurs during Timer Programming VCR REC Indicator Lights up during recording Flashes in Rec Pause mode PLAY Indicator Lights during playba...

Page 12: ...N R L TV AV CABLE not supplied 2 Connect DECK to TV with RF Coaxial Cable RF COAXIAL CABLE supplied a b DSS Receiver OUT IN IN Note to CABLE system installer This reminder is provided to call the CABLE system installer s attention to Article 820 40 of the NEC in USA and to the Canadian Electrical Code in Canada that provides guidelines for proper grounding and in particular specifies that the cabl...

Page 13: ...ying higher picture quality Other Connections With a Cable Box DECK Cable Box TV You can watch DVDs through the S VIDEO or COMPONENT VIDEO VHF UHF OUT TO TV and VIDEO OUT connections to your TV The VCR and TUNER pictures are available only from the VIDEO OUT and VHF UHF OUT TO TV connections to your TV PROG functions on the remote are not available when using S VIDEO OUT and COMPONENT Video Output...

Page 14: ... 44 1 kHz 16 bit DVDs are recorded in 48 kHz 16 bit up to 96 kHz 24 bit If you have a Dolby Pro Logic Surround decoder you will obtain the full benefit of Pro Logic from the same DVD movies that provide full 5 1 channel Dolby Digital soundtracks as well as from titles with the Dolby Surround mark For information on Panasonic or Technics Dolby Pro Logic Surround Sound Decoders please contact your l...

Page 15: ...ts in Settings for DVD Operation Audio Output see p 53 Otherwise any attempt to play DVDs may cause such a high level of noise that it may be harmful to your ears and damage your speakers When a Dolby Digital DTS decoder is connected please select Bitstream at dts or Dolby Digital in Settings for DVD Operation Audio Output If PCM is selected there will be stereo sound See p 53 Video CDs and CDs ca...

Page 16: ... AC wall outlet DECK comes on and auto channel and clock set starts If screen below does not appear check DECK TV connection and if TV is tuned to channel 3 try switching it to channel 4 To change VCR s output channel please see VCR s Output Channel on page 19 Plug VCR Power plug into an AC wall outlet Initial Setup Ready to Play 2 1 Function buttons are void during Initial Setup To eject a tape d...

Page 17: ...this screen appears If AUTO CLOCK SET IS INCOMPLETE appears manually set clock below 3 If Auto Clock Set was incomplete Press ACTION on remote to display CLOCK screen Press to select the month and SET to set In the same manner select and set the date year time and DST Daylight Saving Time Press ACTION to start clock and exit Manual Clock Set 1 2 3 VCR ACTION SET SELECT EJECT STOP EJECT ...

Page 18: ... SET to set your antenna system TV or CABLE After Channel Auto Set is finished Auto Clock Set will be performed 1 2 Press ACTION to display MENU 3 Press ACTION to exit 1 Press to select SET UP CHANNEL and press SET 1 Press to select SET CLOCK and press SET PROGRAM functions are not available when using COMPONENT Video Output and S VIDEO OUT Please set TV to either RF INPUT or VIDEO INPUT and then ...

Page 19: ...n on the remote and try the button again Only when Auto Clock is set 3 Press ACTION TIME ZONE ADJUST returns to 0 if clock is set manually VCR s Output Channel VCR ACTION SET SELECT POWER NUMBER keys ADD DLT CH 2 Press to select TIME ZONE ADJUST and press SET to subtract or add hour s as necessary Add or Delete a Channel DECK auto adjusts clock for DST p 17 Spring First Sunday in April DST ON Sets...

Page 20: ...each additional press of FF SLOW or REW SLOW changes speed as shown below SP Approx 5 Approx 7 SLP Approx 11 Approx 21 Picture interruption may occur with some TVs FF and REW search speed may vary depending on current tape position After 10 minutes in search mode VCR returns to Play mode to protect the tape and the video heads 3 Press REW SLOW or FF SLOW in Stop mode to rewind or fast forward a ta...

Page 21: ...ng labels from tapes to prevent tape jam Light up Indicators Record using DECK buttons 4 Press REC to start recording Press STOP EJECT to stop This video recorder equipped with HQ High Quality system is compatible with existing VHS equipment Only use tapes with the mark Only tapes tested and inspected for use in 2 4 6 and 8 hour machines are recommended One Touch Recording recording in progress pr...

Page 22: ...mode The DVD mode Light up Indicator lights on DECK If a disc is already inserted go to step 3 Depending on the disc playback may start automatically 1 Press OPEN CLOSE and then place a disc into the disc tray 2 Hold disc by its edges only p 6 with printed side up and use guides to place into tray Use 8 cm 3 or 12 cm 5 disc DVD RAM see p 42 To return to menu play stops Press TITLE MENU or RETURN D...

Page 23: ...ation is prohibited by DECK or the disc DECK memorizes the point where STOP is pressed STOP is flashing on screen Press PLAY to resume play from this point Pressing STOP again or opening the tray cancels RESUME however RESUME is not canceled when power is turned off and on RESUME works only with discs for which elapsed play time is displayed during play When a DVD RAM still picture is played back ...

Page 24: ...VCR mode Press VCR The VCR mode Light up Indicator lights on DECK Sufficient tape remaining for recording time When timer is set the TIMER Light up Indicator lights on DECK When timer recording starts the VCR REC Light up Indicator lights on DECK You can set Timer Recording with the power on or off TIMER REC WILL START SOON appears on screen for 2 minutes before Timer Recording starts If DECK is i...

Page 25: ... Timer Recording must be set to the Cable Box input channel and Cable Box must be manually set to the desired channel Cable Box power must be left on 2 minutes before Timer Recording is performed PLEASE PREPARE FOR TIMER REC appears and TIMER Light up Indicator flashes Be sure a cassette with record tab is loaded and DECK is in Stop mode If a power interruption occurs while programming the timer t...

Page 26: ...sly Select STEREO or SAP audio mode The following are possible audio broadcast types and on screen displays The signal being received is indicated with a mark while the selected audio mode is indicated with an arrow Receivable Broadcast Types MTS Broadcast VHS Hi Fi Stereo System Equipped with TV Noise Reduction for true MTS reproduction TV Noise Reduction is required for good stereo separation an...

Page 27: ...ernal stereo amplifier and speakers See pp 12 14 If tracking is adjusted during playback Hi Fi audio may revert to normal audio Hi Fi and normal audio playback volume level may differ Arrow indicates selection Refer to Receivable Broadcast Types on p 26 Arrow indicates selection Select HIFI L R or HIFI L or HIFI R to listen to stereo recordings in stereo sound Select NORMAL for monaural sound Disp...

Page 28: ...tional codes for the products listed If your product is not listed then the remote is not compatible with that product 2 Mode Unit DVD VCR TV DVD VCR TV All POWER INPUT NUMBER keys ENTER CH VOL EJECT OPEN CLOSE DISPLAY PLAY STOP FF SLOW REW SLOW VCR TV PAUSE STILL SKIP AUDIO CM ZERO SPEED REC TAPE POSITION PAGE COUNTER RESET Press VCR DVD or TV on the remote Table below shows available remote butt...

Page 29: ...d Some Televisions require you to turn on the power manually Panasonic 01 02 Quasar 01 02 RCA 03 GE 03 Zenith 04 Magnavox 05 Sylvania 05 Sharp 06 07 Sony 08 TV Brand Code Numbers Important Notes VCR POWER ENTER NUMBER keys TV DVD Toshiba 09 Sanyo 10 Fisher 10 JVC 11 Hitachi 12 Mitsubishi 07 13 Samsung 14 Gold Star 15 16 17 ...

Page 30: ...e number see below Press FF SLOW or REW SLOW on the remote to start search Play begins at search end To search forward or back 1 index press FF SLOW or REW SLOW on the remote while screen at left is displayed 10 sec To cancel press PLAY or STOP NOTE indicates start points of each recording Zero Search To quickly return to a specified tape location Continue to record playback etc Press STOP DECK wi...

Page 31: ... in DVD mode see page 47 Auto Operation Functions Play Auto Eject Repeat Play must be off Play Tape end Rewind Stop Tape ejects If there is no record tab or some timer programs are set Tape end Rewind Stop REW SLOW FF SLOW PLAY STOP NUMBER keys SET SELECT ACTION SEARCH DISPLAY COUNTER RESET CM ZERO Important If a remote control button does not work when pressed press the VCR button on the remote a...

Page 32: ...over 180 minutes or incompatible tapes are used If the correct tape length is not selected See Tape Select section above Tape Select Select your tape length so the tape position and amount of tape remaining are properly displayed See Tape Position Display section below 3 2 1 Press ACTION to display MENU Press to select SET UP VCR and press SET Press ACTION to return to normal screen 4 Press to sel...

Page 33: ... Press ACTION to return to normal screen 4 3 2 Press to select SET UP CHANNEL and press SET Press to select WEAK SIGNAL DISPLAY and press SET to set ON or OFF 1 Press ACTION to display MENU Auto Shut Off Feature The power shuts off at a preset time 3 1 4 Press to select AUTO SHUT OFF Press SET repeatedly to change shut off time as shown below Press ACTION to return to normal screen Press ACTION to...

Page 34: ... mode For more on VCR TV selection see Record one station watch another and Select channels on DECK sections see p 21 2 Press to select SET UP VCR and press SET When set to ON all operations are prohibited Except for timer record tape eject channel change and power on off Useful for households with small children VCR LOCK ACTIVATED VCR LOCK OFF VCR Lock cancels in 24 hours To turn on hold down REC...

Page 35: ...set to OFF press VCR TV on the remote for VCR mode Dubbing tapes protected with Copy Guard will result in poor quality recordings Connection Press STOP to stop dubbing Press PLAY then PAUSE immediately to enter PLAY PAUSE mode Connect VIDEO OUT terminal on Playing VCR to VIDEO IN terminal on DECK To monitor the dubbing also connect TV as shown Connect L and R AUDIO OUT terminals on Playing VCR to ...

Page 36: ...is not offered on the disc When disc is removed subtitles revert to initial setting language If the initial language is not recorded on the disc the disc s priority language will appear With DVD RAM the subtitle can only be set to ON OFF The subtitle language cannot be selected Subtitles may not change to the selected language immediately Subtitle language being played back see chart right You can...

Page 37: ...yed back You can enlarge specific portions of a picture and select the zoom ratio using the ZOOM button during DVD playback Press ZOOM repeatedly to change display as follows Picture Zoom DVD only You can enlarge the center portion of the image to one of 2 magnifications Use the and buttons to move the position up down left and right This function not available with DVD RAM The subtitle cannot be ...

Page 38: ...Press to select PROGRAM PLAY and press SET to display 5 Press to select START and press SET to start play of programs in the sequence selected To cancel press STOP during play then press CLEAR 4 Press to select a track number Track numbers on disc are displayed and press SET Repeat step 4 to select another track The selected track is added on the right side Disc Operation continued CLEAR ACTION SE...

Page 39: ...oves to REPEAT To cancel select REPEAT OFF in step 5 then press SET Up to 16 tracks can be programmed or depending on disc indicates additional PROGRAM PLAY screen Press for next or previous screen To clear the last programmed track Press to move to CLEAR LAST and press SET Pressing CLEAR also clears To clear all programs Press to move to CLEAR ALL and press SET Programs are also cleared when the ...

Page 40: ... MENU 1 Disc Operation continued Press to select PLAY MODE and press SET to display 2 Press to select RANDOM PLAY and press SET to begin random play To cancel press STOP during play then press CLEAR 3 DECK is in DVD mode press DVD MENU STOP PLAY NUMBER keys TITLE CLEAR ACTION SET SELECT ReadyChecklist ...

Page 41: ...de to display DVD MENU Press or NUMBER keys to select an item and press SET or PLAY to perform DVD Menu DVD only 2 Press or NUMBER keys to select a title and press SET or PLAY to start playing Pressing SET or PLAY is not necessary when using NUMBER keys Example Example Example Example Repeat step 2 if there is more than one menu Pressing SET or PLAY is not necessary when using NUMBER keys Cats Sam...

Page 42: ... used Direct Navigator Pressing SET or PLAY is not necessary when using NUMBER keys Program No Titles Recording time length Recording time and date Page No Using NUMBER keys starts playing automatically The number of available titles varies with each disc 3 Press D NAVI to clear Direct navigator menu Example 1 Do steps 1 3 on page 22 2 Press D NAVI or PLAY LIST to display Direct Navigator or Play ...

Page 43: ...avigator and Play List cannot be changed using this DECK With Direct Navigator up to 99 programs can be displayed With Play List up to 99 titles 999 scenes can be displayed While DVD MAIN MENU is displayed Direct Navigator and Play List display will not appear even if TITLE or MENU is pressed When appears on the screen while a button is being operated it means that the corresponding operation is p...

Page 44: ...ct number For more details refer to the disc operation information To return to normal screen press DISPLAY repeatedly Selected Disc information Selected DECK information Normal Screen See pp 45 46 See pp 47 48 DISPLAY button does not function while main menu of DVD title menu of DVD Direct Navigator or Play List is displayed NUMBER keys SET SELECT DISPLAY When DISPLAY button is pressed during pla...

Page 45: ...ayed The type of disc currently inserted is displayed 5 Operating mode The current operation is displayed 1 2 3 4 5 Disc information screen for Video CD CD A TRACK No Go directly to a preset track number Select TRACK and press SET Change the No by pressing or NUMBER keys and press SET B Elapsed playing time When disc information screen is displayed it is not possible to enter an elapsed playing ti...

Page 46: ...ing with seconds If the time entered is not on the disc the entry will have no effect Re enter the correct time e g press 0 1 2 3 4 5 SET for 01 23 45 press 3 0 SET for 00 00 30 This function does not work with some discs 3 Disc currently being played The type of disc currently inserted is displayed 4 Operating mode The current operation is displayed 1 2 Direct Navigation PROGRAM PLAY LIST When ap...

Page 47: ... when pressed press the DVD button on the remote and try the button again Note Repeat Play mode DVD Video CHAPTER TITLE OFF NORMAL DVD RAM PROGRAM PROGRAM DISC OFF NORMAL PLAYLIST PLAY LIST ALL PLAY LISTS OFF NORMAL OFF NORMAL Video CD CD TRACK DISC a Repeat Play mode see p 48 Repeat play mode can be selected Select REPEAT and press SET Change the desired mode during play by pressing and press SET...

Page 48: ...Screen Displays continued CHAPTER TITLE REPEAT PLAY DVD Video Important If a remote control button does not work when pressed press the DVD button on the remote and try the button again PROGRAM DISC REPEAT PLAY DVD RAM PROGRAM PLAY LIST ALL PLAY LIST REPEAT PLAY DVD RAM PLAY LIST OPEN CLOSE POWER FF PAUSE STOP PLAY NUMBER keys ACTION SET SELECT REW TRACK DISC REPEAT PLAY Video CD CD Repeat Play mo...

Page 49: ...ng STOP mode Press SET or PLAY to start playback a b c d Press STOP to stop play Do steps 1 3 at left NORMAL All MP3 files are selected and played back one time only SINGLE REPEAT The selected MP3 file is played back repeatedly FOLDER REPEAT The MP3 files contained in the selected folder are played back repeatedly However folders below the selected folder are not played back DISC REPEAT All MP3 fi...

Page 50: ...PEG Playback Cancel slide show Press STOP to return the MP3 JPEG MENU See p 49 Still picture Press STILL only SLIDE Press PLAY to release Forward Reverse File Skip Press SKIP or SKIP Each press skips a file Example Operation can be done when files are in order such as in the diagram below Some JPEG format may not be played back Press STOP to return to the MP3 JPEG MENU PLAY MODE NORMAL All JPEG fi...

Page 51: ...ft and right Position cannot be changed on 1 0 ORIGINAL images JPEG Zoom JPEG Rotation During JPEG Playback Set rotation Press ANGLE repeatedly to change display as below Press STOP to return the MP3 JPEG MENU During JPEG Playback You can rotate a JPEG picture using the ANGLE button on the remote during JPEG Playback screen The JPEG picture will be rotated 90 clockwise 2nd press 3rd press Operatio...

Page 52: ...ally DVDs each time 1 If the selected language is not offered the original disc language is selected 1 2 Press ACTION to display DVD MAIN MENU Press to select an item and press SET DISC LANGUAGES See below All languages offered on the disc can be set If a language not offered is set the original disc language will be selected AUDIO OUTPUT See p 53 You can set the audio output that comes from the d...

Page 53: ...utput See below Press to select AUDIO OUTPUT and press SET to display screen 1 3 2 Recommended setting LPCM DVD PCM PCM PCM Dolby Digital PCM 1 Bitstream Bitstream 2 DTS PCM 1 PCM Bitstream 2 No amplifier is connected AV amplifier with digital audio input connector without Dolby Digital DTS decoder AV amplifier including Dolby Digital decoder AV amplifier including Dolby Digital DTS decoder Type o...

Page 54: ...mode See below 2 4 3 Pan Scan Factory preset Wide screen video data is played in Pan Scan style left and right of screen is trimmed Video data not formatted in Pan Scan will play in letterbox style 4 3 Letterbox Wide screen video data is played in Letterbox style top and bottom of screen has black margin 16 9 Set 16 9 when using Wide screen TV Set the screen display style for wide screen video mat...

Page 55: ...O OFF IF THERE ARE QUESTIONS REGARDING YOUR TV SET COMPATIBILITY WITH THIS MODEL 525p DVD VCR DECK PLEASE CONTACT OUR CUSTOMER SERVICE CENTER A V OPTIMIZER Press A V OPTIMIZER in Play mode to display the A V OPTIMIZER selection on screen 1 You can set to preset audio video effects as desired SET ACTION SELECT A V OPTIMIZER 2 Press A V OPTIMIZER to select the desired mode below Display disappears a...

Page 56: ... Irish 7384 Italian 7465 Japanese 7487 Javanese 7578 Kannada 7583 Kashmiri 7575 Kazakh 7589 Kirghiz 7579 Korean 7585 Kurdish 7679 Laotian 7665 Latin 7686 Latvian Lettish Code Language 7678 Lingala 7684 Lithuanian 7775 Macedonian 7771 Malagasy 7783 Malay 7776 Malayalam 7784 Maltese 7773 Maori 7782 Marathi 7779 Moldavian 7778 Mongolian 7865 Nauru 7869 Nepali 7879 Norwegian 7982 Oriya 8083 Pashto Pus...

Page 57: ...CRATCHES ON DISC TO CANCEL TIMER REC HOLD DOWN STOP KEY FOR APPROX 3 SEC 6 20 21 25 4 6 THIS TYPE OF DISC CANNOT BE PLAYED PLEASE INSERT A DIFFERENT DISC 3 6 CANNOT PLAY THIS FILE 49 If you press REC on the remote control or DECK and a cassette is inserted with no record tab If you press PLAY FF REW or REC on the remote control or DECK without a cassette inserted If you press STOP or POWER during ...

Page 58: ...to channel to be recorded Set recording start stop times correctly p 24 Timer recording may not be performed or continued if a power interruption occurs before or during a Timer Recording even after power is restored Timer recording cannot be performed Select channel 3 or 4 on TV to match VCR output channel 3 or 4 p 16 or select LINE Set VCR TV selector to VCR Adjust TRACKING control in either dir...

Page 59: ...language cannot be selected This function is dependent on software availability Even if disc has multiple angles they may be recorded for specific scenes only p 37 Angle cannot be changed Miscellaneous Solution Programs cannot be viewed on TV Make sure TV is tuned to VCR s output channel 3 or 4 Check connections between DECK external antenna and TV Set VCR TV selector to TV p 21 Make sure proper s...

Page 60: ... INPUT button 8 35 L Light up Indicators 11 Location of Controls Remote DECK 8 10 M Multi Brand Control 28 29 O On Screen Displays VCR 11 One Touch Recording 21 P PLAY button Playback a Tape 8 20 POWER button 8 PROG button PROGRAM 8 24 Program Clear Review Replace 25 Q Quality Picture 4 R REC button Record on a Tape 8 21 Record Tab 6 Remote Sensor 9 Repeat Play 31 Reset All Memory Functions 9 REWI...

Page 61: ...U button To display DVD Menu 8 41 MP3 49 Multiple Angle Viewing 37 O OPEN CLOSE button 8 22 Optical Digital Audio Output 10 15 P PLAY button Play a Disc 8 22 Play List 43 Program Play For Video CD CD 38 Progressive Scan 10 13 55 R Random Play For Video CD CD 40 Repeat Play 47 48 Resume Function 23 RETURN button 8 22 Rotation 51 S SKIP l or SKIP l button Forward Reverse Chapter Track 8 23 Slide sho...

Page 62: ...62 Memo ...

Page 63: ...63 For Information Memo ...

Page 64: ...ucus NJ 07094 201 348 7196 WESTERN ZONE including Southwest 3330 Cahuenga Blvd W Los Angeles CA 90068 323 436 3608 Government Sales 201 348 5300 Eastern U S 323 436 3608 Western U S Panasonic Canada Inc 5770 Ambler Drive Mississauga Ontario L4W 2T3 905 624 5010 Panasonic Sales Company Division of Panasonic Puerto Rico Inc Ave 65 de infantería Km 9 5 San Gabriel Industrial Park Carolina PR 00985 78...

Reviews: