background image

HDD playback

19

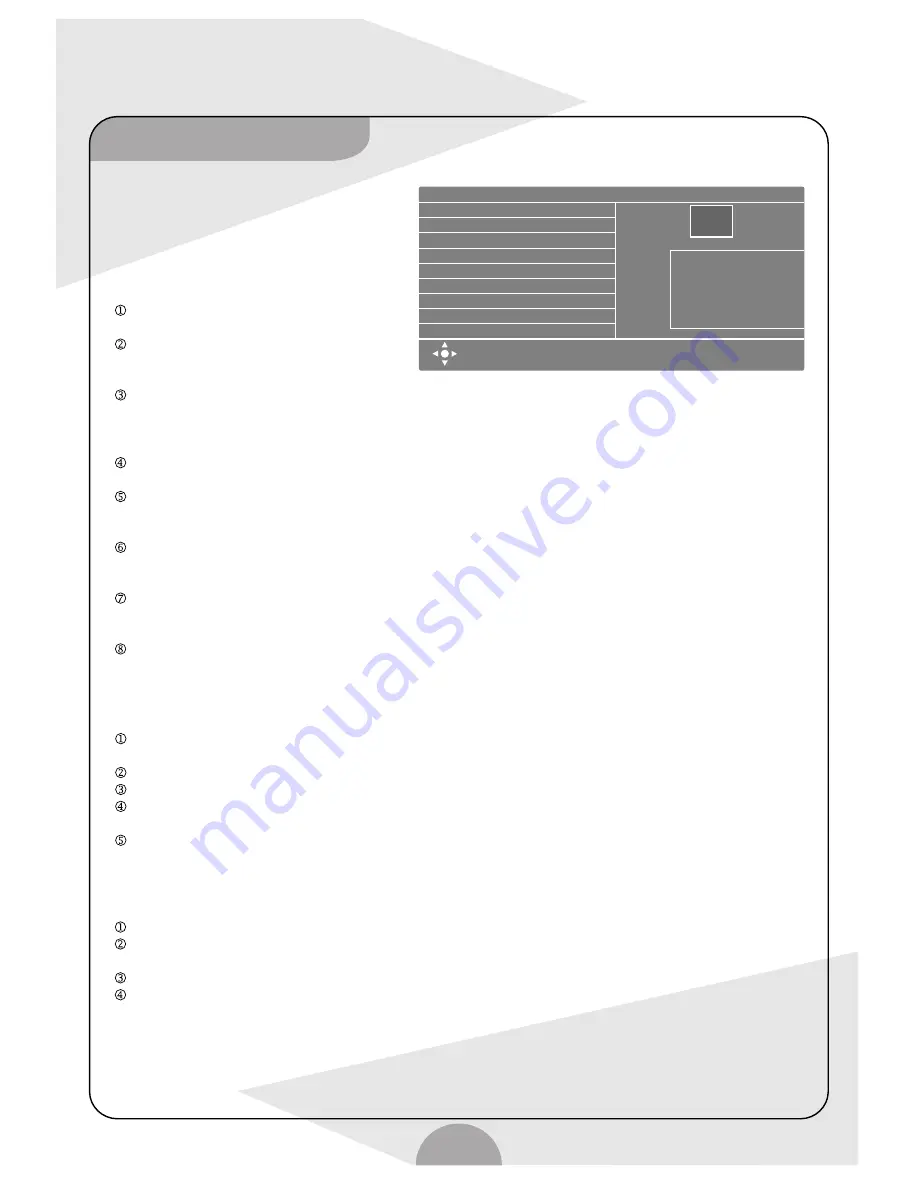
Press "HDD/DUB" key after power on to enter
HDD menu, move cursor to select desired title
and press "ENTER" key to play.
Other playback function:
After entering HDD menu, press direction
"Right" and the system will show the function
menu:
    Select "Play" and press "ENTER" key to
play selected title;
    Select "Delete" and press "ENTER" key to
delete the selected title from HDD.
Note: the title deleted from HDD can't be recovered.
    Select "Split" is to divide a title into 2 or even more
titles, operation as follows: move cursor to "Split", press "ENTER" key to enter title playback and wait until
the time point that needs to divide, press "ENTER" key and wait for seconds the time point will be divided.
Then the system will return to HDD menu, and you can find there's one more title that is divided out.
    Select "Segment" is to insert a chapter mark into selected title. When playing title that needs to be marked,
each press of "ENTER" key will have one chapter segment inserted.
    Change index picture: each title have a picture displayed on the upper right of the HDD menu. Through this
setup you can change the index picture, when the playing title goes to the picture that needs change,
press "ENTER" key to make it.
    Rename: the system gives each title a title name, through this setup, user can change the name to a familiar
one. Move cursor to "Rename", press "ENTER" key and rename menu composed of letters and figures etc will
display on TV screen, move cursor to desired letter or figure by direction key, press "ENTER" to make it.
    Lock: is to lock selected title, means when you want to play the title, you have to input code, when you need
other operation. e.g. delete divide etc.
Note: super code: 8806.
    Protect: is to prevent the selected title from being deleted. Split or segment.

How to copy the content of USB to the disc?

    When the unit is working, plug the USB flash or card-reader with memory card into the USB jack
in the front panel.
    Press "DV/USB" key to switch the operation mode to USB playback mode.
    Press "EDIT" key, the system will indicate to enter USB to DVD back up mode.
    Move cursor to select the file that needs copy. Press "ADD/CLEAR" key and the system will send
selected file to selected file list.
     After select the files, press "RECORD" key to start copy.
Note: The disc used to copy must be blank recordable disc or recordable disc recorded with similar files.
Recordable disc with different type of files can not used to copy.

How to copy the content of HDD to disc?

    When the unit is working, load a blank recordable disc, press "HDD/DUB" key to enter HDD menu.
    Move direction key to select title that needs copy, press "ADD/CLEAR" key, and system will display the title,
disc capacity it would take and how many titles you can select at the same time on the up side of HDD menu.
    After selection, press "HDD/DUB" key to start copy.
    During the process of copy, system enter AUX in playback mode.
Note: If the disc contains files of other mode or type, it can not used to copy.

Press Add/Clear key to Select

Program(s)

Press Dub key to copy selected

Program(s) to DVD

Press Sort key to sort Program

by name, date or time.

Play

Delete

Split

Segment

Rename

Lock

Protect

No.       CH          Date          Time    Title

001     CH007    01/01/01     17:02    Title 1

002

003

004

005

006

007

008

For other options Press DVD, TV/VIDEO, USB, SETUP or TIMER

keys.

A

HDD

Summary of Contents for DVDR160G

Page 1: ...ease read this manual before installation and operation PALSONIC CORPORATION PTY LTD 1 JOYNTON AVENUE WATERLOO NSW 2017 AUSTRALIA TEL 02 9313 7111 FAX 02 9313 7555 www palsonic com au PALSONIC CUSTOME...

Page 2: ...laser beams used in this unit and CLASS 1 refers to laser beams of the weaker class There is no danger of hazardous radiation outside this unit Double insulation This is class II apparatus Please disc...

Page 3: ...void injury from tip over Unplug this apparatus during lightning storms or when unused for long periods of time Refer all servicing to qualified service personnel Servicing is required when the appara...

Page 4: ...onditions lightning rainstorm unused for a long time Maintain 1 2 3 4 5 6 Do not repair the unit yourself Opening or removing the cover may expose you to dangerous voltage or other hazards Refer all s...

Page 5: ...order DVB DVD recorder Remote Chapter 3 Basic playback Chapter 4 Menu setup Setup Recording Setup Video Setup Audio Setup Language Setup Date Time Setup Preferences Setup menu Time Shift Chapter 5 Bas...

Page 6: ...udio mode 15 Disc lock function prevent from deleting or recording by mistake 16 Disc compatibility processing make recorded DVD R RW disc to be played in other DVD players easily 17 Built in Multi di...

Page 7: ...S Video output S Video input 5 1 channels surround audio Antenna Output AUDIO input Rear panel L Power ON OFF STANDBY Open Close Receiver window Channel up Channel down Source Disc tray LED display i...

Page 8: ...than one video inputs you may choose either one to connect Make sure you have properly connected the video and audio ports and switch the TV channel to the same input e g AV1 AV2 etc HDMI jack contain...

Page 9: ...mplifier connect the player s audio out L left and R right to the stereo amplifier s audio input left and right To connect a 5 1 channel amplifier connect the player s 5 1 channel audio outputs to the...

Page 10: ...er Note 1 If you want to record DV or USB contents you can use front jacks those jacks are on the right side of the front panel 2 The excellent image quality if you hold DV you can connect it to the u...

Page 11: ...power before connecting VCR or RF modulator Antenna Aerial cable TV Set Notes 1 This is a suggested connections for your reference only The actual connection should be base on your own needs and your...

Page 12: ...ift SUBTITLE AUDIO NUMBER KEY ENTER RETURN TIMER STOP PAUSE PLAY PREV NEXT VOLUME RECORD CHANNEL REVERSE REPEAT A B FUNC VIDEO OUTPUT MODE PIP ZOOM SETUP STANDBY ADD CLEAR SOURCE DV USB HDD DUB EDIT F...

Page 13: ...ck press number key 1 and 8 then press ENTER Note when playing VCD or SVCD you can only select by number keys in PCB OFF mode SETUP System setup key Enter system setup mode SOURCE To select source of...

Page 14: ...yback by repeat key REVERSE To play backwards in slow motion This function refers to S VCD DVD disc only SLOW SORT To play forwards in slow motion sort This function refers to SVCD DVD disc only A B s...

Page 15: ...playback The full name is Time Shift This function has the AUX in signal recorded in the HDD so that you can control the playback speed by pressing keys like F FWD F REW PAUSE etc The recorded signal...

Page 16: ...ack What is PBC There are controllable signals in VCD and SVCD The disc holds PBC signal would show its information on the TV screen as menu which makes it easy to choose the contents MP3 MP3 MPEG1 AU...

Page 17: ...n which the picture displays on the TV screen DIVX XVID refer to the latest video compressed standard which can recover a very low bit rate digital stream into high quality video this kind of format c...

Page 18: ...f use wireless antenna to search for TV channels Select Wired cable if use wired TV to search for TV channels 5 Fine Tuning This option can only be set while watching TV When watching TV enter into Fi...

Page 19: ...tomatically 4 3PS when the unit is connected to normal TV set while playing wide screen films there will be a black area in top and bottom 16 9WS choose this option when the unit is connected with a w...

Page 20: ...l output from unit Downmix ON when playing disks with 5 1 channels the left speaker will output sound of left channel and partial sound of centre and surround channels the right speaker will output so...

Page 21: ...as no optional audio language this option will not work SETUP MENU LANGUAGE Set up date time Manual you can set the time and date as the exact time of your local place by hand Auto The earth is divide...

Page 22: ...stem will reset all setup items to the default values OK to confirm Cancel to exit Parental Level Change Password Factory Defaults Screen saver SCART Output ON OFF YCbCr RGB OK OK NO PARENTAL 1 G 2 3...

Page 23: ...to select recording sources are listed as below 6 If TV program is selected press CHANNEL or number keys to select the program you need to record 7 After selected recording source press RECORD to star...

Page 24: ...means when you want to play the title you have to input code when you need other operation e g delete divide etc Note super code 8806 Protect is to prevent the selected title from being deleted Split...

Page 25: ...ct Overwrite disc press ENTER to enter recording preparing mode select the source to record from press RECORD to record new contents Lock disc This function is to protect disc from being deleted its r...

Page 26: ...o an independent chapter by edit function then when playing the chapters after edit select the title that needs to be hidden press EDIT key to select hide chapter press ENTER key to confirm press EDIT...

Page 27: ...tically Mon Fri record in the scheduled time from Monday to Friday automatically Mon Sat record in the scheduled time from Monday to Saturday automatically Weekend record in the scheduled time on week...

Page 28: ...re COPY to copy the file Move cursor to COPY and press ENTER key OSD will show the menu Select HDD to copy file to HDD Select DISC to copy file to disc Select USB to copy file to USB After select the...

Page 29: ...to other VCR After recorded cassette video tape no signal shows when playing in DVD recorder Why Check if cable is fastened securely If the input video signal is very weak or do not match correlative...

Page 30: ...sc There may be moisture condensation inside the player Remove the disc and leave the unit power on for one or two hours No Picture Check if the TV set has power on use TV remote to select A V signal...

Page 31: ...I x 1 VGA x 1 S video x 1 Component Video YCbCr YPbPr x 1 Composite video audio x1 5 1 channel output x 1 Digital Audio Coaxial output x 1 Digital Audio Optical output x1 Input Terminals Antenna in x...

Page 32: ...PALSONIC CORPORATION PTY LTD 1 JOYNTON AVENUE WATERLOO NSW 2017 AUSTRALIA TEL 02 9313 7111 FAX 02 9313 7555 www palsonic com au PALSONIC CUSTOMER SERVICE TELEPHONE AUSTRALIA 1300 657 888...

Reviews: