62
PA-5400 SERIES NEXT-GEN FIREWALL HARDWARE REFERENCE | Service the PA-5400 Series Firewall
Hardware
©
2021 Palo Alto Networks, Inc.
end into one of the ESD ports located on the back of the appliance before handling ESD
sensitive hardware. For details on the ESD port location, see
.
STEP 2 |
Locate the failed power supply by viewing the system logs or by viewing the LED on the front
of the power supply. A red LED indicates a failed power supply. For details on the power
supply LEDs, see
Interpret the PA-5400 Series Firewall Power Supply LEDs
.
STEP 3 |
Shut off power to the failed power supply.
(
AC only
) Unplug and remove the power cord (leaving the cord in place can cause arcing inside the
appliance).
(
DC only
) Power off the DC power source that is connected to the failed DC power supply.
STEP 4 |
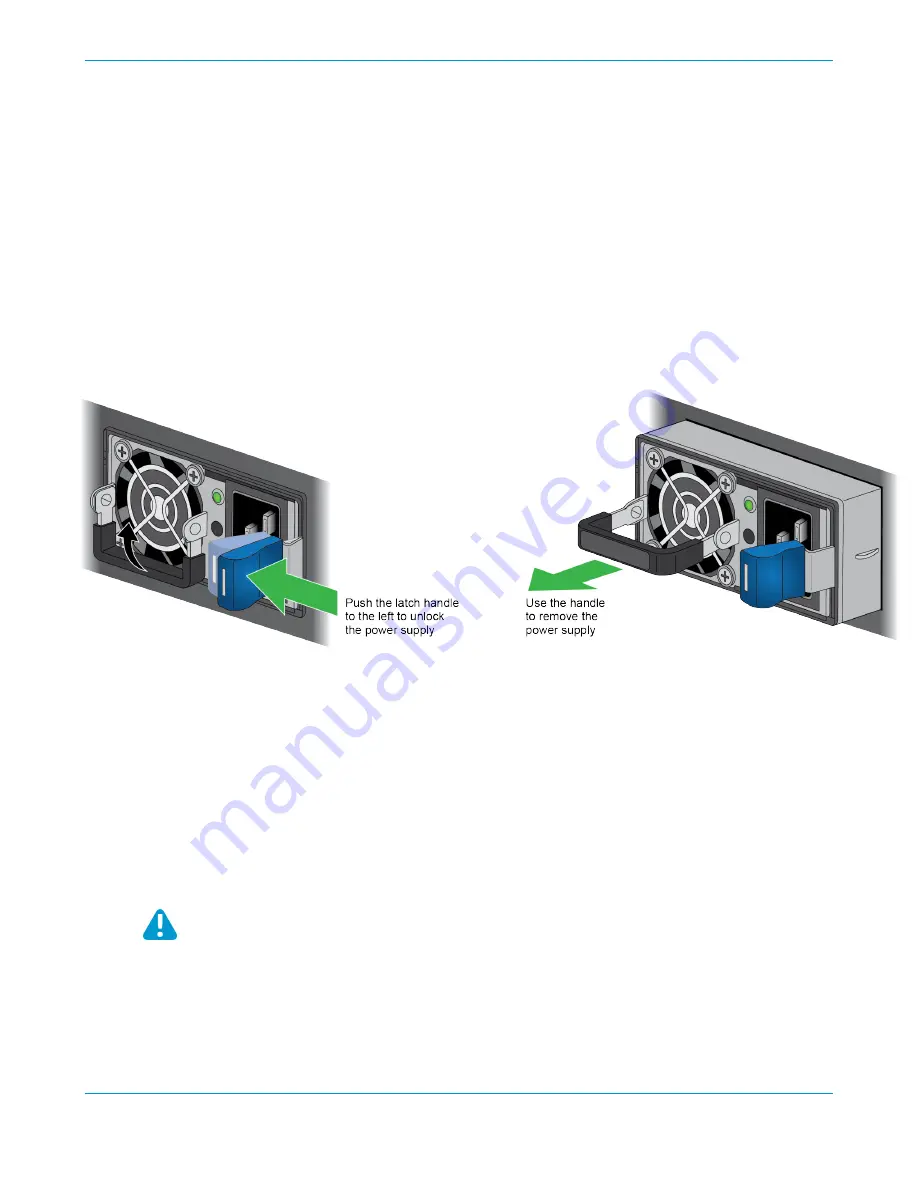
Facing the rear side of the appliance, push the power supply latch handle to the left to
disengage the latch from the appliance. With the latch still pushed to the left, pull on the metal
handle to slide the power supply out.
STEP 5 |
Remove the replacement power supply from the packaging.
STEP 6 |
Slide the new power supply into the empty power supply slot until you hear the latch click into
place. Pull on the metal handle to ensure that the power supply latch is fully engaged and the
power supply is locked into the appliance.
STEP 7 |
Turn on power to the new power supply.
(
AC only
) Plug the power cable into the corresponding AC power module on the back of the appliance.
The new power supply turns on and the LED will turn green.
(
DC only
) Insert the DC power cable back into the power supply ensuring that the notches line up
correctly. The plastic clips on each side of the connector will clip into place as you seat the cable.
When cabling the DC power supply to your power source, ensure that you route the cable
in such a way that it does not put pressure on the plastic clips located at the front of the
power supply. It is best to route and secure the cable first and then plug the cable into the
power supply.


