background image

5

Palmgren Operating Manual & Parts List

80329

OPERATION

Refer to Figures 4, 5 and 6.

WARNING:

Read and understand operating instructions and

parts manual before operating this machine.

CAUTION:

The operation of any power tool can result in foreign

objects being thrown into the eyes, which can result in severe eye
damage. Always wear safety glasses complying with United States
ANSI Z87.1 (shown on package) before commencing power tool
operation.

SPEED ADJUSTMENTS

Refer to Figures 4 and 6.

WARNING:

Be sure drill press is turned off and is disconnected

from power source before adjusting speeds.

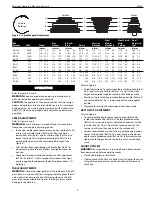
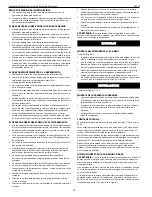
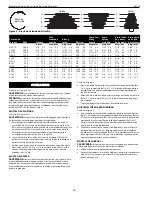
To change spindle speed, loosen motor tension rod (Ref. No. 49)
and set screw of idler pulley (Ref. No. 46). Pivot the motor
toward front of drill press and twist idler pulley (Ref. No. 5) to
loosen front belt. This will permit relocating the belts to the
desired pulley groove for the required spindle speed (See
Figure 4).

After belt has been repositioned, pull handle (Ref. No. 56) to
move motor toward rear of drill press and tighten motor ten-
sion rod.

Check belt for proper tension and make any final adjustment
(Ref. Nos. 50 and 51). A belt is properly tensioned when light
pressure applied to midpoint of the belt produces about 1/2”
deflection.

TABLE ADJUSTMENTS
WARNING:

Change the radial position of the table only if the drill

press base is secured to the floor. Swinging the table about the col-
umn without the base secured to the floor could cause the drill
press to become unstable and tip over resulting in injury and/or
damage to the machine.

Refer to Figure 5.

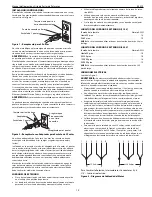
Height adjustments: To adjust table, loosen locking handle (Ref.
No. 3) and turn crank handle (Ref. Nos. 12 and 13) to desired
height. Immediately retighten table bracket locking handle.

Rotation of work table : Loosen table locking handle (Ref. No. 3)
and rotate table (Ref. No. 1) to desired position and retighten
handle.

Clamp table securely after adjustments have been made.

DEPTH STOP ADJUSTMENT

Refer to Figure 6.

To control drilling depth, loosen locking knob (Ref. No. 36)
inside feed handle hub (Ref. No 37). Rotate graduated collar
(Ref. No. 38) so desired depth is indicated on collar next to the
indicator line (ref. No. 41). Tighten the locking knob. Use this
feature to drill more than one hole to the same depth.

Spindle can be locked in either fully or partially down position.
Loosen locking knob (Ref. No. 36). Lower chuck to the desired
depth, rotate graduated collar (Ref. No. 38) fully clockwise and
tighten the locking knob. Use this feature to set up and align
work.

MOUNT DRILL BIT
WARNING:

Be sure drill press is turned off and is disconnected

from power source before adjusting speeds.

Place drill bit in jaws of drill chuck.

Tighten chuck with drill chuck key. Be sure to tighten the chuck
using all three key positions on the chuck body and remove
chuck key.

Spindle
Rotation

Spindle

Motor

Figure 4 – Spindle Speed Adjustment

D

C

B

A

Z

Y

X

W

4

3

2

1

D4-1W
C3-1W
B2-1W
D4-2X
C3-2X
D4-3Y
B2-3Y
A1-2X
C3-4Z
B2-4Z
A1-3Y
A1-4Z

2600
2060
1540
1220

965
715
420
415
320
240
235
140

in/mm

3/8

9.5

5/8

15.9

7/8

22.2

7/8

22.2

7/8

22.2

1

25.4

1

1

4

31.8

1

1

4

31.8

1

5

8

41.3

1

5

8

41.3

2

50.8

2

50.8

in/mm

1/4

6.4

3/8

9.5

1/2

12.7

1/2

12.7

1/2

12.7

5/8

15.9

3/4

19.0

3/4

19.0

7/8

22.2

7/8

22.2

1

25.4

1

25.4

in/mm

7/32

5.6

11/32

8.7

15/32 11.9
15/32 11.9
15/32 11.9
9/16

14.3

11/16 17.5
11/16 17.5
3/4

19.0

3/4

19.0

7/8

22.2

7/8

22.2

in/mm

3/16

4.8

5/16

7.9

7/16

11.1

7/16

11.1

7/16

11.1

1/2

12.7

5/8

15.9

5/8

15.9

13/16 20.6
13/16 20.6
1

25.4

1

25.4

in/mm

1/8

3.2

1/4

6.4

11/32 8.7
11/32 8.7
11/32 8.7
7/16 11.1
1/2

12.7

1/2

12.7

5/8

15.9

5/8

15.9

3/4

19.0

3/4

19.0

in/mm

3/32

2.4

5/32

4.0

1/4

6.4

1/4

6.4

1/4

6.4

5/16

7.9

3/8

9.5

3/8

9.5

1/2

12.7

1/2

12.7

5/8

15.9

5/8

15.9

in/mm

1/16

1.6

1/8

3.2

3/16

4.8

3/16

4.8

3/16

4.8

1/4

6.4

5/16

7.9

5/16

7.9

7/16 11.1
7/16 11.1
9/16 14.3
9/16 14.3

in/mm

3/64 1.2
1/16 1.6
1/8

3.2

1/8

3.2

1/8

3.2

3/16 4.8
1/4

6.4

1/4

6.4

3/8

9.5

3/8

9.5

1/2

12.7

1/2

12.7

Belt
Location

RPM

Wood

Zinc 
Diecast

Alum. &
Brass

Plastic

Cast Iron 
& Bronze

Steel 
Mild &
Malleable

Steel Cast &
Med.
Carbon

Steel
Stainless &
Tool

Summary of Contents for 80329

Page 1: ...operating manual parts list 80329 20 HEAVY DUTY FLOOR MODEL DRILL PRESS Read carefully and follow all safety rules and operating instructions before first use of this product 35702 00 0512...

Page 2: ...x D x H 29 x 35 5 x 74 Ship weight 510 lbs Weight 444 lbs Motor 1 HP 115 230 V 60 Hz 16 8 A 1725 RPM SAFETY RULES WARNING For your own safety read all of the instructions and precautions before operat...

Page 3: ...r into spindle push arbor into spindle and twist arbor slightly to release air trapped in taper Make sure tang of arbor seats properly into spindle Mount chuck onto arbor push chuck over arbor and twi...

Page 4: ...on cord is worn cut or damaged in any way replace it immediately EXTENSION CORD LENGTH 115V Wire Size A W G Up to 25 ft 14 25 50 ft 12 NOTE Using extension cords over 50 ft long is not recommended EXT...

Page 5: ...Refer to Figure 6 To control drilling depth loosen locking knob Ref No 36 inside feed handle hub Ref No 37 Rotate graduated collar Ref No 38 so desired depth is indicated on collar next to the indica...

Page 6: ...icate the splines grooves in the spindle and the rack teeth on the quill as follows Lower quill assembly Figure 6 Ref No 28 all the way down Apply lubricant around the inside of the hole in the spindl...

Page 7: ...hing bit or excessive feed 2 Improper belt tension 3 Workpiece not supported or clamped properly CORRECTIVE ACTION 1 Check wiring fuse or circuit breaker 2 Replace switch 3 Replace motor Replace beari...

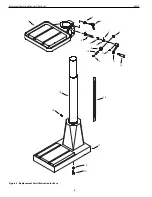
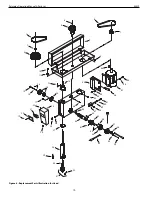
Page 8: ...1 2 3 4 5 7 6 8 9 10 8 12 13 14 17 18 19 15 16 11 8 Figure 5 Replacement Parts Illustration for Base Palmgren Operating Manual Parts List 80329...

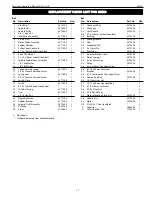
Page 9: ...5 16 Set Screw 1 12 Crank Arm 35697 00 1 13 Handle Assembly 35698 00 1 14 Rack 35699 00 1 15 Column Assembly 35700 00 1 16 8 1 25 x 15mm Set Screw 2 17 Base 35701 00 1 18 12mm Lock Washer 4 19 12 1 75...

Page 10: ...9 23 24 28 29 30 31 32 25 26 27 46 45 51 50 49 48 47 43 42 40 37 36 34 35 33 39 38 41 44 14 16 18 13 4 5 7 6 9 8 43 54 58 56 57 55 52 53 54 10 Figure 6 Replacement Parts Illustration for Head Palmgren...

Page 11: ...07936 00 1 31 Chuck with Key 35724 00 1 32 Chuck Key 35725 00 1 33 Quill Handle 35726 00 3 34 6 1 0 x 25mm Socket Head Bolt 1 35 Bushing 35727 00 1 36 Locking Handle 35728 00 1 37 Hub 35729 00 1 38 G...

Page 12: ...etal forming equipment 2 years Accessories 1 year The obligation of Palmgren is limited solely to the repair or replacement at our option at its factory or authorized repair agent of any part that sho...

Page 13: ...miento del husillo 5 Di metro del eje hueco 2 16 Di metro del collar del eje hueco 3 38 Di metro de la columna 3 93 Velocidades 12 RPM 140 2600 Movimiento 20 Tama o de la mesa 14 x18 Superficie de tra...

Page 14: ...amienta se vuelca o si entra en contacto con la cortadora sin intenci n Mantenga las manos alejadas de las partes m viles y de las superficies cortantes Conozca su herramienta Aprenda su operaci n apl...

Page 15: ...os alambres del cord n de extensi n deben tener el tama o suficiente para conducir la corriente adecuada y mantener el voltaje correcto Utilice la tabla para determinar el tama o m nimo del cord n de...

Page 16: ...6 Para controlar la profundidad de taladrado afloje la perilla de fijaci n Ref No 36 dentro de la campana del mango de alimentaci n Ref No 37 Rote el collar graduado Ref No 38 de manera que la profun...

Page 17: ...e de peso 20 seg n se indica a continuaci n Descienda el eje hueco Figura 6 Ref No 28 totalmente hasta abajo Aplique lubricante alrededor del interior del hueco en la polea del husillo Figura 6 Ref No...

Page 18: ...rea 3 La pieza de trabajo no est correctamente soportada o sujetada MEDIDA CORRECTIVA 1 Revise el cableado el fusible o el cortacir cuito 2 Reemplace el interruptor 3 Reemplace el motor Reemplace los...

Page 19: ...19 Manual de Operaci n y Lista de Partes de Palmgren 80329 NOTAS...

Page 20: ...de acabado 2 a os Sierras de banda 2 a os Plataformas de soporte 2 a os Prensas de husillo 2 a os Equipos de formado met lico 2 a os Accesorios 1 a o La obligaci n de Palmgren est limitada nicamente...

Reviews: