background image

WX-1x 

User Guide Version 1.3


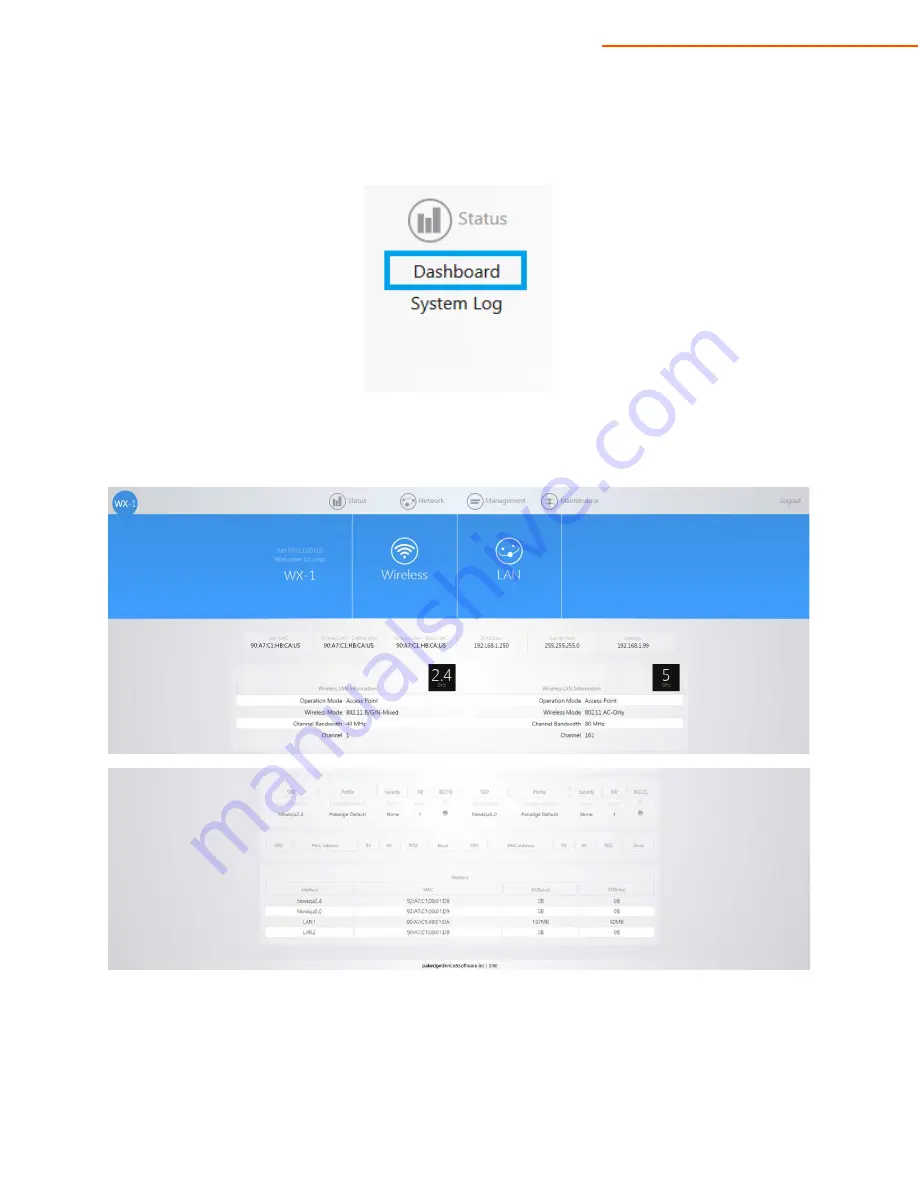
Dashboard 


The Dashboard is the default landing page of the access point. You can also access this page by hovering 
over the 

Status

 icon and clicking 

Dashboard

. This page displays the MAC and IP addresses, operation 

mode, WLAN information, SSIDs and connected clients. 


Summary of Contents for WX-1

Page 1: ...pakedgedevice software inc WX 1x WX 1 WX 1 O 802 11ac Dual Band Access Point User Guide Version 1 3...

Page 2: ...ptional pre construction bracket 18 Accessing WX 1 LAN Reset 19 WX 1 O Installation 21 Antennas 21 Weather Proof RJ 45 21 Wall Mounting 22 Pipe Mounting 22 Power Method for the WX 1x 22 Power via PoE...

Page 3: ...1 Appendix A Specs 52 HARDWARE SPECIFICATIONS 52 RF INFORMATION 52 OPERATIONS 52 MANAGEMENT AND SECURITY 53 ENVIRONMENT 53 MECHANICAL 53 Appendix B Accessory List 54 Appendix C Technical Support 54 Ap...

Page 4: ...s network Each band either 2 4 GHz or 5 GHz of the WX 1x can operate in three modes Access Point Mode This is the typical configuration for most Wi Fi networks as shown below WDS Bridge Mode This mode...

Page 5: ...from another access point However unlike a brige access point a repeater access point sends out Wi Fi so that client devices can connect to it wirelessly The functionality of the WX 1x changes depend...

Page 6: ...k compatible with an Ethernet interface Operating system that supports an HTTP web browser Hardware Installation Note the product is designed for specific application and must be professionally instal...

Page 7: ...ELECTRICAL BOX EUROPEAN OUTLET BOX US 4 ROUND JUNCTION BOX US 3 5 ROUND JUNCTION BOX Vertical mount Secure the wall bracket to the wall anchors using the included hardware Horizontal mount Line up the...

Page 8: ...the WAP downwards to lock it in place and secure it with a security screw Using the provided spacer to mount the Access Point Optional In order to properly route the Ethernet cable to the unit use th...

Page 9: ...1 3 4 Attach the rectangular feet onto WX 1 5 Line the two tabs on the top of the Wall Bracket with the two pockets on the back of the access point Slide the AP downwards to lock it in place and secu...

Page 10: ...vided T bar 1 Place the T bar bracket into the slots on the back of the WAP and line up the two holes on the T Bar Bracket with the two mounting points on the back of the WAP Using the supplied hardwa...

Page 11: ...WX 1x User Guide Version 1 3 2 Line up the T bar brackets with the T Bar Press down until the T bar brackets snap on...

Page 12: ...ser Guide Version 1 3 WX 1 In Ceiling Bracket Mounting 1 Press down on the AP bracket to release the AP bracket from the push latches on the In ceiling bracket 2 Swing AP bracket out from In ceiling b...

Page 13: ...nside of the In ceiling bracket to its open position 4 Push hinge arms towards the center of the AP bracket to release hinge pins from hinge mounting holes on the In ceiling bracket While holding the...

Page 14: ...Install AP bracket such that the LAN Reset DC Kensington Lock ports are aligned with their respective labels on the AP bracket 6 Using the supplied template cut a 10 1 4 x 7 1 2 rectangle at the desir...

Page 15: ...ion 1 3 7 Use a Phillips screwdriver to tighten the mounting ears Use a clockwise rotation NOTE Do not use excessive force when tightening the mounting ears This can strip the mounting ears and render...

Page 16: ...mbly into the In ceiling bracket Align the hinge pins on the hinge arms with the hinge mounting holes on the In ceiling bracket Once aligned release hinge arms Make sure that the hinge pins are fully...

Page 17: ...ng bracket until the AP bracket is secured to the two push latches An audible click will be heard when the AP bracket is secured to the push latch NOTE Make sure hinge arm locks are in their closed po...

Page 18: ...ocations for mounting screws Drill 1 16 pilot holes at marked locations Secure pre construction bracket to ceiling studs using the provided hardware 3 Install sheet rock over pre construction bracket...

Page 19: ...the WX 1 in towards the ceiling wall until the AP bracket has been released from the two push latches An audible click can be heard when the push latches are released 2 Once the AP bracket has been re...

Page 20: ...e center of the AP bracket to release hinge pins from hinge mounting holes on the In ceiling bracket While holding the hinge arms inward slide the AP bracket out from the In ceiling bracket to access...

Page 21: ...access point 3 Plug the other end of the Ethernet cable into a PoE injector or PoE Switch 4 The LED lights will begin to light up and indicate that WAP is connected 5 Once the WAP fully boots up you m...

Page 22: ...WX 1x User Guide Version 1 3 Wall Mounting Pipe Mounting...

Page 23: ...Power Method for the WX 1x The diagrams below show using a PoE injector or a PoE switch to power the WX 1x Note the product must be powered by 802 3at compliant Power over Ethernet PoE injector or sw...

Page 24: ...WX 1x User Guide Version 1 3 Power via PoE Switch Power using the included power adapter...

Page 25: ...d of pakedge pakedgea In order to log into the WX 1x you must first configure the TCP IP settings of your PC Notebook Follow these steps 1 Under Control Panel double click Network Connections and doub...

Page 26: ...as the WX 1x WX 1x IP address 192 168 1 250 PC IP address 192 168 1 10 PC subnet mask 255 255 255 0 WX 1x Start Up To configure the WX 1x through a web browser type the IP address of the WX 1x default...

Page 27: ...u appears see figure below The main menu displays the current status of WX 1x and general information such as the IP address subnet mask and MAC addresses The 2 4 GHz and 5 GHz sections display the de...

Page 28: ...x access point The dashboard is the default page that comes up when you log into the WX 1x GUI Network User can make changes to the network settings such as the LAN wireless settings and transmit powe...

Page 29: ...shboard is the default landing page of the access point You can also access this page by hovering over the Status icon and clicking Dashboard This page displays the MAC and IP addresses operation mode...

Page 30: ...es System log buffer size Maximum value of the buffer is 10240 KB 10MB which is also the default setting External system log server An external server may be set up to receive log activity Enter the I...

Page 31: ...ver over the Network icon and click LAN This page displays the LAN settings for the WX 1 To configure the IP address of your WX 1 you can configure the WX 1 with a static IP address or obtain an IP ad...

Page 32: ...ary DNS Click Apply to apply the changes Management VLAN Warning Do not enable this feature unless you need to tag the default VLAN on the access point If configured incorrectly the access point will...

Page 33: ...guration page under the Radio tab Country Code Selecting your country is required for proper functionality of this device and may be required by law After selecting your country and clicking Apply the...

Page 34: ...xed N G Mixed or B G N Mixed on the 2 4GHz or A Only N Only N A Mixed AC Only AC N Mixed or A AC N Mixed on the 5GHz If you aren t sure which type s of clients will access the wireless networks it s r...

Page 35: ...etection Click Scan to perform an automatic site survey A new window will open and display the site survey utility The WX 1 will scan the frequency for devices currently broadcasting their SSID and th...

Page 36: ...rofile without security not recommended o WPA PSK Password must be at least 8 characters long This is a legacy encryption protocol not recommended o WPA2 PSK Password must be at least 8 characters lon...

Page 37: ...a total of 16 SSIDs On Off The SSID may be turned on or turned off using this checkbox Wireless Name SSID The SSID is the name associated with the Wi Fi network An SSID cannot exceed 32 characters Sec...

Page 38: ...under Management VLAN Management VLAN is located on the LAN page under Network Guest Network Settings The Guest Network feature is designed for networks that do not have a guest VLAN The Guest Network...

Page 39: ...his option turns the Guest Network on and off Wireless Name SSID The SSID of the Guest Network can be entered in this textbox Security Profile Select a security profile that has already been defined u...

Page 40: ...st network of each access point will be independent of one another Ending IP Address This is the last IP address available on the DHCP range DNS Server IP The DNS Server IP can be set to an external D...

Page 41: ...er Please make sure it is identical between WX 1 and your RADIUS server Manage You are able to delete the second Profile by clicking the Delete button Advanced On the Advanced page you can configure T...

Page 42: ...hannel based on the access point s country code RTS CTS Threshold Enter the packet size threshold for RTS CTS Request to Send Clear to Send to occur Default setting is 2347 Beacon Interval Adjusting t...

Page 43: ...WX 1x User Guide Version 1 3 Management Diagnostics Ping Hover over Management and click on Diagnostics You will be directed to the ping test under the Ping tab...

Page 44: ...X 1x User Guide Version 1 3 Ping o Target IP Domain Name Enter the IP Address of a location to ping 8 8 8 8 is a Google DNS server o Click Start to start the test Traceroute Click on the Traceroute ta...

Page 45: ...te text maps the path for packets moving between the WX 1x and the target location To run a Traceroute test enter an IP Address or Domain Name into the Target IP Domain Name textbox and click Start to...

Page 46: ...erence Contact Enter the contact information of the installer or network administrator for the SNMP manager Description Enter in a description of the device The default description is Pakedge WX 1x WA...

Page 47: ...WX 1x User Guide Version 1 3 Maintenance Username Password Hover over Maintenance and click on Username Password You can change the username and password for the device here...

Page 48: ...WX 1x User Guide Version 1 3 Time Zone Hover over Maintenance and click on Time Zone This page allows you to set up the timezone...

Page 49: ...ttings Selecting this will preserve your current configurations after the firmware update Local Image Click Choose File to select the firmware file Local Update Updates the firmware with the file you...

Page 50: ...backup Click Download Configuration to save and export the current settings of the WX 1x Reset to defaults Click Factory Default to reset the the WX 1x back to its factory default settings Restore bac...

Page 51: ...WX 1x User Guide Version 1 3 Reboot Hover over Maintenance and click on Reboot Clicking the Reboot Button allows you to reboot the device...

Page 52: ...INFORMATION Frequency Band o 802 11 B G N on 2 4 to 2 462GHz which can be programed based on country regulations o 802 11 A N AC on 5 to 5 805GHz which can be programed based on country regulations O...

Page 53: ...d channel Backup and restoration settings available through web interface QoS WMM WPA PSK WPA2 PSK WPA WPA2 Mixed using TKIP or AES SSID broadcast can be enabled or disabled WLAN L2 Isolation AP mode...

Page 54: ...T5e cable External outdoor antennas Waterproof RJ45 plastic protector Mounting bracket B WX 1 In Ceiling Bracket B WX 1 In Ceiling In Wall Bracket Installation Guide Installation screws Appendix C Tec...

Page 55: ...rebuilt replacement parts for parts that fail due to defects in materials or workmanship for a period of one 1 year from the effective date of delivery to the end user Such replacement parts are then...

Page 56: ...tes do not allow limitations on how long an implied warranty lasts and some states do not allow the exclusion or limitation of incidental or consequential damages In this case the above limitations or...

Page 57: ...d Consult the dealer or an experienced radio TV technician for help FCC Caution Any changes or modifications not expressly approved by the party responsible for compliance could void the user s author...

Page 58: ...the following two conditions 1 This device may not cause harmful interference and 2 this device must accept any interference received including interference that may cause undesired operation Ce dispo...

Page 59: ...naison n cessaires pour rester conforme l exigence de la p i r e applicable au masque d l vation et nonc e la section 6 2 2 3 doivent tre clairement indiqu s v De plus les utilisateurs devraient aussi...

Page 60: ...services Part 1 Common technical requirements EN 301 489 17 Electromagnetic compatibility and Radio spectrum Matters ERM ElectroMagnetic Compatibility EMC standard for radio equipment and services Pa...

Page 61: ...il WX 1 est conforme aux exigences essentielles et aux autres dispositions pertinentes de la directive 1999 5 CE Italiano Italian Con la presente Pakedge Device Software Inc dichiara che questo WX 1 c...

Page 62: ...tt WX 1 tyyppinen laite on direktiivin 1999 5 EY oleellisten vaatimusten ja sit koskevien direktiivin muiden ehtojen mukainen Svenska Swedish H rmed intygar Pakedge Device Software Inc att denna WX 1...

Page 63: ...the power supply and disconnect the CAT5e to the WX 1x at the PoE This will prevent damage to the product due to lightning and power surges Give particular attention to all safety precautions Operate...

Page 64: ...WX 1x User Guide Version 1 3 pakedgedevice software inc 3847 Breakwater Avenue Hayward CA 94545 17011 Beach Blvd Suite 600 Huntington Beach CA 92647 650 385 8702 www pakedge com sales pakedge com...

Reviews: