197
Appendix A
ENTK83-
N354G32Mnrr
WW
WW
S2.BQJ
02.001
ENTK83-N354G32Mnrr
W7HP64BSWW2
MADISON_PRO1GBCrr_3V3
2*2G/320/6L2.2/2R/
CB_bgn_1.3C_AUr_EN11
ENTK83_MA
DISON_PRO1
GBCrr_3V3
ENTK83-
P324G32Mnrr
EMEA
Spain
LX.BQF
02.003
ENTK83-P324G32Mnrr
W7HP64BSES1
PARK_XT512Crr_3V3 2*2G/320/
6L2.2/2R/
CB_bgn_1.3C_AUr_ES31
EASYNOTE_TK83-SB-320SP
ENTK83_PAR
K_XT512Crr_
3V3
ENTK83-
P324G50Mnrr
EMEA
Nordic
LX.BQF
02.002
ENTK83-P324G50Mnrr
W7HP64BTND1
PARK_XT512Crr_3V3 2*2G/
500_L/6L2.2/2R/
CB_bgn_1.3C_AUr_ENU3
EASYNOTE_TK83-SB-553NCD
ENTK83_PAR
K_XT512Crr_
3V3
ENTK83-
P343G32Mnrr
EMEA
Germany
LX.BQF
02.001
ENTK83-P343G32Mnrr
W7HP64BSDE1
PARK_XT512Crr_3V3 2G+1G/
320/6L2.2/2R/
CB_bgn_1.3C_AUr_DE41
EASYNOTE TK83-SB-010GE
ENTK83_PAR
K_XT512Crr_
3V3
ENTK83-
N854G32Mnrr
WW
WW
S2.BQF
02.001
ENTK83-N854G32Mnrr
W7HP64BSWW2
PARK_XT512Crr_3V3 2*2G/320/
BT/6L2.2/2R/
CB_bgn_1.3C_AUr_EN11
ENTK83_PAR
K_XT512Crr_
3V3
Model
RO
Country
CPU
LCD
VGA Chip
VRAM 1
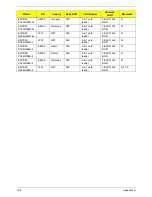
ENTK81-
P324G50Mnkk
EMEA
Nordic
AAP320
N15.6WXGAG
MADISON
_PRO
1G-DDR3
(64*16*8)
ENTK81-
N354G32Mnkk
WW
WW
AAN350
NLED15.6WXGAG
MADISON
_PRO
1G-DDR3
(64*16*8)
ENTK81-
P324G32Mnkk
EMEA
Germany
AAP320
NLED15.6WXGAG
PARK_XT
512M-DDR3
(64*16*4)
ENTK81-
P344G50Mnkk
EMEA
Belgium
AAP340
NLED15.6WXGAG
PARK_XT
512M-DDR3
(64*16*4)
ENTK81-
P324G50Mnkk
EMEA
Nordic
AAP320
N15.6WXGAG
PARK_XT
512M-DDR3
(64*16*4)
ENTK81-
P324G32Mnkk
EMEA
Nordic
AAP320
N15.6WXGAG
PARK_XT
512M-DDR3
(64*16*4)
ENTK81-
P323G32Mnkk
EMEA
Hungary
AAP320
NLED15.6WXGAG
PARK_XT
512M-DDR3
(64*16*4)
ENTK81-
P343G32Mnkk
EMEA
Germany
AAP340
NLED15.6WXGAG
PARK_XT
512M-DDR3
(64*16*4)
ENTK81-
N854G32Mnkk
WW
WW
APN850
NLED15.6WXGAG
PARK_XT
512M-DDR3
(64*16*4)
ENTK83-
N354G32Mnrr
WW
WW
AAN350
NLED15.6WXGAG
MADISON
_PRO
1G-DDR3
(64*16*8)
ENTK83-
P324G32Mnrr
EMEA
Spain
AAP320
NLED15.6WXGAG
PARK_XT
512M-DDR3
(64*16*4)
Model
RO
Country
Acer
Part No
Description
BOM Name
Summary of Contents for ENTK83 Series
Page 6: ...VI...
Page 10: ...X Table of Contents...
Page 38: ...28 Chapter 1...
Page 55: ...Chapter 2 45...
Page 56: ...46 Chapter 2...
Page 71: ...Chapter 3 61 4 Detach the WLAN module from the WLAN socket...
Page 88: ...78 Chapter 3 5 Lift the Bluetooth cable from the cable guides Discrete UMA...
Page 99: ...Chapter 3 89 8 Remove the LCD assembly from the lower cover...
Page 110: ...100 Chapter 3 5 Lift the microphone set clear of the panel...
Page 121: ...Chapter 3 111 4 Replace the adhesive tape securing the inverter board cable to the LCD cover...
Page 127: ...Chapter 3 117 7 Replace the adhesive tape to secure the antennas to the lower cover...
Page 138: ...128 Chapter 3 4 Connect the USB cable to the mainboard and lock the connector...
Page 144: ...134 Chapter 3 Replacing the Upper Cover 1 Place the upper cover on the lower cover as shown...
Page 146: ...136 Chapter 3 4 Connect the speaker cable B 5 Connect and lock the touchpad FFC C...
Page 150: ...140 Chapter 3 4 Slide the HDD module in the direction of the arrow to connect the interface...
Page 160: ...150 Chapter 3...
Page 188: ...178 Chapter 5...
Page 219: ...Chapter 6 209...
Page 228: ...Appendix A 200...
Page 236: ...208 Appendix C...
Page 240: ...212...


