background image

Welding

1.  Ensure that the workpiece is clamped down securely, is cleaned 

and prepared for welding.

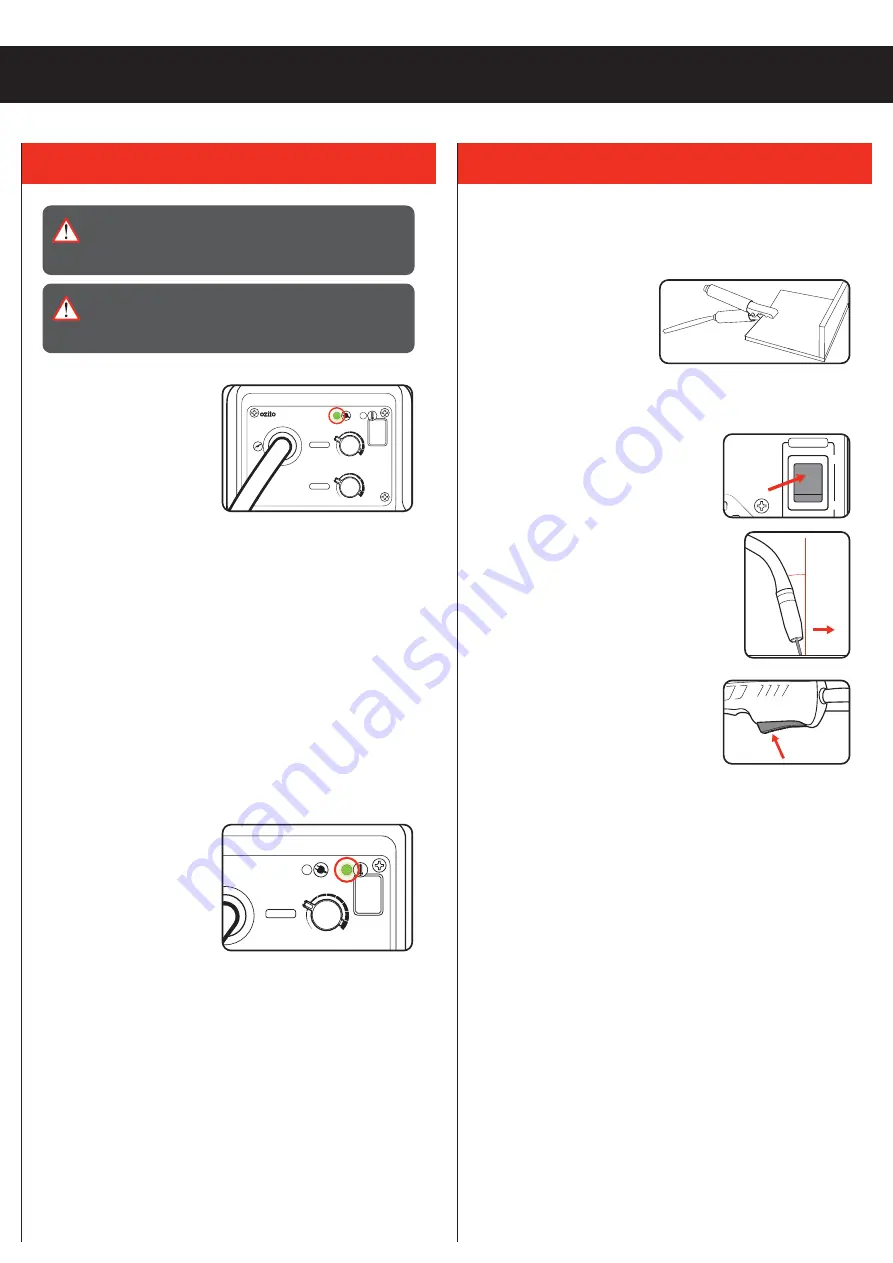
2.  Attach the earth clamp to the 

workpiece ensuring there is 

good metal to metal contact. 

Note:

 Prior to connecting 

the earth clamp it may be 

necessary to clean the surface of the work piece using the metal 

brush. Clamp it where it will not be in the way. This clamp provides 

an earth connection back to the welder.

3.  Switch the welder on and position the 

welding mask in front of your eyes.

4.  Position the wire tip approximately 8mm 

from the workpiece at a 20° angle from the 

vertical in the direction of movement.

Note: 

Leaving a 10mm length of protruding 

wire and holding the torch so that the wire 

touches the workpiece is a good way to 

estimate the proper placement.

5.  Squeeze the torch trigger to start the 

weld.

6. WELDING

5. INDICATOR LEDS

20

0

8mm

0

I

AC 240V ~ 50Hz

OFF

ON

AC POWER

Power LED Light

1.  The ON LED illuminates 

when the power cord is 

connected to a live mains 

outlet and the on/off switch 

is in the on position.

Note:

 The cooling fan will 

operate when the unit is 

switched on. 

Thermal Overload Protection

All Welders have a feature called a duty cycle. Duty cycle on a 

welder refers to the time in which the welder operates during 

normal welding. A welder can only weld for a certain continuous 

period of time before it requires to cool down.

If the internal components of the welder should become hot 

the welder could overheat. If the welder overheats the Thermal 

Overload Protection feature will automatically shut down the 

welder.

THIS CAN OCCUR IN HEAVY USE AND DOES NOT INDICATE A 

FAULT.

The Welder will cease to weld 

and the Thermal Overload 

LED light will turn on. This 

LED indication light is just to 

inform you that your welder is 

becoming too hot and requires 

a cool down to protect the 

internal components of the 

welder. 

Do Not turn your welder Off as the welder has an internal cooling 

fan and this will assist your welder to cool down quicker. Reducing 

the cooling time will enable you to get back to your welding job 

quicker.

Depending on how many Amps or how heavy the welding you are 

doing the cooling time may take up to 10 minutes for your welder 

cool down so you can return to your welding job.

Duty cycle % as referenced on the rating label are based on 10 

minute intervals. For instance with a 20% duty cycle, one can weld 

continuously for 2 minutes, but then must wait 8 minutes for the 

welder to cool. 

Lower current levels have longer duty cycles.

ON

THERMAL

OVERLOAD

ALLOW

WELDER
TO COOL

DOWN

!

100A

INVERTER 

MIG WELDER

VOLTAGE

MIN

MAX

FEED RATE

MIN

MAX

ON

THERMAL

OVERLOAD

ALLOW

WELDER
TO COOL

DOWN

!

100A

INVERTER 

MIG WELDER

VOLTAGE

MIN

MAX

FEED RATE

MIN

MAX

WARNING! 

IF THE WELDER OVERHEATS & THE 

THERMAL OVERLOAD PROTECTION ENGAGES, 

DO NOT TURN OFF THE WELDER AS THE FAN WILL 

ASSIST IN SPEEDING UP THE COOLING TIME.

WARNING! 

ENSURE THE CLAMP & THE TORCH IS 

AWAY FROM THE WELDING MATERIAL & PLACED 

ON A NON-CONDUCTIVE SURFACE WHILE THE 

OVERLOAD PROTECTION IS ENGAGED.

Summary of Contents for IMW-100

Page 1: ...al or high frequency use WARRANTY OZITO Australia New Zealand Head Office 25 Fox Drive Dandenong South Victoria Australia 3175 ozito com au Self Shielded Flux Cored Inverter Arc Welder 0 9mm Torch Tip...

Page 2: ...t and ultraviolet radiation It is essential that the eyes of the operator and any bystanders are protected from the glare during welding ALWAYS use a face shield or welding helmets fitted with the cor...

Page 3: ...7 Rotate the pressure arm back into place and flip the tension adjustor bar back to lock it in place Assembling The Welding Mask The included welding mask must be fitted with the lens assembly and han...

Page 4: ...the surface without bending switch off the welder and tighten the feed tensioner slightly by turning it clockwise 7 The tension is correctly set if the wire fed through the torch bends when it encoun...

Page 5: ...ERATION ON Off Switch The on off switch is located on the rear of the welder 1 Press the on off switch into the on position I to switch the unit on 2 To switch the unit off press the switch to the 0 p...

Page 6: ...should become hot the welder could overheat If the welder overheats the Thermal Overload Protection feature will automatically shut down the welder THIS CAN OCCUR IN HEAVY USE AND DOES NOT INDICATE A...

Page 7: ...off Check on off switch is in the on position Power supply fault Test power supply with another product avoid using extension leads Circuit breaker tripped Check the rating of the circuit breaker on t...

Page 8: ...nvironment Please recycle packaging where facilities exist Check with your local council authority for recycling advice CARING FOR THE ENVIRONMENT SPARE PARTS Spare parts can be ordered from the Speci...

Page 9: ...IMW 100 0321 SELF SHIELDED FLUX CORED INVERTER ARC WELDER 100A MAINTENANCE MANUAL ON THERMAL OVERLOAD ALLOW WELDER TO COOL DOWN 100A INVERTER MIG WELDER VOLTAGE MIN MAX FEED RATE MIN MAX...

Page 10: ...wer Tool Safety Warnings Page 5 Welder Safety Warnings Page 7 Circuit Diagram Page 10 Maintenance Page 12 1 2 1 On Off Switch 2 AC Power Cord 3 Power ON LED 4 Thermal Overload LED 5 Voltage Control Di...

Page 11: ...RMAL OVERLOAD ALLOW WELDER TO COOL DOWN 100A INVERTER MIG WELDER VOLTAGE MIN MAX FEED RATE MIN MAX 3 4 8 3 7 10 9 5 6 ONLINE MANUAL Scan this QR Code with your mobile device to take you to the online...

Page 12: ...on the rating plate Note The supply of 230V and 240V on Ozito tools are interchangeable for Australia and New Zealand Using an Extension Lead Always use an approved extension lead suitable for the pow...

Page 13: ...the cord for carrying pulling or unplugging the power tool Keep cord away from heat oil sharp edges or moving parts Damaged or entangled cords increase the risk of electric shock e When operating a po...

Page 14: ...cidentally d Store idle power tools out of the reach of children and do not allow persons unfamiliar with the power tool or these instructions to operate the power tool Power tools are dangerous in th...

Page 15: ...materials are securely clamped down fastened before welding Always place welding torch and clamp on flat stable surface when not in use Never put the welding torch down until the welder is switched o...

Page 16: ...to be moved or shielded Fumes Toxic gases are given off during the welding process which may collect in the welding area if the ventilation is poor Be alert at all times to the possibility of fume bu...

Page 17: ...e safety regulations during welding and after it Remember that fire can break out from sparks even several hours after the welding work is completed Protect the environment from welding splatter Remov...

Page 18: ...10V_1 GND R13 R12 VGND R54 DZ9 R10 D4_1 C8_1 D5_1 C10 C5_1 R11 VGND R16 R57 VGND 12V R15 C15 C13 D15 D5 1 2 CN6 11 12 3 1 5 6 8 10 9 2 T6 D30 D29 D33 D32 C49 C47 C11 C4_1 GND GND C48 C46 15V C9_1 C3_1...

Page 19: ...D30 R74 R33 GND D31 D28 C50 C40 15V R64 D27 C43 R48 Q8 C42 GND 3 2 1 8 4 U4A 15V 15V 5 6 7 U4B GND OUT 6 SEN 3 VCC 7 COMP 1 VFB 2 RT CT 4 VREF 8 GND 5 U1 C3 C2 D1 C08 C1 R01 R26 R03 R28 C7 R29 C9 R27...

Page 20: ...switch off the tool and make sure that it is secured in such a way that it cannot be started up again by any unauthorised person Store the tool in a dry location which is not accessible to unauthorise...

Reviews: