


GB
- 18 -
or it starts to lean back and traps the saw chain,
interrupt the felling cut and insert wedges made
of wood, plastic or aluminum to open out the cut
and control the lean of the tree until it leans in the
required direction.
When the tree starts to fall, remove the chainsaw
from the cut, switch it o
ff
, place it on the ground
and exit the danger zone via the planned escape
route. Watch out for falling branches and take
care not to trip.
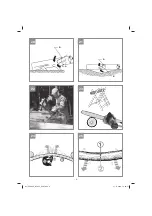
Removing branches
Here we are talking about removing branches
from the felled tree. When removing branches,
leave any downward facing branches which are
supporting the tree until the trunk of the tree has
been cut up. Smaller branches should be re-
moved as shown in Fig. 18 (A= cutting direction
when removing branches, B= keep away from the
ground! Supporting branches should be left until
the trunk is cut up) in a single cut from the bottom
to the top. Any branches which are under tension
should be cut from the bottom to the top to pre-
vent the saw from becoming trapped.
Cutting the tree trunk into lengths
Here we are looking at the process of cutting the
felled tree into sections. Make sure you have a
sure footing and distribute your body weight even-
ly onto both feet. If possible the trunk should be
underlaid and supported with branches, beams
or wedges. For easy cutting follow the simple ins-
tructions below.
If the full length of the tree trunk is evenly suppor-
ted as shown in Fig. 19 then proceed by cutting
from the top down. Take care not to cut into the
ground in the process.
If the weight of the tree trunk is resting on one end
as shown in Fig. 20,
fi
rst cut through 1/3 of the
trunk diameter from the underside (A) in order to
prevent it from splintering. Make the second cut
from the top (2/3 of the diameter) to the height of
the
fi
rst cut (B) (this prevents the chainsaw from
being trapped).
If the weight of the tree trunk is resting on both
ends as shown in Fig. 21,
fi
rst cut through 1/3 of
the trunk diameter from the top (A) in order to pre-
vent it from splintering. Make the second cut from
underneath (2/3 of the diameter) to the height of
the
fi
rst cut (B) (this prevents the chainsaw from
being trapped).
When working with the saw on a slope, always
position yourself at a higher point on the slope
above the tree as shown in Fig. 15. In order to re-
tain full control at the moment when the cut goes
through, reduce pressure towards the end of the
cut without releasing your
fi
rm grip on the hand-
les of the chainsaw. Take care to ensure that the
chainsaw does not touch the ground.
After completing the cut, wait for the chain saw to
come to a standstill before removing the chain-
saw. Always switch o
ff
the motor of the chainsaw
before moving from tree to tree.
7.3 Kickback
The term “kickback” describes what happens
when the running chainsaw suddenly kicks up-
ward and backward. Usually, this is caused by
contact between the tip of the cutter rail and the
workpiece or the saw chain becoming trapped.
In the event of kickback, large forces occur sud-
denly and violently. As a result, the chainsaw
usually reacts uncontrollably. This can often result
in very serious injuries to the worker or persons
in the vicinity. The risk of kickback is particularly
great when performing cross cuts, angled cuts
and longitudinal cuts, as it is not possible to use
the claw stop on these cuts. You should therefore
avoid these cuts as far as possible and take parti-
cular care when they are unavoidable.
The risk of kickback is at its greatest when the
saw is positioned for a cut in the region of the tip
of the cutter rail, as the leverage e
ff
ect is greatest
there (Fig. 22). It is therefore safest to position the
saw
fl
at and as close as possible to the claw stop
before making the cut (Fig. 23).
Warning!
•
Make sure that the chain tension is always
correctly adjusted.
•
Only use a chainsaw if it is in perfect working
order.
•
Only work with a saw chain that has been
properly sharpened in accordance with the
instructions.
•
Never operate the saw above shoulder height.
•
Never cut with the upper edge or the tip of the
sword.
•
Always hold the chainsaw firmly with both
hands.
•
Whenever possible, use the claw stop as a
leverage point.
Anl_PXCCSS_0182U_SPK7.indb 18
Anl_PXCCSS_0182U_SPK7.indb 18
27.11.2019 14:48:15
27.11.2019 14:48:15


