background image

GB

- 17 -

 7.  Working with the chainsaw

7.1 Preparations

To ensure that you can work safely, check the fol-

lowing points before every use:

Condition of the chain saw

Inspect the chainsaw before the start of work for 

damage to the housing, the power cable, the saw 

chain and the cutter rail. Never use a chainsaw 

which is obviously damaged.

Oil container

Fill level of the oil container. Even while working, 

keep checking that su

  cient oil is in the system. 

To avoid damaging the chainsaw, never run the 

saw if there is no oil in the system or if the oil 

drops below the “min” mark (Fig. 10/Item B).

On average, a single 

fi

 lling will last around 15 

minutes depending on the number of pauses in 

cutting and the loads involved.

Saw chain

Tension of the saw chain, condition of the cutting 

elements. The sharper the chainsaw, the easier 

and more controllable it is to operate the chain-

saw. The same also applies to the chain tension. 

Again, while working also check the chain tension 

every 10 minutes in order to increase your safety. 

New saw chains in particular often tend to expand 

more.

Chain brake

Check the operation of the chain brake as de-

scribed in the chapter “Safety devices” and then 

release it.

Safety clothing

Always wear appropriate tight-

fi

 tting safety 

clothing like special trousers which protect 

against cuts, protective gloves and safety shoes.

Hearing protection and protective goggles.

When felling trees or performing forest work, al-

ways wear a protective helmet with integral face 

and hearing protection. This will o

 er protection 

against falling branches and any branches if they 

spring back.

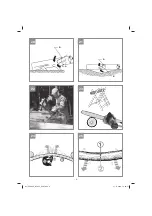
7.2 Description of the correct procedures for 

basic use of the chainsaw

Felling a tree (Figs. 14-17)

If two or more persons are working at the same 

time on felling and cutting back then the minimum 

distance between the tree being felled and the 

tree being cut back should be at least twice the 

height of the tree being felled (Fig. 14). When 

felling trees, care must be taken to ensure that no 

other persons are endangered, no power supply 

lines are hit and no material damage is caused 

to equipment or property. In the event that a tree 

comes into contact with a power supply line, he 

responsible power supply company should be 

informed immediately.

When working with the saw on a slope, the opera-

tor of the chainsaw must be standing at a higher 

point on the slope than the tree being felled, as 

the tree will roll or slip downhill once it has been 

felled (Fig. 15).

Before felling the tree you must 

fi

 rst plan and if 

necessary clear an escape route. This escape 

route must lead away diagonally in the opposite 

direction to the expected fall direction – this can 

be seen in Fig. 16 (A= danger zone, B= direction 

of fall, C= escape zone).

Before felling the tree you must take into account 

the natural inclination of the tree, the location of 

larger branches and the wind direction, as this will 

help you to correctly determine the direction in 

which the tree will fall.

Dirt, stones, loose bark, nails, staples and wire 

must be removed from the tree.

Making the felling notch (Fig. 17)

Cut a notch (A) at right angles to the fall direction 

to a depth of 1/3 of the tree diameter as shown 

in Fig. 17. First make the lower horizontal felling 

notch (1). This prevents the saw chain or the gui-

de rail from becoming trapped when the second 

felling notch is made.

Making the felling cut (Fig. 17)

The felling cut should be positioned at least 50 

mm above the horizontal felling notch. Make the 

felling cut (B) parallel to the horizontal felling 

notch. The felling cut should be cut to a depth 

which leaves a thin strip (felling hinge strip) (D) 

which can act as a hinge. This strip prevents the 

tree from rotating and falling in the wrong direc-

tion. Do not cut through the strip. When the felling 

cut gets close to the strip the tree should start to 

fall. If it becomes clear that the tree may well fall in 

a di

 erent direction to the desired fall direction (C) 

Anl_PXCCSS_0182U_SPK7.indb   17

Anl_PXCCSS_0182U_SPK7.indb   17

27.11.2019   14:48:14

27.11.2019   14:48:14

Summary of Contents for 45.017.82

Page 1: ...PXCCSS 0182U Art Nr 45 017 82 I Nr 11019 7 GB Original operating instructions Cordless Chainsaw Anl_PXCCSS_0182U_SPK7 indb 1 Anl_PXCCSS_0182U_SPK7 indb 1 27 11 2019 14 48 02 27 11 2019 14 48 02...

Page 2: ...2 1 2 4 3 3 14 10 2 9 8 11 5 7 1 15 17 16 19 16 15 6 Anl_PXCCSS_0182U_SPK7 indb 2 Anl_PXCCSS_0182U_SPK7 indb 2 27 11 2019 14 48 03 27 11 2019 14 48 03...

Page 3: ...3 4 5 6b 6c 6a A 7 8 B 15 B 16 9 16 15 9 Anl_PXCCSS_0182U_SPK7 indb 3 Anl_PXCCSS_0182U_SPK7 indb 3 27 11 2019 14 48 04 27 11 2019 14 48 04...

Page 4: ...4 9 10 11 12 13 8 13 A 12 18 12 10 B min Anl_PXCCSS_0182U_SPK7 indb 4 Anl_PXCCSS_0182U_SPK7 indb 4 27 11 2019 14 48 07 27 11 2019 14 48 07...

Page 5: ...5 14 15 B A 16 17 18 19 A A C C B D A C 1 2 3 B B A A Anl_PXCCSS_0182U_SPK7 indb 5 Anl_PXCCSS_0182U_SPK7 indb 5 27 11 2019 14 48 10 27 11 2019 14 48 10...

Page 6: ...6 20 21 22 23 24 25 B A B A Anl_PXCCSS_0182U_SPK7 indb 6 Anl_PXCCSS_0182U_SPK7 indb 6 27 11 2019 14 48 11 27 11 2019 14 48 11...

Page 7: ...7 1 2 3 5 6 4 26 27 28 A 15 19 7 Anl_PXCCSS_0182U_SPK7 indb 7 Anl_PXCCSS_0182U_SPK7 indb 7 27 11 2019 14 48 12 27 11 2019 14 48 12...

Page 8: ...equipment 6 Operation 7 Working with the chainsaw 8 Cleaning maintenance and ordering of spare parts 9 Notes on environmental protection disposal 10 Storage 11 Troubleshooting 12 Charger indicator 13...

Page 9: ...for carrying pulling or unplugging the power tool Keep cord away from heat oil sharp edges or moving parts Damaged or entangled cord increase the risk of electric shock e When operating a power tool o...

Page 10: ...or other small metal objects that can make a connection from one terminal to another Shorting the battery terminals together may cause burns of a fire d Under abusive conditions liquid may be ejected...

Page 11: ...l become warm Allow the battery pack to cool to room temperature before commencing with the charging 7 Do not over charge batteries Do not ex ceed the maximum charging times These charging times only...

Page 12: ...he risk of personal injury and should never be done NOTE For chain saws designed with the gui de bar on the left side the reference to right hand and left hand positioning is reversed Wear safety glas...

Page 13: ...ire may make exposed metal parts of the power tool live and could give the operator an electric shock Residual risks Even if you use this electric power tool in ac cordance to instructions certain res...

Page 14: ...or inju ries of any kind caused as a result of this Please note that our equipment has not been de signed for use in commercial trade or industrial applications Our warranty will be voided if the mach...

Page 15: ...hten the fixing screw of the chain wheel cover Fig 7 Danger All of the chain links must lie proper ly in the guide groove of the cutter rail Notes on tensioning the chain The saw chain must be properl...

Page 16: ...ake will bring the running chain saw to a standstill within a very short space of time Always disconnect the mains plug when you stop working even if it is only for a short time Warning Always carry t...

Page 17: ...being felled Fig 14 When felling trees care must be taken to ensure that no other persons are endangered no power supply lines are hit and no material damage is caused to equipment or property In the...

Page 18: ...he second cut from underneath 2 3 of the diameter to the height of the first cut B this prevents the chainsaw from being trapped When working with the saw on a slope always position yourself at a high...

Page 19: ...ter rail and the saw chain To do this point the tip of the cutter rail towards a smooth surface board section of a cut tree and allow the chainsaw to run If an increasing oil trace becomes evident dur...

Page 20: ...n s reach in a dark and dry place at above freezing temperature The ideal storage tempe rature is between 5 and 30 C Store the electric tool in its original packaging Anl_PXCCSS_0182U_SPK7 indb 20 Anl...

Page 21: ...alist workshop Consult a specialist workshop Saw chain dry No oil in the tank Oil tank cap breather blocked Oil outlet blocked Fill up with oil Clean the oil tank cap Clear the oil outlet Chain brake...

Page 22: ...ery pack out of the charger Disconnect the charger from the mains supply Flashing O Adapted charging The charger is in gentle charging mode For safety reasons the charging is performed less quickly an...

Page 23: ...m 380 mm Oregon Chain 90PX045X 90PX052X 90PX056X Chain bar 566655 124MLEA041 577293 144MLEA041 112329 164MLEA041 Kangxin Chain 3 8 043X45DL 3 8 043X52DL 3 8 043X57DL Chain bar AP12 45 437P AP14 53 437...

Page 24: ...cal equipment must make sure that the equipment is properly disposed of if he no longer wants to keep the equipment The old equipment can be returned to a suitable collection point that will dispose o...

Page 25: ...bles Category Example Wear parts Cutter bar Battery Consumables Saw chain Missing parts Not necessarily included in the scope of delivery In the e ect of defects or faults please register the problem...

Page 26: ...nance Damage to the device caused by abuse or incorrect use for example overloading the device or the use or unapproved tools or accessories ingress of foreign bodies into the device such as sand ston...

Page 27: ...paskaidro du atbilst bu ES direkt vai un standartiem LT apib dina atitikim EU reikalavimams ir prek s normoms RO declar urm toarea conformitate conform directivei UE i normelor pentru articolul GR HR...

Page 28: ...EH 11 2019 01 Anl_PXCCSS_0182U_SPK7 indb 28 Anl_PXCCSS_0182U_SPK7 indb 28 27 11 2019 14 48 16 27 11 2019 14 48 16...

Reviews: