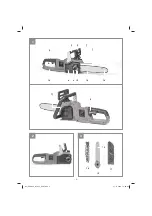


GB
- 16 -
•
Close the oil tank cover.
5.4 Charging the Li battery pack (Fig. 11-12)
The battery is protected from exhaustive dischar-
ge. An integrated protective circuit automatically
switches o
ff
the equipment when the battery is
fl
at.
Warning!
Do not actuate the On/O
ff
switch any
more if the protective circuit has tripped. This may
damage the battery.
1. Remove the battery pack from the handle,
pressing the pushlock button (13) downwards
to do so.
2. Check that your mains voltage is the same as
that marked on the rating plate of the battery
charger. Insert the power plug of the charger
(18) into the socket outlet. The green LED will
then begin to
fl
ash.
3. Push the battery pack onto the battery char-
ger.
In section 12 (Charger indicator) you will
fi
nd a
table with an explanation of the LED indicator on
the charger.
If the battery pack fails to charge, check for the
following:
•
voltage at the power socket
•
whether there is good contact at the charging
contacts of the charging unit
If the battery pack still fails to charge, send
•
the charger and charging adapter
•
and the battery pack
to our customer service center.
To ensure that the Li battery pack provides
long service you should take care to recharge
it promptly. You must recharge the battery pack
when you notice that the power of the cordless
chainsaw drops.
6. Operation
6.1 Switching on/o
ff
Switching on
•
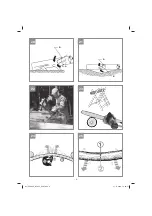
Plug in the battery on the equipment.
•
Hold the chainsaw by the handles with both
hands as shown in Fig. 13 (thumbs under the
handles).
•
Press and hold the safety lock-off (Fig. 1/Item
5).
•
Switch on the chainsaw at the ON/OFF switch
(Fig. 1/Item 6). You can then release the safe-
ty lock-off.
Switching o
ff
Release the ON/OFF switch (Fig. 1/Item 6).
The integrated brake will bring the running chain-
saw to a standstill within a very short space of
time. Always disconnect the mains plug when you
stop working, even if it is only for a short time.
Warning!
Always carry the saw by the front
handle. If the saw is plugged in and you carry it by
the rear handle (which is where the switches are
located), then there is a risk that you could acci-
dentally press the safety lock-o
ff
and the ON/OFF
switch at the same time, and the chainsaw could
inadvertently start up.
6.2 Safety devices
Motor brake
The motor brakes the saw chain as soon as the
ON/OFF switch (Fig. 1/Item 6) is released or the
power supply is interrupted. This signi
fi
cantly
reduces the risk of injury that would otherwise be
present if the chain continued to run after being
switched o
ff
or disconnected.
Chain brake
The chain brake is a safety mechanism which is
triggered via the front hand guard (Fig. 1/Item 2).
If kickback causes the chainsaw to suddenly jerk
back then the chain brake trips and stops the saw
chain in less than 0.1 seconds. You must check
the operation of the chain brake on a regular ba-
sis. To do this, fold the hand guard (Fig. 1/Item 2)
forward and brie
fl
y switch the chainsaw on. The
saw chain must not start up.
Pull back the front hand guard (Fig. 1/Item 2) until
it engages to release the chain brake.
Danger!
Never use the saw if the safety equip-
ment is not working properly. Never try to repair
safety related protection systems yourself – al-
ways have any work done by our service depart-
ment or by a similarly quali
fi
ed workshop.
Hand guard
The front hand guard (which also acts as the
chain brake at the same time) (Fig. 1/Item 2)
and the rear hand guard (Fig. 1/ Item 14) protect
against
fi
nger injuries resulting from contact with
the saw chain if the chain breaks because it is
overloaded.
Anl_PXCCSS_0182U_SPK7.indb 16
Anl_PXCCSS_0182U_SPK7.indb 16
27.11.2019 14:48:14
27.11.2019 14:48:14


