Overland Tandberg RDX QuikStation 4 Product Manual Download Page 87

RDX QuikStation 4 and 8 Product Manual

6 - Manage Tape Library Configurations

10400880-003

©2019-21 Overland-Tandberg


87

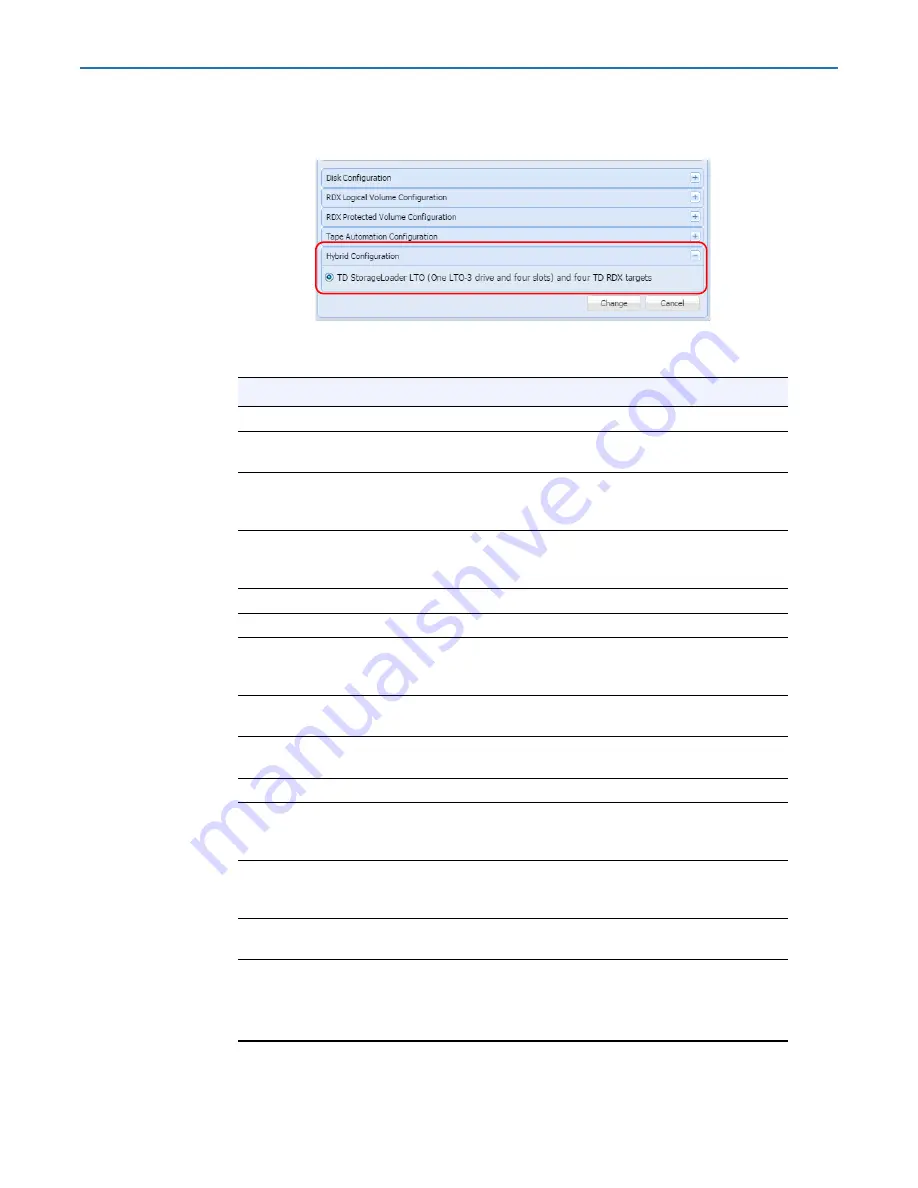
The RDX QuikStation 8 may also be configured as a “hybrid” device. In this case, four docks 
are used for tape library slots and four are used as RDX docks.

The following logical properties are displayed for RDX QuikStation 8 virtual tape libraries.

Property Name 

Description

For the library and its tape drives

Element address

Element address associated with the virtual location of the 
library and drives.

Vendor

Vendor name for the virtual library and drives. For example, the 
vendor name for a StorageLoader tape library is Tandberg Data 
and the vendor name for the tape drives is HP.

Product

Product name for the virtual library and drives. For example, the 
StorageLoader tape library product name is StorageLoader. For 
the LTO-3 virtual tape drive, the product name is Ultrium 3-SCSI.

Revision

Firmware revision level for the logical device.

Serial number

Serial number for the logical device.

iSCSI name

iSCSI name that identifies the library device targets. The iSCSI 
name is used to connect the initiators (host computers) to the 
targets.

Target ID/LUN

iSCSI target/logical unit number that identifies the library and 
drives.

Status

Operating status for the device. The status displays either good, 
offline, or an error state. 

For I/E port and tape slots

Element address

Element address associated with the virtual location of the tape 
library slots. The element address correlates to the RDX dock 
number.

Media label

1

1. Property item only visible if cartridge is loaded in the dock.

Default media label is derived from the last six digits of the RDX 
cartridge serial number and 

L

n

, For example, 

L3

 refers to an 

LTO-3 tape cartridge.

Media state

Media state displays either loaded or unloaded depending on 
how the drive is set in your backup application.

Media usage

1

Percentage of capacity that has been used for the RDX cartridge 
(or virtual tape cartridge). 

NOTE: Media usage for RDX docks is unavailable. This 

property is only reported for tape library configurations.

Summary of Contents for RDX QuikStation 4

Page 1: ...RDX SATA III Part Number 1021806 Rev A November 2016 Product Manual For RDX QuikStation 4 and QuikStation 8 Systems Running Firmware Version 2 9 May 2021 10400880 003 ...

Page 2: ...losed by this document is considered proprietary by Overland Tandberg By accepting this material the recipient agrees that this material and the information contained therein are held in confidence and in trust and will not be used reproduced in whole or in part nor its contents revealed to others except to meet the purpose for which it was delivered It is understood that no right is conveyed to r...

Page 3: ...ially configure the RDX QuikStation Chapter 3 iSCSI Configuration describes how to connect host computers to RDX QuikStation iSCSI targets including how to set up iSCSI security Using the RDX QuikStation Web Interface Chapter 4 System Configuration describes RDX QuikStation system configuration tasks such as network configuration and user account management Chapter 5 Logical Device Management prov...

Page 4: ...can impact the product and its function CAUTION A Caution contains information that the user needs to know to avoid damaging or permanently deleting data or causing physical damage to the hardware or system WARNING WARNUNG ADVERTISSEMENT A Warning contains information concerning personal safety Failure to follow directions in the warning could result in bodily harm or death Eine Warnung enthält In...

Page 5: ...een reviewed for accuracy but not for product warranty because of the various environments operating systems or settings involved Information and specifications may change without notice Technical Support You can get additional technical support information at https www overlandtandberg com service support contact service support ...

Page 6: ...act Design 12 RDX QuikStation 4 Components 12 Front Components 12 Rear Components 13 RDX QuikStation 8 Components 14 Front Components 14 Rear Components 15 Chapter 2 Initial Setup and Configuration Obtain the IP Address 17 Assign a Static IP Address 18 Revert to DHCP IP Address Usage 18 Connect to RDX QuikStation 19 First Access Password Change Requirement 19 Configuring the RDX QuikStation 20 Log...

Page 7: ...lt In Administrator Password 52 Convert Device Type 55 Options for RDX QuikStation 55 System Options 56 Setting Removable Disk Options 56 Setting the Auto Insert Option 58 Configure Remote Access SSH 60 Chapter 5 Logical Device Management Logical Device Type Overview 63 Select the Logical Device Type 64 RDX Targets 65 RDX Individual Docks 66 RDX Logical Volume 66 Logical Volumes 68 Creating a Logi...

Page 8: ...96 Chapter 8 System Maintenance System Maintenance Overview 98 Generate System Logs 99 Diagnostics Tab Log Options 99 RDX QuikStation Restart and Shutdown 100 System Restart 100 System Shutdown 100 Import RDX QuikStation System Configuration Files 101 Export RDX QuikStation System Configuration Files 102 Update RDX QuikStation Firmware 102 Automatic Firmware Updates 102 Manual Firmware Updates 102...

Page 9: ... Manual Contents Australia and New Zealand 111 China RoHS 112 Japan 112 Korea 113 United States FCC Declaration of Conformity 113 Appendix C Safety Guidelines General Safety Precautions 115 Electrical Safety Precautions 115 ESD Precautions 116 Battery Precautions 116 Index ...

Page 10: ...ogy They combine data protection benefits of removable media and the reliable performance of disks They also provide enterprise grade performance 99 999 reliability and high speed yet are very easy to use QuikStation 4 Rack Mount QuikStation 4 Desktop QuikStation 8 Rack Mount Topics in Product Overview RDX QuikStation Features RDX QuikStation 4 Components RDX QuikStation 8 Components ...

Page 11: ...inst the loss of two cartridges or two RDX logical volumes each combining the capacity of up to four RDX cartridges and each can be protected against the loss of a single cartridge High Performance and Capacity When configured as a virtual tape library emulating a Storage Loader LTO or StorageLibrary T24 the RDX QuikStation can simultaneously read and write from all RDX docks loaded with cartridge...

Page 12: ...ck panel components Front Components RDX Cartridge Eject Button Status LED The following table describes status LED color codes 1 2 4 5 3 Description 1 RDX dock four each 2 Emergency eject keyhole centered above each dock NOTE To use the emergency eject function use the Eject Key included with the RDX QuikStation and insert it into the keyhole You can also straighten a paper clip and insert it int...

Page 13: ...ith Four 1GbE Ports 1 2 5 5 3 6 4 7 Description 1 AC power plug 2 Power switch 3 USB 3 0 ports 2x 4 VGA Connector 5 USB 2 0 ports 6x 6 1Gb Ethernet port eth0 7 1Gb Ethernet port eth1 1 2 4 3 5 6 7 8 Description 1 AC power plug 2 USB 2 0 Ports USB0 top USB1 bottom 3 Ethernet port IPMI remote management 4 1GbE Port eth2 5 1GbE Port eth0 6 1GbE Port eth3 7 1GbE Port eth1 8 VGA connector ...

Page 14: ...hten a paper clip and insert it into the keyhole The paper clip needs to be sturdy enough to engage the eject mechanism 3 RDX cartridge eject button with status LED eight each 4 QuikStation status icons 5 USB 2 0 port used for configuration and diagnostics 6 QuikStation power button with LED green when power is ON LED Status Off no color The dock does not have power Green Power is ON and the dock ...

Page 15: ...3 RDX 1Gb connected Software polls 1Gb interface for activity If there is activity the LED is refreshed If there is no activity the LED is not refreshed Hardware will turn on the LED when refreshed Hardware will turn off the LED if not refreshed Warning Turned on when there is an error or warning condition that requires the user to check the GUI USB in use On or blinking when the front panel USB p...

Page 16: ...d connector green purple 4 USB 2 0 ports 2x 5 USB 3 0 ports 2x 6 Ethernet port IPMI remote management 7 Serial connector 8 VGA connector Version 1 Models Only 8930 RDX and 8940 RDX 9 1GbE built in port eth0 10 1GbE built in port eth1 11 1GbE on card port eth2 12 1GbE on card port eth3 13 10GbE on card port eth4 model 8940 RDX only Versions 2 3 Models Only 8943 RDX 14 10GbE built in port eth0 15 10...

Page 17: ...n IP address is needed to continue the configuration NOTE The default network configuration is set for dynamic IP addresses DHCP but static IP addresses are also supported To determine the unit s IP address 1 Attach a monitor to the VGA connector 2 Power on the unit by pressing the power button After the unit initializes the IP addresses are displayed on the monitor The IP address can also be obta...

Page 18: ...E If the unit does not reboot automatically recheck the network conf filename to ensure it is all lowercase letters You may need to use a Linux or MacOS host system to check a filename as Windows OS can sometimes change the filename to uppercase but cannot display it as such Use your browser to access the new static IP address to view the QuikStation interface For more information on how to config...

Page 19: ...irst time you login to the RDX QuikStation you will be required to create a new uncommon Administrator s password First Access Password Change Requirement Due to heighten security and privacy requirements in today s world the first time you log into the RDX QuikStation you are required to create a new uncommon Administrator s password A reset password pop up screen is displayed when connected via ...

Page 20: ...QuikStation with a few basic settings to prepare it for use Logical Device Type You can configure your QuikStation in two ways As individual RDX docks four RDX docks for QuikStation 4 or eight RDX docks for QuikStation 8 With RDX logical volumes one set of four RDX docks for QuikStation 4 or either one set of eight RDX docks or two sets of four RDX docks for QuikStation 8 The unit is shipped in th...

Page 21: ...tion Network Information We recommend that you assign a static IP address to prevent inadvertent IP address changes of the iSCSI target You can also configure optional DNS server addressing information Go to System Settings Network The RDX QuikStation automatically reboots after you have made your network changes See Chapter 4 Network Configuration on page 39 for more information Email Notificatio...

Page 22: ...our iSCSI targets RDX QuikStation 4 or one to eight iSCSI targets RDX QuikStation 8 with which to connect NOTE For more information about viewing iSCSI targets see Chapter 6 iSCSI Device General Information on page 89 You can configure iSCSI initiators with or without iSCSI security The RDX QuikStation supports the one way Challenge Handshake Authentication Protocol CHAP The CHAP protocol is used ...

Page 23: ...Targets Without Authentication This section describes how to connect Windows Linux and Mac OS X hosts to RDX QuikStation iSCSI targets without authentication If you plan on using one way CHAP authentication follow the instructions in Set iSCSI Security on page 30 Connecting iSCSI Targets for Windows Connecting iSCSI Targets for Linux Connecting iSCSI Targets for Mac OS X Connecting iSCSI Targets f...

Page 24: ...land Tandberg 24 2 Open Microsoft iSCSI Initiator and click the Discovery tab Your version of iSCSI initiator may use Add depending on your Windows OS 3 Click Discover Portal 4 In the Discover Target Portal dialog window that opens type the IP address for the RDX QuikStation and click OK ...

Page 25: ...pe for the actual RDX QuikStation you have you will see either four or eight iSCSI targets 6 For each iSCSI target a Select an iSCSI qualified name IQN from the list and click Connect NOTE Depending on your Windows OS your version of iSCSI initiator button may say Log On b In the dialog box that opens check the Add this connection to the list of Favorite Targets box and click OK ...

Page 26: ...The following instructions describe how to connect iSCSI targets using a Linux Open iSCSI Initiator that is available for Redhat Enterprise Linux CentOS Fedora Linux Debian and Ubuntu operating systems NOTE For more information about using an Open iSCSI Initiator with your specific Linux operating system refer to your Linux distribution website 1 Install Open iSCSI Initiator For a Linux operating ...

Page 27: ...ormat and mount iSCSI disks like a normal disk Other iscsiadm Commands To disconnect from an iSCSI target enter the following command replacing target_IQN_name with the iSCSI qualified name IQN of the target and replacing target_portal with the RDX QuikStation IP Address iscsiadm m node T target_IQN_name p target_portal logout To delete a target enter the following command replacing target_IQN_nam...

Page 28: ...e IP address for the RDX QuikStation If you are using a port number other than the default type the number in the Port field Otherwise leave the default 3260 port number 3 Click Finish The dialog window displays the discovered iSCSI targets Depending on how you configured the logical device type for the RDX QuikStation you have you will see one to eight iSCSI targets ...

Page 29: ...ayed in the left pane with a red icon signifying that they are not yet connected 5 For each iSCSI target complete the following steps to connect the target a Select an iSCSI qualified name IQN from the left pane The target s port information opens in the center pane b Check both the Visible and Auto Login boxes c Click the Status tab The target s connection status is displayed ...

Page 30: ...tiator can be actively connected to the target at a time Host Authentication Only the initiators on host computers that you specify for an iSCSI target will be allowed to connect to the target Without host authentication any network host can connect to the iSCSI target You can add up to 10 host computers per iSCSI target However for all logical device configurations only one initiator can be activ...

Page 31: ...ab select the iSCSI target from the tree view on the left and click the Security tab 3 Enable your authentication To set CHAP authentication see Enabling CHAP Authentication on page 31 To set host authentication see Enabling Host Authentication on page 32 Enabling CHAP Authentication To add CHAP users host computers to an iSCSI target 1 From the Security tab dialog window verify that the CHAP Auth...

Page 32: ...hange the default host initiator name in your host iSCSI initiator software to match this name 4 Enter and verity the CHAP Secret Key The secret must be 12 to 16 characters long You can use any combination of letters numbers and the following special characters _ 5 Click Add Enabling Host Authentication To add host computers that are allowed to connect to an iSCSI target 1 From the Security tab di...

Page 33: ...SI initiator interface may differ slightly depending on your Windows operating system To establish an iSCSI connection with CHAP enabled 1 After discovering all the iSCSI targets see Connecting iSCSI Targets for Windows on page 23 select an iSCSI qualified name IQN from the list and click Connect The Connect To Target dialog window opens 2 Click Advanced 3 In the Advanced Settings dialog window co...

Page 34: ...ts with CHAP for Linux The following instructions describe how to connect iSCSI targets with CHAP authentication using a newly installed Linux Open iSCSI Initiator that is available for Redhat Enterprise Linux CentOS Fedora Linux Debian and Ubuntu operating systems NOTE For more information about using an Open iSCSI Initiator with your specific Linux operating system refer to your Linux distributi...

Page 35: ...ollowing command iscsiadm m node L all To connect to an individual target enter the following command replacing target_IQN_name with the iSCSI qualified name IQN of the target and replacing target_portal with the RDX QuikStation IP address iscsiadm m node T target_IQN_name p target_portal login Once all iSCSI targets are connected the initiator Linux host can use the iSCSI disks as a normal disk I...

Page 36: ... information opens b Check both the Visible and Auto Login boxes c Click Security The Configure Security dialog window opens NOTE The Target User Name the host s IQN name must match the user name that is specified in the iSCSI Management settings d Enter the Target Secret This secret must match the CHAP secret that was set for this particular iSCSI target e Click OK f Click the port information St...

Page 37: ...nd Tandberg 37 g Select the Network Node that is shown and click Login When connected to the RDX QuikStation the iSCSI targets are displayed with a green icon CAUTION Before you shut down or restart the RDX QuikStation for any reason it is recommended that you disconnect all iSCSI targets ...

Page 38: ...ormation Modify the RDX QuikStation name assign a static IP address configure DNS server addressing information and set a port bonding mode see Network Configuration on page 39 Notification Specify email addresses where messages for error reporting and password recovery are sent enable SMTP authentication and customize email sender and subject line text see Notification Configuration on page 47 Us...

Page 39: ...me Server field When entering multiple NTP server names or IQNs separate them with commas With the Keep time synchronized with NTP server box unchecked use the Time Zone drop down list at the top to select a zone then manually change the System Date and System Time fields as needed NOTE The RDX QuikStation hardware clock defaults to UTC Coordinated Universal Time When changing the time zone always...

Page 40: ...hat interface to None If this is not done it will take longer for the system to boot and under certain circumstances ports that are connected may not function properly To configure network information for the RDX QuikStation 1 Select System Settings Network The Network Settings dialog window opens showing only those interfaces that are not part of another bonded interface 2 If desired you can modi...

Page 41: ...verland Tandberg 41 The Modify Bonding dialog opens NOTE For the RDX QuikStation 8 model with four 1GbE and one 10GbE ports the 10GbE port cannot be bonded with any 1GbE ports RDX QuikStation 4 two 1GbE ports RDX QuikStation 8 four 1GbE ports 10GbE RDX QuikStation 8 Single 10GbE Model ...

Page 42: ...he network 1500 to 9000 bytes The default value is 1500 bytes All devices sharing a network should have the same MTU setting 8 If you are configuring a bonded setup select a bonding configuration By default the port setting is set for Active Backup or Failover In most cases this default setting suffices for your network environment See Port Configuration Options on page 43 for more information 9 C...

Page 43: ... Settings Network Settings dialog select Information to display the Active Network Interface Settings dialog 11 Click OK to close Port Configuration Options The RDX QuikStation 4 depending on the model has either two or four 1GbE ports to provide failover protection and high availability network connectivity The RDX QuikStation 8 depending on the model has either four 1GbE ports four 1GbE and one ...

Page 44: ... connection if you choose to allow the Multiple Host Connections option See Options for RDX QuikStation on page 55 Port bonding mode Description Active backup failover The Active backup or failover mode is the default configuration for the RDX QuikStation This mode uses one port adapter and is limited by that port s throughput It will only switch to the other port if the active port fails Adaptive...

Page 45: ...face MUST be disabled as well Failure to disable the bond interface causes the QuikStation to become inaccessible over the network This condition requires a network reset using a specially configured USB drive Contact Overland Tandberg Technical Support 1 Remove the Ethernet ports from the bond configuration a Select System Settings Network b Click Modify Bonding c At the Modify Bonding dialog che...

Page 46: ...on 10400880 003 2019 21 Overland Tandberg 46 b At the modify dialog box select the Disable this interface option and click OK 3 Configure at least one of the Ethernet ports See Network Configuration on page 39 for details The example below is configured as DHCP ...

Page 47: ...s dialog window consists of three tabs basic authentication and customization If your email server requires it the Authentication tab allows you to add a user name and password for SMTP authentication The Customization tab allows you to define the From email address and the subject text for email messages that are sent by the RDX QuikStation NOTE If the network is set to a static IP address the De...

Page 48: ... address such as 192 168 1 101 4 If required specify the SMTP email port The default is 25 5 If your email server uses SSL TSL check the box to enable it 6 Click Change Setting SMTP Authentication 1 From the Notification Settings dialog window click the Authentication tab 2 Type the SMTP user name and password for your email server 3 From the drop down menu select the authentication method either ...

Page 49: ...an access Adding Users to a Group To add users to a group 1 Select System Settings User Management User Manager Administrator Users have permission to do the following change their log in password view physical and logical device information refresh update device information manually Managers have permission to do the following view group information view iSCSI Management security and connection s...

Page 50: ...words are case sensitive and must be 6 to 30 characters long Passwords can contain any combination of letters numbers and these special characters _ 4 From the drop down menu select the group to which you want to assign the user For a description of the permissions available to each group see Group Permissions Overview on page 49 5 If desired type a description to identify the user 6 Click Add Rem...

Page 51: ... the User Name Group or Description 1 Select System Settings User Management 2 From the User Management dialog double click in the field you want to edit The field becomes editable 3 Make your desired changes and press Enter NOTE User names can only contain letters numbers and the underscore _ character Names are limited to 80 characters in length Editing a Password NOTE For users assigned to admi...

Page 52: ...al characters _ Recovering the Built In Administrator Password If you have forgotten the built in administrator password you created you can reset the password via email or USB If you have forgotten the user name and password for any other account to edit the password either contact the RDX QuikStation administrator or sign in as the Administrator Resetting the Password via Email 1 From the RDX Qu...

Page 53: ...og open IMPORTANT If you close the browser session the request key that was sent via email becomes invalid 6 Copy the request key from the email message and paste it into the Reset Key field 7 Type a new password type the password again to verify and click OK Passwords are case sensitive and must be 6 to 30 characters long Passwords can contain any combination of letters numbers and these special ...

Page 54: ...is formatted with a type of FAT32 file system 2 Navigate to the flash drive and create a blank text file on the drive In Windows right click in the directory window and select New Text Document 3 Rename the text file to password reset In Windows click Yes to confirm the file name change 4 Remove the USB flash drive from your computer and insert it into an RDX QuikStation USB slot A slot is conveni...

Page 55: ...ce Type to open the Options tabs Select the Automation tab See Setting the Auto Insert Option on page 58 For more information refer to Chapter 5 Select the Logical Device Type on page 64 Options for RDX QuikStation To access the Options dialog from the main menu select System Settings Options The Options dialog window is divided into four tabs System Removable Disk Automation and Diagnostics Refer...

Page 56: ...igurations Removable Disk Unsafe Eject Allows you to enable the Unsafe Eject mode for RDX cartridges that have an established host connection see Setting Removable Disk Options on page 56 Automation Auto Insert Options Allows you to enable the Auto Insert mode tape automation devices If set then cartridges physically inserted in the QuikStation docks will be logically placed in an empty tape libra...

Page 57: ...disk operation mode can also be used for Windows backup support Enabling the unsafe eject option allows you to override the default and manually eject an RDX cartridge This option is not recommended because you could potentially lose data on the RDX cartridge if you use unsafe eject We recommend that you eject the RDX cartridge from your backup software application or from the host computer s ejec...

Page 58: ...on ON This is the default setting When one or more RDX cartridges are inserted the RDX QuikStation automatically moves them into an available logical slot The Auto Insert option eliminates the need to use your backup software to import each inserted cartridge If the slot corresponding to the physical dock is available that slot is used by the RDX QuikStation However you can still perform an export...

Page 59: ... library with the Tape Auto Insert option turned ON Note that the cartridges physical locations correspond with their logical tape slot locations This is the Logical Device view of a tape library with the Tape Auto Insert option turned ON Note that cartridges automatically mount to logical slots that correspond with their physical dock locations ...

Page 60: ...ware documentation for tape library import export commands and recommended use Change Auto Insert Option 1 From the Options dialog window click the Automation tab 2 Select your desired setting ON OFF 3 Click OK Configure Remote Access SSH Besides using a browser and the unit s IP address for access your RDX QuikStation can also be accessed at the root level Connect to the unit with the serial port...

Page 61: ...tion 1 From the main menu select System Settings Options 2 Switch to the Diagnostics tab 3 Click Re Initialize SSH Keys A confirmation message is shown 4 Click OK again to close the System Settings options dialog box Generate and Upload SSH Public Key 1 Generate a public private SSH key pair using the ssh keygen utility a Open a command line terminal with ssh keygen support b Paste the text below ...

Page 62: ...em Configuration 10400880 003 2019 21 Overland Tandberg 62 5 Navigate to the location where the new public private key pair was stored select the file with pub extension and click OK 6 Click OK again to close the System Settings options dialog box ...

Page 63: ...ed Logical Volume on page 66 One target for each RDX dock RDX Logical Volume Fixed Disk Target Up to four RDX cartridges as a single fixed disk target Two volumes with up to four RDX cartridges presented as two fixed disks targets Each volume is one target RDX Logical Volume Removable Disk Target Up to four RDX cartridges as a single removable disk target Two volumes with up to four RDX cartridges...

Page 64: ...s with up to four RDX cartridges presented as removable disks targets each with one disk fault tolerance Each volume is one target RDX Disk Automation Configuration One removable disk and four slots One removable disk and eight slots One disk target RDX Tandberg Data StorageLoader LTO Emulated Tape Library with one tape drive and four storage slots Emulated Tape Library with one tape drive and eig...

Page 65: ...on and click Change 4 At the confirmation message click OK A reboot note with a progress bar is displayed The RDX QuikStation reconnects automatically When done the Logical Device tab shows the new configuration with tabs for Properties Connection and Security RDX Targets This configuration presents each QuikStation RDX dock to the computer host as a individual iSCSI RDX dock QuikStation 8 ...

Page 66: ...ons dialog opens 2 Check the Present the disk as a fixed disk on the network box and click OK RDX Logical Volume The RDX Logical Volume combines up to either 4 RDX cartridges for the QuikStation 4 or 8 RDX cartridges for the QuikStation 8 into a single logical volume target This configuration allows you to manage a single logical volume comprised of one or more of the RDX cartridges in your system...

Page 67: ...Disk RDX Logical Volume is presented as an RDX removable disk to the host computer This means that the host computer expects that the disk may be removed The host operating system may allow ejection of the device from the host The user interface software will allow the logical volume to be ejected while it has an iSCSI connection to a host as long as the host software has allowed the removal When ...

Page 68: ...stall the RDX Manager which is available from www tandbergdata com A link is also provided in the Logical Device Type Settings dialog The Removable Disk RDX Logical Volume is presented as a single RDX device Even if no logical volume is present in the system an RDX dock device will be available to the host iSCSI initiator In this case the virtual dock will appear to be empty Logical Volumes RDX do...

Page 69: ...ogical Volume dialog opens to allow you to select which available disks to use to create the logical volume NOTE Write protected and damaged cartridges are not allowed in this operation 3 Select the docks to use in the logical volume and click Create The logical volume is created Importing a Logical Volume If no logical volume is currently present you can also import a logical volume created on th...

Page 70: ...logical volume will be ready to use if all the disks that comprise the Logical Volume are present Expanding a Logical Volume If the logical volume contains fewer than eight disks for the QuikStation 8 or four disks for the QuikStation 4 you can add available disks to expand it NOTE The logical volume must be disconnected from any iSCSI host prior to adding available disks to the logical volume Wri...

Page 71: ...tem documentation Erasing a Logical Volume The entire logical volume can be also be erased using Erase NOTE The logical volume must be disconnected from any iSCSI host prior to erasing it To erase an entire logical volume 1 From the Logical Device dialog select the logical volume and click Erase to show the information dialog 2 Click Remove Once all logical volume information is removed all disks ...

Page 72: ... information to keep with the logical volume disk set after it is ejected Once the logical volume disks have been ejected they should be carefully marked and kept as a set The disk set if complete may be imported into this or any other RDX QuikStation When an RDX Logical Volume is ejected the Logical Device tab will show an empty logical volume NOTE For a Removable Disk RDX Logical Volume you can ...

Page 73: ... disk or as an RDX device NOTE Adding fault protection to a volume requires some data redundancy The loss of storage capacity may be roughly estimated as the capacity of the fault tolerated disks in the volume When creating an RDX Protected Volume the size of the available space is dependent on the size of the smallest disk used to create the volume It is strongly advised to use disks which are al...

Page 74: ...ing systems Since the RDX Protected Volume is presented as an actual RDX device it will work with any host software that can utilize an RDX dock NOTE If you select the RDX Removable Protected Volume configuration you should first install the RDX Manager which is available from www tandbergdata com A link is also provided in the Protected Device Type Settings dialog The Removable Disk RDX Protected...

Page 75: ... available disks to use to create the protected volume 3 Select the docks to use in the protected volume and click Create Importing a Protected Volume If no protected volume is currently present you can also import a protected volume created on this or another RDX QuikStation 1 Insert all the RDX cartridges belonging to this protected volume 2 From the Logical Device page select one of the availab...

Page 76: ...cted volume contains fewer than the maximum number of disks you can expand it NOTE The logical volume must be disconnected from any iSCSI host prior to adding available disks to the logical volume 1 Select an available disk and click the Extend button The Extend dialog allows you to select which available disks to add to the protected volume NOTE Write protected and damaged cartridges are not allo...

Page 77: ...administrator s guide for your operating system Expanding a Fixed Logical Volume File System for a Window Host When one or more disks are added to an existing RDX Logical Volume the file system on that logical volume is not enlarged That must be done by the host file system handler For a Windows host the file system on an RDX Fixed Logical Volume can be expanded Expanding the file system leaves al...

Page 78: ... 4 and 8 Product Manual 5 Logical Device Management 10400880 003 2019 21 Overland Tandberg 78 4 In the Extend Volume Wizard use the defaults to fully extend the file system by clicking Next The extension is completed ...

Page 79: ...different IQN than the Removable RDX Logical Volume so the old IQN must be cleared from the initiator first 6 Connect the host iSCSI initiator to the Fixed RDX Logical Volume 7 Follow the instructions in Expanding a Fixed Logical Volume File System for a Window Host on page 77 8 Disconnect the host iSCSI initiator from the Fixed RDX Logical Volume 9 Use Convert Device Type to convert the RDX QuikS...

Page 80: ...ased on the RDX cartridge only the partition table on the disk and LVM metadata Exporting the Protected Volume NOTE The protected volume should be disconnected from any iSCSI host prior to ejecting the protected volume A RDX Protected Volume can be exported by using the protected volume Eject option NOTE For a Removable Disk RDX Protected Volume you can also export the protected volume by using th...

Page 81: ...can be imported into this or any other RDX QuikStation at a later time When a RDX Protected Volume is ejected the Protected Devices list shows no protected volumes and is marked as Empty Recovering a Degraded Protected Volume If a protected volume disk has failed and the volume is in a Degraded status you may restore the volume to full functionality by replacing the faulty cartridge 1 Remove the f...

Page 82: ...ikStation is configured as a Disk Autoloader the host will primarily see an iSCSI removable disk target When the host software ejects an RDX cartridge from the disk target the autoloader will virtually move the next cartridge into the disk target The disk target will become ready and the host software can continue operation Depending on the setting of the Autoloader Continuous Rotate option the ho...

Page 83: ...k has been logically ejected the first disk is again logically loaded If you have your RDX QuikStation configured as a disk autoloader you can do the following tasks from the Logical Device interface View Logical Properties for Autoloaders View Active iSCSI Connections Autoloaders Set iSCSI Security Logical Device Type Move a Cartridge Set the Autoloader Option View Logical Properties for Autoload...

Page 84: ...ridges continuously rotate through the slots This option eliminates the need to re insert the cartridges into the RDX docks Product The product name for the virtual disk autoloader and drives For example the disk autoloader product name is RDX Disk Library For the RDX virtual dock the product name is RDX Revision The firmware revision level for the logical device Serial number The serial number fo...

Page 85: ...kup job Once the cartridge is ejected the virtual autoloader loads a cartridge from the next subsequent slot into the drive It will load cartridges from the slots sequentially and will stop when it reaches the last slot even if new cartridges have been inserted On Checkbox is selected Does not physically eject the cartridge from the RDX dock when the virtual drive completes a backup job Instead th...

Page 86: ...Information Customize the iSCSI Devices View View Active iSCSI Connections for iSCSI Devices NOTE From the System Settings menu you can set an option to allow auto insert import export functionality of cartridges See Chapter 4 Options for RDX QuikStation on page 55 for more information View Logical Properties for Virtual Tape Library Emulations The RDX QuikStation 8 can be configured as a virtual ...

Page 87: ... the logical device Serial number Serial number for the logical device iSCSI name iSCSI name that identifies the library device targets The iSCSI name is used to connect the initiators host computers to the targets Target ID LUN iSCSI target logical unit number that identifies the library and drives Status Operating status for the device The status displays either good offline or an error state Fo...

Page 88: ...e cartridges within the virtual library or autoloader This functionality is built into the RDX QuikStation mainly for testing and diagnostic purposes NOTE Make sure that you do not have any backup jobs in progress before you logically move a cartridge To logically move cartridges 1 From the Logical Device interface select the tape slot I E Port or tape drive from the tree view in the left pane 2 S...

Page 89: ...be viewed from the iSCSI Devices view To view iSCSI Devices under the Logical Device tab select iSCSI Devices from the tree view in the left pane Inquiry String setting Behavior Original device inquiry string Default The virtual tape library reports the device s original inquiry string This is the inquiry string that a physical version of the tape library reports For example the device inquiry str...

Page 90: ...e RDX volume RDX Logical Volume UUID Unique identification number of the RDX volume RDX Logical Volume Capacity Total capacity of the logical volume Fixed Disk Provides a presentation to the iSCSI initiator Fixed disk shown as either On or Off iSCSI Name Full iSCSI name Target ID LUN Shows 1 0 Status Operating status for the device of either good offline or an error state Property Name Description...

Page 91: ...vice target from the tree view in the left pane NOTE The Connection tab only displays when you have selected an iSCSI device target from the left pane 2 Select the Connection tab Target ID LUN Shows 1 0 Status Operating status for the device of either good offline or an error state Fixed Disk Provides a presentation to the iSCSI initiator Fixed disk shown as either On or Off Media Label Default me...

Page 92: ...10400880 003 2019 21 Overland Tandberg 92 If there is a host connected to the target the host s initiator node name is displayed in the Connection window NOTE You can also set iSCSI security for each iSCSI target See Chapter 3 Set iSCSI Security on page 30 for more information ...

Page 93: ...idge to another Topics in Setup and Configuration Viewing Physical Device Properties Ejecting RDX Cartridges Reformatting RDX Cartridges Cloning Data Viewing Physical Device Properties At the main GUI screen click the Physical Device tab QuikStation Properties In the left pane of the Physical Device interface click the RDX QuikStation name Its properties are shown on the right The following QuikSt...

Page 94: ...tatus of the power supply Upper Power Module Status of the upper power supply module alerts temperature fan speed and voltage setting Lower Power Module Status of the lower power supply module alerts temperature fan speed and voltage setting Property Name Description Property Name Description Dock Version RDX dock firmware version Cartridge Status Operating system status for the RDX QuikStation ca...

Page 95: ... on page 56 NOTE Make sure that you do not have any backup jobs in progress before you eject RDX cartridges with the RDX QuikStation GUI To eject RDX cartridges 1 From the Physical Device interface select the dock where the RDX cartridge is located 2 On the upper right click Eject The RDX QuikStation ejects the RDX cartridge The dock displays Empty in the tree view If the RDX cartridge is part of ...

Page 96: ...ical volume may not be used in a cloning operation CAUTION Cloning a 3 TB or larger cartridge using code that is earlier than v01 002 00 may cause corruption of the destination disk and render it Not Authorized and unusable The cloning function copies the source RDX cartridge to a destination cartridge sector by sector so that the destination cartridge will be an exact image of the source cartridg...

Page 97: ...ens 3 Select the Source RDX cartridge 4 Select the Destination RDX cartridge NOTE The iSCSI targets related to the source and destination RDX cartridges will be offline during the cloning process 5 Click Start The RDX QuikStation begins the cloning process You can monitor the progress of the cloning job in the bottom right corner of the Physical Device interface Cloning Job Status Bar ...

Page 98: ...oad system log files to a host computer These files are encrypted and are meant for Overland Tandberg technical support only System Restart Restart the RDX QuikStation Important Before you restart the system for any reason make sure there are no active host connections to the iSCSI targets System Shutdown Perform a soft shut down of the RDX QuikStation which is the preferred way to turn off the po...

Page 99: ...system into the RDX QuikStation The RDX QuikStation automatically generates a log dump when a USB flash drive is detected Make sure that the flash drive does not include any RDX QuikStation system configuration files see Use a USB Flash Drive for System Tasks on page 104 Otherwise the RDX QuikStation will read and process those files instead of generating a system log Diagnostics Tab Log Options W...

Page 100: ...ts System Restart 1 From the main menu select System Maintenance System Restart 2 Click Yes to confirm The system reboots This process takes about three minutes When the reboot is complete the RDX QuikStation interface is active again You do not have to sign in again to access the system System Shutdown 1 From the main menu select System Maintenance System Shutdown 2 Click Yes to confirm If you ca...

Page 101: ...n Files on page 102 for information about exporting configuration files To import system configuration files 1 From the main menu select System Maintenance Import Configuration The Import Configuration dialog window opens 2 Select the network settings you want to import By default all configuration settings are selected 3 Click the green plus sign to browse to and select the RDX QuikStation config...

Page 102: ...te the name and location of the downloaded file The default location is C Users Administrator Downloads Click the folder icon in the confirmation message to go to that folder Update RDX QuikStation Firmware RDX QuikStation firmware can be either automatically or manually updated Automatic Firmware Updates If the Check firmware update automatically option is enabled see Chapter 4 Options for RDX Qu...

Page 103: ...r firmware versions v2 0 or later 4 Click the green plus sign in the dialog window to select the configuration file The firmware fw file must be appropriate for your device either for QuikStation 4 vtx1u or for QuikStation 8 vtx2u These code files are not interchangeable A software upgrade swu can be used for either QuikStation 5 Click Update 6 Click Yes to proceed The system reboots This process ...

Page 104: ...e is inserted into the RDX QuikStation the system automatically detects and imports the network settings from the file For more information see Chapter 4 Options for RDX QuikStation on page 55 Important The file must be exactly named network conf in order for the RDX QuikStation to import network settings Firmware updates You can update firmware by saving the firmware file to a USB flash drive and...

Page 105: ... page 13 and on the RDX QuikStation 8 model with two 10GbE ports QuikStation 8 Version 2 Model 8943 RDX on page 15 CAUTION The IPMI port is also accessed by the RDX QuikStation firmware Do NOT change or update the IMPI firmware The default network configuration for the IPMI port is set for dynamic IP addresses DHCP IMPORTANT To protect your system it is highly recommended that you change the defau...

Page 106: ...AP authentication make sure the CHAP secret specified for the RDX QuikStation see Chapter 3 Enabling CHAP Authentication on page 31 matches the CHAP secret specified in your iSCSI initiator software Refresh the discovered targets in your iSCSI initiator software This may require restarting the iSCSI initiator The RDX QuikStation interface has a session timeout error message The RDX QuikStation bro...

Page 107: ...ock cartridge with an amber LED and by using email notifications The emails detail the issue and whether it is the dock or cartridge Status Alerts Problem OK System is functioning Dock LED is green No problems found Broken Bad RDX Dock Dock LED is amber For QuikStation 8 the Warning symbol is also lit Broken or damaged dock Degraded Bad RDX Cartridge Broken or damaged cartridge ...

Page 108: ... 5 TB RDX cartridges 1 Unlimited offline capacity 1 5 TB cartridge is the largest size available when this product was published however the online capacity is only limited by the size of the RDX cartridge available Please refer to OverlandTandberg com for current maximum capacity cartridges Data Transfer Rate Up to 200 MB2 second across multiple docks write uncompressed See Chapter 4 Port Configu...

Page 109: ... load balancing or dynamic link aggregation Network Connectivity 2 x 1GbE or 4 x 1GbE ports USB Front Panel Ports 1 USB 2 0 port USB Rear Panel Ports 2 x USB 2 0 Removable Media Docks 4 x RDX bays RDX Cartridge Compatibility Capacity Backward and forward to all RDX cartridges of all capacities Part Numbers 8930 RDX 8940 RDX 8943 RDX Dimensions D x W x H 47 8cm x 44 0cm x 8 6cm 18 8in x 17 3in x 3 ...

Page 110: ...ber is filed as RMN A 01 16 Removable Media Docks 8 x RDX bays RDX Cartridge Compatibility Capacity Backward and forward to all RDX cartridges of all capacities 1 5 TB cartridge is the largest size available when this product was published however the online capacity is only limited by the size of the RDX cartridge available Please refer to Overland Tandberg website for current maximum capacity ca...

Page 111: ...EN 62368 1 EN 50581 2012 This device is in compliance with 2012 19 EU Waste of Electronic and Electrical Equipment WEEE RDX QuikStation 4 This device has been tested and found to comply with the limits for a Class B digital device pursuant to the Australian New Zealand standard AS NZS CISPR32 2015 and EN 55032 2015 Electromagnetic compatibility of multimedia equipment Emission requirements set out...

Page 112: ... GB 18455 2001 Packaging and Recycling Symbols Translation This is a Class B product based on the standard of the Voluntary Control Council for Interference from Information Technology Equipment VCCI If this is used near a radio or television receiver in a domestic environment it may cause radio interference Install and use the equipment according to the instruction manual Translation This is a Cl...

Page 113: ...s B digital device pursuant to part 15 of the FCC Rules These limits are designed to provide reasonable protection against harmful interference in a residential installation This equipment generates uses and can radiate radio frequency energy and if not installed and used in accordance with the instructions may cause harmful interference to radio communications However there is no guarantee that i...

Page 114: ...is equipment has been tested and found to comply with the limits for a Class A digital device pursuant to Part 15 of the FCC Rules These limits are designed to provide reasonable protection against harmful interference when the equipment is operated in a commercial environment This equipment generates uses and can radiate radio frequency energy and if not installed and used in accordance with this...

Page 115: ... operation of the equipment is not compromised Mechanical Loading Mounting of the equipment in the rack should be such that a hazardous condition is not achieved due to uneven mechanical loading Circuit Overloading Consideration should be given to the connection of the equipment to the supply circuit and the effect that overloading of the circuits might have on overcurrent protection and supply wi...

Page 116: ...s difference before contact is made to protect your equipment from ESD Use a grounded wrist strap designed to prevent static discharge Discharge static electricity from your body by touching a known grounded surface such as a computer s metal chassis Keep all components and printed circuit boards PCBs in their anti static bags until ready for use For grounding purposes make sure your computer chas...

Page 117: ...assword requirements 32 Xtend SAN initiator for Mac OS X 35 cloning RDX cartridge data 96 configuration files exporting 102 importing 101 configuring network settings 39 conventions typographical 4 customer support 5 D date and time setting 39 diagnostic tab log options 99 disk autoloader 11 Disk Automation Configuration 64 dynamic link aggregation network mode 44 E eject button power LED indicato...

Page 118: ...I targets for Mac OS X with CHAP 35 connecting iSCSI targets for Windows 23 connecting iSCSI targets for Windows with CHAP 33 device panel view 89 enabling CHAP 31 enabling host authentication 32 security overview 30 iSCSI connections 91 iSCSI device properties 90 iSCSI initiator 22 iSCSI target 22 L Linux command to delete a target 27 command to disconnect a target 27 connecting iSCSI targets 26 ...

Page 119: ...ifications 108 power ratings 110 restarting 100 safety guidelines 115 shutting down 100 system components 12 14 system maintenance overview 98 System Settings 38 updating firmware 102 rear components QuikStation 4 13 QuikStation 8 15 regulatory agency compliance 110 remote access via SSH 56 Remote Management Console iSCSI device view 89 removable disk unsafe eject mode 56 restarting the RDX QuikSt...

Page 120: ...ng modifying 39 typographical conventions 4 U Unique Inquiry option 89 Unsafe Eject Button Option 57 unsafe eject option 56 updating firmware 102 USB flash drive for system tasks 104 generating system logs 99 resetting the administrator password 53 user group adding to 49 editing 51 permissions 49 removing users from 50 V virtual tape library 11 logical properties 86 move a cartridge 88 W Windows ...

Reviews: