Page 25
Page 24
900-0125-
12
-
02 Rev A
©2017 OutBack Power Technologies. All Rights Reserved.
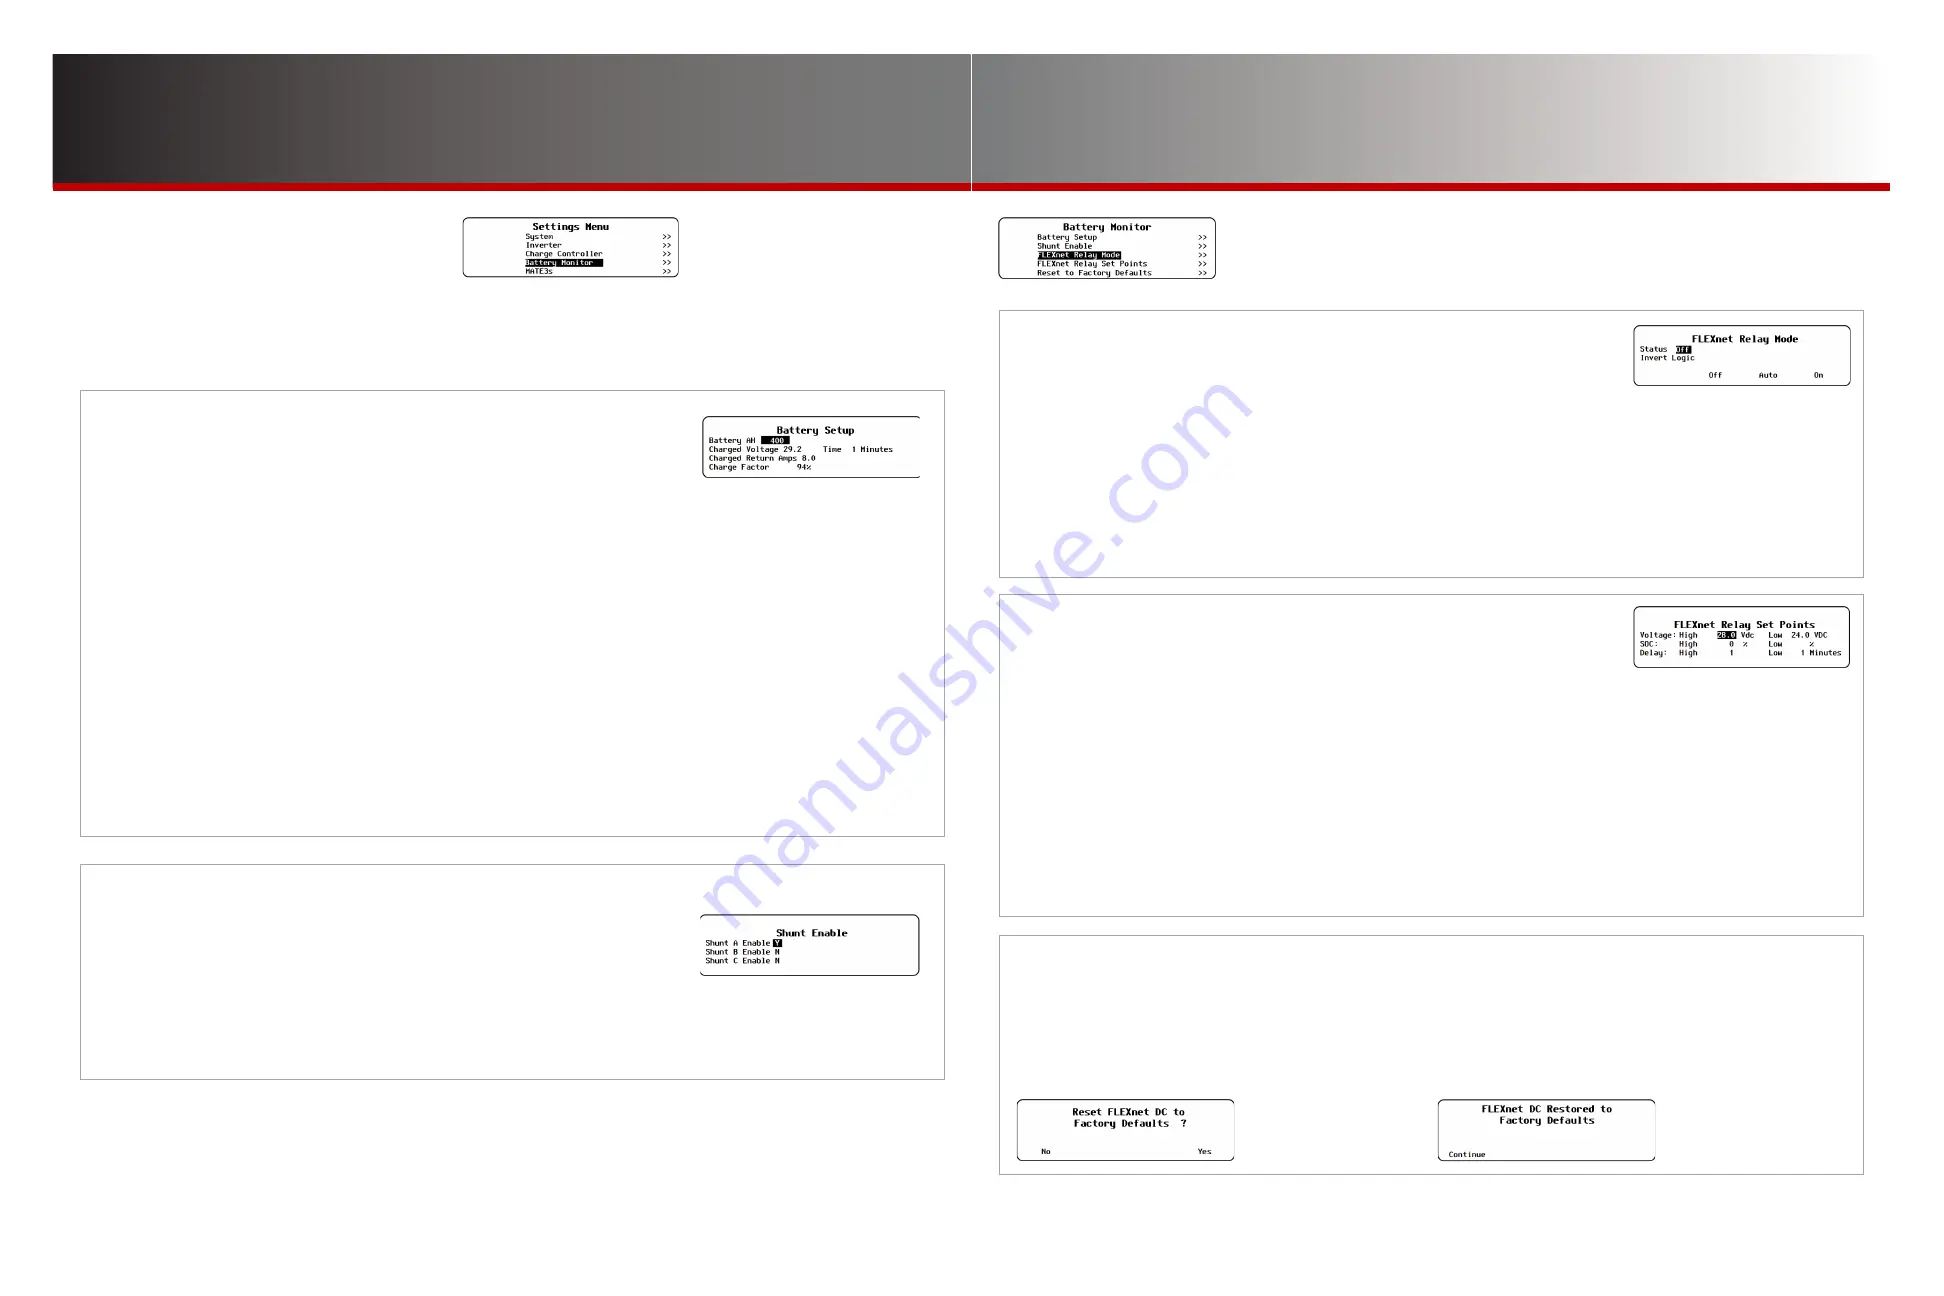
B-4. FLEXnet Relay Set Points
This menu allows the user to adjust the criteria used by the
Auto
selection in
the
FLEXnet Relay Mode
menu. For more information on these criteria, see
the FLEXnet DC literature.
NOTE
: The following set points assume N.O. logic as described in
B-3
. If N.C. logic is used, all uses of the
words “close” or “open” are reversed.
●
Voltage: High
— The relay will close upon reaching a specified high voltage level following the appropriate delay.
●
(Voltage)
Low
— After the relay was closed according to the
High
voltage set point, it will open again upon reaching a specified low
voltage level (following the appropriate delay; see below).
●
SOC: High
— If voltage conditions are not met, the relay will close when the battery state of charge (SOC) increases to a specified
percentage following the appropriate delay.
●
(SOC)
Low
— After the relay was closed according to the
High
SOC set point, it will open again upon reaching a specified low SOC level
following the appropriate delay.
●
Delay: High
— Sets the delay time before the relay closes due to a
High
set point. This applies to either the SOC or voltage settings.
●
(Delay)
Low
— Sets the delay time before the relay opens due to a
Low
set point. This applies to either the SOC or voltage settings.
B-3. FLEXnet Relay Mode
This menu allows the user to turn on or off an internal relay. The relay contacts
are rated for 5 amps at 30 Vdc. (It provides no voltage of its own.) The relay
can be used as a switch to turn other devices on or off. For more information,
see the
FLEXnet Relay Set Points
menu and the FLEXnet DC literature.
●
Status
— The Relay output status is controlled by the <
Off
>,<
Auto
>, and <
On
> soft keys.
◘
<
On
> activates the relay immediately. Its contacts will remain continuously closed until <
Off
> is selected.
◘
<
Auto
> activates the relay by automatic criteria, according to the option selected in
Relay Set Points
.
◘
<
Off
> deactivates the relay and prevents any of the
FLEXnet Relay Set Points
options from working. Note that even if the
relay output is set to <
Off
>, it may still be activated by an external option such as AGS. (See page 26.)
●
Invert Logic
– Switches the relay‘s function from N.O. (a normally open state) to N.C. (a normally closed state). The selections are
N
(no) and
Y
(yes). Since the default condition is N.O., the
N
selection means it remains in this state. Selecting
Y
inverts the logic to
N.C. The relay will close with an audible click when this occurs.
B-2. Shunt Enable
This menu allows the user to turn on or off any of three shunts
(current sensors) used by the battery monitor. These are designated as
shunts A, B, and C. For more information on the use of each shunt, see the
Owner’s Manual
for the FLEXnet DC.
●
Y
(yes) — Instructs the battery monitor to measure the current running through a particular shunt.
●
N
(no) — Instructs the battery monitor to ignore the selected shunt.
Battery Monitor Settings
Battery Monitor
Battery Monitor Settings (B)
○
B-1
Battery Setup
○
B-2
Shunt Enable
○
B-3
FLEXnet Relay Mode
○
B-4
FLEXnet Relay Set Points
○
B-5
Reset to Factory Defaults
B-1. Battery Setup
This menu sets the parameters used by the FLEXnet DC battery monitor
(FN-DC) to track battery status. (Many of the figures must be given by the
battery manufacturer.)
These settings are “fully charged” parameters. When they are met, the Home screen SOC percentage
indicator meter will alternate between light and dark text. (See the
MATE3s Overview Guide
.)
●
Battery Amp-hours
— Identifies the total size of the battery bank in amp-hours.
●
Charged Voltage
— This is the minimum voltage that the batteries must reach during the Bulk or Absorption stages for
the FN-DC to consider the batteries fully charged.
●
Charged Return Amps
— Sets the limit to which the current must “trickle down” or decrease before the batteries are
considered charged.
●
Time
— Sets the duration the
Charged Voltage
and
Charged Return Amps
must be maintained before the charging cycle is
considered finished.
●
Charge Factor
— Adjusts the anticipated charging efficiency of the batteries. Because the batteries cannot be 100% efficient,
the battery monitor discounts a certain percentage of the energy used to charge them. This provides a more realistic estimate of
the amount of charge that has been restored.
See the FLEXnet DC literature for more information on recommended settings.
See page 44 for the effects of the Profile Wizard on several of these settings.
NOTE
: The MATE3s has certain additional functions that can be used with the FLEXnet DC. See
M-8
on page 40.
B-5. Reset to Factory Defaults
This screen allows the user to erase the settings from
the selected charge controller and start over with the
values programmed at the factory. These values are
listed in the FLEXnet DC literature.
Entering this screen brings up the query
Reset FLEXnet DC to Factory Defaults?
Use the soft keys to select
No
or
Yes
.
●
If <
No
> is selected, the screen returns to the
Battery Monitor
menu. No changes will be made to any settings.
●
If <
Yes
> is selected, the battery monitor’s settings immediately
change to the original factory values. The screen displays the
message
FLEXnet DC Restored to Factory Defaults
. A
<
Continue
> soft key will appear. Pressing this key returns the
screen to the
Battery Monitor
menu.


