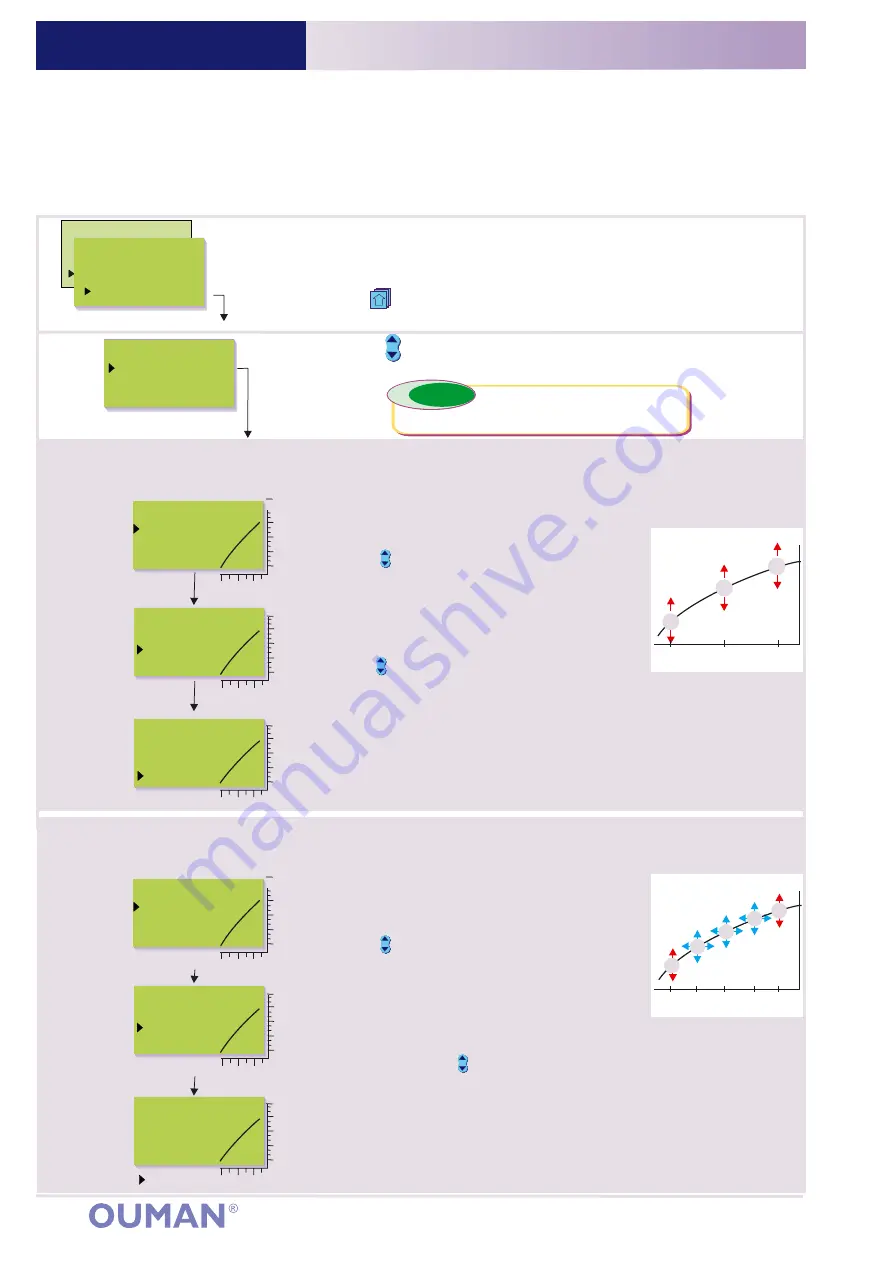
H2
Automatic
Press
Press the
or
button to set the supply water
temperature at an outdoor temperature of -20 C.
o
Press
OK.
OK.
-
+
Press the
button to move to the next
adjustment point..
Press
ESC
until the display no longer changes.
You are then in the "Selection" display shown in the adjoining picture.
Use the
button to move from one regulating circuit to the next
(H1, H2).
Press the
button to move cursor to "Heating curve"
Press
OK.
OUMAN EH-203
SETTINGS FOR HEATING CURVE
OUMAN EH-203
OPERATING INSTRUCTION:
80
65
50
35
20
20 0 -20 °C
80
65
50
35
20
20 0 -20 °C
80
65
50
35
20
20 0 -20 °C
Press
OK.
H1
Outdoor
°C
SupplyTemp
°C
Selection
Automatic
-15
52
H1 Curve:
-20 =
°C
20 = 18°C
0 = 41°C
+
58
H1 Curve:
-20 = 58°C
20 = 18°C
0 =
°C
+
41
H1 Curve:
-20 = 58°C
0 = 41°C
+20 =
°C
18
4
H1 Select
Heating curve
Settings
Measurements
Info water temp
DH Energy meas.
Press
Press the
or
button to set the
supply water temperature at an outdoor temperature
of 0 C.
o
Press
OK.
OK.
-
+
Press the
button to move to the next
adjustment point..
Press
Press the
or
button to set the supply water temperature at an outdoor
temperature of -20 C.
Exit with
o
Press
OK.
OK.
-
+
ESC.
The correct shape for the characteristic heating curve depends on
many factors (the insulation in a house, type of heat distribution, the
dimensions of the piping, etc.).
Ouman EH-203's characteristic heating curve can be adjusted to
exactly fit the needs of the facility from either three or five points. A 3-
point curve is a factory setting.
A 5-point curve can be taken into
use in the special maintenance mode. (see p. 33).
A heating curve is typically set so that
the supply water temperature rises when the outdoor temperature drops.
1
2
3
20
0
-20 °C
Supply water
Outdoor temp.
20
-20 °C
Supply water
Outdoor temp.
1
5
2
3
4
Hint !
Hint!!
Adjustable values are
white in color.
3-point curve (factory setting): You can adjust the characteristic heating curve using outdoor temperature
settings - 20°C, 0°C and +20°C. EH-203 prevents you from setting characteristic heating curves that are
the wrong shape. It automatically proposes a correction.
Adjustment
point 1
Adjustment
point 2
Adjustment
point 3
80
65
50
35
20
20 0 -20 °C
80
65
50
35
20
20 0 -20 °C
80
65
50
35
20
20 0 -20 °C
H1 Curve:
-20 = 58°C
-10 = 50°C
0 = 41°C
10 = 28°C
20 = 18°C
H1 Curve:
-20 = 58°C
=
°C
=
°C
=
°C
20 = 18°C
-10
50
0
10
28
41
H1 Curve:
-20 = 58°C
-10 = 50°C
0 = 41°C
10 = 28°C
20 =
°C
18
Adjustment
point 1
Adjustment
points 2-4
Adjustment
point 5
Press
Press the
or
button to set the
supply water temperature at an outdoor
temperature of -20 C.
o
Press
OK.
OK.
-
+
Press the
button to move to the next
adjustment point..
Press
Press the
or
button to set
OK.
-
+
OK
-
+
OK
the
outdoor temperature for which you want to
determine the supply water temperature. Press
. Press the or
button
to set the supply water temperature for the outdoor temperature in question.
Press
. . Press the
button to move to the next adjustment point..
Press
Press the
or
button to set the supply water temperature at an outdoor
temperature of -20 C.
Exit with
o
Press
OK.
OK.
-
+
ESC.
5-point curve (taken into use in special maintenance see p. 33):
Note! Automatic characteristic heating curve proposed correction is not in use!
You can adjust the characteristic heating curve
using outdoor temperature settings -20°C and +20°C as well as three other outdoor temperature settings between
-20°C - +20°C.


