background image

10

English

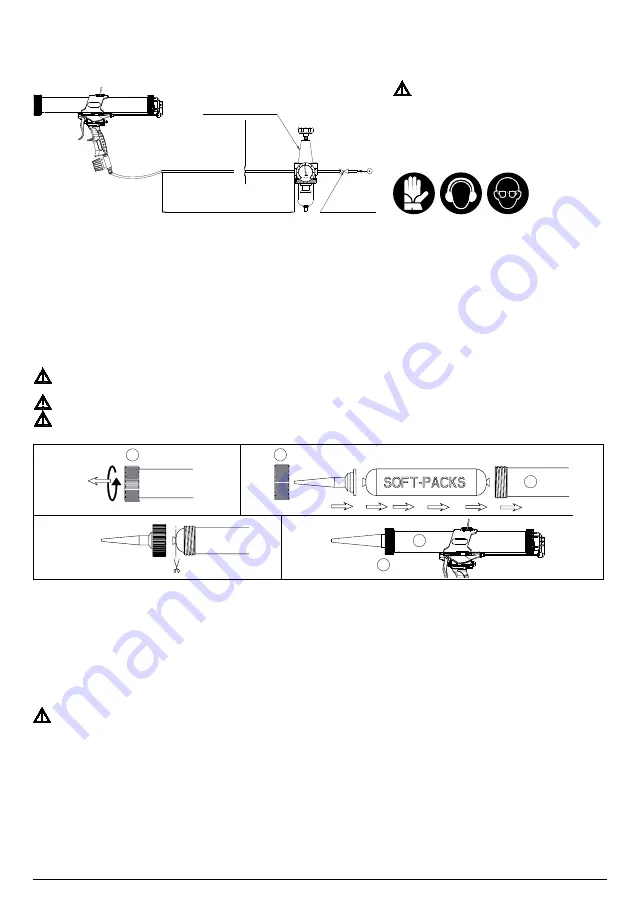
4.2.1   Unscrew the front ring nut counter-clockwise (2) and remove it from the machine.

4.2.2   Introduce and fix the bag nozzle to the front ring nut (2) (push the piston back in case it is forward); secondly introduce the 


bag in the material holder tube (7); push the bag to the very bottom letting out only the part which is meant to be cut.

4.2.3   Cut the bag just under the closing metal band.

4.2.4  Tighten clockwise the front ring nut (2) to the material holder tube (7). The ring nut shall contain the plastic nozzle. 

4.2.5    (Model CSG II 450 only) before introducing the bag in the material holder tube, make sure the bags extrusion kit has been 


assembled, as outlined below.

Assembly of bag kit (Mod. 450)


Caution: this is the only operation to perform without the front nut. Before performing it, be sure that there are no  


bags or cartridges inside!Carefully read the following! 

4.2.5.1   Before starting, prepare two 13 mm spanners and a 5 mm Allen wrench.


Totally unscrew the knob of the pressure reducer on the machine anti-clockwise, then slowing slowly, clockwise with the  


control level pressed until the piston inside starts to slowly move, stop pressing the control lever and remove the front nut  


when the lever reaches it and stops. Afterwards, press the control lever again with one hand on the grip and one on the  


pipe, as recommended, until the piston completely comes out of the pipe. Now disconnect or switch off the power supply.

4.2.5.2   Tighten the nut C with the two open ended spanners and unscrew and remove the locking nut A, also remove the metal 


cartridge presser B (standard).

4.2.5.3   In the following order, tighten: the locking nut C (if removed to the previous position), the cartridge presser B, the (blue) 


plastic support F, the scraper E, and with the 5 mm allen key the aluminium plastic bag presser D.

4.2.5.4   Ensure all components are tightened properly with the spanners and key previously employed.

4.1 Air feeding system

Connect the machine to a compressed air system featuring the following characteristics:

• Max. air humidity 5%;  • Air temperature from -10° C to +70° C • System capacity 500 l/min at least  • System equipped with lubri-

cator, pressure reducer and gauge.Lubrication must be: 3-4 drops of lubricant every 1000 l/min. 

The machine is equipped with a ¼ gas male threaded connector, to which connection is possible according to specific needs. The 

tube shall be a wound conductive tube for dynamic laying  with resistance lower than 1 Mega Ohm and bursting pressure at least 

twice the maximum pressure of the system. Air consumption is reduced and proportional to the number of times in which the 

product supply lever is released.

4.2 Bag refill (Mod. 245 - 270 - 370 - 400 - 450* - 660 - 1100) 

to be carried out by the operator

(*) These models are equipped with a bag conversion kit.


Always disconnect the machine from air feed during bag/cartridge replacement operations and any other time the front  


ring nut is unscrewed from the tube. Accidental pressure on the lever may cause the violent unload of the bag the  


crushing of fingers or any other risk for the operator and people nearby.


Always control the refill material expiry date.


Never introduce bags that are damaged or not perfectly intact.

Pressure reducer 
with filter and gauge

Ø 6 mm

Fast tap

Max. tube length: 10 m.

Operating pressure: 4-8 bar 
 

          58/116 PSI

Before gun start-up and usage, wear the recom-

mended individual safety devices: 
• Safety gloves 

• Ear defenders 

• Safety glasses

4. START-UP 

to be carried out by the operator

4.2.1

4.2.2

4.2.3

2

2

2

7

7

4.2.4

Summary of Contents for P 600 B-2

Page 1: ...User s manual OTTO Compressed Air Gun P 600 B 2 corresponds to CSG II 400 Index 01 January 2019 Hermann Otto GmbH 2019 Languages Italiano English Deutsch Nederlands Fran ais Polski Espa ol Portugu s...

Page 2: ...anno FAC SIMILE 1 1 DATI TECNICI Kit conversione a cartucce distanziale in plastica con guarnizione forniti in dotazione Kit di conversione a sacchetto raccoglitore sacchetto raschiatore tubo pistone...

Page 3: ...in qualunque caso che veda la ghiera anteriore non avvitata le sopracitate operazioni sono da effettuarsi solo come previsto da questo manuale 3 1 4 Operare solo in codizioni di sicurezza come riport...

Page 4: ...tico blu F raschiatore E e utilizzando la brugola da 5 mm il pressore in alluminio D per sacchetto 4 2 5 4 Assicurarsi di aver stretto in maniera ottimale i vari componenti assicurandosene tramite le...

Page 5: ...70 4 3 3 Tagliare la parte frontale del filetto della cartuccia evitando di rovinare il filetto retrostante avvitare in senso orario l ugello di plastica in dotazione con la cartuccia su quest ultima...

Page 6: ...sioni alle mani si presenta principalmente durante le operazioni di caricamento e o manutenzione ordinaria i filetti e l utilizzo di utensili per l apertura delle cartucce e sacchetti possono causare...

Page 7: ...tecnico non sono coperti di garanzia Manutenzione ordinaria FREQUENZA OPERAZIONE DESCRIZIONE Ogni 2 settimane Ingrassaggio filetti Ingrassare con grasso lubrificante il filetto dello ghiera 2 e il ri...

Page 8: ...arconi 3 7 24051 Antegnate BG ITALIA MAX PRESSURE 10 bar 145 psi mese anno FAC SIMILE Cartridge based conversion kit plastic spacer with gasket included in the supply Bag based conversion kit bag hold...

Page 9: ...ppearstobeloose theaboveoperationsaretobeperformedonlyasspecifiedinthismanual 3 1 4 Workonlyinsafeconditionsasdescribedinthismanual inawell ltworkareawithgoodvisibilityandgoodventilation theworkareamu...

Page 10: ...d to the previous position the cartridge presser B the blue plastic support F the scraper E and with the 5 mm allen key the aluminium plastic bag presser D 4 2 5 4 Ensure all components are tightened...

Page 11: ...gun 4 3 2 Use a 5 mm Allen key to unscrew the bag pressing cone anti clockwise and remove it from the gun 4 3 3 Cut the front part of the thread of the cartridge while avoiding damaging the thread be...

Page 12: ...working 5 5 Disconnect the air feed to stop using the machine if some material is left inside the cartridge close it at the front to avoid product dry up 6 ADJUSTMENT 6 1 Regulation of the extrusion...

Page 13: ...ent is not covered by warranty as our technical department could not test and approve them INCONVENIENTS CAUSES REMEDIAL ACTIONS After charging the material and connecting the machine to the system no...

Page 14: ...PRESSURE 10 bar 145 psi mese anno FAC SIMILE 1 1 TECHNISCHE DATEN Kit zur Umstellung auf Kartuschen Abstandhalter aus plastik mit dichtung im Lieferumfang enthalten Kit zur Umstellung auf Beutel Beut...

Page 15: ...n Aluminium oder Kunststoffkartuschen oder Soft Packs enthaltenen Dichtstoffen Silikon Kitt Klebstoffe usw 3 1 2 Vor der Inbetriebnahme des Ger ts m ssen Sie die Bedienungsanleitung sowie das Sicherhe...

Page 16: ...ndeln mit einem Widerstand von weniger als 1 Megaohm und einem Berstdruck der dem Zweifachen des maximalen Anlagendrucks entspricht Der Luftverbrauch ist gering und h ngt davon ab wie oft man beim Aus...

Page 17: ...achten ist dass der Bolzen und der Adapter bis zum Anschlag gedr ckt werden 4 3 4 Den vorderen Gewindering im Uhrzeigersinn anschrauben bis ein gewisser Druck auf die Kartusche entsteht 4 3 5 Den vord...

Page 18: ...eigern Sie den Luftdruck um der Pistole mehr Schubkraft zu verleihen 7 RESTRISIKEN Schnelles Herausdr cken des Kolbens Materials oder von Adaptern Diese Gefahr besteht haupts chlich nur wenn die Hinwe...

Page 19: ...uben Sie den Gewindering fest zu und halten Sie sich an die Anleitungen zur Kartusche Wechseln Sie die besch digte Kartusche Die Pistole arbeitet nicht korrekt Besch digte oder schmutzige Teile F hren...

Page 20: ...EUMATIC APPLICATOR mod xxx xxx xx cod xxxxxxx P M T srl con unico socio Via G Marconi 3 7 24051 Antegnate BG ITALIA MAX PRESSURE 10 bar 145 psi mese anno FAC SIMILE 1 1 TECHNISCHE GEGEVENS 2 12 3 2 5...

Page 21: ...Bovenstaande werkzaamheden mogen alleen worden uitgevoerd als voorzien in deze handleiding 3 1 4 Gebruik dit apparaat uitsluitend onder veilige omstandigheden zoals vermeld in deze handleiding in een...

Page 22: ...n 2 met daarin het plastic spuitstuk met de klok mee op de materiaalhouderbuis 7 4 2 5 Alleen model CSG II 450 zorg er voordat u de worst in de materiaalhouderbuis stopt voor dat u de worstextrusiekit...

Page 23: ...bij de koker meegeleverde plastic spuitstuk rechtsom op de koker Breng de koker helemaal tot het einde aan waardoor de zuiger CSG II 450 terugkomt of duw tot aan de achterste pakking aan de onderkant...

Page 24: ...t zich met name voor tijdens de laad en of periodieke onderhoudswerkzaamheden De schroefdraden en het gebruik van gereedschap voor het openen van de kokers en worsten kunnen snij en schaafwonden veroo...

Page 25: ...materiaalhouderbuis na een lange gebruiksperiode kunnen er aan de achterkant van de materiaalhouderbuis luchtlekken ontstaan In dat geval dient de O ring van de ontluchting te worden vervangen Neem hi...

Page 26: ...45 psi mese anno FAC SIMILE 1 1 DONN ES TECHNIQUES Pr disposition base Il est le mode avec lequel le pistolet est assembl l usine et fourni au client 2 12 3 2 5 1 10 8 7 9 5 6 4 3 2 1 4 6 9 8 7 H L D...

Page 27: ...tiliser la machine que quand les conditions de s curit vis es dans ce manuel sont d ment respect es et dans une zone de travail bien clair e o la visibilit et la ventilation sont bonnes La zone de tra...

Page 28: ...rtouche B le support plastique bleu F le racleur E et l aide de la clef hexagonale de 5 mm le presseur en aluminium D pour sachet 4 2 5 4 S assurer d avoir parfaitement serr les diff rents composants...

Page 29: ...tihoraire et l ter du machine 4 3 2 Se munir d une cl hexagonale de 5 mm et d visser dans le sens antihoraire le c ne de pression du sachet et l ter du piston 4 3 3 Couper la partie avant du filet de...

Page 30: ...ent surtout si le probl me se trouve sur la partie avant Jet d air il se pr sente principalement au moment du rel chement du levier lorsque l air contenu dans le tube porte mat riel est expuls par les...

Page 31: ...Toutes les pi ces qui seront jug es d fectueuses par notre bureau technique seront remplac es gratuitement seulement si retourn es non alt r es ou souill es et franco notre usine Le fabricant d cline...

Page 32: ...xx cod xxxxxxx P M T srl con unico socio Via G Marconi 3 7 24051 Antegnate BG ITALIA MAX PRESSURE 10 bar 145 psi mese anno FAC SIMILE Zestaw konwersji na kartusze przek adka z plastiku z uszczelk wypo...

Page 33: ...wy sze czynno ci nale y wykonywa wy cznie w spos bopisany w niniejszej instrukcji 3 1 4 U ytkowa wy cznie w warunkach bezpiecze stwa opisanych w instrukcji w dobrze o wietlonym miejscu pracy z dobr wi...

Page 34: ...osta a odkr cona w poprzednim punkcie t ok do kartusza B podpor plastikow niebiesk F zgarniacz E i u ywaj c imbusa o rozmiarze 5 mm t ok aluminiowy D do saszetek 4 2 5 4 Upewni si e wszystkie cz ci sk...

Page 35: ...5 mm i odkr ci w kierunku przeciwnym do ruchu wskaz wek zegara sto ek podtrzymuj cy saszetki po czym zdj go z t oka 4 3 3 Przyci przedni koniec gwintu wk adu tak aby nie uszkodzi gwintu z ty u przykr...

Page 36: ...miejsce g wnie wtedy gdy w momencie zwolnienia spustu z otwor w wylotowych zostaje wyrzucone powietrze zawarte w tubie Nale y uwa a aby nie zbli a oczu i uszu uwa a r wnie na blisko py w i niebezpiec...

Page 37: ...ntem Co 2 tygodnie Py y lub brud czy ci dok adnie z cze pomi dzy maszyna a urz dzeniem zasilaj cym czyst ciereczk i detergentem Co miesi c Py y lub brud dok adnie wyczy ci ca y maszyna czyst ciereczk...

Page 38: ...socio Via G Marconi 3 7 24051 Antegnate BG ITALIA MAX PRESSURE 10 bar 145 psi mese anno FAC SIMILE 1 1 ESPECIFICACIONES Juego de conversi n para cartuchos distanciador de pl stico con junta suministra...

Page 39: ...ados en la ficha t cnica y de seguridad del producto que est usando y llevando puestos todos los dispositivos de protecci n individual indicados 3 1 3 Desconecte el aire del aplicador antes de efectua...

Page 40: ...esi n y man metro La lubricaci n debe ser 3 4 gotas de lubricante cada 1000 l min La pistola cuenta con un racor 1 4 gas macho al que es posible conectarse seg n las exigencias espec ficas El tubo ser...

Page 41: ...aplique sobre el pist n el adaptador para cartuchos suministrado v anse las vistas explosionadas Es necesario introducir el adaptador hasta el final en la parte de lat n dotada de junta t rica de goma...

Page 42: ...n caso de da o evidente del anillo delantero parte anterior del tubo para producto o en caso de evidente funcionamiento no totalmente eficiente de la m quina o de uno de sus componentes sobre todo si...

Page 43: ...ango que tendr que ser siempre f cil de agarrar Cada 2 semanas s lo CSG II 450 Engrase varilla de transmisi n Tras retirar el tubo para producto engrase con lubricante la varilla de transmisi n y empu...

Page 44: ...e nuestro servicio t cnico PROBLEMA CAUSAS MEDIDAS DE CORRECCI N A pesar de haber cargado el producto y conectado la M quina a la instalaci n de alimentaci n apretando el gatillo no ocurre nada Falta...

Page 45: ...te BG ITALIA MAX PRESSURE 10 bar 145 psi mese anno FAC SIMILE 1 1 DADOS T CNICOS Kit convers o cartuchos distanciador de pl stico com guarni o fornecido com o produto Kit convers o bolsas recolhedor p...

Page 46: ...s devem ser efetuadas de acordo com o previsto neste manual 3 1 4 Trabalhar apenas em condi es de seguran a de acordo com o previsto neste manual numa rea de trabalho bem iluminada com boa visibilida...

Page 47: ...prensor para cartuchos B suporte pl stico azul F raspador E e usando a chave umbraco de 5 mm o prensor de alum nio D para a bolsa 4 2 5 4 Controlar de ter apertado bem os v rios componentes e verifica...

Page 48: ...ze a chave umbraco de 5 mm para desparafusar no sentido contr rio ao dos ponteiros do rel gio o cone pressionador de bolsa e remova o do pist o 4 3 3 Cortar a parte frontal da rosca do cartucho evitan...

Page 49: ...adas na parte da frente Jato de ar pode ocorrer principalmente quando solta se a alavanca de comando pelos furos de descarga O ar contido no tubo expulso preste portanto a m xima aten o a n o aproxima...

Page 50: ...detergente A cada duas semanas Poeira ou sujeira Limpar com aten o a conex o entre a pistola e a instala o de alimenta o 6 com um pano limpo e detergente A cada m s Poeira ou sujeira Limpar com aten...

Page 51: ......

Page 52: ......

Page 53: ......

Page 54: ......

Page 55: ...USER S MANUAL CSG II SERIES MOD 210 245 270 370 400 450 660 1100 5010319 REV F 03 2018...

Reviews: