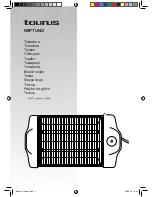
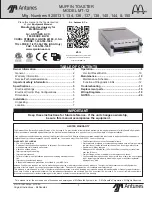
4
5
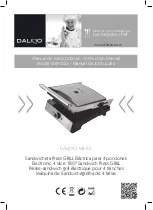
A.
Floating Hinge System
B.
Die Cast Metal Arm
C.
Cool Touch Grip
D.
Securing Latch
E.
Power On Indicator Light
(red)
F.
Ready Indicator Light
(green)
G.
Non-stick Cooking Surface
H.
Vertical Storage with Cord Wrap
B
E FO R E
U
S I N G
Y
O U R
O
ST E R
® S
A N DW I C H
P
R E SS
G
R I L L
Before using your OSTER
®
Sandwich Press Grill for the first time, clean and season
the non-stick cooking surfaces:
• With the appliance unplugged, clean the cooking surfaces with a cloth or sponge
dampened with hot, soapy water. DO NOT IMMERSE UNIT IN WATER.
Rinse with a dampened cloth or sponge and wipe dry.
• To season the cooking surfaces, plug the appliance into an electrical outlet. The red
Power On Indicator Light and the green Ready Indicator Light will both illuminate.
Allow the Sandwich Press Grill to pre-heat until the green Ready Indicator Light turns
off. Wipe a small amount of butter or margarine onto the cooking surfaces, rub lightly
and wipe away any excess.
•
N
OTE
:
When using your Sandwich Press Grill for the first time you may notice
a fine smoke haze being emitted from the unit. This is normal. It is due to
the initial heating of internal components.
U
S I N G
Y
O U R
O
ST E R
® S
A N DW I C H
P
R E SS
G
R I L L
• Plug the power cord into an electrical outlet, the red Power On Indicator Light
will illuminate and remain lit while the appliance is plugged in.
• Release the Securing Latch located on the side of the cast-metal arm.
• Pre-heat your Sandwich Press Grill until the green Ready Indicator Light turns off.
• Once you have prepared your snack, place the food to be grilled on the cooking surface.
• Gently lower the top cooking surface by pulling down the cast metal arm
(use the Cool
Touch Grip)
. The floating hinge system will adjust automatically ensuring that the top
cooking surface lies evenly on your snack, for perfect grilling every time.
•
N
OTE
:
Ensure that the cord is kept well away from the cooking surfaces when in use.
• Allow your snack to grill until done. The Sandwich Press Grill will heat both sides
at the same time.
•
N
OTE
:
The green Ready Indicator Light may turn on and off during cooking.
This indicates that the thermostat is maintaining the proper cooking temperature
to prepare snacks to perfection.
• The cooking surfaces are coated with a durable non-stick coating. Some sandwich
fillings such as cheese may melt and cause the sandwich to stick to the cooking
surfaces. To free the sandwich, use a plastic spatula or wooden spoon. Never use
a sharp or metal object, as this will damage the non-stick surface.
• After you have completed using your Sandwich Press Grill, unplug the appliance from
the electrical outlet.
F
EATURES OF THE
O
STER
® S
ANDWICH
P
RESS
G
RILL
A
E
F
B
G
H
C
D
Summary of Contents for 3882
Page 14: ...26 27 NOTES NOTAS NOTES NOTAS...