background image

7 of 72 


Safety Information 


• 

Avoid exposure of this telephone to moisture or liquid. 

• 

To prevent electric shock, do not open the handset or base 

cabinet. 

• 

Avoid metallic contact (e.g. metal clips, keys) between the battery 

contacts and charging conductors.  

• 

Do not use the handset in an explosive hazard area such as 

where there is gas leaking. 

• 

There is a slight chance that the telephone could be damaged by 

an electrical storm. It is recommended that users unplug the 
phone from the mains supply and telephone socket during a 
storm.  

• 

Follow the local regulations regarding the disposal of your 

packing materials, exhausted batteries and used phone.  
Wherever possible, recycle those materials.  

• 

We advise that this phone should not be used near intensive care 

medical equipment or by persons with pacemakers. 

• 

Clean with a dry, soft, lint-free cloth. Never use cleaning agents, 

particularly aggressive solvents.  

• 

Because the phone works by sending radio signals between base 

station and handset, wearers of hearing aids may experience 
interference in the form of a humming noise.


• 

Your phone can interfere with electrical equipment such as 

answering machines, TV and radio sets, clock radios and 
computers if placed too close.  It is recommended that you 
position the base unit at least one metre from such appliances


CAUTION


This telephone is not designed for making emergency telephone 
calls when the mains power fails.  Always have a corded 
telephone available to be able to make and receive calls to 
emergency services. 
 
Do not use your telephone during an electrical storm 
thunderstorm as it is possible to get an electric shock.  Refer to 
information contained in Telstra White pages directory. 

8 of 72 

Getting Started 

 
Unpacking 
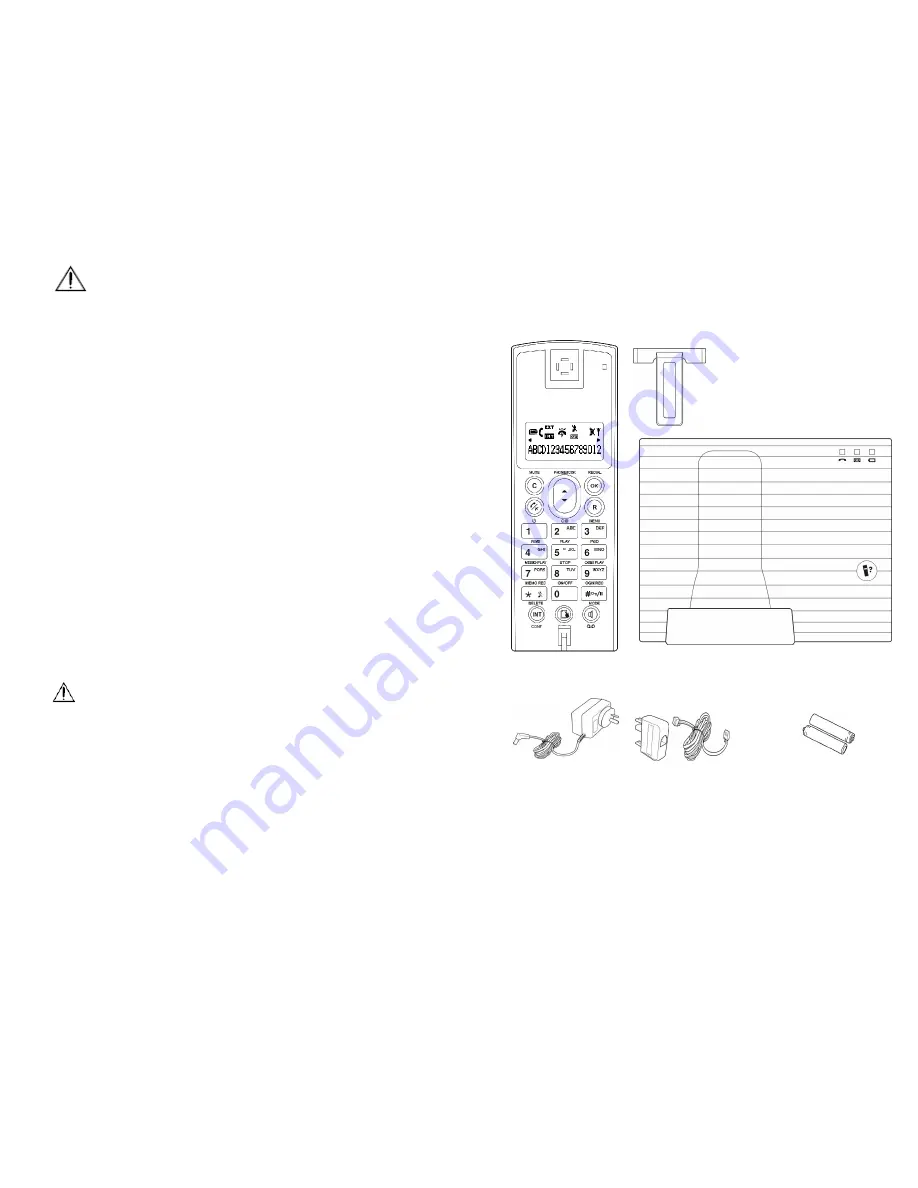
This package should contain the following: 
Handset Belt 

Clip 


Base Unit 


Power Adaptor 

Phone Lead and 
modular plug 

Rechargeable Batteries  
  Ni-MH, 1.2V 650mAh  
 2* AAA size (HR 10/44) 


And this Owner’s Manual 
Headset is not included. 
If any of these items are missing, please contact your retailer were 
you purchased the product from. 

Summary of Contents for DECT MI40

Page 1: ...Battery Level Indication 12 Charging the Handset 12 Menu Overview 13 Basic Operations 16 During Standby 16 Making External Calls 16 Using Traditional Dialling 16 To End a Call 16 Using Pre Dialling 17...

Page 2: ...ting the customized OGM 35 Answering Machine On Off 35 Answering Machine Quick OFF 36 4 of 72 Memo 36 Recording Memo 36 Playing Memo 37 Deleting Memo 37 Incoming Message ICM 38 Recording ICM 38 Playin...

Page 3: ...other item of Telepermitted equipment of a different make or model nor does it imply that any product is compatible with all of Telecom s network services This device may be subject to ringing or bell...

Page 4: ...s by sending radio signals between base station and handset wearers of hearing aids may experience interference in the form of a humming noise Your phone can interfere with electrical equipment such a...

Page 5: ...inking no signal linkage with any base Off Hook Display during off hook Calling External User is calling outside Calling Internal User is making an intercom call Conference User is talking with one ex...

Page 6: ...on When charging the battery icon will be scrolling to indicate that the batteries are being charged When fully charged four bars are displayed The scrolling will stop When an empty battery icon is di...

Page 7: ...HARGING AUTO ANS FLASH TIME DISPLAY LABEL CALL TIMER BACKLIT SYSTEM REGISTER BS 1 2 3 4 SELECT BS AUTO FIXED DELETE HS CHANGE PIN RESET RECORDS SETTINGS ANSWER MAC RING DELAY ALERT TONE MSG LENGTH 14...

Page 8: ...r dialling tone The icon on handset will be turned on The LED on the handset and the In Use LED on the base unit will also be turned on Use the keypad to dial the phone number The display shows the di...

Page 9: ...oll through KEY 1 to KEY 9 Press on a selection Use to select ON or OFF 18 of 72 Press at OFF will de activate the quick dial feature for the selected key Press at ON will activate the quick dial feat...

Page 10: ...st to redial in Pre Dialling mode However you can only select the last number for redial in dialling mode 20 of 72 Redial the Last Dialled Number Press and wait for dial tone Press the last number dia...

Page 11: ...sets including the base unit will ring provided that the ringers are turned on The icon on the 22 of 72 display will blink The LED on the handset and the In Use LED on the base unit will also blink Wh...

Page 12: ...et Plug the headset into to the headset socket 24 of 72 The handset receiver and microphone are now turned off You can now talk into to the microphone of the headset without holding the handset to the...

Page 13: ...number entered must be unique If not the display will remain at the number 26 of 72 To exit Press Note If there 50 records have been added pressing at ADD ENTRY will display FULL and then return to A...

Page 14: ...display will return to phonebook Press to exit Press and hold will exit to standby Note Refer to Delete All Records section to delete the entire phonebook at once VIP Ringing Melody You can assign a...

Page 15: ...short beeps is heard Press then will place the first external call on hold and answer the 2 nd call Press then to toggle between two calls Please consult your telephone service provider for details ab...

Page 16: ...to standby Note Refer to Delete All Records section to delete the entire call log at once 32 of 72 Call Back from the Call Log This feature only works if the CID record contains a valid phone number P...

Page 17: ...s that a message can not be left at this time 34 of 72 When the answering machine answers the call your customized OGM1 or 2 will play to the caller as selected If the customized OGM s are deleted or...

Page 18: ...y will show AM OFF Press to turn answering machine to on A confirmation tone will be heard The display will show ANS RECORD or ANS 36 of 72 ONLY depending on the answering mode and icon on the display...

Page 19: ...splay will show DELETED Incoming Message ICM A maximum of 25 messages ICM s can be recorded unless a memo has been recorded You can specify the maximum duration of the ICM and Memo Refer to Message Le...

Page 20: ...ICM is the newest Otherwise the playback will be stopped Press at the first ICM to replay the ICM Press to view the message info Press to adjust the speaker volume When an ICM is played back the disp...

Page 21: ...red to the system 42 of 72 Message Length User can specify the maximum duration of the message ICM or memo that can be recorded There are two choices of message length 1 minute or 2 minutes Press to e...

Page 22: ...n use the SOS code the breakthrough the screening and let the base ring SCREEN The number with starts with the designated digits will be diverted to the answering machine Calls from other numbers will...

Page 23: ...ering machine remotely from any tone dialling telephone Press to enter the menu mode Use scroll through the menu until the display reads ANSWER MAC 46 of 72 Press Use to scroll until the display reads...

Page 24: ...the oldest message will be played back You can also enter a short cut within 8 seconds For example press 5 to stop the message playing Press 9 to record a new OGM etc o If the code is entered incorre...

Page 25: ...k with your network operator The network services 50 of 72 functions are accessed like the phonebook except that they can also be accessed when the phone is off hook Service Number Name Service code S...

Page 26: ...e service will be displayed Edit the name and press to confirm The number of the entry will be displayed Edit the number and press to confirm The display will return to EDIT ENTRY Press will return to...

Page 27: ...confirm the prefix entered The display will read NUMBER Or the previously entered number Use the numeric keys and the to enter the number 54 of 72 Press to confirm the number entered Note When the nu...

Page 28: ...o Press The display reads NUMBER Or the previously entered bar number o Use the numeric keys and to enter the number to be barred o Press to confirm the entry o All external calls starting with the BA...

Page 29: ...e to scroll through the menu until the display reads BS RINGER Press Use to scroll through the menu until the display reads MELODY Press Use to select the desire melody MELODY 1 to MELODY 10 for incom...

Page 30: ...S Press To activate o Use to select ON o Press User can answer a call by lifting the handset out of the base cradle without having to press the key To de activate 60 of 72 o Use to select OFF o Press...

Page 31: ...s and hold will exit to standby To de activate Press Use to scroll through the menu until the display reads DISPLAY Press Use to scroll through the menu until the display reads CALL TIMER Press Use to...

Page 32: ...ess The display will read BS 1 2 3 4 64 of 72 Enter the number of the base unit you wish to register using the numeric key The handset will read PIN Enter the PIN number default is 0000 Press and hold...

Page 33: ...e icon will be blinking and a series of short beeps can be heard from the earpiece The CID of the caller will be displayed on the screen Press to hang up the internal call Press again to answer the ex...

Page 34: ...e turned off Room Monitoring When more than one handset is registered to the same base unit one of the handsets can be used as a room baby Monitor device To activate Press Use to scroll through the me...

Page 35: ...Enter the correct PIN of the connected base Press The display reads NEW PIN Enter the new PIN maximum 8 digits Press to confirm The display will read REPEAT Re enter same PIN again Press to confirm an...

Page 36: ...ry rights Full details of the warranty are contained in the enclosed warranty card If you feel this product is not working correctly please consult the user guide and ensure that you are using the pro...

Reviews: