ENGLISH
FRENCH
GERMAN
IT
ALIAN
SP
ANISH
ENGLISH
FRENCH
GERMAN
IT
ALIAN
SP
ANISH
POR
TUGUESE
POR
TUGUESE
4
5
5. After the batteries have been inserted and the cover has been locked, press the RESET button on the
back of the PDA.
6. The screen will display the following remark:
“SYSTEM DATA PROCESSING... PLEASE WAIT.”
It will then ask you to calibrate the touch screen. Tap the targets to carry out the calibration.
7. The PDA then displays the INITIALIZATION screen and asks you whether you want to “DELETE
ALL DATA?”
8. It is recommended that you tap “YES” when you use your PDA for the first time. The PDA will ask
you to reconfirm the action, which you can do by tapping “YES” again. Initialization of the system is
then complete.
9. After initialization, set the home time and date (see section on HOME TIME).
Replacing the batteries
CAUTION
*
Always use new, good quality alkaline batteries.
*
Always replace both batteries at the same time. Do not mix old and new batteries.
*
Always lock the battery cover after replacing the batteries.
*
If the unit is not to be used for a long time, it is recommended that you remove the batteries to avoid
them leaking.
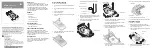
1. Make sure the PDA is switched off before replacing the batteries.
2. Open the battery compartment by sliding the switch down and then sliding the compartment cover off.
3. Remove both of the old batteries.
4. Insert the new batteries one by one, making sure they are inserted according to the correct polarity.
5. Put the battery compartment cover back on and slide the switch up to lock the cover in place.
6. The unit can be switched on only when the cover is locked.
7. After inserting the batteries and locking the battery cover, press the RESET button on the back of the PDA.
8. The screen will display the following remark:
“SYSTEM DATA PROCESSING... PLEASE WAIT.”
It will then ask you to calibrate the touch screen. Tap the targets to carry out the calibration.
9. The PDA then displays the INITIALIZATION screen and asks you whether you want to “DELETE
ALL DATA?”
ALWAYS TAP ON “NO”. Otherwise you will lose the data you have stored in the PDA.
Resetting the PDA
Press the RESET button on the back of the unit to reset your PDA if there is a system error, if the touch-
screen calibration is off target or if you encounter any other abnormal situation.
After you press RESET, the screen will display “SYSTEM DATA PROCESSING... PLEASE WAIT.” It
will then ask you to calibrate the touch screen - tap the targets to carry out the calibration. The PDA then
displays “INITIALIZATION DELETE ALL DATA?”
If the format lock (inside SETUP
SECURITY) is set, you will need to enter your password before the
INITIALIZATION screen appears.
Tapping “NO” will reset the system and return it to the settings you have configured before.
If you tap “YES”, the display will ask “ARE YOU SURE TO CONTINUE?”
Tapping “NO” will reset the system and return it to the settings you have configured before.
WARNING!
If you tap “YES”, the PDA will reformat the database memory and delete all records. Only
perform this memory clean-up if pressing RESET does not solve your problem. If you proceed with the
memory clean-up, the display will show “FORMATTING...”
Turning the PDA on
Press the button at the top left of the PDA. The HOME LAUNCHER/MAIN screen will appear on screen.
The PDA also features an “Auto off” function, which is set at the factory to 3 minutes. That means that the
unit will switch itself off automatically if it is not operated for 3 minutes. You can change the “Auto off”
function in “SETUP”.
To turn the PDA back on after it has switched itself off, press the button on the left-hand side of the unit.
The unit will go back to the screen last displayed before it was switched off.
Always use the stylus to tap the screen, access the applications and input data, and remember to slide it
back into its protective holder on the side of the PDA when you have finished using it.
Inputting data
When you want to input data, for example to create a new record or edit an old one in an application, you
can choose between two methods of inputting data: using handwriting recognition or using a touch-screen
QWERTY keyboard. Backspace, carriage return, four punctuation marks and the spacebar are always
available in both methods.
To move between the two methods, simply tap on the pencil or keyboard icon displayed in the top right
corner of the inputting screen.
HANDWRITING
Your PDA recognizes handwritten letters of the alphabet, numerical characters and punctuation marks and
symbols. To use handwriting recognition, make sure the screen shows the pencil icon. To the left of the
pencil, you will see the icon
. This is for inputting standard letters of the alphabet. To input numbers,
tap this icon to change it to
, and tap it again to input punctuation marks or symbols [
].
Using the stylus, write a letter (or number/punctuation mark) in one of the two large boxes at the bottom
left of the screen. The PDA inputs a letter in the content line at the top of the screen and in the long
rectangular box it also suggests a list of letters that it recognizes from your handwritten input. If the letter
in the content line is not correct, tap the letter in the row that you want to input.
When you write another letter, a letter is inserted in the content line and a new set of alternatives is
displayed in the rectangular box.
INITIALIZATION
DELETE ALL DATA?
Yes
No