background image

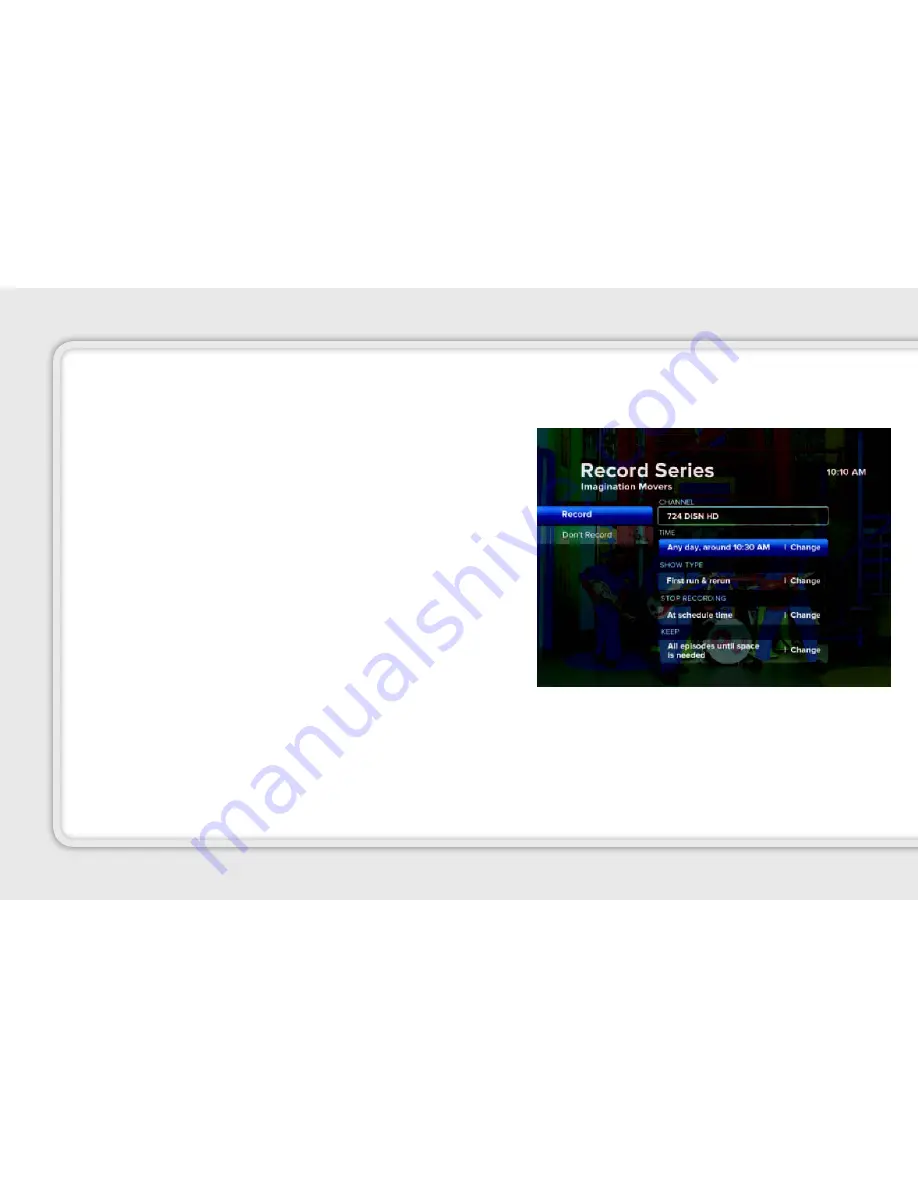
Record a series from the Program Info screen:

1.  Access the program info screen:

•  Press 

INFO

  when  tuned  to  a  program  you  want  to 

record, OR

•  Press 

GUIDE

.  Use  the  arrow  buttons  to  highlight  a 

program you want to record and press 

INFO

.

2.  Select 

Record Series

 and press 

OK

.

3.  Use the arrow buttons to select Time. Press 

OK

.

4.  You can limit the recordings to:

•  Any day (at the scheduled time)
•  Any day/anytime
•  Any day/anytime/once per day

5.  Select 

Show  Type

  if  you  want  to  limit  it  to  first  run  only. 

Otherwise, your DVR will record every episode.

6.  To  add  time  in  case  the  program  runs  long,  select 

Stop 

Recording

. Press 

OK

. Select a time and press 

OK

.

7.  Select 

Record

, then press 

OK

.

36

Summary of Contents for QuantumVu

Page 1: ...USER GUIDE...

Page 2: ...WELCOME 2...

Page 3: ...As always OptiNet s friendly staff of local customer care professionals are ready to answer any questions you may have about your QuantumVu service If you need any assistance call us toll free at 866...

Page 4: ...hing Programming 24 Program Info Screen 25 Search for Programs 26 Narrowing Your Search by Title People or VOD 27 Digital Video Recorder DVR 28 Control Live Programming 29 Record Programs 30 View a Li...

Page 5: ...ent 52 Lock Video On Demand rentals 53 Watch a Locked Program 54 Settings 55 Change the Aspect Ratio for Widescreen or HDTV 56 Set Language Preferences 56 Turn Sound Effects On Off 57 Change the Digit...

Page 6: ...mVu service to your home or business and connects to most entertainment devices USER EQUIPMENT SetTopBoxSafetyInformation 7 ResidentialGatewayUnit RGU 10 Set Top Box Front Panel Features 12 Set TopBox...

Page 7: ...o your home or business consult your local power company The AC inlet on the unit must remain accessible and operable at all times Ground the Product WARNING Avoid electric shock and fire hazard If th...

Page 8: ...tertainment devices such as VCRs or DVDs lamps books vases with liquid or other objects on top of this equipment Do not block ventilation openings Protect from Exposure to Moisture and Foreign Objects...

Page 9: ...ed in any way such as a power supply cord or plug is damaged liquid has been spilled or objects have fallen into the equipment the equipment has been exposed to rain or moisture does not operate norma...

Page 10: ...Note This illustration may vary from the actual product 2 13 1 4 5 11 14 17 3 6 12 7 8 9 10 15 16 18 Front Panel Back Panel Residential Gateway Unit 10...

Page 11: ...AN Ethernet ports When one of the LAN Ethernet LEDs flashes data traffic is passing across the corresponding connection 6 HPNA The HPNA LED illuminates when the RG is connected to another device via i...

Page 12: ...1 2 3 4 5 6 7 8 9 Note This illustration may vary from the actual product Motorola Set Top Box Front Panel 12...

Page 13: ...t top may be equipped with a hard disk drive to store programs that you record and to allow you to rewind and pause live Programming Any time the set top is powered on power LED is illuminated or a re...

Page 14: ...1 2 3 4 6 7 8 9 10 11 12 Note This illustration may vary from the actual product Motorola Set Top Box Back Panel 14 5...

Page 15: ...ded Typically one output is connected to the television set and the other output is used to connect to a home theater system DVD recorder or VCR 8 Audio Out L R Connects RCA type cables to Audio Out t...

Page 16: ...1 2 3 4 5 6 7 8 9 Note This illustration may vary from the actual product Pace Set Top Box Front Panel 16...

Page 17: ...t top may be equipped with a hard disk drive to store programs that you record and to allow you to rewind and pause live Programming Any time the set top is powered on power LED is illuminated or a re...

Page 18: ...1 2 3 5 6 7 8 Note This illustration may vary from the actual product Pace Set Top Box Back Panel 4 18...

Page 19: ...audio signals left and right to a television set with stereo inputs or to a stereo amplifier Note Two sets of audio out connectors are provided Typically one set of outputs is connected to the televis...

Page 20: ...functions Enables STB mode functions Select options in menus and the program guide Stops DVD VCR VOD or DVR content Plays DVD VCR VOD or DVR content Pauses DVD VCR VOD or DVR content Skips back 7 seco...

Page 21: ...t of recordings Selects and deselects screen items Moves through selections Returns from menu screen and to viewing TV or video Displays text information for current selected channel Displays text inf...

Page 22: ...The Menu Screen provides access to the features of your QuantumVu service USING THE MENU SCREEN UsingtheMenuScreen 19 MenuNavigationTips 20 MainMenuScreens 21 USING THE MENU SCREEN 22...

Page 23: ...se the menu screen 1 Press MENU 2 Use the RIGHT and LEFT arrow buttons to select a heading on the horizontal menu bar 3 Use the UP and DOWN arrow buttons to highlight an item under the heading 4 Press...

Page 24: ...rizontal menu that appears at the top of any screen Use the UP and DOWN arrow buttons to select items in vertical menus that appear when you highlight an item in the top menu bar Press OK to activate...

Page 25: ...a list of all the programs you have recorded on your DVR See p 26 for more information Select Video On Demand VOD to access the video library or watch a program you ve already rented See p 37 for mor...

Page 26: ...d and select programs recorded shows and Video On Demand content Find and Watch a Program 23 Browse While Watching Programming 24 Program Info Screen 25 Search for Programs 26 Narrowing Your Search by...

Page 27: ...vals 5 Press OK to watch the selected program If it is not currently on a Program Info screen will appear Press INFO for viewing options and more information like cast and crew Press RECORD to record...

Page 28: ...ted channel 4 Press OK to watch the selected program If it is not currently airing a Program Info screen will appear Press INFO for viewing options and more information like cast and crew Press RECORD...

Page 29: ...ion of the program including running time 2 Use the RIGHT arrow to view information about the cast and crew 3 To record the program or set up a series recording use the DOWN arrow and press OK to sele...

Page 30: ...tters you enter the narrower the results 4 Press the RIGHT arrow repeatedly to tab over to the results list 5 Highlight a title or name using the UP or DOWN arrow buttons and press OK for more options...

Page 31: ...OK to watch or record the program If On Demand appears next to the title the program is available on Video On Demand You can watch a preview or rent the program 1 From the Search screen use the arrow...

Page 32: ...ws at once With optional Whole Home DVR service watch recorded programs from any room in your house Record up to 5 times more than your current DVR Manage your recordings from any computer 24 7 Contro...

Page 33: ...speeds Press FWD to fast forward in 30 second increments A progress bar will appear to indicate how far you can go forward and backward in the program Press REW on the remote control to rewind continu...

Page 34: ...ecording at any time Press OK to confirm 4 The recording will be saved under its program title See View a List of All Recorded Programs on p 32 for information on how to play recorded shows NOTE The R...

Page 35: ...itle 4 Press RECORD a third time to cancel the recording The red dots will disappear 5 Select EXIT to return to your last viewed channel Record a single program from the Program Info screen 1 Access t...

Page 36: ...lect Record Series and press OK 3 Use the arrow buttons to select Time Press OK 4 You can limit the recordings to Any day at the scheduled time Any day anytime Any day anytime once per day 5 Select Sh...

Page 37: ...RECORDED TV button on your remote as a shortcut 2 Use the RIGHT arrow to select Scheduled Press OK The recorded TV screen lists upcoming recordings in the order in which they will be recorded 3 Use th...

Page 38: ...ECORDED TV Or press the RECORDED TV button on your remote as a shortcut 2 The recorded TV screen lists your available recordings by date starting with the most recent 3 To view the list by title use t...

Page 39: ...ct Play and press OK to watch the program Select Resume Play to continue watching the program where you left off Press Stop at any time The stopped screen appears 1 When a recording is finished playin...

Page 40: ...ECORDED TV and press OK Or press the RECORDED TV button on your remote as a shortcut 2 Highlight the program to erase then press OK 3 Select Erase then press OK 4 Repeat to confirm 1 Press MENU then s...

Page 41: ...rogram s title to open the Program Details screen for more details or to record the program 3 Set your recording options and click Record A red recording icon will appear in the program guide The sche...

Page 42: ...ick on the name of the show or the folder to the left and it will expand outward Review the upcoming episodes Find the episode you want to cancel and click on Episode red box under cancel column Delet...

Page 43: ...ecial features Just like a DVD you can also pause rewind fast forward and watch the programming as many times as you like within the rental period Access the Video On Demand Screen 40 Rent Video On De...

Page 44: ...Press On Demand on your remote control OR Press MENU and select Video On Demand then Video On Demand again followed by your desired category choice Access the Video On Demand Screen 44...

Page 45: ...press OK on your remote A Program Info screen appears and enables you to watch a preview rent the program or add to Saved Videos by arrowing over to the heart icon and pressing OK on remote 5 Select...

Page 46: ...eriod 1 Press red On Demand button on remote control 2 Access the Video On Demand screen and select Recent Saved 3 Use the RIGHT arrow to select the category and the DOWN arrow to select the video tha...

Page 47: ...kage or a premium movie channel suite such as HBO 1 Press red On Demand button on remote control 2 Select Premium VOD 3 A list of premium channels will appear Use the LEFT and RIGHT arrows to select t...

Page 48: ...nd programs you have chosen When you do not want to look through the full IPG for a program you can use the Favorites screen instead FAVORITE CHANNELS Set up or Revise a List of Favorites 45 Use a Fav...

Page 49: ...elect channels 6 Channels that have a check mark in the box are included in your favorite channels list 7 To add a channel to the list highlight the unchecked box the check mark will appear and press...

Page 50: ...1 Press MENU 2 Under Live TV use the DOWN arrow to select Favorites then press OK 3 The Favorites screen appears Use it as you would the regular guide Use the Favorite Channels Screen 50...

Page 51: ...t Customize Channel Guide and then press OK 5 Channels that have a check mark in the box are currently displayed in the guide To hide a channel highlight the checked box the check mark will disappear...

Page 52: ...locking PIN a 4 digit number and enabling lock settings Once Parental Controls have been activated locked programs can only be viewed by entering the PIN PARENTAL CONTROL Create a PIN 49 Lock Specifi...

Page 53: ...lock means that no PIN has been set 4 Select Parental Locking and press OK 5 Enter the default PIN 1234 6 Re enter the PIN to confirm The Parental Locking Settings screen appears with all of your lock...

Page 54: ...in the list Press OK to lock a channel A lock symbol will appear Press OK again to unlock it To unlock all channels use the LEFT arrow to select Unlock All Press OK To view only the locked channels se...

Page 55: ...Select the lowest rating you want to lock Press OK to lock programs with that rating and higher To unlock all ratings use the LEFT arrow to select Unlock All Press OK 4 Select Save and press OK 5 If y...

Page 56: ...on remote 3 Select Parental Controls then press OK 4 Select Adult Locking then press OK 5 Press OK The lock symbol will appear 6 Select Save and press OK 7 If you are finished setting parental locks s...

Page 57: ...entals Press OK 6 Use the RIGHT arrow to select Lock Renting and press OK A lock symbol appears Press OK again to clear the lock 7 Use the LEFT arrow to select Save Press OK 8 If you are finished sett...

Page 58: ...your 4 digit PIN at the prompt 3 Use the UP and DOWN arrow buttons to select the unlocking option and press OK NOTE If you have set up Video On Demand locking you must still enter the PIN to rent VOD...

Page 59: ...s to view and customize features of your QuantumVu service Change the Aspect Ratio for Widescreen or HDTV 56 Set Language Preferences 56 Turn Sound Effects On or Off 57 Change the Digital Audio Output...

Page 60: ...udio track You can set programs to automatically switch to Spanish when available this feature does not work if you are watching a recorded program 1 Press MENU 2 Select Settings then select Audio Pre...

Page 61: ...Press OK 3 Select System Sound Effects Press OK 4 Select Play sound effects or Mute sound effects Press OK 5 Select Save and press OK 1 Press MENU 2 Select Settings then select Audio 3 Select Digital...

Page 62: ...The Applications menu provides access to interactive applications that are free or available for purchase APPLICATIONS APPLICATIONS 62...

Page 63: ...1 Press MENU 2 Select Apps 3 Choose the application you wish to access Press OK 4 Each application will display automatically or provide on screen instructions once accessed Using Applications 63...

Page 64: ...Caller ID is automatically activated for every customer with OptiNet phone service and QuantumVu ON SCREEN CALLER ID Incoming Calls 61 View your On Screen Caller ID History 61 Snooze the On Screen Cal...

Page 65: ...proximately 15 seconds 1 Press MENU 2 Select Apps then press OK 3 Select My Phone then press OK 4 Select Caller ID History then press OK 5 Use the UP or DOWN arrow buttons to browse your call history...

Page 66: ...then press OK 4 Select Caller ID Settings then press OK 5 Select On Screen Message Press OK 6 Select Caller ID then Disable Press OK 7 Use the arrow buttons to select the Disable option Press OK 8 On...

Page 67: ...you set up a PIN parental controls can be used for Video On Demand VOD All rentals will require the use of a PIN Please remember to keep your PIN in a safe place because the PIN reset process is not i...

Page 68: ...deo cables to make sure they are properly seated in their jacks Also try changing the channel to be sure that the problem is not just on one channel If you have no connection after five minutes make s...

Page 69: ...THANKS FOR CHOOSING 69...

Page 70: ...Additional Notes 70...

Page 71: ...Additional Notes 71...

Page 72: ...v 06 2014 Contact Us Bristol 276 821 6100 Abingdon 276 698 3210 Area Wide 866 835 1288 Website bvu optinet com Email customerservice bvua com Address 15022 Lee Hwy Bristol VA...

Reviews: