11
1
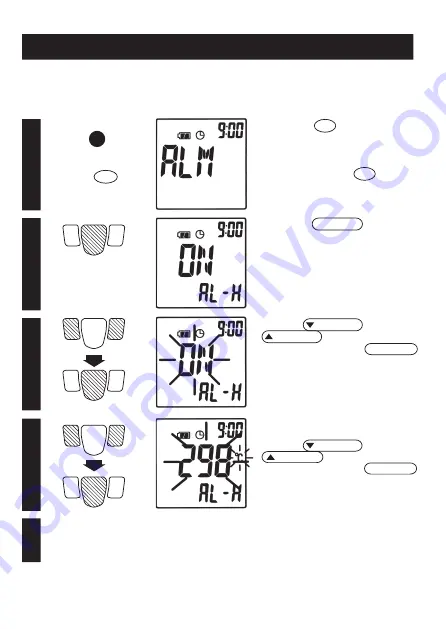
Pressing the MEASURE button blinks
“ALM”
. Then,
“ON”
or
“OFF”
(currently
set status) is displayed on the top of
LCD and
“AL-H”
is displayed on the
sub-display. (The High alarm is set up.)
2
Press the /MAX/MIN or
/MAX/MIN button to select ON or
OFF, and then press the MEASURE
button to confirm the setting.
When OFF is selected, the display
shifts to the setting for the lower limit
temperature alarm.
3
Press the SET button
while the power is ON.
The alarm temperature is displayed on
the top of LCD by selecting ON.
Press the /MAX/MIN or
/MAX/MIN button to select ON or
OFF, and then press the MEASURE
button to confirm the setting.
When the setting has been completed,
the display shifts to the setting for the
Low temperature alarm.
4
For the setting/resetting of the lower limit temperature alarm, the above steps can be
applied excluding that
“AL-H”
on the sub-display is changed to
“AL-L”
in step 2 and later.
When the lower limit setting has been completed, the mode is changed to HOLD.
When the upper and lower limit alarms are set,
“HI”
and
“LO”
lamps are lit on the display.
Note) The upper limit temperature cannot be set to the value less than the setting for the
lower limit temperature alarm, and the lower limit temperature cannot be set to the value
more than the setting for the upper limit temperature alarm.
Setting/Resetting the High/Low Temperature Alarm
When the measured temperature of the object exceeds the High alarm value, the alarm LED blinks in red
and a buzzer (high tone) sounds. When it is below the Low alarm value, the alarm LED blinks in green and
a buzzer (low tone) sounds. The “High alarm” is set up first, and then the “Low alarm”.
Set up the alarms according to the following steps.
Pressing the SET button displays
“ALM”
on the top of
LCD
.
(Regarding PT-U80, the display is
switched in order of
“ALM”
,
“EMS”
and
“TIME”
each time the SET button is
pressed.)
SET
Summary of Contents for PT-7LD
Page 7: ...7...
Page 23: ...7...
Page 34: ......
Page 40: ...6 There is no button to turn ON OFF the supper supply Name of Components...
Page 41: ...7...


