


75
Additional information
—Continued
■
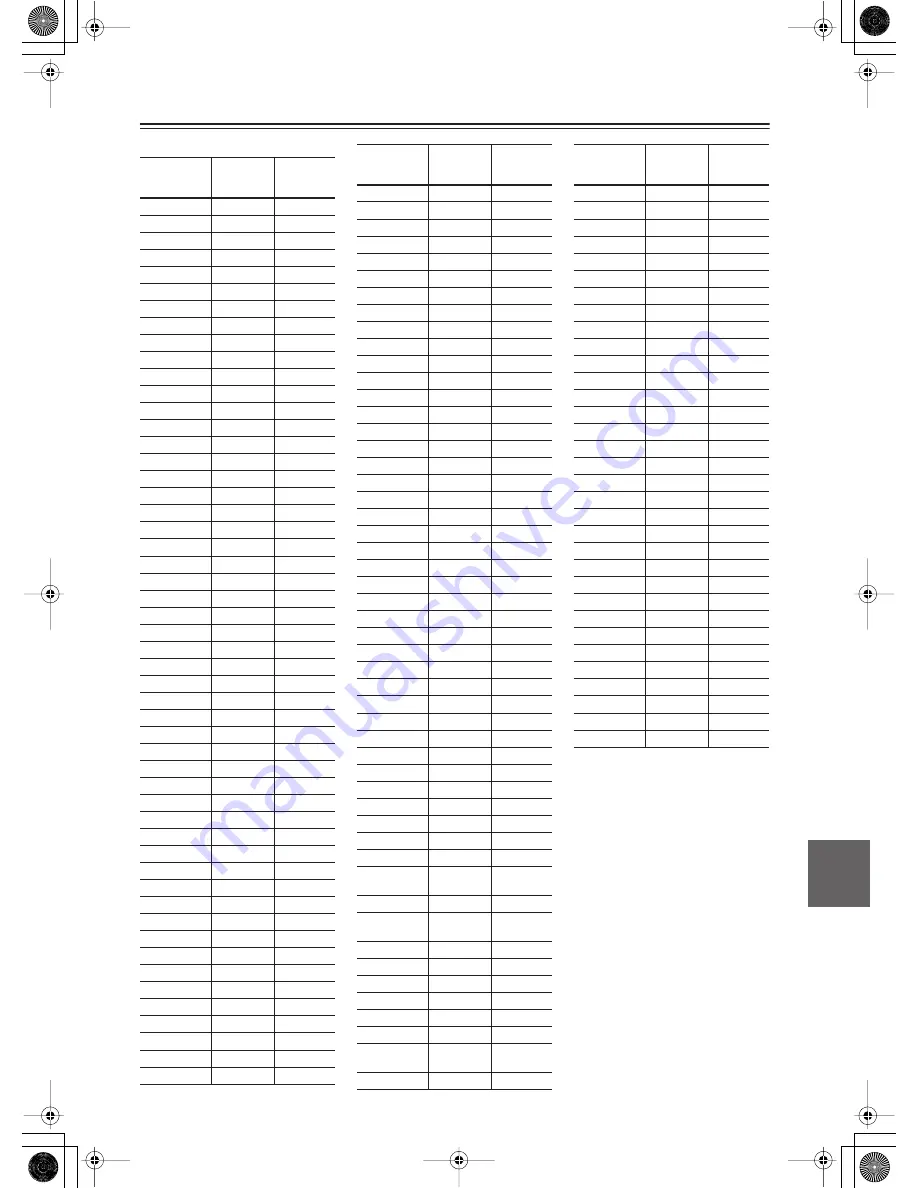
Language code list
Language
Language
code
letter
Language
code
Japanese
ja
1001
English
en
0514
French
fr
0618
German
de
0405
Italian
it
0920
Spanish
es
0519
Chinese
zh
2608
Dutch
nl
1412
Portuguese
pt
1620
Swedish
sv
1922
Russian
ru
1821
Korean
ko
1115
Greek
el
0512
Afar
aa
0101
Abkhazian
ab
0102
Afrikaans
af
0106
Amharic
am
0113
Arabic
ar
0118
Assamese
as
0119
Aymara
ay
0125
Azerbaijani
az
0126
Bashkir
ba
0201
Byelorussian
be
0205
Bulgarian
bg
0207
Bihari
bh
0208
Bislama
bi
0209
Bengali
bn
0214
Tibetan
bo
0215
Breton
br
0218
Catalan
ca
0301
Corsican
co
0315
Czech
cs
0319
Welsh
cy
0325
Danish
da
0401
Bhutani
dz
0426
Esperanto
eo
0515
Estonian
et
0520
Basque
eu
0521
Persian
fa
0601
Finnish
fi
0609
Fiji
fj
0610
Faroese
fo
0615
Frisian
fy
0625
Irish
ga
0701
Scots-Gaelic
gd
0704
Galician
gl
0712
Guarani
gn
0714
Gujarati
gu
0721
Hausa
ha
0801
Hindi
hi
0809
Croatian
hr
0818
Hungarian
hu
0821
Armenian
hy
0825
Interlingua
ia
0901
Interlingue
ie
0905
Inupiak
ik
0911
Indonesian
in
0914
Icelandic
is
0919
Hebrew
iw
0923
Yiddish
ji
1009
Javanese
jw
1023
Georgian
ka
1101
Kazakh
kk
1111
Greenlandic
kl
1112
Cambodian
km
1113
Kannada
kn
1114
Kashmiri
ks
1119
Kurdish
ku
1121
Kirghiz
ky
1125
Latin
la
1201
Lingala
ln
1214
Laothian
lo
1215
Lithuanian
lt
1220
Latvian
lv
1222
Malagasy
mg
1307
Maori
mi
1309
Macedonian
mk
1311
Malayalam
ml
1312
Mongolian
mn
1314
Moldavian
mo
1315
Marathi
mr
1318
Malay
ms
1319
Maltese
mt
1320
Burmese
my
1325
Nauru
na
1401
Nepali
ne
1405
Norwegian
no
1415
Occitan
oc
1503
Oromo
om
1513
Oriya
or
1518
Panjabi
pa
1601
Polish
pl
1612
Pashto,Push
to
ps
1619
Quechua
qu
1721
Rhaeto-
Romance
rm
1813
Kirundi
rn
1814
Romanian
ro
1815
Kinyarwanda
rw
1823
Sanskrit
sa
1901
Sindhi
sd
1904
Sangho
sg
1907
Serbo-
Croatian
sh
1908
Sinhalese
si
1909
Language
Language
code
letter
Language
code
Slovak
sk
1911
Slovenian
sl
1912
Samoan
sm
1913
Shona
sn
1914
Somali
so
1915
Albanian
sq
1917
Serbian
sr
1918
Siswati
ss
1919
Sesotho
st
1920
Sundanese
su
1921
Swahili
sw
1923
Tamil
ta
2001
Telugu
te
2005
Tajik
tg
2007
Thai
th
2008
Tigrinya
ti
2009
Turkmen
tk
2011
Tagalog
tl
2012
Setswana
tn
2014
Tonga
to
2015
Turkish
tr
2018
Tsonga
ts
2019
Tatar
tt
2020
Twi
tw
2023
Ukrainian
uk
2111
Urdu
ur
2118
Uzbek
uz
2126
Vietnamese
vi
2209
Volapük
vo
2215
Wolof
wo
2315
Xhosa
xh
2408
Yoruba
yo
2515
Zulu
zu
2621
Language
Language
code
letter
Language
code
Summary of Contents for DR-815
Page 83: ...83 Memo...


