background image


71


Initial Settings menu


—Continued


• Default level: Off; Default password: none; Default 

Country code: us (2119) 

To give you some control over what your children watch 
on your DVD receiver, some DVD-Video discs feature a 
Parental Lock level. If your player is set to a lower level 
than the disc, the disc won’t play. 
Some discs also support the Country Code feature. The 
player does not play certain scenes on these discs, 
depending on the Country Code you set.


Notes:


• Not all discs use Parental Lock, and will play without 

requiring the password first.

• If you forget your password, you’ll need to reset the 

player to register a new password. (See page 74.)


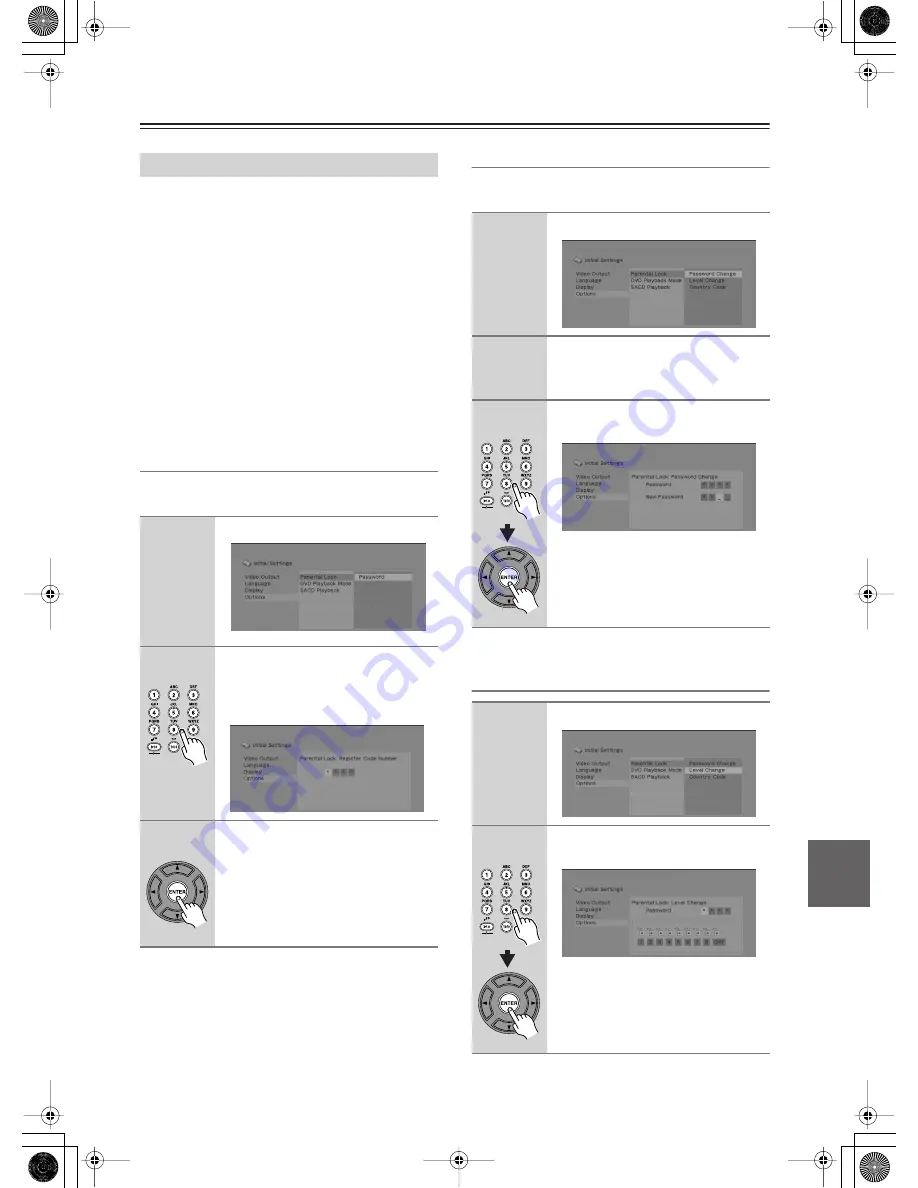
Registering a new password


You must register a password before you can change the 
Parental Lock level or enter a Country code.


Changing your password


To change your password, confirm your existing pass-
word then enter a new one.


Setting/changing the Parental Lock


How to Use Parental Lock


1


Select “Password”.


2


Use the number buttons to enter a 
4-digit password.


The numbers you enter show up as aster-
isks (*) on-screen.


3


Press ENTER to register the pass-
word. 


You will return to the Options menu 
screen.


1


Select “Password Change”.


2


Use the number buttons to enter 
your existing password, then 
press ENTER.


3


Enter a new password and press 
ENTER.


This registers the new password and you 
will return to the Options menu screen.


1


Select “Level Change”.


2


Use number buttons to enter your 
password, then press ENTER.

Summary of Contents for DR-815

Page 1: ...standing of its features and operation will allow you to achieve optimum performance and enjoy ment Keep this manual for future reference Contents Getting Started 2 Connections 16 Operations 25 Playi...

Page 2: ...aratus does not operate normally by following the operating instructions Adjust only those controls that are covered by the operating instructions as an improper adjustment of other controls may resul...

Page 3: ...tion Ensure that there s adequate ventilation all around this unit especially if it s installed in an audio rack If the ventilation is inadequate the unit may overheat leading to malfunction Do not ex...

Page 4: ...k for the ASTA mark or the BSI mark on the body of the fuse If the power cord s plug is not suitable for your socket outlets cut it off and fit a suitable plug Fit a suitable fuse in the plug This uni...

Page 5: ...CD MP3 WMA 3 JPEG DVD Audio and SACD compatible DVD R DVD Video DVD RW DVD Video VR format Others Full function remote controller Supplied Accessories Make sure you have the following accessories In...

Page 6: ...etting Up the Player for Your TV 29 Setting the Language of This Player s On screen Displays 30 Playing Discs 31 Resume and Last Memory 31 Basic Playback Controls 32 DVD Disc Menus 32 Video CD PBC men...

Page 7: ...tween the 12 hour and 24 hour Displays 60 Turning the Current Time Display On or Off while the Unit is in Standby Mode 60 Using the Timer Functions 61 About the Once and Every Timers 61 Using the Slee...

Page 8: ...ing those of a compatible format may not work properly in the DVD receiver because of incorrect settings in the disc burning software Check the manuals supplied with your disc burning software for add...

Page 9: ...right protection technology must be authorized by Macrovision Corpora tion and is intended for home and other limited con sumer uses only unless otherwise authorized by Macrovision Reverse engineering...

Page 10: ...same type is used in the same room or the DVD receiver is installed close to equipment that uses infrared rays the remote controller may not work reliably Don t put anything such as a book on the rem...

Page 11: ...ns also move the cursor when you input characters K DISPLAY button 41 47 50 Each time you press this button the information on the display changes This button also enables you to select the input char...

Page 12: ...ators show the type of disc loaded G DVD operation indicators These indicators show the status of DVD playback H Camera angle indicator This indicator appears if the DVD Video disc being played featur...

Page 13: ...t can be connected to a TV or projector with a SCART input This SCART con nector outputs composite video S Video and RGB video G VIDEO OUT VIDEO 20 This RCA connector can be used to connect a TV or pr...

Page 14: ...are used to select and adjust settings M CLOCK button 60 Press this button to display the current time N SLEEP button 62 Used to program the Sleep timer which turns off the power to the unit at a spe...

Page 15: ...ton is used to select camera angles on DVD Video discs J SUBTITLE button 35 This button is used to select subtitles on DVD Video discs K TOP MENU button 32 This button is used to display the top menu...

Page 16: ...s ready for use you ll need to tune into an FM radio station and adjust the position of the FM antenna to achieve the best possible reception 2 Use thumbtacks or something similar to fix the FM antenn...

Page 17: ...st be grounded in accordance with local regulations to prevent electrical shock haz ards Using a TV FM Antenna Splitter It s best not to use the same antenna for both FM and TV reception as this can c...

Page 18: ...et before making any connections Read the instructions supplied with your speakers Pay close attention to speaker wiring polarity In other words connect positive terminals to only positive terminals a...

Page 19: ...to connect composite video inputs and outputs Push each plug in all the way to make a good connection loose connections can cause noise or malfunctions To prevent interference keep audio and video cab...

Page 20: ...nnect the S VIDEO OUTPUT to an S Video input on your TV or monitor or AV receiver Line up the small triangle above the jack with the same mark on the plug before plugging in Using SCART If your TV has...

Page 21: ...kyo RI Dock which is sold separately Connect the TAPE HDD IN jacks on the DVD receiver to the AUDIO OUT jacks on the RI Dock The jack connection enables you to use the following functions You can cont...

Page 22: ...woofer that contains an amplifier Note If you want to connect any passive subwoofer you must connect at first a power amplifier with the DVD receiver and then connect a subwoofer to the power amplifie...

Page 23: ...page 22 Once you have completed the connection make sure to configure the settings for speakers described on page 52 so that you can enjoy your favorite surround mode Connection for Enjoying 5 1ch Pla...

Page 24: ...it close to your TV preferably on top facing forward at about ear level or at the same height as the front left and right speakers Subwoofer The subwoofer handles the bass sounds of the LFE Low Frequ...

Page 25: ...for a while as shown The ACCUCLOCK function automatically updates the clock daily at 2 A M 3 A M and 2 P M If the clock has not been set correctly see Setting ACCUCLOCK to Use a Specific Station on pa...

Page 26: ...te tape deck that is connected to the DVD receiver via an cable and RCA phono audio cables the power to the DVD receiver is automatically turned on Also if you turn on or off the power to the DVD rece...

Page 27: ...on again the sound will be restored Press DIMMER on the remote controller Every time you press the button the display brightness will change as follows Decrease the volume then connect the stereo hea...

Page 28: ...e name you wish to change appears in the display You can select TAPE or LINE 2 Press EDIT NO CLEAR repeatedly until Name Select appears in the display 3 Press MULTI JOG 4 Turn MULTI JOG to select a ne...

Page 29: ...Note This player features a screen saver function If the player is stopped and no button is pressed for five minutes the screen saver starts Using the On screen Displays Button What it does Display ex...

Page 30: ...1 Press DVD SETUP and select Ini tial Settings 2 Select OSD Language from the Display settings English French German Italian and Spanish are available Note that the language you choose here may not be...

Page 31: ...e next disc you load is the same one the display shows LAST MEM and playback will resume For DVD Video discs except VR mode DVD RW the player stores the play position of the last five discs When one o...

Page 32: ...or restarts a paused disc Stops playback See also Resume and Last Mem ory on page 31 Press to start fast reverse scanning Press play to resume normal playback Press to start fast forward scanning Pre...

Page 33: ...st scan discs forward or backward at four dif ferent speeds Video CD PBC menus Button What it does DVD receiver remote RETURN Displays the PBC menu Numbers remote only Use to enter a numbered menu opt...

Page 34: ...es not work with Video CD Playing in Slow Motion 1 During playback press pause 2 Press and hold or until slow motion playback starts The slow motion speed is shown on screen There is no sound during s...

Page 35: ...Video CD or playing a JPEG disc Note If you are displaying subtitles these will disappear when the screen is zoomed They will reappear when you return the screen to normal Switching Audio Language Cha...

Page 36: ...a DVD Video disc Track Tracks from a Video CD disc Time Thumbnails from a Video CD disc at 10 minute intervals Original Title Original titles from a VR mode DVD RW disc DVD SETUP ENTER Playlist Title...

Page 37: ...on to return to the parent folder Use ENTER or cursor right to open a highlighted folder You can also return to the parent folder by going to the top of the list to the folder then pressing ENTER When...

Page 38: ...ist and turns off program play Creating a Program List 1 Press MODE and select Program from the list of functions on the left Select Create Edit from the list of program options and press ENTER You ca...

Page 39: ...random play Searching a Disc 1 Press MODE and select Search Mode from the list of functions on the left The search options available depend on the kind of disc loaded Select a search mode The disc mus...

Page 40: ...When A B Repeat is set it can be also selected as one of the Repeat modes Looping a Section of a Disc 1 During playback press MODE and select A B Repeat from the list of functions on the left 2 Select...

Page 41: ...hapter and title information such as the elapsed and remaining playing time can be displayed on screen while a disc is playing Viewing a JPEG Slideshow Button What it does Pauses the slideshow press a...

Page 42: ...g mode and listen to the station in mono Manually Tuning a FM AM Broadcast Station 1 Select FM or AM Press the INPUT or button to select FM or AM The channel selected most recently will be recalled 2...

Page 43: ...humbtack Do not press the thumbtack through the antenna Caution Be careful not to prick your finger Adjusting the AM antenna Adjust the location and position of the AM antenna while listening to an AM...

Page 44: ...available Naming a preset channel see page 50 Erasing a preset channel see page 49 Copying the radio station in the selected channel to another see page 48 Programming FM Stations Automatically Auto...

Page 45: ...frequencies to any channel num ber For example you could program threeAM stations to channels 2 5 and 9 Before auto presetting Display 1 Tune into the FM AM station that you want to store a preset 2 P...

Page 46: ...start the proce dure Selecting Preset Stations 1 Press the INPUT or button to select FM or AM The channel selected most recently will be recalled 2 Turn MULTI JOG or press the dial repeatedly to sele...

Page 47: ...broadcasting your favorite categories of music or other information The information of Program Service Name and Radio Text is available for display on the DVD receiver The RDS indicator lights up whe...

Page 48: ...t channel see page 50 is also copied to the other channel Tips for Changing the Preset Channels Copying a Preset Channel Preset Copy 1 Call the preset channel you wish to copy 2 Press EDIT NO CLEAR an...

Page 49: ...you wish to erase 2 Press EDIT NO CLEAR and turn MULTI JOG until PresetErase appears in the display 3 Press MULTI JOG A message requesting confirmation appears in the display To stop erasing press ED...

Page 50: ...column To complete the operation execute Step 5 Naming a Preset Channel Entering a Name 1 Press EDIT NO CLEAR and turn MULTI JOG until Name In appears in the display 2 Press MULTI JOG 3 Press DISPLAY...

Page 51: ...putting Characters from the Remote Controller 2 3 2 2 1 4 1 Press NAME 2 Press DISPLAY repeatedly until the character type you wish to enter appears in the display Each press of the DISPLAY switches t...

Page 52: ...ant to abort the setting press RCV SETUP Configuring Subwoofer and Setting Up the Number of Speakers 1 Press RCV SETUP The display will show 1 Sp Config 2 Press ENTER The display will show Subwfr No 3...

Page 53: ...ess than the Front distance The Surround speakers distances can be set up to 1 5 m 5 ft more and 4 5 m 15 ft less than the Front distance 9 Press RETURN Returns to the display shown in step 7 Then go...

Page 54: ...DVDs LDs or CDs that bear the DTS logo Dolby Pro Logic II Movie Use this mode with DVDs and vid eos that bear the Dolby Surround logo or TV programs that feature Dolby Surround You can also use this...

Page 55: ...he remote controller If center surround speakers are added on you can switch to All Ch St by pressing ALL CH STEREO on the remote controller Minimum required number of speakers Signal format Analog PC...

Page 56: ...ial that you are playing and with some material there will be little or no effect The Late Night function is set to Off when the DVD receiver is set to Standby Adjusting Individual Speaker Levels 1 Us...

Page 57: ...nel is output default S The sub channel is output MS Both the main and sub channels are output LstnAngl Listening Angle Select this to modify the Theater Dimensional T D lis tening modes The listening...

Page 58: ...appears on the display If Manual Adjust appears turn MULTI JOG to select AccuClock or AccuClock 3 Press MULTI JOG The display appears as shown 4 Use to tune into the FM station Tip Pressing YES MODE...

Page 59: ...JOG You can now set the day of the week 5 Turn MULTI JOG to select the cur rent day of the week SUN Sunday MON Monday TUE Tuesday WED Wednesday THU Thursday FRI Friday SAT Saturday 6 Press MULTI JOG...

Page 60: ...ed on the display First turn on the power to the unit then press and hold down the STANDBY ON button on the unit for more than two seconds Displaying the current time in Standby mode consumes more pow...

Page 61: ...y and Sunday i e Timer 1 Used as an alarm clock every morning Timer Play Every Everyday 7 00 7 30 Timer 2 Records a radio program every week Timer Rec Every MON SAT 15 10 15 30 Timer 3 Records a radio...

Page 62: ...Sleep timer can be set for 10 to 90 minutes in inter vals of 10 minutes SLEEP 1 Press and hold TIMER for more than 1 second Sleep 90 appears in the display win dow The unit will turn off in 90 minute...

Page 63: ...and time have not been set Set the day of the week and time 2 Turn MULTI JOG to selectTimer Play or Timer Rec When the desired timer operation is dis played press MULTI JOG The Timer Rec operation is...

Page 64: ...timer operates on the specified day s of every week Turn MULTI JOG to select the day s of the week When the desired day of the week is displayed press MULTI JOG Days Set You can specify the range of...

Page 65: ...d volume press MULTI JOG to confirm the current value 9 Place the unit in Standby mode Press STANDBY ON to place the unit in Standby mode Notes Even if you set Memory or Random mode for timer playback...

Page 66: ...een programmed 2 Turn MULTI JOG to switch the timer on or off After the timer is switched on or off the unit displays the previous screen 2 1 Display 1 TIMER or Viewing the Timer Settings 1 Repeatedly...

Page 67: ...dium Low Off Hue Adjusts the red green balance Green 9 to Red 9 Chroma Level Adjusts how saturated colors appear 9 to 9 BNR Switches on off block noise reduction On Off default Adjust the Brightness C...

Page 68: ...menu Video Output settings Using the Initial Settings menu DVD SETUP ENTER 1 Press DVD SETUP and select Ini tial Settings 2 Use the cursor buttons and ENTER to select the setting and option you want t...

Page 69: ...d overriding the Subtitle Language setting Discs with two or more subtitle languages usually allow you to select the subtitle language from the disc menu Press MENU to access the disc menu English If...

Page 70: ...a DVD disc Off No multi angle indication is shown Setting Option What it means Parental Lock See How to Use Parental Lock on page 71 DVD Playback Mode DVD Audio All material on a DVD Audio disc is pla...

Page 71: ...assword See page 74 Registering a new password You must register a password before you can change the Parental Lock level or enter a Country code Changing your password To change your password confirm...

Page 72: ...the number buttons to enter the 4 digit Country code The new Country code is set and you will return to the Options menu screen Note that the new Country code doesn t take effect until the next disc i...

Page 73: ...n discs override the player s settings so that the disc is shown in letter box format regardless of the setting Note Using the 16 9 Wide setting with a standard 4 3 TV or either of the 4 3 settings wi...

Page 74: ...ceiver also has a region mark which you can find on the rear panel Discs from incompatible regions will not play in this player Discs marked ALL will play in any player The diagram below shows the var...

Page 75: ...rgian ka 1101 Kazakh kk 1111 Greenlandic kl 1112 Cambodian km 1113 Kannada kn 1114 Kashmiri ks 1119 Kurdish ku 1121 Kirghiz ky 1125 Latin la 1201 Lingala ln 1214 Laothian lo 1215 Lithuanian lt 1220 La...

Page 76: ...76 Input Source Names and Available Buttons on Remote Controller If you customized source names using the method described on page 28 you can use the following buttons 9 4 J A 2 3 5 8 7 6 K L M N...

Page 77: ...on the remote controller 1 TAPE HDD TAPE HDD TAPE HDD 2 PRESET FF FR SKIP SKIP 3 TUNING 4 MODE DOLBY NR MODE 5 MEMORY MEMORY 6 RANDOM SHUFFLE RANDOM 7 REPEAT REV MODE REPEAT REPEAT 8 1 9 1 9 10 0 10 0...

Page 78: ...rding component 3 Start recording Start playing the source component selected in Step 1 Notes Do not change the input selection during recording Otherwise the recording cannot be made correctly Set th...

Page 79: ...it high intensity radio waves near the DVD receiver such as a cellular phone in operation calling noise may be generated The DVD receiver uses a rotating unit whose precision instrument generates fain...

Page 80: ...the plugs and terminals are free of dirt oxide etc and clean if necessary Also check the cable for damage Noticeable difference in DVD and CD volume This is due to differences in the audio format and...

Page 81: ...ogrammed time may overlap with another timer Be sure to set multiple timers such that time ranges do not overlap If you try to set the Sleep timer or press TIMER during timer operation the current tim...

Page 82: ...kHz Dynamic power 24 W 24 W 3 Front 21 W 21 W 4 Front 14 W 14 W 8 Front Damping Factor 70 Front l kHz 8 Input Sensitivity and Impedance 150 mV 47 k LINE Output Level and Impedance 120 mV 2 2 k REC OUT...

Page 83: ...83 Memo...

Page 84: ...ebenzell GERMANY Tel 49 8142 4401 0 Fax 49 8142 4401 555 http www eu onkyo com ONKYO EUROPE UK Office Suite 1 Gregories Court Gregories Road Beaconsfield Buckinghamshire HP9 1HQ UNITED KINGDOM Tel 44...

Reviews: