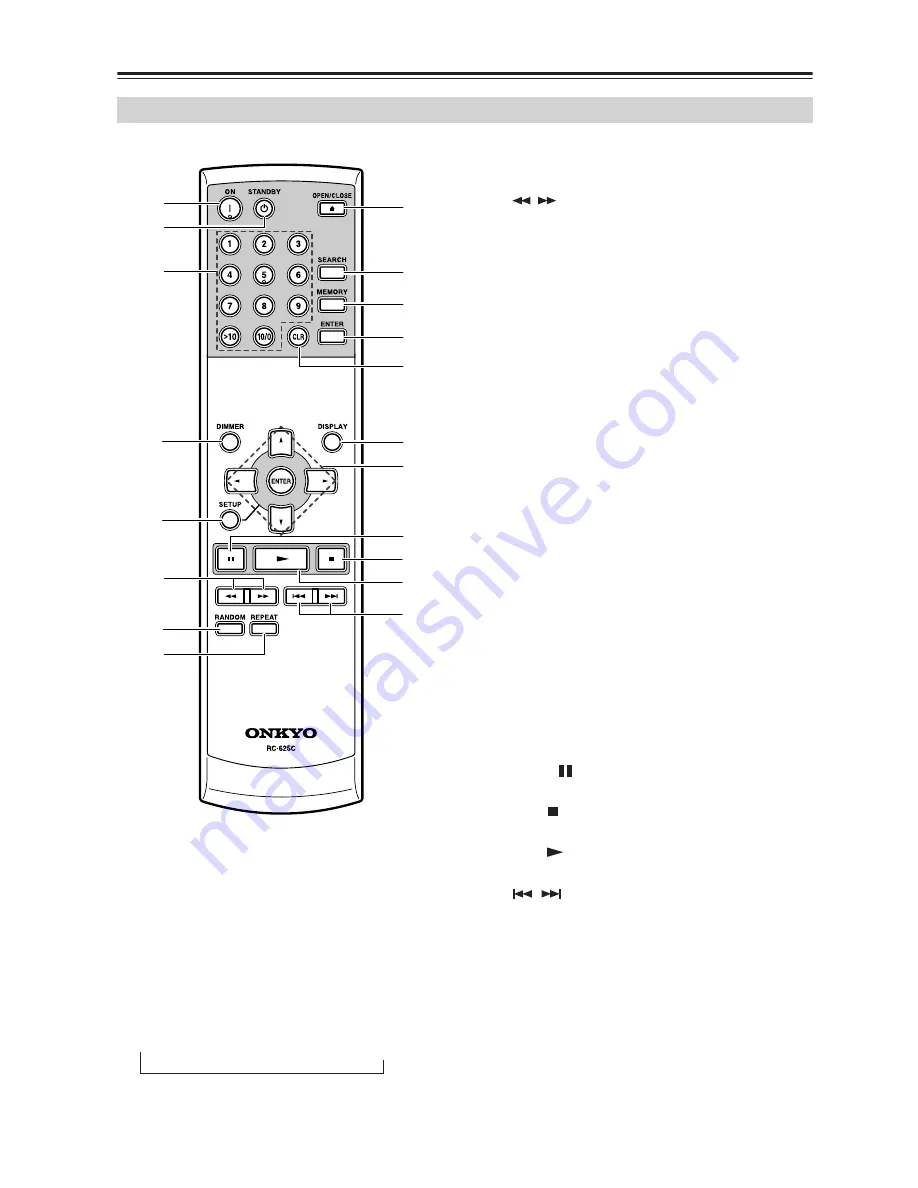
background image

8

Remote Controller

The page numbers in parentheses show where you can find the main explanation for each item.

A

ON button (12)

Press to turn on the DX-7555 from its standby 
mode.

B

STANDBY button (12)

Press to put the DX-7555 on standby from its pow-
ered on status.

C

Number buttons (13, 15)

Use these buttons to enter track numbers.

D

DIMMER button

Press to adjust the display brightness. The bright-
ness changes in this order:

 Normal 

 Dim 

 Dimmer 

 No Display*

* When the display is set to turn off (No Display), 
any operation will temporarily turn on the display 
for several seconds, then turn it off again.

E

SETUP button (20)

Press to display the screen for various settings.

F

[

/

] buttons (13)

Press and hold to fast reverse or fast forward during 
playback.

G

RANDOM button (18)

Press to set random playback.

H

REPEAT button (18)

Press to set repeat playback.

I

OPEN/CLOSE button (12)

Press to open and close the disc tray.

J

SEARCH button

Press to search and select a track number.
For MP3 disc, the button can be used to search and 
select a group (folder) number.

K

MEMORY button (17)

Press to set memory program.

L

ENTER button

Press to set a selected preference.

M

CLEAR button (17)

Press to cancel an input of data, while entering 
numeric values.
Press to remove the last track in the program, while 
registering memory.

N

DISPLAY button (16)

Press to change the displayed information.

O

Arrow and ENTER buttons

Press the Arrow buttons to configure various set-
tings, and then press the ENTER or Arrow buttons 
to set them.
These buttons can be also used to select a track.

P

Pause [

] button (13)

Press to pause playback.

Q

Stop [ ] button (13)

Press to stop playback.

R

Play [

] button (12)

Press to start playback.

S

[

/

] buttons (13)

Press to select the previous or next track.

RC-625C Remote Controller

3

1
2

4

5

6

8

7

9

0
A

B

D
E

C

F
G
H
I

Summary of Contents for 7555 - DX CD / MP3 Player

Page 1: ...anual thoroughly before making connections and plugging in the unit Following the instructions in this manual will enable you to obtain optimum performance and listening enjoyment from your new Compac...

Page 2: ...aratus does not operate normally by following the operating instructions Adjust only those controls that are covered by the operating instructions as an improper adjustment of other controls may resul...

Page 3: ...Unit Install this unit in a well ventilated location Ensure that there s adequate ventilation all around this unit especially if it s installed in an audio rack If the ventilation is inadequate the un...

Page 4: ...lug Fit a suitable fuse in the plug For European Models This unit contains a semiconductor laser system and is classified as a CLASS 1 LASER PRODUCT So to use this model properly read this Instruction...

Page 5: ...packaging the letter added to the end of the product name indicates the color of the DX 7555 Specifications and operation are the same regardless of color Table of Contents Important Safety Instructi...

Page 6: ...J Stop button 13 Press to stop playback K Pause button 13 Press to pause playback L Remote Control Senser 9 M Play Pause indicators Illuminate in play or pause mode N MP3 indicator Illuminates when MP...

Page 7: ...ive control To use the DX 7555 must be connected with an cable and an audio cable B AUDIO OUTPUT ANALOG 10 This analog audio output can be connected to an amplifier s analog input by using the supplie...

Page 8: ...REPEAT button 18 Press to set repeat playback I OPEN CLOSE button 12 Press to open and close the disc tray J SEARCH button Press to search and select a track number For MP3 disc the button can be used...

Page 9: ...ller of the same type is used in the same room or the DX 7555 is installed close to equipment that uses infrared rays the remote control ler may not work reliably Don t put anything such as a book on...

Page 10: ...AUDIO OUTPUT If your CD R MiniDisc or DAT recorder has a digital input use a commercially available coaxial or optical fiber digital audio cable to connect the DX 7555 s COAXIAL or OPTICAL DIGITAL AUD...

Page 11: ...DX 7555 s connectors to an connector on another AV component in your system by using the sup plied cable See the manuals supplied with your other compati ble AV components for more information Notes U...

Page 12: ...te controller while the DX 7555 is powered on You will see the STANDBY indicator light up To turn on the DX 7555 from its standby mode press the ON but ton on the remote controller 4 Press again the s...

Page 13: ...the button to select the previous track If you press the button during playback or while playback is paused the beginning of the current track is selected If you select a track while playback is stopp...

Page 14: ...troller Remote controller 1 While playback is stopped press the dial The first folder will be displayed When JOG MODE is set to NAVI in the SETUP menu keeping the dial pressed will put the DX 7555 int...

Page 15: ...g the button on the DX 7555 or the button on the remote controller 3 If you press the dial or the ENTER button on the remote controller while a track is selected playback will start for the track You...

Page 16: ...at the current track has been playing default display Track name Name of the current track Group folder name Name of the current group folder Title name Title of the current track if ID3 tag present A...

Page 17: ...on about how to select folders and tracks see page 15 If you want to store folders only in memory select folders alone and then press the MEMORY button RANDOM ENTER CLEAR ENTER MEMORY REPEAT Number bu...

Page 18: ...during random play back tracks will be played in random order repeatedly 1 Press the Stop button to stop playback Now you can view the reserved mem ory by pressing the buttons Press the STOP button t...

Page 19: ...OFF SHARP SLOW NORMAL REVERSE 40 40 EXTRA ID3 VER 1 ID3 VER 2 CD EXTRA JOLIET READ NOT READ NOT INITIALIZE CANCEL EXECUTE AUDIO MP3 USE SVD ISO9660 JOG MODE GROUP NAVI DISPLAY DISC NAME GROUP NAME TRA...

Page 20: ...all the groups fold ers and the tracks should be indi cated on the display The memory mode should be dese lected 2 Press and hold the STOP button until SETUP MENU appears on the display about a few s...

Page 21: ...haracter is displayed if it is contained in the head of the track name and the group folder name BAD NAME REPLACE NOT This preference determines whether or not track and folder names that contain undi...

Page 22: ...clockwise or coun terclockwise to display INITIAL IZE and then press the dial When using the remote controller press the buttons and then the ENTER button 4 Rotate the dial in a direction of clockwis...

Page 23: ...disc properly Discs Made on Personal Computers Discs made on personal computers including those of a compatible format may not work properly in the DX 7555 because of incorrect settings in the disc b...

Page 24: ...nce on page 21 For ID3 version 2 tags information contained in the beginning of the file are recognized We recommend that you include only title artist name and album name information in ID3 tags Comp...

Page 25: ...disc and clean it page 23 The disc is very scratched Replace the disc Can t enter track numbers for memory playback No such track on the CD Enter another number page 17 It takes a long time to locate...

Page 26: ...re than 25 tracks in memory The DX 7555 contains a microcomputer for signal processing and control functions In very rare situations severe interference noise from an external source or static electri...

Page 27: ...mpedance Analog 2 0 V rms 470 Power supply AC 230 240 V 50 Hz AC 220 230 V 50 60 Hz AC 120 V 60 Hz Power consumption 16 0 W Standby power consumption 0 2 W Dimensions W H D 435 111 405 mm Weight 8 0 k...

Page 28: ...6 82194 Groebenzell GERMANY Tel 49 8142 4401 0 Fax 49 8142 4401 555 http www eu onkyo com ONKYO EUROPE UK Office Suite 1 Gregories Court Gregories Road Beaconsfield Buckinghamshire HP9 1HQ UNITED KIN...

Reviews: