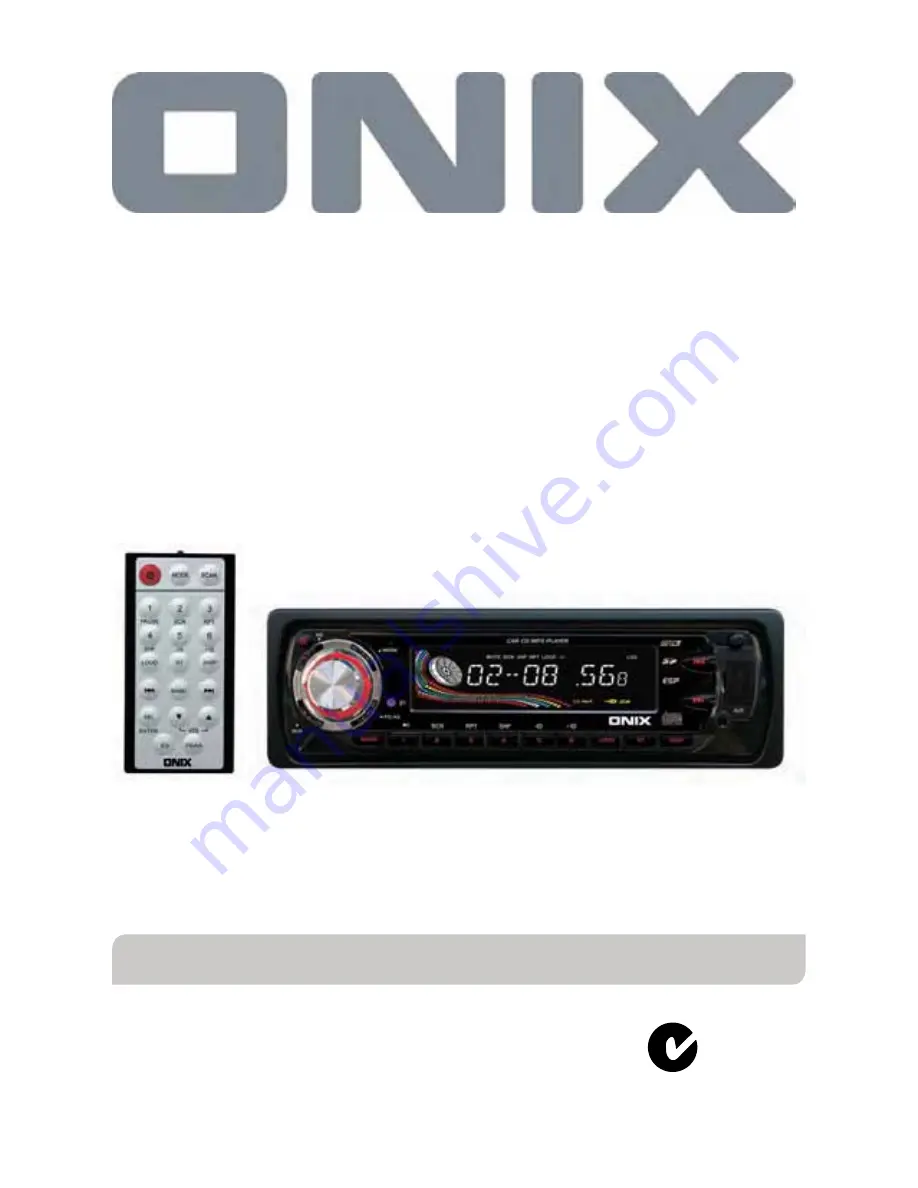
Car Stereo
Car CD/CD-R/CR-RW Compatible/AM/FM 2 Band Radio
Model Number AN-8006
After Sales Support
TEL: 1300 886 649
Made in China
INSTRUCTION MANUAL
N13275
Page 1: ...Car Stereo Car CD CD R CR RW Compatible AM FM 2 Band Radio Model Number AN 8006 After Sales Support TEL 1300 886 649 Made in China INSTRUCTION MANUAL N13275 ...
Page 2: ... ONIXproduct All products brought to you by ONIX are manufactured to the highest standards of performance and safety and as part of our philosophy of customer service and satisfaction are backed by our comprehensive 1 Year Warranty We hope you will enjoy using your purchase for many years to come Car Stereo ...
Page 3: ...l 8 Wiring Diagram 9 Operations 9 Location and Function of Keys 11 Using the Remote Control 13 General Operations 18 Radio Operations 20 CD MP3 Operations 24 Mixed Mode CDs Operations 25 SD MMC Memory Card Play Operations 25 AUX in Operations 26 USB Device Operations 27 Disc Notes 30 Specications 31 Important notes 32 FAQ s Contents ...
Page 4: ... not get in the driver s way and cannot injure the passenger if there is a sudden stop like an emergency stop If installation angle exceeds 30 from horizontal the unit might not give its optimum performance Avoid installing the unit where it would be subject to high temperature such as from direct sunlight or from hot air from the heater or where it would be subject to dust dirt or excessive vibra...
Page 5: ...nect the wire harness and the antenna 3 Press the button on the front panel and remove the control panel For details refer to using the detachable front panel 4 Lift the top of the outer trim ring then pull it out to remove it 5 The two supplied keys release tabs inside the unit s sleeve so you can remove it Insert the keys as far as they will go with the notches facing up into the appropriate slo...
Page 6: ...into place 9 To further secure the unit use the supplied metal strap to secure the back of the unit in place Use the supplied hardware Hex Nut M5mm and Spring Washer to attach one end of the strap to the mounting bolt on the back of the unit If necessary bend the metal strap to fit your vehicle s mounting area Then use the supplied hardware Tapping Screw 5x25mm and Plain Washer to attach the other...
Page 7: ... ring then pull it out to remove it 5 Insert both of the supplied keys into the slots at the middle left and right sides of the unit then pull the unit out of the dashboard 2 DIN REAR MOUNT Method B If your vehicle is a Nissan Toyota follow this mounting instruction Use the screw holes marked T Toyota N Nissan located on both sides of the unit to fasten the unit to the factory radio mounting brack...
Page 8: ...ently push the front panel towards the left side before pulling it out from the unit 3 Store the front panel in the protective case provided for safe keeping To attach the front panel Hold the right side of the front panel with the plate facing down First attach the left side of the front panel to the unit by inserting the hole into the left holder Then slightly push it leftward and attach the rig...
Page 9: ...After Sales Support TEL 1300 886 649 8 Wiring Diagram ...
Page 10: ...After Sales Support TEL 1300 886 649 9 Location and function of the keys Front panel Operations Thefrontfacetafterremovingthefrontpanel ...
Page 11: ... 13 Band ID3 Button 14 Preset Station M1 M6 Buttons 15 PS AS Preset memory Scan Auto storage 16 UP Button Tune up Seek up track up fast forward 17 DOWN Button Tune down Seek down track down fast reverse 18 ST Button 19 LOUD Loudness Button 20 Scan Button 21 EQ Button 22 Playing Pausing Button 23 Scan SCN Playback Button 24 Repeat RPT Playback Button 25 Shuffle SHF Playback Button 26 Skip 10 tracks...
Page 12: ...ntrol if the remote control sensor is exposed to direct sunlight Operation angle about 30 in each the direction of the front of the remote sensor The remote control is a small lightweight precision device To avoid damage short battery life operational errors and poor response observe the following Do not subject the remote control to excessive shock Do not put in a trouser pocket Keep away from fo...
Page 13: ... lithium battery CR2025 3V 1 Remove the battery holder by pressing the locking tab with your thumb and pulling it out 2 Replacing the battery Replace the battery with the same type and the side facing up 3 Closing the cover Gently push in the holder until it is securely locked into place ...
Page 14: ...button and the EJECT button or inserting a disc into the disc slot When the system is on press and hold the POWER button for several seconds to turn off the unit Sound Adjustment Rotate the rotary encoder to adjust volume level Press the SEL button once and or repeatedly to select the following sound modes Volume bass treble balance and fader Press the VOL or VOL button to adjust level of the sele...
Page 15: ...EK PRI If you select this mode the automatic search will be prior when you briefly press the or button STEP PRI If you select this mode the manual search will be prior when you briefly press the or button STEREO MONO FM listening is received in stereo mode However if the signal is weak or the reception is not as good as you would like switching to MONO mode usually improves the overall sound quali...
Page 16: ...witched off PVOL To set the volume to a certain level press the SEL button momentarily until PVOL is shown on the LCD display Then rotate the rotary encoder to adjust to a certain volume level BEEP ON OFF The car audio device is equipped with 2 beep tone on beep tone off function After entering this mode by pressing the button rotate the rotary encoder to choose one Beep on mode The confirmation b...
Page 17: ...e TUNER DISC with a CD MP3 disc inside the disc slot USB SD MMC memory card AUX mode To select the audio auxiliary input mode During TUNER DISC USB or SD MMC memory card playback mode press the AUX button to switch to audio auxiliary input mode Press again to exit and resume original playback mode Last position memory feature During disc USB SD MMC card playback if you turn off the unit and then s...
Page 18: ...djust minute by rotating the rotary encoder or pressing the VOL UP or VOL DOWN button TEL MUTE The audio system automatically mutes whenever a call comes in NOTE The function will not work if a cable is not connected to the car phone 1 When a call is received TEL CALL is displayed and all the unit functions are temporarily interrupted 2 Hang up the phone the TEL CALL disappears from the display Th...
Page 19: ...MODE appears on LCD display it will change into manual search mode Manual search mode Press the or button once and or repeatedly to manually search upward or downward step by step for the desired radio station within the current band In manual search process if both buttons haven t been pressed within 5 seconds it will change into automatic search mode automatically SEEK MODE will be visible on th...
Page 20: ...to store Preset scan Preset scan Short pressing the PS AS button it scans each preset stations in the memories of the current band Each preset station will blink for 5 seconds with releasing mute then go to next station finally the radio will go to play the start preset station Press again to stop preset scanning Auto store Pressing the PS AS button for more than 2 seconds it will enter auto store...
Page 21: ...f the first track of current disc Playing the previous next track When playing the track or file briefly press the button to play the next track In playback process briefly press the button once to play the current track from the beginning Press the button twice continuously to play the previous track Playing forward and backward In the track or file playback pressing and holding the or button to ...
Page 22: ...and play the current track Repeat playback In CD MP3 WMA files playback briefly press the RPT button to continuously play the current track Press again to stop repeat playback and resume normal playback For MP3 WMA files press and hold the RPT button to play all the tracks in the current folder Press again to stop repeat and resume normal playback Shuffle playback In CD MP3 WMA files playback brie...
Page 23: ...in the current disc USB device or SD MMC memory card e g TRK 093 will appear on the LCD display and the first digit will blink b Rotate the rotary encoder to adjust the first digit c If you press and hold the SEL button the system will play the selected track If you press the SEL button briefly to confirm and the second digit will blink and you can select and enter the second digit by rotating the...
Page 24: ...file was not found NO FILE message will be visible on the display Root directory search mode The root directory search mode will allow you to quickly find an MP3 WMA title under a specific group folder a In playback of discs with MP3 or WMA format press the PS AS button three times to access the first folder mode b Rotate the rotary encoder to change and select a desired folder If there are no roo...
Page 25: ... title artist and album information will be scrolling on the LCD display automatically NOTE As long as the current playing MP3 music contains relevant ID3 tag information in version 1 0 2 0 format the 3 items underlined above will be scrolling on the LCD display otherwise they will not appear Mixed Mode CD operations If available the unit can play the mixed mode CD disc the disc contains both CD a...
Page 26: ...e MP3 operation described above NOTE The operations of the MP3 file in the SD MMC memory card is the same as the MP3 operation described in the MP3 WMA disc part When reading the memory card please don t touch or take out the card If following the instruction above the unit can t read the card please check if the card is in good condition or take out the card then insert it into the card slot once...
Page 27: ... t touch or take it out If following the instructions above the unit can t read the file in the USB stick please check if the device is in good condition or take it out then insert it into the USB port once more The main unit can only support the standard USB memory disc USB MP3 player is not a standard which means different brand name or different models have their own standard So our product can...
Page 28: ... your CD R CD RW recorder or CD R CD RW software for more information on finalisation process 3 Depending on the recording status conditions of the disc and the equipment used for the recording some CD Rs CDRWs may not be played on this unit see 1 1 To have more reliable play back please see following recommendations a Use CD RWs with speed 1x to 4x and write with speed 1x to 2x b Use CD Rs with s...
Page 29: ...mp areas 3 Near car heaters 4 On the seats or dashboard Disc cleaning Use a dry soft cloth to wipe the surface If the disc is quite dirty use a soft lightly dampened cloth with isopropyl rubbing alcohol Never use solvents such as benzene thinner or conventional record cleaners as they may mark the surface of the disc NOTE A disc may become somewhat scratched although not enough to make it unusable...
Page 30: ...utside edges If a disc with rough edges is used the proper setting will not be performed and the player will not play the disc Therefore remove the rough edges in advance by using a ballpoint pen or pencil as shown below To remove the rough edges press the side of the pen or pencil against the inside and outside edges of the disc ...
Page 31: ...ne Controls Bass at 100 Hz 10 dB Treble at 10 KHz 10 dB Maximum Output Power 4 x 50 watts Current Drain 15 Ampere max 2 CD PLAYER Signal to Noise Ratio 55 dB Channel Separation 40 dB Frequency Response 40Hz 18 KHz 3 RADIO FM Frequency Coverage 87 5 108 0 MHz IF 10 7 MHz Sensitivity S N 30dB 4μV AM Frequency Coverage 531 1629 KHz IF 450 KHz Specifications ...
Page 32: ...t Do not allow this unit to come in contact with liquids Electrical shock could result Also damage to this unit smoke and over heating could result from contact with liquids Keep this manual handy as a reference for operating procedures and precautions Always keep the volume low enough so that you can hear sounds from outside the vehicle Protect the unit from moisture If the battery is disconnecte...
Page 33: ...in reverse direction Insert the CD with the label facing upwards The surface of CD is extremely dirty or has been scraped Clean the disc or try to replace with a new one Temperature inside the car is too high Cool off or until the ambient temperature returns to normal Condensation Leave the player off for an hour or so and then try again The following chart will help in solving most problems that ...
Page 34: ...sc or try to replace with a new one The operation keys do not work 1 The built in microcomputer is not operating properly due to noise 1 Press the RESET button to restore the program 2 The front panel is not properly installed 2 Fix the front panel into its place No radio reception The antenna cable is not connected Insert the antenna cable firmly into the antenna socket of this CD player In autom...
Page 35: ...After Sales Support TEL 1300 886 649 34 This page has been left intentionally blank ...
Page 36: ...After Sales Support TEL 1300 886 649 ...