3-3
Chapter 3 Basic Setup
3
Basic
S
etup
3-2. Opening Setup Screen
This section describes steps from opening a setup screen for an access point and a client (slave) to checking
communication.
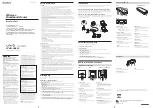
Step 1. PC (Wired LAN) Setup
Configure an IP address through Chapter 2-3. Connection Check, IP Address Setup (P.2-10).
Step 2. Connecting
(1) Connect an access point and PC using a LAN cable.
Always use a straight cable.
(2) Connect power cables of an access point and a client (slave).
(3) Turn their power on and check indication of each POWER indicator as
shown below.
Check the LAN indicator of the access point because it is connected to
PC.
To 24VDC Power
To 24VDC Power
Straight LAN Cable
WE70-AP
WE70-CL
LAN
MODE
POWER
WIRELESS
Check if the indicator
is on after connection.
LAN
RSSI
POWER
WIRELESS
Check if the indicator
is on after connection.
ETHERNET
INIT
PUSH
RSSI
ETHERNET
INIT
+ –
24V
+ –
24V
Check the light is ON.
LAN
MODE
POWER
WIRELESS
Check the light is ON.
LAN
MOD
E
POW
ER
WIRE
LESS
WE70-AP
FA
W
IRE
LE
SS
LA
N A
CC
ES
S P
OIN
T
Access point
WE70-AP
LAN
MOD
E
POW
ER
WIRE
LESS
WE70-CL
FA
W
IRE
LE
SS
LA
N A
CC
ES
S P
OIN
T
Client (Slave)
WE70-CL
LAN
RSSI
POWER
WIRELESS
(4) Check if each WIRELESS indicator of the access point and the client
(slave) is on in several seconds (about 8 seconds).Communication will be
started as they have the same SSID and channel in their factory
shipment status.
Summary of Contents for WE70-AP
Page 1: ...OPERATION MANUAL WE70 AP CL pan FA Wireless LAN Unit Cat No N153 E1 01...
Page 2: ......
Page 32: ...Chapter 1 Overview 1 12 1 Overview...
Page 98: ...Chapter 4 Advanced Setup 4 30 4 Advanced Setup...
Page 146: ......