background image

65

Heat-resistive RFID System

User's Manual

S

e

c

tion 4

Communic

a

tions

 Comma

nds

Section 4

Reading from/Writing to Tags

AUTO WRITE (AW)

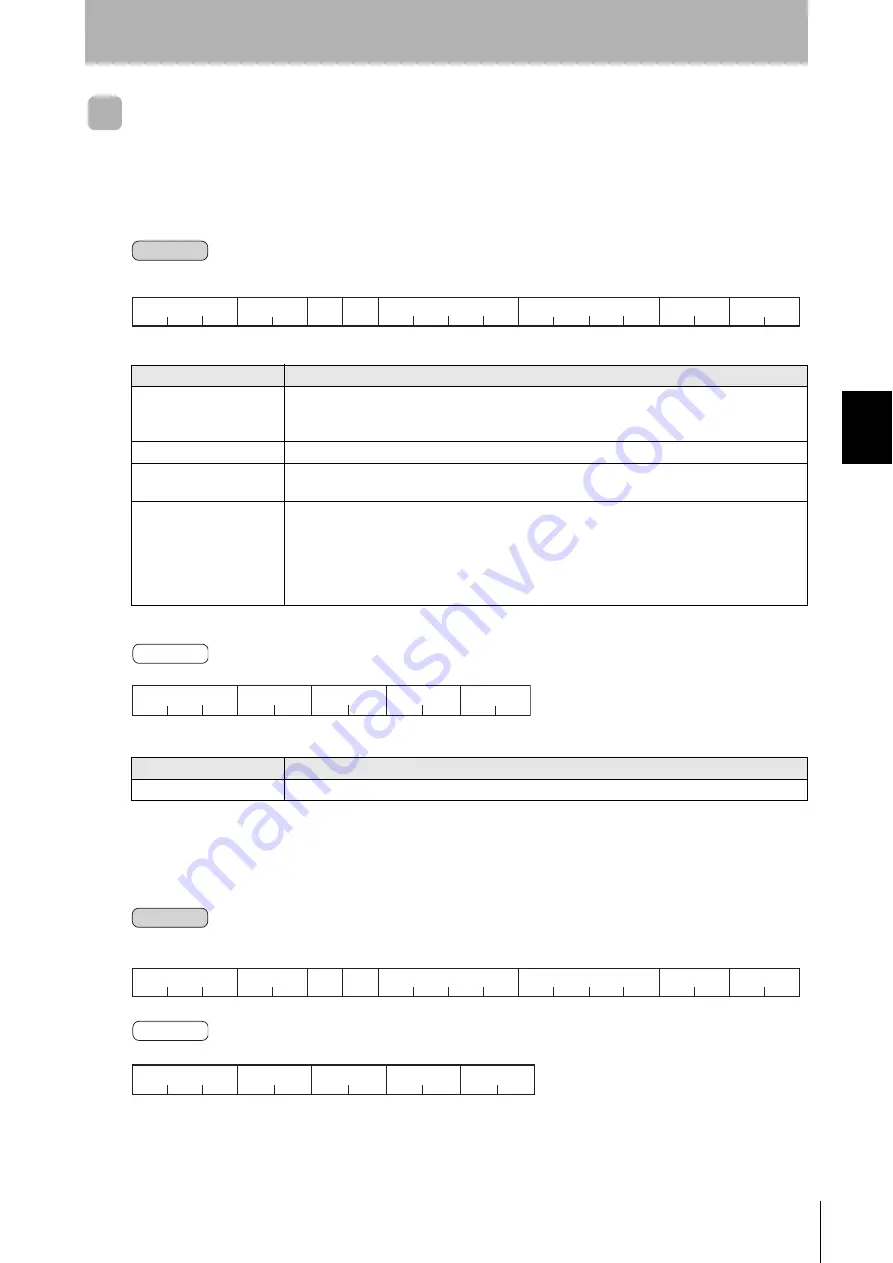
This command writes data to the Tag when the Tag enters the communications area. The Controller

returns a response when communications between the Controller and Tag has been completed. The

host device cannot send other commands until either a response is received or processing is aborted

using the COMMAND PROCESSING ABORT (AA) command.

• Example

Writing two bytes of data “1122” (hexadecimal code) from address 0010h of the Tag in the communica-

tions area to Controller No. 2. 

Name

Details

Data type

Specifies the code format for sending the write data to the Tag.

A: ASCII
H: Hexadecimal code

Antenna designation

Always 1

Start address 

Specifies the start address of the area to which data is to be written in 4-digit hexadecimal code.

Setting range: 0000h to 03E7h

Write data

Contains the data to be written to the Tag.
The number of bytes that can be written at one time is as follows:

Setting range

ASCII: 256 bytes (256 characters)
Hexadecimal code: 128 bytes (256 characters)

* When hexadecimal code is designated, specify two characters for each byte.

Name

Details

End code

Indicates the execution result for the command.

Command

×

×

A

W

×

×

×

×

A/H

1

×

×

2

1

1

4

2

@

×

×

3

*

CR

2

×

×

n

Data 

type

Antenna 

designation

Start address

Write data

FCS

Controller No.

Terminator

Command 

code

Response

A

W

×

×

0

0

2

2

2

@

×

×

3

*

CR

2

End code

FCS

Terminator

Command code

Controller No.

Command

1

1

A

W

2

C

1

0

H

1

0

0

2

1

1

4

2

@

0

2


CR

2

2

2


3

Data 

type

Antenna 

designation

Start address

Write data

FCS

Controller No.

Terminator

Command 

code

Response

A

W

5

4

0

0

2

2

2

@

0

2

3

*

CR

2

End code

FCS

Terminator

Command code

Controller No.

Summary of Contents for V680-CA1D

Page 1: ...Heat resistive RFID System V680 Series User s Manual Cat No Z221 E1 01 ID Controller V680 CA1D V680 CA2D Read Write Antenna V680 H01 ID Tag V680 D1KP58HT ...

Page 2: ...this manual This manual describes the functions performance and application methods needed for optimum use of the V680 series Heat resistive RFID System Please observe the following items when using the RFID System Read and understand this manual before attempting to use the product and use the product correctly Keep this manual in a safe but accessible location so that it is available for referen...

Page 3: ...on 4 Section 5 Section 6 Application Considerations Read and understand this information first Product Overview Installation Connections and Wiring Before Communications Reading from Writing to Tags Troubleshooting Appendices Heat resistive RFID System V680 CA1D ID Controller V680 CA2D ID Controller V680 H01 Read Write Antenna V680 D1KP58HT ID Tag User s Manual ...

Page 4: ...ed to imply that the uses listed may be suitable for the products Outdoor use uses involving potential chemical contamination or electrical interference or conditions or uses not described in this document Nuclear energy control systems combustion systems railroad systems aviation systems medical equipment amusement machines vehicles safety equipment and installations subject to separate industry ...

Page 5: ... Commission FCC Part 15 Subpart C 3 Japan Radio Law Equipment using high frequencies Inductive Reading Writing Communications Equipment Identification No EC 04023 Conforming standards Inductive Reading Writing Communications Equipment Standard ARIB STD T82 Model specifications for the Heat resistive RFID System apply only for use in combination with an ID Controller Safety Precautions Indicates a ...

Page 6: ...g requirements The DC power supply must be used for the V680 Series only and must not be connected to any other devices or equipment The voltage of the DC power supply must be within the specified rating 24 VDC 10 15 8 Install the ferrite cores provided with the V680 CA1D and V680 CA2D according to the instructions Do not remove the ferrite core installed on the V680 H01 9 Do not touch the product...

Page 7: ...t can affect communications with the Tags If such devices are located near the Tags always test operation in advance to confirm whether the system will be affected Observe the following precautions to minimize the effects of normal noise 1 Ground all metal objects in the vicinity to 100 Ω or less 2 Do not use the system near high voltage or high current lines Do not install the system near radio a...

Page 8: ...n How to Read this Manual Meanings of Symbols Indicates particularly important points related to a function including precautions and application advice Indicates page numbers containing relevant information Indicates reference to helpful information and explanations for difficult terminology ...

Page 9: ...on 1 Product Overview 9 System Configuration 10 Operation Overview 12 Component Names and Functions 13 Operation Flowchart 15 Section 2 Installation Connections and Wiring 17 Installation Environment 18 Installation Method 20 Connecting and Removing the Antenna Connector 24 Wiring 25 RS 232C Interface Connections V680 CA1D 29 RS 485 Interface Connection V680 CA2D 33 Section 3 Before Communications...

Page 10: ...Commands 62 Communications Subcommands 72 Controller Control Commands 73 Other Commands 76 Section 5 Troubleshooting 77 Self diagnostic Function 78 Errors and Countermeasures 79 Maintenance and Inspection 80 Troubleshooting 81 Section 6 Appendices 87 Specifications and Dimensions 88 Characteristics According to Operating Conditions 98 JIS8 Unit Code Table ASCII 105 Degree of Protection 106 Revisio...

Page 11: ...Section 1 Product Overview 9 Heat resistive RFID System User s Manual Section 1 Product Overview System Configuration 10 Operation Overview 12 Component Names and Functions 13 Operation Flowchart 15 ...

Page 12: ...stem Configuration The V680 CA1D contains a serial interface based on RS 232C and can connect easily to a general purpose personal computer and Programmable Controller PLC Standard communications are per formed by executing instructions from any host device Desktop PC Notebook PC PLC RS 232C V680 CA1D V680 CA1D V680 H01 Container Tag Host Devices ...

Page 13: ...nge to receiving mode within 5 ms after the command has been completely sent to the Controller from the host device Otherwise communications with the Controller may not be possible Desktop PC Notebook PC PLC RS 485 RS 485 RS 485 0 1 2 3 4 5 6 7 8 9 0 1 2 3 4 5 6 7 8 9 SW1 SW2 SW3 SW4 V680 CA2D RUN COMM NORM ERR R W ANTENNA RS 485 COM RST GR SYNC MADE IN JAPAN 24VDC V680 CA2D V680 H01 0 1 2 3 4 5 6...

Page 14: ...Tags 1 When the command is sent to the Controller from the host device the antenna waits for a Tag to arrive 2 When the Tag enters the antenna s communications area the data in the memory area specified in the READ command is returned to the host device as a response 3 The host device performs processing e g sorting based on this data V680 CA1D Tag Container Processing sorting Desktop PC Notebook ...

Page 15: ...D V680 CA1D 1 Rotary switches 2 DIP switches 3 LED display 4 Cover 5 Connecting port for antenna 6 RS 232C port 7 Power supply terminals 8 External input terminals 9 Reset terminals 1 Rotary switches 2 DIP switches 3 LED display 4 Cover 5 Connecting port for antenna 6 RS 485 port 7 Power supply terminals 8 External input terminals 9 Reset terminals V680 CA2D ...

Page 16: ...once when communications ends in an error and then turns OFF Also lit when a system error occurs 4 Cover Cover for 1 2 and 5 Open only when required for use 5 Connecting port for antenna Connects an antenna A single antenna can be connected via a V700 A40 W Antenna Cable order separately Applicable Antenna V680 H01 250 200 mm 6 RS 232C port V680 CA1D Connects a host device A general purpose PLC or...

Page 17: ...r s communications conditions Preparation Communications preparation Test p 43 Perform a communications test between the V680 and host device p 43 Perform a communication test between the Tag and Read Write Antenna p 98 Check the ambient environment p 45 Perform communication using real commands Communication p 18 p 20 Install the V680 Connect the V680 ...

Page 18: ...16 Section 1 Operation Flowchart Heat resistive RFID System User s Manual Section 1 Product Overview MEMO ...

Page 19: ...RFID System User s Manual Section 2 Installation Connections and Wiring Installation Environment 18 Installation Method 20 Connecting and Removing the Antenna Connector 24 Wiring 25 RS 232C Interface Connections V680 CA1D 29 RS 485 Interface Connection V680 CA2D 33 ...

Page 20: ...metal powder Locations that will expose the Controller to direct vibration or shock Locations exposed to direct sunlight Locations exposed to water oil or chemicals sprays Mounting in Panel The Controller can be used at an ambient temperature range between 10 C and 55 C Be sure to observe the following precautions Make sure that the Controller is provided with sufficient ventilation space Do not i...

Page 21: ...ent The communications distance of the Antenna drops due to ambient noise from surrounding electronic devices The following precautions apply when installing the Antenna near such devices or other sources of ambient noise Power Lines and High tension Lines Do not wire the Antenna cable along with high tension lines or power lines Keep the Antenna cable as far away as possible from them Inverters M...

Page 22: ... the Controller with two M4 screws together with spring washers and flat washers when enclosing the Controller in a panel Do not use any organic solvent such as lock paint to fix screws Otherwise the case may crack Mounting to a DIN Track 1 First hook the Controller to part A and then press the Controller in direction B to mount the Controller to the DIN Track Two M4 PEF 100N2 DIN Track PFP M End ...

Page 23: ...llation Connections and Wiring 2 To disconnect the Controller from the DIN Track pull the mounting hook downwards and then lift the Controller upwards V680 CA1D V680 CA1D DIN Track End Plate Mounting hooks See note Note Consider the height of the DIN Track when mounting Can be close mounted ...

Page 24: ...Wiring Read Write Antenna Be sure to insert the provided fittings into the Antenna mounting holes and mount the Antenna with four M4 screws with spring washers and flat washers as shown below 142 5 235 0 2 185 0 2 M4 or 4 5 dia Coil center Mounting Hole Dimensions Unit mm Spring washer Flat washer Provided fitting ...

Page 25: ...mount the V680 A80 Attachment when required 1 Mount the Attachment to the workpiece Use a tightening torque of 21 to 42 N m 2 Tighten the lock nut 3 Mount the Tag to the Attachment The Tag can be mounted in either direction 4 Insert the split pin into the 3 2 dia hole and open the tip of the pin to secure Two nuts and one split pin are provided with the V680 A80 Attachment Replacement split pins m...

Page 26: ... the connector cable locking section and insert matching the black mark on the Controller with the white mark on the connector 2 Push the connector in vertically until it locks Be sure to grip the cable locking section The connector will not lock if only the ring section is pushed Removing 1 Grip the ring section and pull the connector out verti cally The cable cannot be removed if the cable locki...

Page 27: ... to a torque of approximately 6 kgf cm Examples of Applicable Crimp Terminals The Controller can internally withstand the noise on the power line By providing power to the Con troller through the noise filter however the noise between the Controller and ground can be greatly reduced Manufacturer Model Applicable wire Type J S T Mfg Co Ltd 1 25 N3A AWG24 to AWG16 Fork shaped J S T Mfg Co Ltd 1 25 Y...

Page 28: ...ID Tag Make sure that there is a distance of 80 cm or more between the Controller and Antenna Note Provide 24 VDC to the Controller The allowable fluctuation of the power supply is between 20 4 and 26 4 VDC i e 24 VDC 15 10 Make sure that the power supply voltage is within this range The maximum power consumption of the Controller in the largest configuration is 20 W An inrush current of approxima...

Page 29: ...wn below 1 Wire the power supply and ground wires in advance 2 Wind the power supply and ground wires together around the ferrite core once so that the ferrite core will not move as shown below As a guide locate the ferrite core within 10 cm of the Controller 3 Close and press the ferrite core until it clicks indicating that the ferrite core is locked V680 CA1D Ferrite core provided ...

Page 30: ...g type of crimp terminals can be connected to these terminals Tighten each screw to a torque of approximately 6 kgf cm Make sure that the input voltage does not exceed a maximum allowable input voltage of 26 4 V otherwise the Controller may malfunction Separate power lines and high tension lines from the input line to protect the input line from noise interference V680 CA1D V680 CA1D RESET input 2...

Page 31: ...M PC AT or Compatible Computer 9 pin Port Signal name Symbol Signal direction Pin No Input Output Ground for maintenance or ground GR No No Shield Signal ground or common retrace line SG No No 5 Send data SD No Yes 3 Receive data RD Yes No 2 Request to send RS No Yes 7 Clear to send CS Yes No 8 Shield Shielded wire Host device ID Controller Connector Pin Arrangement When Viewed from the Controller...

Page 32: ...r the host device 9 pin male Shield Connecting device Controller Cables with connectors Shielded wire 9 pin male Connector Pin Arrangement When Viewed from the Controller C200H ASC02 Host device side Controller side OMRON XM2A 0901 Plug provided with Controller OMRON MX2S 0911 Hood See note 1 provided with Controller Connection cable Recommended cable Hitachi Cable s CO MA VV SB 5PX28AWG See note ...

Page 33: ...ng screws and put on housing B2 to complete the connector assembly Conductors Braided shield Shield tape Cable bushing Insert the cable into the cable bushing Unravel the braided shield for approximately 10 mm and fold it back on the cable bushing Apply shield tape to the folded braided shield Plug Jumper Aluminum tape Cable bushing Note Short circuit pins 7 RS and 8 CS with a jumper Pin No Symbol...

Page 34: ...mpletely loosen the two lock screws Then hold the protruding part of the connector hood by hand and pull the connector out straight If the connector is difficult to disconnect hold the Controller by hand while pulling out the connector Example of Grounding the Shield Wire at the Controller Philips screwdriver Lock screw Controller Host device The shielded wire must be grounded either from the Cont...

Page 35: ...ed before sending the command After the command is completely sent change to receiving mode within 5 ms Otherwise communications with the Controller may not be possible Pin No Pin No 1 2 3 4 Polarity Pin numbers 1 and 3 and 2 and 4 are internally short circuited in the connector Host device Terminating re sistance of 220 Ω provided RS 485 Controller 0 Terminating resist ance of 220 Ω not provided ...

Page 36: ...es 2 and 3 are used Noise source Other devices power lines AC Adapters etc Set SW 3 7 No terminating resistance OFF Set SW 3 7 No terminating resistance OFF Total length 300 m max Set SW 3 7 Terminating resistance ON Set SW 3 7 No terminating resistance OFF Host device with termi nating resist ance Set SW 3 7 Terminating resistance ON Set SW 3 7 No terminating resistance OFF Total length 300 m max...

Page 37: ...and insert each wire into the correct connector hole 2 Securely tighten the connector s cable fixing screws for each wire Use a small flat blade screwdriver with a uniform thickness Do not use a standard screwdriver with a tapered end only Other wise the screwdriver will not fully insert into the hole Tighten the cable fixing screws to a suitable torque of approximately 0 5 N m Small flat blade sc...

Page 38: ...r on the cable are facing the right direction and push them together firmly Tighten the fixing screws to a suitable torque of approximately 0 3 N m 4 To disconnect connectors completely unscrew the two fixing screws hold the protruding part of the connector and pull the connector out straight If the connector is difficult to disconnect hold down the Controller and pull out the connector Do not con...

Page 39: ...ons 37 Heat resistive RFID System User s Manual Section 3 Before Communications Switch Settings 38 Opening the Cover 38 Setting Methods 39 Default Settings 39 Rotary Switch Settings 40 DIP Switch Settings 40 Communications Test 42 ...

Page 40: ...ver of the Controller to make each of the switch settings Opening the Cover A screwdriver is provided with the Controller Open the cover by inserting the screwdriver into the groove on the left side of the cover Under the cover there are two rotary switches SW1 and SW2 and two DIP switches SW3 and SW4 Rotary switches DIP switches ...

Page 41: ...SW3 5 SW3 6 SW3 7 SW4 1 SW4 2 SW4 3 SW4 4 SW4 5 SW4 6 SW4 7 SW4 8 SW3 8 Node number Reserved by the system Reserved by the system Reserved by the system Reserved by the system Reserved by the system Reserved by the system Baud rate Data length Parity Number of stop bits Reserved by the system Reserved by the system Reserved by the system CD1D CD2D Not used RS 485 terminating resistance 0 0 OFF OFF...

Page 42: ...et to 0 System Reserved Switch SW2 Do not use this switch Always set this switch to 0 DIP Switch Settings SW3 Pins 1 to 6 and pin 8 Reserved by the system Do not use these pins Always set these pins to OFF Pin 7 Not used V680 CA1D Do not use this pin Always set this pin to OFF Pin 7 RS 485 terminating resistance V680 CA2D If two or more Controllers connected to the host device terminating resistan...

Page 43: ...rity Pin 6 Number of stop bits Pins 7 and 8 Reserved by the system Do not use these pins Always set these pins to OFF SW4 pin 1 SW4 pin 2 Details ON ON 115 200 bps OFF 19 200 bps OFF ON 9 600 bps OFF 38 400 bps SW4 pin 3 Details ON 8 bits JIS8 ON OFF 7 bits ASCII7 OFF SW4 pin 4 SW4 pin 5 Details ON ON None OFF None OFF ON Odd OFF Even SW4 pin 6 Details ON 1 OFF 2 ...

Page 44: ...s specifications set correctly p 40 p 41 3 Antenna connection Is the Antenna connected properly p 24 4 Host device connection Is the RS 232C RS 485 connector connected properly p 29 p 33 5 Antenna and Tag connection Are the Antenna and Tag located properly p 98 Turn power ON Online test with the host device Completion Trial operation of the system Check that the supply voltage and the connection o...

Page 45: ...ent from the host device to test whether communication between the Tag and Read Write Antenna is normal 1 Connect the host device and Controller and then turn ON the power to the Controller 2 Send the AUTOWRITE command from the host device 3 If communication with the Tag is normal a response will be returned to the host device Example Using the Read Write Antenna connected to Controller No 2 to wr...

Page 46: ...44 Section 3 Communications Test Heat resistive RFID System User s Manual Section 3 Before Communications MEMO ...

Page 47: ...e RFID System User s Manual Section 4 Reading from Writing to Tags Tag Operation and Command Status 46 Tag Memory Map 50 Command and Response Format 56 Communications Commands 62 Communications Subcommands 72 Controller Control Commands 73 Other Commands 76 ...

Page 48: ...to the host device 3 The right to send is transferred by using a carriage return CR Explanation 1 The host device sends a command to the Controller 2 The Controller analyzes the command from the host device transmits the command and writes data to or reads data from the memory in the Tag 3 For read commands the read data and response is sent to the host device For write commands a response indicat...

Page 49: ...ived until a the response indicating that command processing is completed has been returned In this status the COMMAND PROCESSING ABORT and ABORTcommands only can be received Polling Auto Subcommand Standby Status The following processing is performed after receiving a POLLING AUTO command 1 Processing with the Data Carrier is ended and the processing results are returned as the response when a po...

Page 50: ...rkpiece with Tag along the production line Auto Read Write Functions Auto Command Processing The Controller does not return a response for AUTO commands until the Tag is within range i e the communications path with the host device is busy during this time 1 An AUTO command is sent to the Read Write Antenna from the host device 2 The Controller does not return a response while the Tag is not in ra...

Page 51: ...r immediately returns a response indicating that the command was received 3 The host device can send subcommands to request to proceed with processing or abort polling auto processing 4 If the Tag is not in range an out of range response will be returned for the subcommand request 5 Read or write processing is performed when the Tag passes in front of the Read Write Antenna 6 After processing is c...

Page 52: ...ection 4 Tag Memory Map Heat resistive RFID System User s Manual Section 4 Reading from Writing to Tags Tag Memory Map Tag Memory Map Address Data 0000 H 0001 H 0002 H 0003 H 1 byte 03DF H 03E7 H User area ...

Page 53: ...ser specified overwrite count control area to determine whether the 100 000 overwrites have been exceeded Set the start address between 0H and 5H or between 8H and DH If the start address is set between 6H and 7H or between EH and FH an address error error code 7A hexadecimal will be returned in the end code Command M D 1 CR S L Specifies the number of refreshes in hexadecimal 00H 01H 02H to FBH R...

Page 54: ...e to set the number of overwrites to 100 000 or lower The number of overwrites is controlled using hexadecimal values and can be read using the READ command If the control area data is already 0 the control area value will not be refreshed and only a warning will be returned as a response When the refresh count is set as 00H the count will not be updated and only an overwrite count check will be p...

Page 55: ...t is set as 00H the count will not be updated and only an overwrite count check will be performed Example Using Overwrite Count Control Command MDL In the following example the three bytes from address 0010H is the overwrite count control area Do not execute the MDS command and MDL command together for the same Tag Doing so will prevent managing the service life Area start address Upper digit Midd...

Page 56: ...culated and written to the check code area When data comparison is specified transaction code C the CRC of the calculation area data is calculated and a comparison made with the check code area data If they coincide end code 75 is returned and if they do not coincide end code 76 is returned as a warning Command Number of check block bytes in hexadecimal 03H 04H FEH FFH 00H 00H 256 bytes Processing...

Page 57: ...4H 1 2 H 3 4 H 5 6 H 5 C H D 6 H 0010H 0011H 0012H 0013H 0014H 0 0 H 3 4 H 5 6 H 5 C H D 6 H 0010H 0011H 0012H 0013H 0014H Data error If a data error occurs MD76 FCS a data error warning will be returned 1 In this example the following data already exists in the memory 3 Execute MDC1001005 FCS comparison transaction The normal response MD75 FCS will be returned if the data coincides 2 Execute MDK1...

Page 58: ... partner in decimal Does not respond to any node other than the local node Setting range 00 to 09 Command code A two character symbol indicating the command function is entered The same symbol used for the command is entered in the response If a code is received that is not in the list of commands an IC error is returned Data Contains the read data or other data according to the execution details ...

Page 59: ...1 address of Tag memory Therefore always set two character units even number of characters for write commands One byte of Tag data is converted to two hexadecimal characters 00 to FF and transmitted A command error will occur if an odd number of characters is mistakenly set Hexadecimal Code Designation Example 0010H 0011H 0012H 0013H 0014H 4 4 5 4 4 F D 2 F E O M R O N Tag memory address A 1 0 0 1...

Page 60: ...s is resumed p 64 AW AUTO WRITE Writes data to the memory of the Tag when the Tag is within the com munications area Processing is aborted with the AUTO COMMAND PROCESSING ABORT command AA command standby status is resumed p 65 PR PRC E POLLING AUTO READ Reads data from the Tag when the Tag is within the communications area The command processing results can be requested using a subcom mand p 66 P...

Page 61: ... the Tag started Auto processing can celed Auto processing was canceled after communications with the Tag started Host communica tions error 10 Parity error A parity error occurred for one of the characters in the command 11 Framing error A framing error stop bits undetected occurred in the received frame 12 Overrun error An overrun error occurred for one of the characters in the command 13 FCS er...

Page 62: ...II Reading 5 Bytes from Address 0010H 0 2 2 8 FCS 0 5 R D FCS calculation range CR Terminator 1 0 H 1 0 0 Data 0100 0011 0011 0101 0100 0100 0011 0011 0011 0011 0011 0011 0011 0000 0000 0010 0010 0100 1000 0001 0000 0000 0001 0000 0000 0101 XOR XOR XOR XOR XOR XOR 0 2 R D H 1 0 0 1 0 0 5 0010 1000 40 30 32 52 44 48 31 30 30 31 30 30 35 XOR XOR XOR XOR XOR XOR Command code Controller No Read data A...

Page 63: ...mber of read bytes Set the number of bytes to be read from the Data Carrier in hexadecimal The following table shows the number of bytes that can be read at one time Controller No A H 1 2 FCS 00 to 09 Command code Data designation Antenna designation Start address Start address Write data 271 characters max per frame ASCII 256 bytes 256 characters Hexadecimal 128 bytes 256 characters CR Set the wr...

Page 64: ...t hexadecimal code The number of bytes that can be read at one time is as follows Setting range ASCII 256 bytes 256 characters set value 01h to FFh Hexadecimal 128 bytes 256 characters set value 01h to 80h Name Details End code Indicates the execution result for the command Read data Contains the data read from the Tag The number of characters is the number of read bytes for ASCII and the number o...

Page 65: ...03E7h Write data Contains the data to be written to the Tag The number of bytes that can be written at one time is as follows Setting range ASCII 256 bytes 256 characters Hexadecimal code 128 bytes 256 characters When hexadecimal code is designated specify two characters for each byte Name Details End code Indicates the execution result for the command Command W T A H 1 2 1 1 4 2 3 CR 2 n Data typ...

Page 66: ...e Setting range 0000h to 03E7h Number of read bytes Specifies the number of bytes to be read from the Tag in 2 digit hexadecimal code The number of bytes that can be read at one time is as follows Setting range ASCII 256 bytes 256 characters set value 01h to FFh Hexadecimal code 128 bytes 256 characters set value 01h to 80h Name Details End code Indicates the execution result for the command Read ...

Page 67: ...rt address Specifies the start address of the area to which data is to be written in 4 digit hexadecimal code Setting range 0000h to 03E7h Write data Contains the data to be written to the Tag The number of bytes that can be written at one time is as follows Setting range ASCII 256 bytes 256 characters Hexadecimal code 128 bytes 256 characters When hexadecimal code is designated specify two charac...

Page 68: ...ad from in 4 digit hexadecimal code Setting range 0000h to 03E7h Number of read bytes Specifies the number of bytes to be read from the Tag in 2 digit hexadecimal code The number of bytes that can be read at one time is as follows Setting range ASCII 256 bytes 256 characters set value 01h to FFh Hexadecimal code 128 bytes 256 characters set value 01h to 80h Name Details End code Indicates the exec...

Page 69: ...as aborted 76 Data processing with the Tag was in progress or had completed when the polling auto pro cessing was aborted Read data Indicates the data that was read according to the execution details command Subcommand Response P R 0 0 2 2 n 2 0 2 3 CR 2 End code FCS Terminator Command code Controller No Read data Command 0 2 P R 1 0 H 1 0 0 2 1 1 4 2 3 7 2 0 2 3 CR 2 Data type Antenna designation...

Page 70: ...rt address of the area from which data is to be read from the Tag in 4 digit hexa decimal Setting range 0000h to 03E7h Number of write bytes Specifies the number of data bytes to be written to the Tag in 4 digit hexadecimal Setting range 0000h or 0001h to 0080h When 0000h is specified the data will be written to the user area from the specified start address until the Tag s final address Name Deta...

Page 71: ...to processing was aborted 76 Tag was communicating or processing had completed when polling auto processing was aborted Read data Displays the read data according to the execution details command Subcommand Response P W 0 0 2 2 2 3 CR 2 End code FCS Terminator Command code Controller No Command 1 1 P W 2 2 Write data 1 0 H 1 0 0 2 1 1 4 4 0 2 3 0 2 CR 2 3 Data type Antenna designation Start addres...

Page 72: ...ock bytes Specifies the number of bytes for the check block in 2 digit hexadecimal Setting range 03h to FFh 00h 00 256 bytes Name Details End code Indicates the execution result for the command The end code 00 indicates normal completion calculation processing only 75 Data normal comparison processing only 76 Data error warning comparison processing only Command M D C K 1 Process setting Channel d...

Page 73: ...700 000 max L Fixed overwrite count of 100 000 using addition method Channel designation Always 1 Start address Specifies the start address of the overwrite count control area in 4 digit hexadecimal Setting range 0000h to 03E5h Number of refreshes Specifies the number of refreshes in 2 digit hexadecimal Setting range 00h to FFh 00 Checks number of refreshes only Name Details End code Indicates the...

Page 74: ...sing during execution in Controller No 2 Name Details End code Indicates the execution result for the command 14 AUTO command processing not executed 75 Aborted as a result of Tag not being in range Command A A CR 2 2 2 3 Command code Controller No FCS Terminator Response A A 0 0 2 2 2 3 CR 2 Command code End code FCS Controller No Terminator Command A A CR 3 6 2 2 2 0 2 3 Command code FCS Control...

Page 75: ...he end code 00 indicates normal completion Input status Indicates the present input status Leftmost digit 1 ON 0 OFF Rightmost digit 1 ON 0 OFF Output status Always 00 Command Command code C C Processing code 2 4 FCS 2 Controller No 3 CR Terminator 2 0 0 0 0 Response Command code C C 0 0 End code 2 2 FCS 2 Controller No 3 CR Terminator 2 Input status 0 0 Output status 2 2 Command C C 2 4 4 2 2 0 2...

Page 76: ...roller No 2 Name Details Message data Any character string for testing communications Name Details Message data Returns the test message sent with the command Command T S 2 n 2 3 CR 2 Message data Command code Terminator FCS Controller No Response T S 2 n 2 3 CR 2 Message data Command code Terminator FCS Controller No Command T S 2 5 1 4 2 0 2 3 CR 2 O M R O N Message data Command code Terminator ...

Page 77: ... Section 4 Reading from Writing to Tags ABORT XZ This command resets the Controller None Example Resetting Controller No 2 None Command X Z CR 2 2 2 3 Command code Terminator FCS Controller No Response Command X Z CR 4 0 2 2 2 0 2 3 Command code Terminator FCS Controller No Response ...

Page 78: ...om Writing to Tags Other Commands UNDEFINED COMMAND RESPONSE IC If the Controller receives a command code that is not in the list of commands the Controller will return a response for the undefined command to the host device Response Command code I C CR Terminator FCS 2 2 2 Controller No 3 ...

Page 79: ...Section 5 Troubleshooting 77 Heat resistive RFID System User s Manual Section 5 Troubleshooting Self diagnostic Function 78 Errors and Countermeasures 79 Maintenance and Inspection 80 Troubleshooting 81 ...

Page 80: ...rors If the hardware of the Controller fails the operation of the CPU Unit will be interrupted and the ERR indicator will turn ON or flash Nonfatal Errors If an error occurs in communications between the Controller and host device or between the Antenna and Tag the ERR indicator will turn ON Error type Item Indicator RUN COMM NORM ERR Normal operation Awaiting command Communicating with Tag Normal...

Page 81: ...e noise as a result of the above cause Provide the power through a 1 to 1 non grounded insulating trans former Do not use the same ground as other large capacity devices Inde pendently ground the Controller at a resistance of 100 Ω or less 2 Occurs irregularly Noise on power line Provide the power through a 1 to 1 non grounded insulating trans former or noise filter Do not use the same ground as o...

Page 82: ...nge Maximum and minimum ther mometer Hygrometer Humidity Vibration and shock Influence of vibration or impact of machines Dust Check that the system is free of accumu lated dust and foreign particles Neither is permitted Corrosive gas Check that no metal part of the system is discolored or corroded Panel condi tion Ventilation Check that the system is ventilated properly with natural ventilation f...

Page 83: ...n check flowchart to determine the cause of the error Yes normal Yes normal Yes normal Yes normal No error No error No error No error Main check flowchart Are host communications normal Are communications with the Tag normal Is the operating environment normal Replace the Controller Refer to the system connections check flowchart Refer to the host communications check flowchart Refer to the commun...

Page 84: ...e connector and cable connections OK Start Turn ON the power Is the ERROR indicator lit or flashing NO Are communications with the Tag normal Connect them correctly NO YES Replace the Controller YES NO Is the rated voltage supplied Is the RESET input ON NO Supply the rated voltage NO Turn OFF the RESET input YES Replace the Controller OK YES ...

Page 85: ...he response normal Send the TS command from the host device Start NO Is the communications frame OK NO Correct the communications frame Are the communications cable connectors wired OK NO Wire the connectors correctly YES NO YES Is the host device operating normally Correct the host program or replace the host device Replace the Controller YES ...

Page 86: ...communications area Make sure that only one Tag is within the communications area NO End code 7C Is the Antenna OK Replace the Antenna Is the distance between the Antenna and Tag OK Adjust the distance Are communications with the Tag OK Normal end OK YES Does the COMM indicator go from ON to OFF Send the AUTO WRITE command Turn ON the Controller and connect the host device Start NO YES YES YES YES...

Page 87: ...l Section 5 Troubleshooting Section 5 Troubleshooting Are the Tag and Antenna facing the correct direction Is the Tag OK YES Adjust the distance and direction Replace the Tag Replace the Tag Is the Tag OK YES Replace the Controller NO NO NO YES ...

Page 88: ...ID System User s Manual Section 5 Troubleshooting Operating Environment Check Flowchart YES Are the operating conditions OK YES NO NO Start Is the ambient noise OK Refer to Maintenance and Inspection Refer to Errors and Countermeasures OK p 80 p 79 ...

Page 89: ...cording to Operating Conditions 98 Communications Area Reference 98 Communications Time and Turn Around Time 99 Calculating Tag Movement Speed 100 Influence of Metal behind Antenna Reference 101 Mutual Interference between Antennas Reference 101 Influence of Metal Behind Tag Reference 102 Mutual Interference with Tag Reference 103 Influence of Tag Angle Reference 103 JIS8 Unit Code Table ASCII 105...

Page 90: ...1 minute in any of the above combinations inrush current 10 mA max Vibration resistance Destruction 10 to 150 Hz 0 2 mm double amplitude at 20 m s2 in X Y and Z directions ten sweeps each for 8 minutes Shock resistance Destruction 150 m s2 in X Y and Z directions 3 times each total of 18 times Ambient operating tem perature 10 C to 55 C with no icing Ambient operating humid ity 35 to 85 with no co...

Page 91: ...ices 89 Circuit Configuration Wiring Example 24 VDC RESET terminal COM 0 V 2 2 kΩ Internal circuit Controller 24 VDC External input terminal COM 0 V Controller 2 2 kΩ Internal circuit V680 CA1D V680 H01 Antenna V680 CA1D Controller 24 VDC power supply 24 VDC 24 VDC V700 A40 W Antenna Cable Host PLC ...

Page 92: ...cifications and Dimensions Heat resistive RFID System User s Manual Section 6 Appendices Dimensions The V680 CA1D and V680 CA2D have the same appearance V680 CA1D Two 4 5 dia Two M4 Unit mm Casing material PC ASA resin ...

Page 93: ... rear plate and casing leakage current of 1 mA max Degree of protection IP63 IEC 60529 Mounting direction Communications surface facing up Vibration resistance Destruction 10 to 150 Hz 0 7 mm double amplitude at 50 m s2 in X Y and Z directions up down left right forward backward four times each for 8 minutes Shock resistance Destruction 150 m s2 three times each in X Y and Z directions up down lef...

Page 94: ...rs Standard length 0 5 m Note Mounting hole dimensions 1 5 500 Cable connector Ferrite core 40 21 Four bushing screws 235 250 200 185 Four R8 78 8 142 5 85 7 5 20 max 235 0 2 142 5 Four M4 or 4 5 dia Connector Coil center 185 0 2 13 5 FCC label Four 5 dia mounting holes Power supply green Communications orange indicator Casing material PC ASA resin Rear panel Aluminum Cable PVC Unit mm ...

Page 95: ...sheath Dielectric strength 500 VAC 1 min Item Model V700 A40 W 2M V700 A40 W 5M V700 A40 W 10M V700 A40 W 20M V700 A40 W 30M Length Approx 2 m Approx 5 m Approx 10 m Approx 20 m Approx 30 m Weight Approx 150 g Approx 360 g Approx 700 g Approx 1 350 g Approx 2 000 g L1 2000 5000 10000 20000 30000 Connector RWH end Connector Controller end Connection label Vinyl insulated round cable 6 dia 20 dia 41...

Page 96: ...method EIA TIA 232 E 1 to N half duplex Baud rate 9 600 bps 19 200 bps 38 400 bps 115 200 bps See note Synchronization method Start stop synchronization with 1 stop bit or 2 stop bits See note Transmission code 7 bit ASCII or 8 bit JIS See note Maximum connectable number of Controllers 10 Cable length 15 m max Suitable connector D sub 9 pin male connector OMRON XM2A 0901 Plug and XM2S 0911 Hood 1 ...

Page 97: ...odel V680 D1KP58HT Memory capacity 1 000 bytes user area Memory type EEPROM Data backup time 10 years after writing Total data backup time at high temperatures exceeding 110 C is 10 hours See note Data overwrite count 100 000 times per address Ambient operating tem perature communicating 10 C to 85 C with no icing Ambient operating tem perature not communicat ing 40 C to 110 C with no icing Ambien...

Page 98: ...nditions Heat cycle Room temperature 200 C 30 minutes each for 2 000 cycles Normal operation has been confirmed after performing the above tests although minor cracks may occur LTPD Lot tolerance percent defective The lower limit of the malfunction rate for lots to be considered unacceptable during reliability testing Reference Data Evaluation Test Results Room temp 180 C 30 min each Room temp 200...

Page 99: ...V680 D1KP58HT Dimensions General Specifications Conforms to the specifications for the Tag Influence of Metal behind Tags Use of this Attachment increases the distance between the Tag and the metal surface to approx 50 mm For metal workpieces refer to Influence of Metal Behind Tag Reference before using the Attachment p 102 Mounting Hole Dimensions 20 dia M12 M12 40 50 11 5 15 110 3 2 dia 12 dia 1...

Page 100: ... diagram shows the communications area for the V680 H01 The communications area depends on the installation conditions and environmental conditions V680 H01 V680 D1KP58HT The following diagram shows the communications area when a Tag passes by and perpendicular to the center of the Antenna The Antenna and Tag surfaces are parallel to each other Unit cm Y 25 20 15 10 5 0 5 10 15 20 25 5 10 15 20 25...

Page 101: ...ata shown here is an example for a V680 CA1D CA2D Controller communicating with a host with a baud rate of 9 600 bps 1 start bit data length of 7 bits 2 stop bits even parity and no spaces between characters The number of TAT data bytes is the number of bytes when ASCII is specified as the code Communications time ms N number of processing bytes TAT ms N number of processing bytes Read T 1 4 N 114...

Page 102: ...d from the actual measurement or com munications area between the Antenna and Tag As noise countermeasures the Reader Writer will perform resend processing as internal software processing if a com munications error occurs between the Tag and Antenna Therefore the communications time will depend on the onsite ambient noise so be sure to check with actual equipment beforehand The communications area...

Page 103: ...n mounting the Antenna Mutual Interference between Antennas Reference When installing multiple Read Write Antennas adjacently make sure that the Antenna communications area do not overlap For details on the Antenna communications area refer to Communications Area Reference As a guide the following diagrams show the minimum distances required between two Antennas installed facing each other or in p...

Page 104: ...ence Influence of Metal The following diagram shows the rate of reduction in the communications distance when metal is located behind the Tag The horizontal axis in the diagram indicates the distance between the Tag and the metal plate and the vertical axis indicates the relative communications distance at 100 without a metal plate i e the rate of reduction in communications distance Test Setup Ma...

Page 105: ... the communications distance is reduced Consider the effect of the Tag angle when installing the Tag As reference data the following diagram shows the rate of reduction in communications distance according to the Tag angle The horizontal axis indicates the angle when the Tag surface and Antenna surface are in parallel at 0 The vertical axis indicates the relative communications distance when the a...

Page 106: ...ore using the Tags in actual operation Chemical substance Room tempera ture 90 C Chemical substance Room tempera ture 90 C Hydrochloric acid 37 A A Sodium hypochlorite solution A A 10 A A Aqueous phenol solution 5 A A Sulfuric acid 98 A B Glacial acetic acid A A 50 A A Acetic acid A A 30 A A Oleic acid A A 3 A A Methylalcohol 95 A A Nitric acid 60 B C Ethanol 95 A A 40 A B Ethyl acetate A A 10 A A...

Page 107: ...NUL TC7 DLE SP 0 P p 0001 1 TC1 SOH DC1 1 A Q a q 0010 2 TC2 STX DC2 2 B R b r 0011 3 TC3 ETX DC3 3 C S c s 0100 4 TC4 EOT DC4 4 D T d t 0101 5 TC5 NEQ TC8 NAK 5 E U e u 0110 6 TC6 ACK TC9 SYN 6 F V f v 0111 7 BEL TC10 ETB 7 G W g w 1000 8 FE0 BS CAN 8 H X h x 1001 9 FE1 HT EM 9 I Y i y 1010 10 FE2 LF SUB J Z j z 1011 11 FE3 VT ESC K k 1100 12 FE4 FF IS4 FS L l 1101 13 FE5 CR IS3 GS M m 1110 14 SO...

Page 108: ...ainst penetration of any solid object such as a wire that is 2 5 mm or more in diameter 4 Protects against penetration of any solid object such as a wire that is 1 mm or more in diameter 5 Protects against penetration of dust of a quantity that may cause malfunction or obstruct the safe operation of the product 6 Protects against penetration of all dust Degree Protection Test method with pure wate...

Page 109: ...he test machine 6 Protection against high pressure water jet spray Protects against high pres sure water jet spray approach ing at any angle towards the product Water is jet sprayed at any angle towards the product for 1 min per square meter for at least 3 min in total from the test machine 7 Protection underwater Resists the penetration of water when the product is placed underwater at speci fied...

Page 110: ...al Electrical Manufacturers Association The following table shows the conversion from NEMA enclosure classifications to IEC 60529 Conver sion from IEC 60529 to NEMA enclosure classifications is not available NEMA250 IEC 60529 1 IP10 2 IP11 3 IP54 3R IP14 3S IP54 4 4X IP56 5 IP52 6 6P IP67 12 12K IP52 13 IP54 ...

Page 111: ...al ëÊ 6 èÕ 109 Revision History A manual revision code appears as a suffix to the catalog number at the bottom of the front and rear pages Revision code Date Revised contents 01 April 2005 Original production Cat No Z221 E1 01 Revision code ...

Page 112: ...110 Heat resistive RFID System User s Manual ...

Page 113: ... LLC 1 East Commerce Drive Schaumburg IL 60173 U S A Tel 1 847 843 7900 Fax 1 847 843 8568 OMRON ASIA PACIFIC PTE LTD 83 Clemenceau Avenue 11 01 UE Square 239920 Singapore Tel 65 6835 3011 Fax 65 6835 2711 OMRON CHINA CO LTD BEIJING OFFICE Room 1028 Office Building Beijing Capital Times Square No 88 West Chang an Road Beijing 100031 China Tel 86 10 8391 3005 Fax 86 10 8391 3688 This document provi...

Reviews: