background image


BP100XSG/BP150XSG Instruction Manual
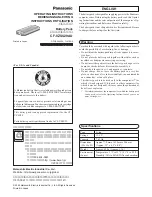
 90%

 50%

30%

-

バッテリ

 交換

バッテリ

 増設

ブザー停止/テスト

電源出力

バイパス

運転

1

2

 90%

 50%

30%

-

バッテリ

 交換

バッテリ

 増設

ブザー停止/テスト

電源出力

バイパス

運転

Battery replacement is now complete.

1

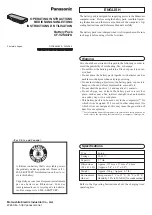
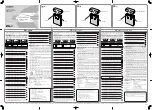
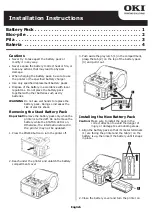
1. Remove the battery connector from the plate cover. 

Hold the connector and pull it out. 

2

2

Hold here to 

disconnect.

Battery  

connector

Plate cover

1

1

Loosen the 4 screws.

 7. Attach the front panel.  

Insert the hook on the bottom side of the front panel into the hole of the main body 

1

and push the front panel toward the main body. 

2


Use a screwdriver to securely tighten (clockwise) the 2 screws at the top of the front 

panel. 

1. Use a screwdriver to loosen (turn counter-clockwise) the 4 screws at the top of the front 

panel of the unit, until they turn freely. (The screws cannot be removed from the front 

panel.) Pull the top of the front panel open and remove it. 

1

BU3002SWG

Summary of Contents for BP100XSG

Page 1: ...ttery pack for uninterruptible power supply UPS For BU1002SWG Model BP100XSG For BU3002SWG Model BP150XSG Safety precautions Important information for safe operation is described Be sure to read it be...

Page 2: ...ectric shock Keep plastic package bags and films out of reach of children l l Children may suffocate if they place their heads into plastic bags and films uNOTEu Battery recycling l l The unit uses le...

Page 3: ...and there is no damage found on their ap pearance If you should notice defects or anything wrong contact the shop of purchase l l Compliance Information Sheet 1 l l Battery pack fixing screw spare 2 2...

Page 4: ...of the battery to gauge how much further you need to pull the battery to remove it Hold the battery securely with both hands so as not to drop it Caution Do not hold the connector or cable of the batt...

Page 5: ...will go and store it 1 l l Replacement battery pack For BU1002SWG Model BP100XSG Attach the plate cover Insert the hook on the bottom side of the plate cover into the hole of the main body 2 and push...

Page 6: ...front panel Insert the hook on the bottom side of the front panel into the hole of the main body 1 and push the front panel toward the main body 2 Use a screwdriver to securely tighten clockwise the...

Page 7: ...and remove the bottom battery connector from the through hole 4 Hold the pullout label at the bottom of the battery pack and remove the battery pack Remove the upper and bottom battery packs one by on...

Page 8: ...rt new batteries in both upper and bottom parts as far as it will go and store them 1 l l Replacement battery pack For BU3002SWG Model BP150XSG 2 required Pass the upper part of the bottom battery con...

Page 9: ...ng the battery when operation was stopped Connect the AC input plug to a wall outlet commercial power and turn ON the power switch of the UPS When operation starts the self diagnostic test is automati...

Page 10: ...dustrial omron hu Italy Tel 39 02 326 81 industrial omron it Netherlands Tel 31 0 23 568 11 00 industrial omron nl Norway Tel 47 0 22 65 75 00 industrial omron no Poland Tel 48 22 458 66 66 industrial...

Reviews: