background image

54

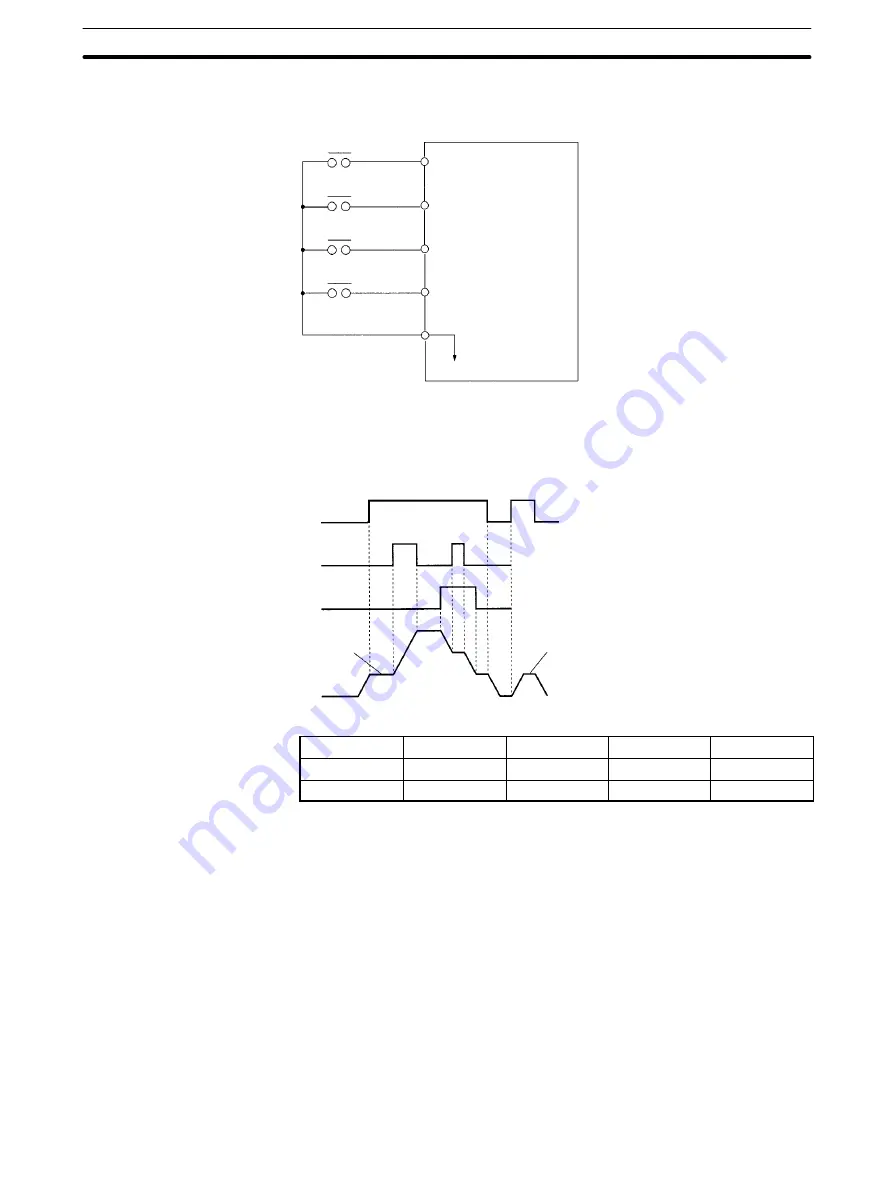
This command is used to increase or decrease the Inverter’s fre-
quency using the sequence input.

FWD/STOP

REV/STOP

UP

DOWN

Note

When No. 33 is set to ”14” UP/DOWN command, the UP command
will be allocated to terminal 4 and the settings of No. 32 will be
ignored.

Run command 
(FWD/STOP, REV/STOP)

UP command 
(terminal 4)

DOWN command 
(terminal 5)

Output frequency

Acceleration and decel-
eration follow the time
set as acceleration time
or deceleration time.

(See note)

(See note)

Terminal 4

ON

OFF

OFF

ON

Terminal 5

OFF

ON

OFF

ON

Accelration

Deceleration

Hold

Hold

Note

Once the Run command is input, rotation starts from either the
minimum frequency or the lower frequency limit, whichever is
higher.

UP/DOWN Command

Description of Functions and Constants

Section 2-8

Summary of Contents for 3G3XV-A2001-EV2

Page 1: ...SYSDRIVE 3G3XV Inverter 3G3XV EV2 Operation Manual Revised November 1997...

Page 2: ...word and is abbreviated Wd in documentation in this sense The abbreviation PC means Programmable Controller and is not used as an abbreviation for any thing else Visual Aids The following headings ap...

Page 3: ...2 1 Digital Operator Components 28 2 2 Function Constant Setting 29 2 3 Digital Operator Operation Example 31 2 4 Constant Initialization and Write protection 33 2 5 Corrective Function 34 2 6 Monitor...

Page 4: ...intenance periodic inspections troubleshooting etc Before using the 3G3XV a thorough understanding of this manual is recommended This manual will be of great help for daily maintenance inspection and...

Page 5: ...1 3 2 Mounting Space 4 1 3 3 Dimensions in Inches mm 4 1 4 Wiring 5 1 4 1 Terminal Blocks 5 1 4 2 Standard Wiring Diagram 7 1 4 3 Main Circuit 8 1 4 4 Control Circuit 14 1 5 Operation 16 1 5 1 Checkin...

Page 6: ...eries only Control circuit terminal block CHARGE indicator Do not touch the main circuit ter minals when this indicator is lit Main circuit terminal block 1 2 Receiving This SYSDRIVE 3G3XV has been pu...

Page 7: ...s during operation 4 Be sure to ground 3G3XV using the ground terminal G E 5 Never connect main circuit output terminals T1 U T2 V T3 W to AC main circuit supply Caution 1 2 3 1 All the constants of 3...

Page 8: ...e other means to cool the air entering the Inverter below 113 F 45 C 1 3 2 Mounting Space Install the 3G3XV vertically and allow sufficient space for effective cooling as shown in below 1 18 in 30 mm...

Page 9: ...7 87 200 7 32 186 4 72 120 0 22 5 5 1 2 0 75 1 5 5 51 140 4 96 126 7 87 200 7 32 186 6 69 170 0 22 5 5 3 5 2 2 3 7 7 48 190 6 89 175 7 87 200 7 28 185 7 48 190 0 23 5 8 1 4 Wiring Connect the main ci...

Page 10: ...erminal numbers are usually shown on the terminal num ber nameplate but the terminal numbers are printed on the printed board on some Inverters Main circuit terminal block Control circuit terminal blo...

Page 11: ...to 20 mA P P G E Sequence common terminal 0v Forward Run Stop Reverse Run Stop Fault reset FM 12 11 FL T A FL T B FL T C Fault contact output contact capacity less than 1 A for 250 VAC and 30 VDC Ext...

Page 12: ...optional Only terminal L1 R L2 S for single phase power supply 3G3XV Note Circuit terminal block screw size is M4 Main Circuit Terminals 3G3XV Main Circuit Terminals Terminal Description L1 R Main ci...

Page 13: ...ase Input Series 3G3XV Model 3G3XV EV2 AB001 AB002 AB004 AB007 AB015 AB022 AB037 3G3XV Capacity kVA 0 3 0 6 1 1 1 9 2 5 4 2 6 7 Rated output current A 0 8 1 5 3 5 6 5 11 17 5 Molded case Circuit Break...

Page 14: ...net or a short circuit may result Never connect the power factor correction capacitor or noise filter to 3G3XV output Never open or close contactors in the output circuit unless Inverter is properly s...

Page 15: ...to 5 5 A2022 4 2 kVA L1 R L2 S L3 T B1 B2 T1 U T2 V T3 W M4 12 10 3 5 to 5 5 G E 14 10 2 to 5 5 A2037 6 7 kVA L1 R L2 S L3 T B1 B2 T1 U T2 V T3 W M4 12 10 3 5 to 5 5 G E 14 10 2 to 5 5 Control circuit...

Page 16: ...Circuit Model 3G3XV Inverter i Terminal symbol Terminal Wire size Wire type 3G3XV capacity y screw AWG mm2 yp Main circuit A4002 0 8 kVA L1 R L2 S L3 T B1 B2 T1 U T2 V T3 W M4 14 10 2 to 5 5 Power cab...

Page 17: ...reduce the Inverter carrier frequency as shown below The carrier frequency can be set with constant No 40 For details refer to 2 8 18 Carrier Frequency The carrier fre quency is set to 10 kHz at the f...

Page 18: ...g resistor optional B1 B2 T1 U T2 V T3 W IM G E 1 2 3 4 5 10 6 8 9 11 0V 13 14 7 2K 0 to 10 VDC 4 to 20 mA P P G E Sequence common terminal 0v Forward Run Stop Reverse Run Stop Fault reset FM 12 11 FL...

Page 19: ...n terminal for control circuit 0 V Sequence O Si l 13 During running L level at run Multifunction i Photo coupler output 48 V 0 A q Output Signal 14 Frequency agreed signal L level at set frequency ou...

Page 20: ...less 5 To drive an inductive load relay coil etc by multifunction pho to coupler output be sure to insert a free wheel diode 13 14 Free wheel diode 100V 100 mA or more 48 V max 50 mA max 7 3G3XV 1 5...

Page 21: ...put Frequency and Accel Decel Time The maximum output frequency is set to 60 Hz and accel decel time to 10 seconds at the factory prior to shipping To change the values refer to 2 8 6 Accel Decel Time...

Page 22: ...ously 1 5 3 Test Run Method The Inverter can be operated using the Digital Operator or control circuit terminal inputs Models with Digital Operator are set to OPERATOR MODE BY DIGITAL OPERATOR prior t...

Page 23: ...ower on 2 Press the PRGM DRIVE Key to enter Program Mode 3 Set constant no 01 to 0000 using the Up and Down Arrow Keys or the RESET Key 4 Press the DATA ENTER Key to enter the new value for con stant...

Page 24: ...namic brake DB operates for 0 5 s and metallic noise is generated by the motor However this noise is normal If a fault occurs during acceleration or deceleration and the motor coasts to a stop check t...

Page 25: ...tting signal 0 to 10 VDC 20 k 4 20 mA 250 Accel decel time 0 1 to 600 sec accel decel time setting independently Braking torque Approx 20 up to 150 possible with optional braking resis tor externally...

Page 26: ...gain upper lower frequency limit DC braking stop current at start s curve characteristics torque boost frequency meter calibrating gain auto reset restart operation frequency jump Monitor display func...

Page 27: ...250 Accel decel time 0 1 to 600 sec accel decel time setting independently Braking torque Approx 20 up to 150 possible with optional braking resistor externally mounted braking resistor built in V f...

Page 28: ...or Displays setting frequency output frequency output current rotating direction and the contents at protective function operation Analog output mon itor Analog output 0 to 10 VDC Possible to select o...

Page 29: ...noise protective filter 3G3IV PHF 3G3IV PLF Use a line filter to reduce radio frequency interference Always use at the input side of the Inverter Isolator K3FK Isolates the Inverter input and output...

Page 30: ...l Decel Time and Patterns 47 2 8 7 Output Frequency Control Gain Bias 47 2 8 8 Electronic Thermal Overload Function 48 2 8 9 Multi function Analog Output Monitor 48 2 8 10 Output Frequency Limit 49 2...

Page 31: ...al commands SEQ When RUN STOP signal is used REF When frequency ref is used Depressing this key changes the display repeatedly Its procedures are described in DRIVE Mode next page Changes numeral such...

Page 32: ...Program function selection constant setting can be changed Display contents of the Digital Operator differ according to selected Mode PRGM DRIVE The constant group to be displayed is changed each time...

Page 33: ...tants for details on the constants and their functions Typical Setting The following shows an example where acceleration time No 9 is changed from 10 s to 5 s Other constants can be changed in the sam...

Page 34: ...ristic Setting If the following condition is not satisfied in the frequency refer ence constant setting Set frequency reference Nos 13 to 17 Maximum frequency No 2 For details refer to 2 8 3 V f Chara...

Page 35: ...ency monitor display optional Select rotating direction FWD is default on power on Jog operation Frequency reference value display is selected Change reference value Set value is written in Stops blin...

Page 36: ...e protection When constant no 00 is set to 0 the settings in constants no 01 to 19 can be read but no constants except no 00 can be overwrit ten The procedure below sets the value of constant no 00 to...

Page 37: ...DATA ENTER BIAS No 23 100 123 10 8 V 10 V 0 REF Input level No 22 Gain Gain FREQ setting voltage V 10 0 1 Description Key Operation Digital Operator Display Gain Select constant No 22 Data No 22 are d...

Page 38: ...ting voltage of 10 V Description Key Operation Digital Operator Display Select PRGM Mode DATA ENTER RESET DATA ENTER 10 V 0 3 3 0 V 12 11 FM No 45 3 V 1 mA FREQ meter calibration PRGM ENTER NO DSPL Se...

Page 39: ...ed off they can be monitored after the power supply is turned on again Checking fault contents The latest data are stored in the constant No 48 except uU Clearing fault contents The fault contents alo...

Page 40: ...Run signal selection 1 1st digit 0 Main frequency reference external terminals 8 and 9 inputs 1 Main frequency reference operator Fxxxx 2nd digit 0 Run by external terminal run command 1 Run by opera...

Page 41: ...z 47 15 Frequency reference 3 Setting unit 0 1 Hz setting range 0 0 to 400 0 Hz 0 0 Hz 47 16 Frequency reference 4 Setting unit 0 1 Hz setting range 0 0 to 400 0 Hz 0 0 Hz 47 17 Jogging fre quency ref...

Page 42: ...39 0 4 kW and standard motor 200 V 60 Hz 0 4 kW are com bined Set the values described in the motor nameplate Function Constant List Section 2 7...

Page 43: ...0 S curve 0 2 s 3rd digit 0 4th digit 1 S curve 0 5 s 3rd digit 1 4th digit 0 S curve 1 0 s 3rd digit 1 4th digit 1 58 Output fre quency con 22 Frequency reference gain Setting unit 0 01 setting rang...

Page 44: ...fault NO contact input 2 External fault NC contact input 3 Multi step speed reference 1 4 Multi step speed reference 2 5 JOG command 6 Accel decel time select 7 External baseblock NO contact input 8 E...

Page 45: ...range 0 0 to 400 0 Hz 0 0 Hz 57 Overtorque detection 37 Overtorque detection function selection 1st digit 0 Overtorque detection not provided 1 Overtorque detection pro vided 0000 1st digit 4th digit...

Page 46: ...nstant output power area is a frequency area higher than the maximum voltage frequency base frequency Set the 3rd digit to 1 when using a high speed motor Auto reset re start operation 47 No of auto r...

Page 47: ...tion 67 OL2 contin uous opera tion selec tion 0 Continuous operation at 103 of rated current 1 Continuous operation at 112 of rated current 0001 65 Factory setting 68 69 Do not set Note When setting t...

Page 48: ...g Mode can be selected according to the application No 1 x0xx 0 Ramp to stop 1 Coasting to a stop Prevents accidental selection of reverse rotation No 20 xx01 0 Reverse rotation is possible 1 Reverse...

Page 49: ...t Limiter Selection 3 If an excessively large value is set in low speed area 3 Hz or less motor overheating or Inverter malfunction may occur Output Limiter Selection When V f is set to an excessively...

Page 50: ...n For 4 step speed No 15 No 16 No 13 No 14 Open Closed Closed Closed Closed Open No 32 3 No 33 4 2 8 5 Jog Operation Item name Constant to be set Factory preset Jog frequency No 17 6 0 Hz Jog referenc...

Page 51: ...terminals 4 and 5 Set the value of constant No 32 to 6 to specify accel decel time select operation for terminal 4 and set the value of constant No 33 to 6 to specify accel decel time select operation...

Page 52: ...al overload relays are inserted For details refer to the precautions on wiring described in 1 4 Wir ing No 19 Motor rated current value Set the motor rated current value according to the value on the...

Page 53: ...assume constant No 2 60 Hz A frequency of 66 Hz will be output if constant No 24 1 1 2 8 11 DC Injection Braking Item name Constant to be set Factory preset DC injection braking current No 26 50 DC in...

Page 54: ...rent Time Time output freq No 30 Set 1 for connecting braking resistor unit No 20 0xxx 0 Stall prevention during deceleration enabled 1 Stall prevention during deceleration disabled When using a high...

Page 55: ...y 2 8 13 Full range Automatic Torque Boost Item name Constant to be set Factory preset Torque compensation gain No 29 1 0 Automatic control of V f ratio according to the load torque ensures tripless o...

Page 56: ...quency 11 Accel Decel prohibit command 12 Local Remote operation 14 see note 4 UP DOWN command Note 1 0 can be set only to No 32 2 Factory preset value for No 32 3 Factory preset value for No 33 4 14...

Page 57: ...STOP REV STOP UP command terminal 4 DOWN command terminal 5 Output frequency Acceleration and decel eration follow the time set as acceleration time or deceleration time See note See note Terminal 4...

Page 58: ...n No 21 0000 Frequency current meter connected to the Inverter can be cali brated without using a resistor for calibration bn 11 FM 12 11 Frequency current meter 3 V 1 mA full scale No 21 xx0x 0 Outpu...

Page 59: ...set in No 38 To output the signal to control circuit terminal 13 set constant No 34 to 4 To output the signal to control circuit terminal 14 set con stant No 35 to 4 Time Overtorque detection signal M...

Page 60: ...o 100 of Inverter output current 5 Up to 90 of Inverter output current 6 Up to 80 of Inverter output current If the wiring distance between the Inverter and motor is long reduce the carrier frequency...

Page 61: ...stics of the soft starter depend on the set ting of digits 3 and 4 of No 21 as follows 4th digit No 21 00xx 3rd digit 0 0 No S curve characteristic linear accel 0 1 The S curve characteristic is 0 2 s...

Page 62: ...e chart at FWD REV run change without S curve charac teristics The figure below shows the time chart at FWD REV run change during deceleration and stop FWD RUN command REV RUN command Output frequency...

Page 63: ...ossible 2 8 23 No of Auto Reset Restart Operation No 47 Item name Constant to be set Factory preset Fault retry selection No 47 00 Sets the number of auto reset restart tries up to 10 Setting this con...

Page 64: ...ncy range Output frequency does not jump during acceleration or deceleration which is performed smoothly 2 Set as follows No 50 No 51 No 52 2 8 25 Speed Search Function Item name Constant to be set Fa...

Page 65: ...nd 2 Determine a sequence so that FWD REV run command enters at the same time or later than search command Example of Sequence Relay 1 Relay 2 Relay 1 SEARCH command FWD REV RUN command When Inverter...

Page 66: ...t Accel Decel Prohibit Function No 32 and No 33 No 32 1 No 33 3 When an accel decel prohibit command is input during accelera tion or deceleration the output frequency is maintained and accel eration...

Page 67: ...Refer to the following formulas to obtain the constants to be set in no 57 and no 58 no 57 Synchronization speed rated motor revolution syn chronization speed x 100 Synchronization speed 120 P f P No...

Page 68: ...set OL2 Continuous Operation No 67 1 The Inverter output is shut off when electronic thermal overload reaches or exceeds the inverse time limit of either 103 or 112 of the Inverter s rated current occ...

Page 69: ...pection and maintenance procedures 3 1 Fault Display 66 3 1 1 Protection Functions 66 3 1 2 Warning and Self diagnosis Functions 68 3 2 Correcting Motor Faults 69 3 3 Maintenance 70 3 3 1 Periodic Ins...

Page 70: ...layed Non opera tion Cooling fin overheat The Inverter output is shut off when the ambient tem perature rises and the heat sink fin reaches 90 C Please check for a defective cooling fan or clogged fil...

Page 71: ...wn Repeated overcurrent protection OC Repeated overload protection OL2 power reset Rapid deceleration in excess excitation improper V f characteristic setting Turn off the power supply once and turn i...

Page 72: ...than 170 accel eration is enabled Non operation the Inverter without trip ping on overcurrent or overvol tage During nor mal opera tion Output frequency is decreased when 160 of the Inverter rated cur...

Page 73: ...e block sig nal input main circuit transistor instantaneous shut off 3 2 Correcting Motor Faults The following table lists possible causes and corrective actions for faults that might occur Fault Poss...

Page 74: ...nit turn off the power and make sure that the CHARGE indicator is off Component Check For Corrective Action Terminals Unit mounting bolts connectors etc Loosened screws or connectors Tighten Cooling f...

Page 75: ...ures below to install or remove the Digital Opera tor The Digital Operator must not be installed or removed while power is on be sure to turn off the Inverter s power supply and check that the CHARGE...

Page 76: ...74 2 Press the lever down 3 and insert a standard screwdriver in slot A as shown below then lift the operator up 4 and out of the Inverter Lever Operator A 3 4 Maintenance Section 3 3...

Page 77: ...59 and No 67 added Note 1 deleted Page 50 Set values and note 4 added Page 51 Local Remote Operation and UP DOWN Command added Page 56 2 8 22 Enable Disable Setting Constants in DRIVE Mode added Page...

Reviews: