CHANGING THE SEA LEVEL PRESSURE AND ALTITUDE UNIT
•
Press
SET
until the local pressure with the word “
SEA LEVEL
” is displayed.
•
Press and hold
MEMORY
until the pressure unit is flashing.
•
Set the sea level pressure units by pressing the
UP
or
DOWN
buttons to adjust the pressure
value.
•
Press
MEMORY
to confirm your selection.
•
Press
SET
button until the local altitude value will be displayed
•
Press and hold
MEMORY
until the altitude unit is flashing.
•
Set the altitude unit in meters or feet by pressing the
UP
or
DOWN
.
•
Press
MEMORY
to confirm your selection.
VIEWING THE SEA LEVEL PRESSURE HISTORY
•
In all modes, press HISTORY button entering the sea level pressure display.
•
When the
SEA LEVEL
is displayed, press
HISTORY
repeatedly viewing the sea level pressure
history for the past 24 hours in hour increments.
•
If no buttons are pressed for 5 seconds, the unit will automatically return to the Pressure and
Weather Forecast Mode.
VIEWING THE PRESSURE, TEMPERATURE AND HUMIDITY BAR CHARTS
The bar chart in Pressure and Weather forecast window can be configured to display a historical data
for the sea level pressure and temperature or humidity for channel 1.
After selecting the Pressure and Weather Forecast Mode, press and hold
ALARM/CHART
button to
toggle the bar chart between the sea level pressure with a word “
PRESSURE
” displayed at the right
bottom corner of the chart, temperature with a thermometer icon and “
CH1
” and a humidity with
“
RH
” icon and “
CH1
”.
Viewing the Moon Phase History and Weather Forecast
•
After selecting the Pressure and Weather Forecast Mode, press
MEMORY
, so “+ 0 days” is
flashing.
•
Press
UP
or
DOWN
selecting from today’s date a future (+) or past (-) days and the
corresponding moon phase will be displayed. Press and hold either button for a quick advance.
•
To exit, press
MEMORY
button.
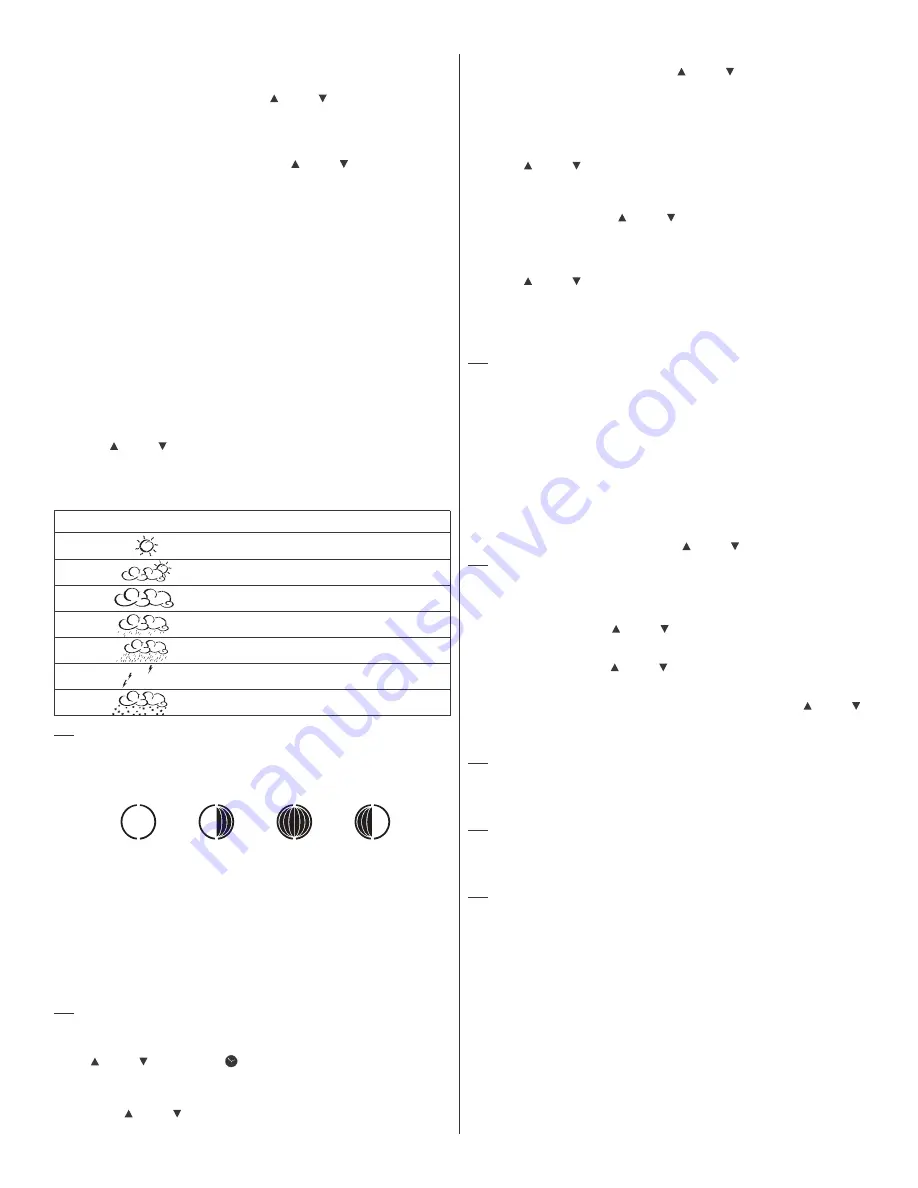
SEVEN UNIQUE WEATHER FORECAST DISPLAYS
Display
Weather Forecast
Sunny
Partly Cloudy
Cloudy
Light Rain
Heavy Rain
Unstable Weather
Snow
NOTE:
The weather forecast accuracy is approximately 70%.
Display shows forecasted, not current conditions. The
SUNNY
icon indicates clear weather, even when
displayed during the night-time.
UNDERSTANDING THE MOON PHASE DIAGRAM
CLOCK AND ALARM MODE
MANUAL SETTING
The main unit can be manually set to display the time, calendar or
UTC
time. There are three time
alarms available on the main unit: Weekday alarm (
W
), Single alarm (
S
) and Ice Warning Alarm (Pre-Al).
•
If Weekday alarm is activated, it will sound at the set time and the alarm icon will flash Mondays
through Fridays.
•
If Single day alarm is activated, it will sound at the set time and the alarm icon will flash only for
this specific day and will not activate on subsequent days.
•
The Ice Warning Alarm is activated at programmed time interval (from 15 to 90 minutes) before
the weekday or single alarm, if channel 1 temperature falling to freezing and below.
NOTE:
Ice Warning Alarm can be set only if one or both-Weekday or Single alarm are programmed.
The snooze duration for listed alarms can also be programmed up to 15 minutes.
ACCESSING CLOCK AND ALARM MODE
Press
UP
or
DOWN
until the clock icon
next to the time/date display will flash.
Setting the time, date and language
•
In the Clock and Alarm Mode, press and hold
SET
button until the day of week language
abbreviation “
ENG
” will flash.
•
Press the
UP
or
DOWN
selecting the day of the week in English, German, French, Italian,
Spanish or Dutch.
•
Press
SET
to confirm selection.
•
Select the City Code for your area by pressing
UP
or
DOWN
. Refer to P.25 for a list of
available codes.
•
Press
SET
to confirm the selection and enter to the latitude and longitude programming mode.
SETTING USR LATITUDE & LONGITUDE
If you selected the
USR
as a city code,
y
ou will be prompted to enter the latitude, longitude, Time
Zone and select Daylight Savings Time on or off.
•
Press
UP
or
DOWN
to adjust the latitude. Press and hold down either button for quick digits
advance.
•
Press
SET
to confirm the selection.
•
Continue setting the longitude using the same steps.
•
Set the Time Zone by pressing
UP
or
DOWN
to adjust the time in 30 min intervals. Press and
hold down either button for quick digits advance.
•
Press
SET
to confirm selection.
If the
USR
was selected as a city code or your city is located in the Daylight Savings zone you would
need to set the Daylight Saving Time Option:
•
Press
UP
or
DOWN
to enable of disable the DST option. Press and hold either button for
quick digits advance.
•
Press
SET
to confirm selection.
•
Continue setting the year, month, day, calendar format (day/month or month/day), time format
(12 or 24 hours), local hour and minutes, using the same steps.
After programming is complete the display will return to the default Clock and Alarm Mode.
NOTE:
Press and hold
SET
anytime during the setup to return to normal Clock and Alarm Mode. All
previous settings will be cancelled.
DIFFERENT CLOCK AND CALENDAR DISPLAYS
In the Clock and Alarm Mode press
SET
selecting either:
•
Hour and Minutes with the Day of the week
•
Hour and Minutes for UTC (Coordinated Universal Time)
•
Hour and Minutes with the City abbreviation
•
Hour and Minutes with the Seconds
•
Month with the day and a year. Or day with month and a year.
ENABLING OR DISABLING THE TIME ALARMS
•
Press the ALARM/CHART to display the Weekday Alarm. If these alarms are not set, the
abbreviation OFF will be displayed.
•
To enable or disable any of these alarms, press
UP
or
DOWN
.
NOTE:
Press
SET
anytime during alarm selection mode to return to the default clock display.
PROGRAMMING TIME ALARMS
•
In the Clock and Alarm Mode, press the
ALARM/CHART
selecting the desired alarm.
•
Press and hold
ALARM/CHART
button until the hour digit will flash
•
Set the alarm hour using the
UP
or
DOWN
. Press and hold either button for quick digit
advance.
•
Press ALARM/CHART to confirm selection.
•
Set the alarm minutes using
UP
or
DOWN
. Press and hold either button for quick digit
advance.
•
Press
ALARM/CHART
to confirm selection.
•
Set a Snooze interval (all three alarms share same snooze time duration) using
UP
or
DOWN
.
Press and hold either button for quick digit advance.
•
Press
ALARM/CHART
to confirm your selection.
After programming is completed, the display will return to the alarm selection screen.
NOTE:
Pre-alarm (Ice Warning Alarm) can be set only if the weekday alarm or single alarm is enabled.
DISABLING OR ENABLING SNOOZE FUNCTION
To enable a snooze function press
LIGHT/SNOOZE
button. Snooze duration is programmable and can
set: from 1 to 15 minutes.
NOTE:
When the alarm sounds for 2 minutes the clock will automatically Snooze if no buttons are
pressed. This will occur for three consecutive snooze cycles.
TO DISABLE ALARM(S):
Press
ALARM/CHART
to disable the alarm (s).
NOTE:
For weekday alarm, pressing ALARM/CHART will only disable the alarm for the current day.
The alarm will activate again on the next day, Monday through Friday.
ATOMIC TIME RECEPTION
The main unit synchronizes the time and date with WWVB radio clock broadcasts maintaining the
atomic time precision.
WWVB RADIO CONTROLLED TIME
The NIST (National Institute of Standards and Technology) radio station (WWVB) is located in Ft. Collins,
Colorado. It transmits an exact time signal continuously throughout the most of the continental United
States at 60 KHz frequency. The Atomic Time Clock in your weather station can receive this WWVB
signal through the internal antenna from up to 2,000 miles away. Due to the nature of the Earth s
ionosphere, reception can be limited during the daylight hours. The radio controlled clock will search
for an alternate station that receives the atomic time signal from the NIST Atomic clock in Boulder,
Colorado.
The WWVB tower icon on the unit’s display will flash indicating a radio signal reception from the WWVB
station. If the tower icon is not fully lit, or if the time and date are not set automatically, please consider
the following:
FIRST
NEW
LAST
FULL
5