


NAVIGATING THROUGH THE MODES
The main unit has five (5) different modes (windows) displaying separate data: Weather Forecast, Clock
& Alarm, Temperature and Humidity, Rain, and Wind. When a specific mode is selected the
corresponding icon begins flashing.
Press
UP
button to cycle through the modes clockwise or
DOWN
button for counter-clockwise.
PRESSURE AND WEATHER FORECAST WINDOW
Displays:
•
Current pressure and history bar-chart
•
Weather forecast
•
Moon phase
CLOCK AND ALARMS WINDOW
Displays:
•
US Atomic Time clock with time and calendar
•
Single alarm, weekday alarm and ice warning alarm (pre-alarm)
TEMPERATURE AND HUMIDITY WINDOW
Temperature & Humidity are automatic features and no adjustments. IN or internal sensors reside
within the main unit. Readings for CH1, Ch2 or Ch3 are provided by external sensor transmitters.
Displays:
•
Temperature and humidity readings for indoor and selected external channel
•
Comfort level indication (Predetermined level)
•
Dew point temperature (Predetermined level)
•
High and Low temperature alerts (Predetermined level)
•
Remote Thermo-Hygrometer sensor battery status
RAIN WINDOW
Displays:
•
Precipitation amount for the last hour, day, yesterday, last week and last month
•
Rainfall alert (User adjustable level setting)
•
Remote rain gauge battery status
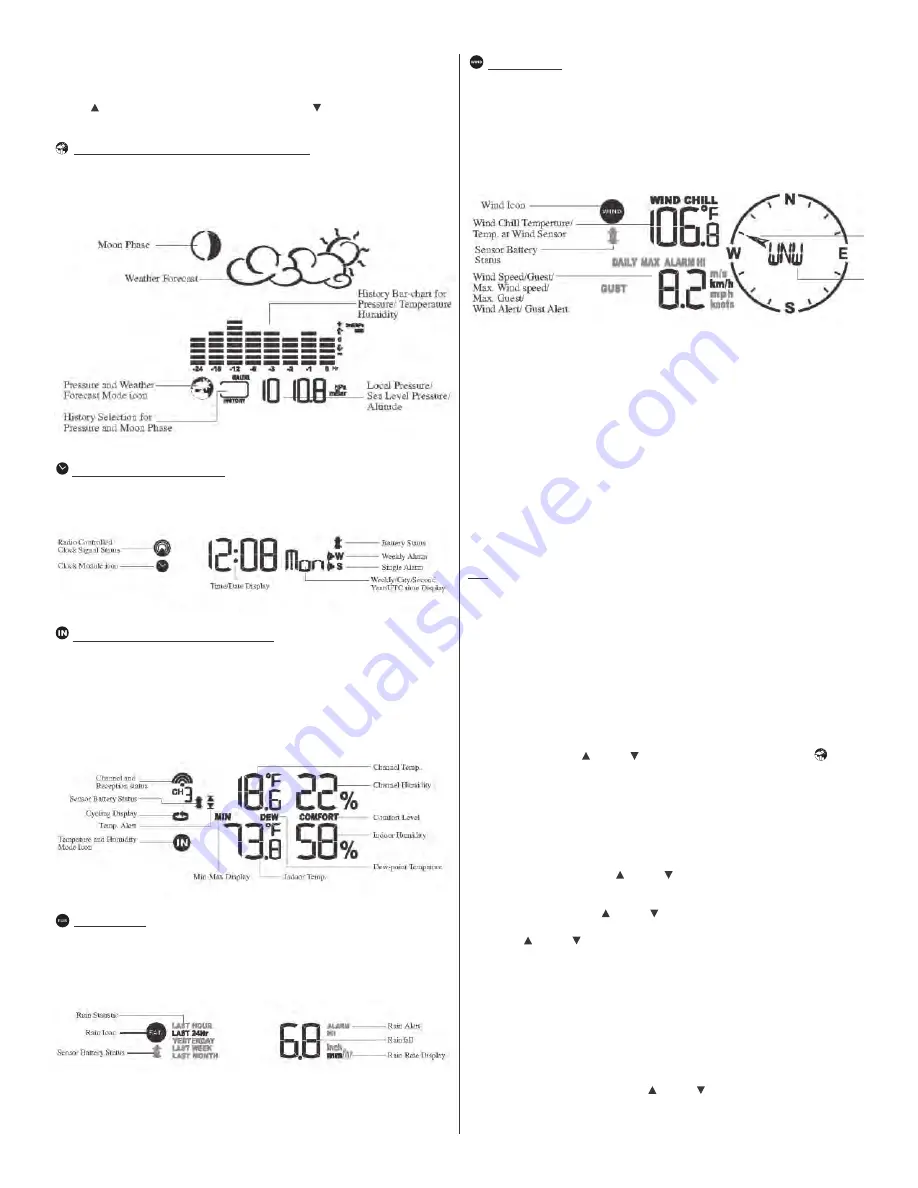
WIND WINDOW
Displays:
•
Wind Chill temperature
•
Temperature at place of anemometer
•
Wind direction
•
Wind speed
•
Wind gust speed
•
Alert for wind speed and wind gust speed (User Adjustable setting)
•
Remote anemometer battery status
CUSTOMIZING YOUR WEATHER STATION
It is required to program:
•
The pressure parameters during Initial Setup (See Pressure and Weather Forecast Mode P.15)
•
The time, the date and the weekday language (Clock and Alarm Mode: P.17)
Optional:
•
The time alarms (Clock and Alarm Mode: P.17)
•
The temperature alerts (Temperature and Humidity Mode P.19)
•
Daily rainfall alerts (Rain Mode P.21)
•
Wind alerts (Winds Mode: P.22)
LED BACKLIGHT OPTIONS
The main unit backlight can be turned on, off or automatically toggled depending on the environment
light conditions. Use the light sensor switch at the back of the main unit to select a desired backlight
setting.
For the automatic backlight control, the sensitivity of the light sensor can be adjusted to high or low
using the switch, located on the back panel.
NOTE:
For an automatic control function the main unit must be plugged into the wall power outlet via
the AC/DC adaptor provided.
USING DIFFERENT WEATHER MODES
PRESSURE AND WEATHER FORECAST MODE
It indicates the current barometric pressure, the sea level pressure, the weather forecast and the moon
phase.
A number of historical statistics can also be viewed, including the sea-level pressure for the past
24 hours, moon phase for the past and following 39 days, as well as a pressure/ temperature/ humidity
history bar-chart.
Pressure can be displayed inHg, hPa/mBar or mmHg, and altitude can be displayed in meters or feet.
(Altitude can be used to set or adjust barometric levels.)
ACCESSING PRESSURE AND WEATHER FORECAST MODE
From the main unit: Press
UP
or
DOWN
until the pressure and weather forecast icon
starts flashing.
SETTING PRESSURE PARAMETERS DURING INITIAL SETUP
IMPORTANT:
During the main unit initial setup, after main unit powered up, all of the functions in
Pressure and Weather.
Forecast mode will be locked for a short time, until the pressure settings are confirmed. The locked
display will show the pressure and weather forecast icon and abbreviation “
hPa/ mBar
” flashing.
To correctly calibrate the sea level barometric pressure, you must program the correct local altitude.
•
Store Units of Pressure: Press
UP
or
DOWN
button selecting the units of pressure in: inHg,
hPa/mBar or mmHg.
•
Press SET to confirm and move to the altitude unit selection mode.
•
Store Altitude Units: Press
UP
or
DOWN
button selecting the altitude unit in feet or meters.
•
Press SET button to confirm and move to the altitude programming mode.
•
Press
UP
or
DOWN
to adjust the local altitude. Press and hold either button for the “Rapid”
setting. (Local information is obtainable via GPS device or online services.)
•
Press
SET
to confirm the programming.
VIEWING THE PRESSURE AND ALTITUDE INFORMATION
To view a pressure or altitude information, press
SET
button to alternate between the sea level
pressure, local pressure and local altitude settings.
SEA LEVEL PRESSURE SETTING
•
Press
SET
button until the sea level pressure with “
SEA LEVEL
” is displayed.
•
Press and hold
SET
until the pressure digits are flashing.
•
Set the sea level pressure by pressing
UP
or
DOWN
buttons. Press and hold either button for
the quick digits advance.
•
Press
SET
to confirm selection
4


