background image

39 


7 Transportation 


Transportation should be done by appropriately qualified personnel. 


For  transportation  please  check  and  follow  local  regulations  for  lifting  and 
transportation of heavy cargo. 


Provide adequate lifting and transportation equipment. 


Dryer can only be transported in a vertical position. 


Centre of gravity is positioned relatively high resulting in a heightened risk of toppling 
the dryer due to tilting, which can cause serious injury or even death.  


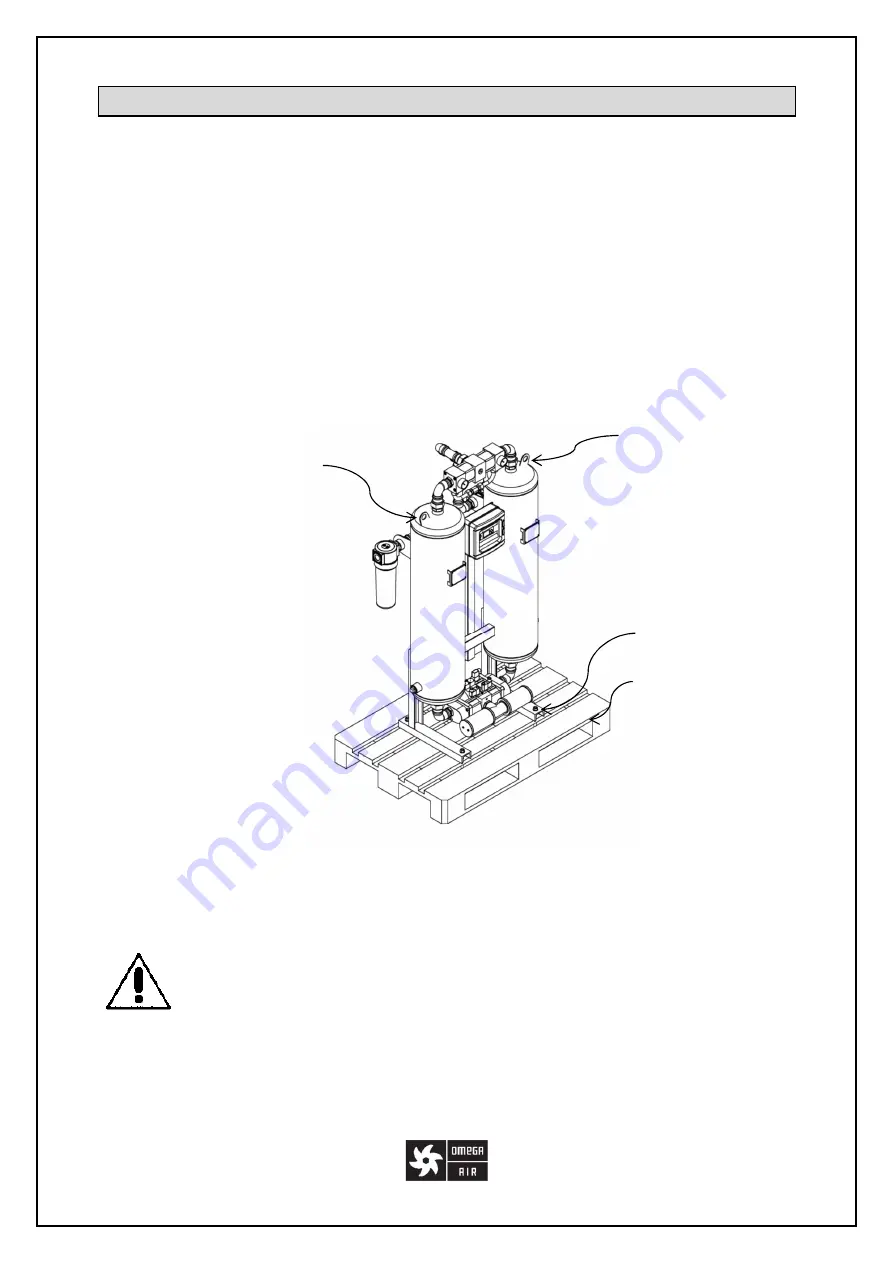
Note that the dryer can only be lifted using the lifting lugs on the top of each vessel. 


In case where the dryer is firmly attached to the standard pallet it can also be lifted by 
forklift. In this case dryer needs to be additionally stabilized and secured to prevent 
tilting or falling. 


Dryer is typically supplied on a standard pallet and fixed on the pallet by four fixing screws. 
Untighten the screws to remove the dryer from the pallet.  

Don not under any circumstance use dryer piping installation or welded brackets 
for lifting or stabilizing purpose. 

Adsorption  dryer  could  be  damaged  during  transportation.  Putting  a  damaged  adsorption 
dryer into operation can result in injury or death! Check the adsorption dryer for any visible 
damage  after  removing  the  packaging.  If  the  adsorption  dryer  is  damaged  contact  the 
transportation  contractor  and  supplier.  Damaged  adsorption  dryer  should  not  be  put  into 
operation! 

Pallet 

Lifting lug 

Lifting lug 

Fixing screw 

Summary of Contents for B-DRY Series

Page 1: ...read the following instructions carefully before installing the product Trouble free and safe operating of the product can only be guaranteed if recommendations and conditions stated in this manual ar...

Page 2: ...2...

Page 3: ...PARAMETER SETTINGS 25 5 8 1 LCD Diagram of Parameter settings 27 5 9 UPDATING AND REPROGRAMMING 28 5 10 ELECTRICAL SCHEME SENSOR CONNECTION 31 5 11 DATA LOGGING 33 5 12 REMOTE ACCESS 34 6 EFFICIENCY...

Page 4: ...s Oversized 56 13 2 3 Oil in the Adsorption Dryer 56 13 2 4 Dryer Connected to the System in the Opposite Way 56 13 2 5 Control Valves Malfunction 57 13 2 6 Clogged Pre filter and or After filter 57 1...

Page 5: ...lity classes for these contaminants Humidity water vapor content is expressed in the terms of Pressure Dew Point PDP where Dew point is the temperature at which air is 100 saturated with moisture When...

Page 6: ...on several factors type of adsorbent relative humidity inlet temperature contact time face velocity and therefore adsorption process is usually set optimized for every individual application 1 6 Appr...

Page 7: ...ng the adsorption dryer The adsorption dryer has been designed in accordance with the generally recognized rules of engineering It complies with the requirements of directive 2014 68 EU concerning pre...

Page 8: ...yer in a way that is not permitted Do not use the adsorption dryer in hazardous areas with potentially explosive atmospheres All installation and maintenance work on the adsorption dryer may only be c...

Page 9: ...vy objects Note that dryer can only be lifted using lifting lugs on the top of each vessel or with forklift in case if it is firmly positioned on an appropriately sized pallet Do not climb on the drye...

Page 10: ...view right rear view 1 Vessel 1 filled with adsorbent 2 Vessel 2 filled with adsorbent 3 Lower valve block 4 Upper valve block 5 Controller 6 Inlet filter 7 Outlet filter 8 Adsorbent discharge connec...

Page 11: ...1 320 251 0 860 535 1742 274 57 13 106 B DRY 400 G 1 410 321 5 854 535 1989 295 70 13 106 B DRY 600 G 1 590 462 5 854 671 2051 392 102 13 106 B DRY 800 G 2 770 603 5 1059 701 2080 507 134 13 106 B DR...

Page 12: ...CCORDING TO ISO8573 1 Solid particles 1 Water 1 2 Oil 1 2 1 3 1 1 Typical result based on standard configuration and nominal operating conditions 2 Depending on the specific design class 2 when operat...

Page 13: ...RATING PRESSURE bar 2 3 4 5 6 7 8 9 10 11 12 13 14 15 16 psi 29 44 58 72 87 100 115 130 145 160 174 189 203 218 232 COP 0 38 0 5 0 63 0 75 0 88 1 1 13 1 25 1 38 1 50 1 63 1 75 1 88 2 00 2 13 OPERATING...

Page 14: ...e adsorption in the first tower is stopped and the control valves are run through a sequence that pressurizes both towers and starts the adsorption in second tower and regeneration in the first tower...

Page 15: ...15...

Page 16: ...ce with buttons that enables the technical expert to examine change settings and operating parameters of the system Typically information such as operating mode and pressure dew point are displayed on...

Page 17: ...g This phase lasts a few seconds I N I T I A L I S I N G When the B DRY adsorption dryer is in the FIXED CYCLE MODE it is operating with fixed adsorption regeneration cycles When the B DRY adsorption...

Page 18: ...urement on the PLC controller display by moving through the menus to the DEW POINT SENSOR screen When in STATUS SCREEN press to proceed to the DEW POINT SENSOR screen If the sensor is connected then t...

Page 19: ...ion The third line REG and the fourth line T represent the set regeneration time and the current time of regeneration The WORKING HOURS AND CYCLES screen displays the total working hours of the adsorp...

Page 20: ...the RELAY OUTPUT Q5 Q1 on the input output module The DRAIN screen displays the drain activation interval time Inter and its duration Durat Interval and duration times can be modified in the controll...

Page 21: ...ensor measurements If MANUALLY SELECTED FIXED CYCLE is set to OFF the adsorption dryer will operate in either VARIABLE CYCLE or FIXED CYCLE mode depending on the conditions To change from ON to OFF or...

Page 22: ...e a s u r e d P D P 4 1 C t d A D S 5 m T 0 0 0 0 h R E G 0 0 0 4 h T 0 0 0 0 h W O R K H O U R S 0 C Y C L E S 1 M A N U A L L Y S E L E C T E D F I X E D C Y C L E O F F T o t u r n O N p r e s s E...

Page 23: ...he controller the status screen changes to STAND BY All other screens remain unaffected The controller has the option to either finish the regeneration cycle upon receiving the STAND BY signal or fini...

Page 24: ...s i n t o S T A N D B Y T o c h a n g e E S C S T A N D B Y s i g n a l s t o p s t h e c y c l e d r y e r g o e s i n t o S T A N D B Y T o c h a n g e E S C S T A N D B Y s i g n a l d o e s n o t...

Page 25: ...lly the drain output interval and duration times can be set in Set Parameter section To access these SETTINGS press until you get to the Date screen Then press ESC to get into the SETTINGS Select Prog...

Page 26: ...duration time when the drain is opened Ta is the current time of the drain timer If B013 is selected the following screen will appear The dew point alarm can be set to ON or OFF on the last screen B01...

Page 27: ...o r k D i a g n o s t i c s S e T P a r a m e t e r P r o g N a m e D r a i n B 0 1 3 P D P S a v e P r o g C a r d L o a d P r o g C a r d C o p y P r o t e c t D R A I N 1 1 T H 1 0 0 0 m T L 0 1 0...

Page 28: ...tances The program update should be provided by manufacturer Reprogramming with third party programs will void the warranty To update the controller with Siemens LOGO 0BA6 follow the instructions bell...

Page 29: ...will appear Select Card by pressing OK key Select Save Prog to save the program to the card or select Load Prog to load a program from the card W e d 0 0 0 0 2 0 1 4 0 1 0 1 S t o p P r o g r a m S e...

Page 30: ...ntroller by selecting Load Prog Card and pressing OK Remove the SIEMENS LOGO Memory Card and reinstall the lid The update is now complete Start the controller by pressing ESC and selecting Start S t a...

Page 31: ...31 5 10 Electrical Scheme Sensor Connection...

Page 32: ...d the dew point sensor cable through the gland and connect the wires to the appropriate pins For two wire 4 20 mA sensor configuration Supply V 24 VDC Signal I 4 20 mA For three wire 4 20 mA sensor co...

Page 33: ...ontroller itself has a limited storage capability To collect the data correctly for extended periods of time it is recommended to use a Micro SD card After the Micro SD card has been inserted in the M...

Page 34: ...s as follows source Siemens manual for LOGO App V3 0 logo_app_en pdf 1 In LOGO Soft Comfort V8 you navigate to Tools Transfer Access Control 2 Select the Interface for your connection to LOGO and ente...

Page 35: ...35...

Page 36: ...gs Select Network and press OK Press OK Set the IP address Subnet Mask and Gateway The address below is an example Open your web browser and enter the IP S t o p P r o g r a m S e t u p N e t w o r k...

Page 37: ...37 Enter the password and you will get access to the controller interface...

Page 38: ...dsorption dryer in a different system configuration or the operating conditions have changed it is recommended that you contact your supplier for the technical counselling Replacement nozzles for diff...

Page 39: ...pallet it can also be lifted by forklift In this case dryer needs to be additionally stabilized and secured to prevent tilting or falling Dryer is typically supplied on a standard pallet and fixed on...

Page 40: ...dryer are closed with a plug In case you intend to store the dryer which has been in operation follow the procedure specified below Close the outlet valve Make sure the dryer is in FIX operating mode...

Page 41: ...r quality 2 for solid particles if dryer is equipped with superfine coalescing filter 0 01 m Compressed air quality 1 for solid particles if dryer is not equipped with superfine coalescing filter 0 01...

Page 42: ...Different arrangement of certain components is always possible 1 Compressor 2 Aftercooler 3 Cyclone separator 4 Pre filter e g 3 m 5 Pressure vessel 6 Fine filter e g 0 1 m 7 Adsorption dryer 8 Dry a...

Page 43: ...upstream from pressure vessel When total flow rate of the compressor is treated by the dryer When consumption of compressed air varies a lot or when short peaks of high consumption higher than dryer c...

Page 44: ...Install a super fine coalescing filter at the inlet side and an after filter at the outlet side only if dryer is not supplied with filters Additionally check that upstream from the dryer sufficient a...

Page 45: ...he adsorption dryer should not be operational Follow the pressurization procedure Make certain that the outlet valve is closed Make certain that the adsorption dryer is not in operation the circuit br...

Page 46: ...until you no longer hear flow noise Fully open the outlet valve 10 3 Start up After the installation pressurization and opening of the outlet valve procedures are completed the start up procedure can...

Page 47: ...lf cycle which takes 5 minutes Turn off fuse switch on the controller Disconnect the dryer from electric power supply Make sure that the dryer is depressurized by inspecting the manometers on the uppe...

Page 48: ...encer REPLACE x Valves REPLACE x Adsorbent REPLACE x Strainers CLEAN REPLACE x Dew point sensor optional CALIBRATION x Refers to moving parts and sealings For stable operation replacement of adsorbent...

Page 49: ...kit 12000403 KIT SERVIS B DRY 110 48 48 months replacement kit Control valves replacement components Check valves replacement components Silencer service kit Adsorbent 12000404 KIT SERVIS B DRY 150 48...

Page 50: ...upstream from the dryer are working properly 12 3 Filter Elements Replacement 1 For filter element replacement consult the instructions for element replacement that can be found in the operating manu...

Page 51: ...check this by inspecting the pressure indicators at the top of the adsorption dryer 3 Unscrew and remove the expansion silencer 4 Unscrew the solenoid valve connectors and lower valve block connectio...

Page 52: ...hat the adsorption dryer is depressurized You can check this by inspecting the pressure indicators at the top of the adsorption dryer 3 Unscrew the upper valve block connections and remove the lower v...

Page 53: ...adsorbent can also be done by using suction device In this case desiccant can be removed through opening on the top 6 Fill new desiccant into the column Make sure that first water resistant desiccant...

Page 54: ...t Sensor Calibration Dew point sensor might become inaccurate due to ageing To prevent inaccurate readings it is recommended to do a dew point sensor calibration yearly For calibration please contact...

Page 55: ...tion Screw the lid back on and start the dryer operation to see if the problem is solved 3 Faulty circuit breaker transformer or PLC If the problem is not solved either circuit breaker transformer or...

Page 56: ...er compressor and a bigger adsoprtion dryer 13 2 3 Oil in the Adsorption Dryer The reason for high pressure drop may be the oil from compressor that saturated and blocked the filters If the oil comes...

Page 57: ...escription Purge flow during one half cycle is greatly increased compared to the other half cycle causing the pressure to drop in both regenerating and adsorbing tower Possible causes inspection and f...

Page 58: ...ble causes of high outlet dew point 13 3 1 Underdiemnsioned Adsorption Dryer If the dryer is underdiemnsioned and the volumetric flow through the dryer is much higher than the dryer rating the ammount...

Page 59: ...lf cycle there is no regeneration purge flow interval on one or both towers Possible causes inspection and fixing procedure 1 No power supply controller is OFF Connect the power supply and turn ON the...

Page 60: ...d fittings Consult with the dryer supplier for technical support 2 Leakage after decommissioning and commissioning or extensive maintenance Review the procedures The steel piping can be replaced with...

Page 61: ...61 15 Maintenance Record TYPE OF MAINTENANCE DATE SIGNATURE NOTES Commissioned...

Page 62: ...62...

Page 63: ...63...

Page 64: ...64...

Page 65: ...65 OMEGA AIR d o o Ljubljana Cesta Dolomitskega odreda 10 SI 1000 Ljubljana Slovenia T 386 0 1 200 68 00 F 386 0 1 200 68 50 info omega air si www omega air si...

Reviews: