background image

SZX2-ZB16 combination (Zoom magnification of the microscope body: 0.7 to 11.5X)

Objective lens

Eyepiece magnification (number of fields of view)

10X (22 fields of view)

Observation magnification (X)

Observation range (mm)

0.3X

2.62 to 43.1

83.8 to 5.10

0.5X

4.38 to 71.9

50.3 to 3.06

0.8X

7.00 to 115

31.4 to 1.91

1X

8.75 to 144

25.1 to 1.53

1.6X

14.0 to 230

15.7 to 0.96

2X

17.5 to 288

12.6 to 0.77

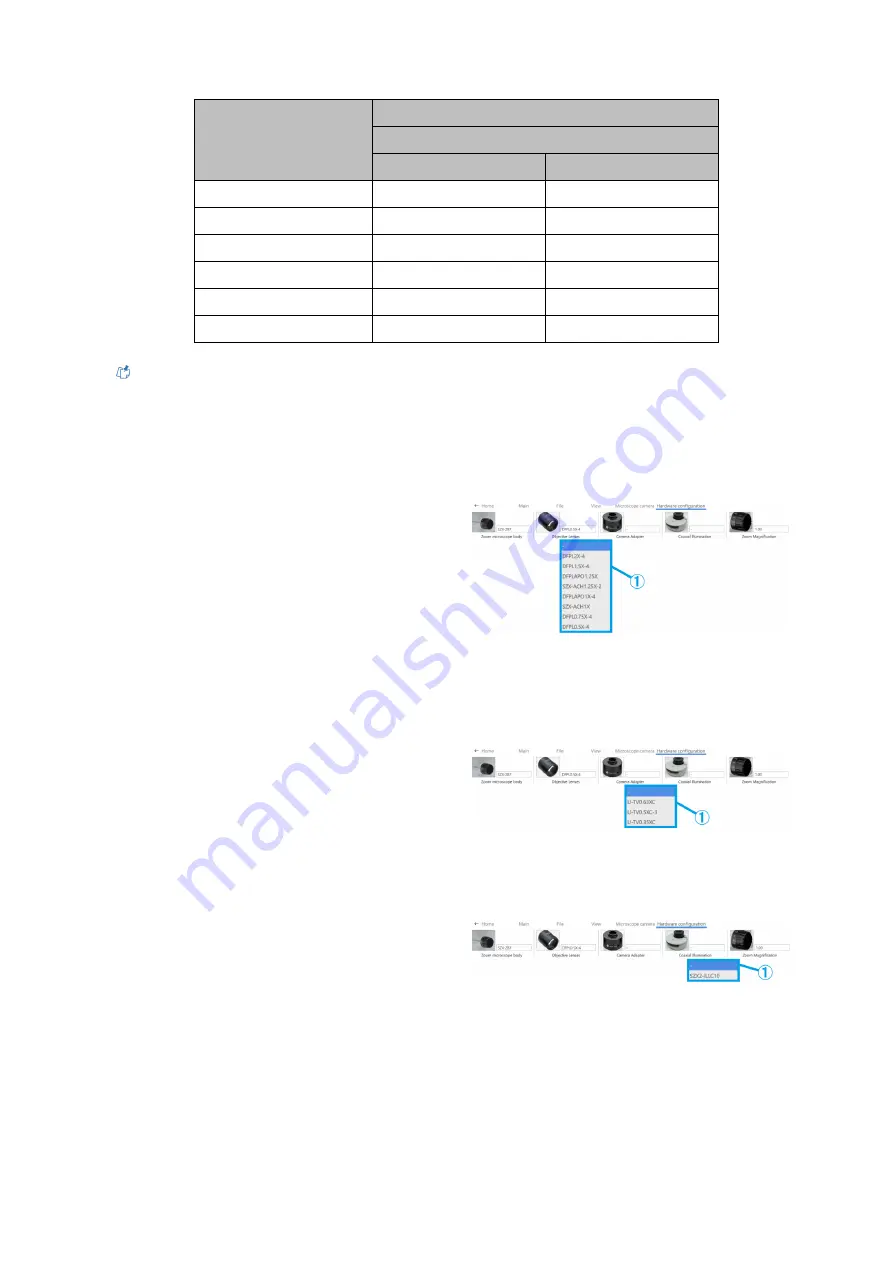
Depending on your needs, select an objective lens

from [DFPL2X-4], [DFPL1.5X-4], [DFPLAPO1.25X],

[SZX-ACH1.25X-2], [SZX-ACH1.25X-2],

[DFPLAPO1X-4], [SZX-ACH1X], [DFPL0.75X-4],

[DFPL0.5X-4],


[SDFPLFL0.3X], [SDFPLAPO0.

5XPF], [SDFPLAPO0.8X], [SDFPLAPO1XPF],

[SDFPLAPO1.6XPF], and [SDFPLAPO2XPFC].

Depending on your needs, select a camera adapter

from [U-TV0.63XC], [U-TV0.5XC-3], and

[U-TV0.35XC].

Depending on your needs, select [SZX2-ILLC10] or

[SZX2-ILLC16] as the coaxial Illumination.


Reference

When used in combination with a coaxial Illumination, the observation magnification will be the above observation

magnification X1.5.

Objective lens


Camera adapter


Coaxial Illumination


1


Operation procedure of the software

22

Summary of Contents for SZX-AR1

Page 1: ...SZX AR1 Software Help Edition 01...

Page 2: ...9 1 4 Drawing operation 10 Editing object styles 10 1 5 Various contents operations 11 Content menu 11 Pen drawing 13 Adding shapes 13 Lines arrows rectangles circles and text 13 Picture 14 Video 14...

Page 3: ...em check 30 2 2 Setup 31 Selecting a microscope configuration 31 AR Display Adjustment 32 Adjustment of the zoom magnification sensor 33 Barcode reader 35 Connecting external switches 36 2 3 Help 36 H...

Page 4: ...e operating procedures You can create content files operating procedures etc for tasks Start the training You can use the created content files to provide training for workers Start the task Tasks can...

Page 5: ...it back to the monitor side press 1 on the keyboard Right click to access the menu screen From Home click Open to open the content file you want to work with After loading the content file is complet...

Page 6: ...tions shut down and restart your PC Reference You cannot overwrite the content file with the edited results such as added free lines If you want to edit the content file you can do so from Create oper...

Page 7: ...on the right side of the screen and add necessary indicator lines etc to the screen for the operator Reference For details on the contents menu please refer to P 10 to 18 You cannot save the informati...

Page 8: ...file for the file type Enter a file name and click Save a If you want to protect your file click Protect File to enable file protection This function is used to check if the file will be opened as re...

Page 9: ...t multiple items by holding down the Ctrl key while selecting them Creating barcodes QR codes a Select the Error correction level Barcodes QR codes have the ability to recover data even if a part of t...

Page 10: ...stored in the content file will be zoomed in and out according to the observation magnification Adjust the magnification to suit your training needs according to your work Reference When the zoom mag...

Page 11: ...u can also use the Ctrl C and Ctrl V shortcuts to copy and paste slides To undo a slide operation click Undo Reference You can revert to the past operation status for operations performed on thumbnail...

Page 12: ...Background Right click on the video picture again to finalize the size and placement The background can also be changed by right clicking on the drawing area and selecting Change slide background a C...

Page 13: ...aspect ratio If you want to rotate an object drag the object s rotation handle The Delete key can also be used for deleting operation You can also use the Ctrl A shortcut to select all You can select...

Page 14: ...n in the Shape Colors menu at the top of the screen Rectangle Draw rectangles You can change the following settings for the placed rectangle using the buttons in the Shape Colors menu at the top of th...

Page 15: ...can change the settings of the placed circular gauge such as diameter position and whether or not to show the dimensions Reticle Cross Display the cross You can change various settings of the displaye...

Page 16: ...ou move the mouse and right click Click Shape To place a shape click Object Click on the screen to place the desired object Reference Line and Arrow Click and draw while holding down the Shift key to...

Page 17: ...ect to display the controller This button is used to control playback pause You can use the playback position bar to control the playback These buttons are used for forward backward operations one cli...

Page 18: ...this box to fix the aspect ratio when scaling the gauge d Enter the values for the gauge position directly e You can change the gauge position in 1 mm increments using these buttons f Check this box t...

Page 19: ...values for the gauge position directly d You can change the gauge position in 1 mm increments using these buttons e Select the Weight Color of the dimension lines f Check this box to display dimensio...

Page 20: ...buttons c Select whether to show or hide the scale d Select the Horizontal interval and Vertical interval e Select the Color of the scale f Select either Solid Dash for the cross g Select the Weight a...

Page 21: ...ified scale interval may cause too many scale lines depending on the observation magnification so the scale interval may be changed to a larger value than the specified one in such cases If a change h...

Page 22: ...will appear c Auto save enabled state Click the gear mark to display the Save Settings screen where you can configure settings for automatic saving After you click Snap or stop recording the data wil...

Page 23: ...the plus or minus button next to Level The exposure level can be adjusted in the range of 6 to 6 c Check the AE lock checkbox to retain the exposure time for the current observation Change the ISO sen...

Page 24: ...0 2X 15 8 to 158 11 0 to 1 57 SZX2 ZB10 combination Zoom magnification of the microscope body 0 63 to 6 3X Objective lens Eyepiece magnification number of fields of view 10X 22 fields of view Observat...

Page 25: ...bjective lens from DFPL2X 4 DFPL1 5X 4 DFPLAPO1 25X SZX ACH1 25X 2 SZX ACH1 25X 2 DFPLAPO1X 4 SZX ACH1X DFPL0 75X 4 DFPL0 5X 4 SDFPLFL0 3X SDFPLAPO0 5XPF SDFPLAPO0 8X SDFPLAPO1XPF SDFPLAPO1 6XPF and S...

Page 26: ...ronized you cannot select it from the screen Please refer to the table below for the respective magnifications Zoom magnification SZX ZB7 SZX2 ZB10 SZX2 ZB16 0 80 0 63 0 70 1 00 0 80 0 80 1 25 1 00 1...

Page 27: ...To display the live screen of the microscope camera click LIVE c To take a snapshot click the Camera mark 1 8 Functions of the AR display side Press 2 on the keyboard to move the mouse cursor to the e...

Page 28: ...Auto Save setting is ON After data acquisition the data will be saved automatically according to the Auto Save settings in the Save Settings d Click the AE mark to switch between automatic and manual...

Page 29: ...ge the line color click the Pen mark c To change the line weight click the Change line weight mark d To delete a line click the Trash Reference The pen can be used only in the Start the task mode and...

Page 30: ...Click Settings Click Language and select the language you want to use Language setting 1 Operation procedure of the software 27...

Page 31: ...e the font size Reference The magnification display can be moved over the view of the eyepiece 1 Press 2 on the keyboard to move the mouse cursor to the eyepiece 2 Move the cursor to Zoom Magnificatio...

Page 32: ...he PC to exit the application and restart the PC Reference If you choose Exit the application please move the mouse after exiting the application so that the mouse cursor appears on the monitor When u...

Page 33: ...layed If it is not displayed correctly click Adjust to make adjustments Reference For details on how to make adjustments please refer to P 33 2 Others 2 1 System check Note System checks should be per...

Page 34: ...he exported device setting data can be used for backup of the settings or for reuse in other systems Clicking Import will load the device setting data of Microscope Configuration and AR Display Adjust...

Page 35: ...and look through the eyepiece to confirm that the cursor appears in the AR display Match the AR image a with the optical image b Click the Angle control buttons and set the value to 0 If the AR image...

Page 36: ...at the location to be marked Look through the eyepiece and check that the optical image as seen through the optical barrel matches the marker line drawn in the camera picture window Reference If the...

Page 37: ...ue displayed on the screen matches the magnification indicated on the zoom handle If there is no problem with the magnification sensor value click Save to save the settings Reference If magnification...

Page 38: ...connected in the Device Manager of your PC and change the COM Port Number Refer to the instruction manual of the barcode reader you are using and select the communication specifications Click Save Cl...

Page 39: ...p file Connecting external switches The shortcut keys built into this software can be assigned to external switches Connect external switches Refer to the list of shortcut keys below and assign the re...

Page 40: ...auto startup select either ON or OFF Reference If you select ON for App auto startup the application will also start up automatically the next time you start up your PC 2 4 Language setting Language s...

Page 41: ...check the version information click on Version Click Third Party Notifications to display information about the open source software you are using 2 6 Version information Version information 2 Others...

Reviews: