background image

78

EN

 Installing Software


Windows

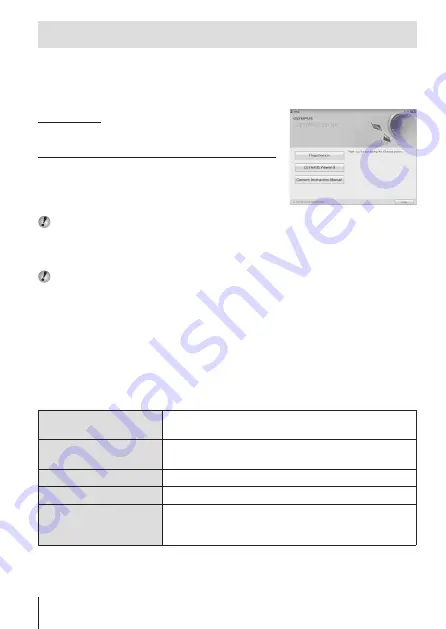
Insert the supplied CD in a CD-ROM drive.

Windows XP

•  A “Setup” dialog will be displayed.

Windows Vista / Windows 7 / Windows 8 / Windows 8.1

•  An Autorun dialog will be displayed. Click 

“OLYMPUS Setup” to display the “Setup” 
dialog.

  If the “Setup” dialog is not displayed, select “My Computer” (Windows XP) or 

“Computer” (Windows Vista/Windows 7) from the start menu. Double-click the 
CD-ROM (OLYMPUS Setup) icon to open the “OLYMPUS Setup” window and 
then double-click “LAUNCHER.EXE”.

  If a “User Account Control” dialog is displayed, click “Yes” or “Continue”.

Follow the on-screen instructions on your computer.

Register your Olympus product.

•  Click the “Registration” button and follow the on-screen instructions.

Install OLYMPUS Viewer 3.

•  Check the system requirements before beginning installation.
•  Click the “OLYMPUS Viewer 3” button and follow the on-screen 

instructions to install the software.

Operating System

Windows XP SP3 /Windows Vista SP2 / 
Windows 7 SP1 /Windows 8 / Windows 8.1

Processor

Pentium 4  1.3 GHz or better
(Core 2 Duo 2.13 GHz or better required for movies)

RAM

1 GB or more (2 GB or more recommended)

Free Hard Drive Space

3 GB or more

Monitor Settings

1024 × 768 pixels or more
Minimum 65,536 colors (16,770,000 colors 
recommended)

•  See online help for information on using the software.

Summary of Contents for SP 100EE

Page 1: ...a longer service life Keep this manual in a safe place for future reference We recommend that you take test shots to get accustomed to your camera before taking important photographs The screen and ca...

Page 2: ...ng or damaged contact the dealer from whom you purchased the camera Digital camera Strap Lithium Ion Battery LI 92B OLYMPUS Setup CD ROM or Lens cap and lens cap strap USB AC adapter F 2AC USB cable C...

Page 3: ...3 EN Attaching the camera strap Attach the strap to the other eyelet in the same manner Pull the strap tight so that it does not come loose You can attach the lens cap to the strap...

Page 4: ...utton 4 Zoom lever 5 Built in flash 6 Strap eyelet 7 Self timer lamp AF illuminator 8 Dot sight 9 Lens 0 Diopter adjustment dial a Dot sight switch b Flash switch c AFL FOCUS LIMIT button d Side zoom...

Page 5: ...Control dial 7 Fn button 8 u EVF button 9 Connector cover 0 Multi connector a HDMI micro connector b q Playback button c Arrow pad d H Left button e A button f button g R Movie button h F Up F Exposu...

Page 6: ...while sliding the battery lock knob in the direction of the arrow Insert the battery as illustrated with the C mark toward the battery lock knob Slide the battery lock knob in the direction of the arr...

Page 7: ...Press the card in until it clicks and comes out slightly then remove the card 1 2 4 Follow Steps 1 and 2 to close battery card compartment cover When using the camera be sure to close the battery card...

Page 8: ...charger and USB AC adapter abroad P 88 Never use any cable other than supplied or Olympus designated USB cable This may cause smoking or burning The included F 2AC USB AC adapter hereafter referred to...

Page 9: ...s If No Connection is displayed on the back monitor disconnect the USB cable and set Storage in USB Connection P 61 before connecting the cable again When to charge the batteries Charge the battery wh...

Page 10: ...elect your language and press the A button 2 Press FG of the arrow pad to select the year for Y X MENU Back Y M D Y M D Time 2014 3 Press I of the arrow pad to save the setting for Y X MENU Back Y M D...

Page 11: ...11 EN...

Page 12: ...viewfinder EVF press the u EVF button Every time you press the u EVF button the viewfinder EVF and the back monitor are switched alternately If the display in the viewfinder EVF looks blurry look thro...

Page 13: ...ays the previous frame Displays the next frame 14 02 26 12 30 4 30 4 30 Still image Index display In single frame playback turn the zoom lever to W for Index playback Use FGHI to move the cursor Turn...

Page 14: ...ng objects may appear distorted due to the rolling shutter phenomenon 0 00 REC REC 0 00 0 34 0 34 0 00 0 00 REC REC 0 34 0 34 Lights up red when recording Recording time Recording length P 91 This is...

Page 15: ...d speed Adjusting the volume Use FG to adjust the volume Operations while playback is paused During pause 00 14 00 34 00 14 00 34 Elapsed time Total shooting time Cueing Use F to display the first fra...

Page 16: ...and press G To erase a movie select the movie to erase and press G MENU Erase Erase Cancel 4 30 4 30 100 0004 100 0004 Back 2 Press FG to select Erase and press the A button Grouped images are erased...

Page 17: ...rge shrink the image Press the A button to restart scrolling Viewing area Playing back grouped images With sequential shooting and interval shooting the taken images are displayed as a group during pl...

Page 18: ...6 28 29 30 13 2 3 When the shutter button is pressed halfway down Reading a histogram If the peak fills too much of the frame the image will appear mostly white If the peak fills too much of the frame...

Page 19: ...s R R 12 Recording with sound wind noise reduction R R 13 Movie recording length R R 14 Movie recording icon R R 15 World time R 16 Image stabilization R 17 Metering R 18 Date stamp R R 19 Compression...

Page 20: ...6 4608 3456 AUTO WB 125 ISO NORM AUTO WB 125 ISO NORM P P 14 02 26 12 30 F6 5 F6 5 10 10 100 0004 100 0004 2 0 2 0 1 1000 1 1000 4608 3456 4608 3456 AUTO WB 125 ISO NORM AUTO WB 125 ISO NORM P P 14 02...

Page 21: ...ts R R 7 Current memory R R 8 Frame number total number of images R R 9 Compression Image size movies R 10 Shutter speed R 11 Shooting mode R 12 ISO sensitivity R 13 Aperture value R 14 Histogram R 15...

Page 22: ...ole Diorama Dramatic Tone P 23 O Scene Mode B Portrait e e Portrait F Landscape 1 Interval Shooting i Hand Held Starlight G Night Scene U Night Portrait C Sport 2 Indoor 3 Self Portrait Sunset X Firew...

Page 23: ...l atmosphere with a soft tone and makes an image dreamy Pale Light Color Expresses a comfortable floating feeling by making an image more pale and light Grainy Film Expresses the strength and roughnes...

Page 24: ...Indoor Suitable for shooting portraits indoors like party scene 3 Self Portrait Suitable for shooting yourself with holding the camera Sunset Suitable for shooting the sunset X Fireworks Suitable for...

Page 25: ...Time 5 30 4 Use FG to highlight an option and press A to select Frame Sets the number of frames to be shot between 1 and 99 frames Start Waiting Time Sets the time from pressing the shutter button un...

Page 26: ...he guide frame and manually releases the shutter Move the camera as if rotating it around a vertical axis through the center of the lens to take better panorama images Taking pictures with Auto 1 Pres...

Page 27: ...rst frame Direction for combining frames MANUAL MANUAL 3 Compose the next shot so that the edge of the first frame displayed faintly on the screen overlaps the subject of the second frame and press th...

Page 28: ...e A button to set S shutter priority mode In mode S you choose the shutter speed and let the camera automatically adjust the optimal exposure to shoot You can shoot a fast action scene without any blu...

Page 29: ...blur the background intentionally The shutter speed and aperture value are displayed in red if the camera is unable to achieve optimal exposure FNo A A F6 5 F6 5 2 0 2 0 1 400 1 400 ISO6400 ISO6400 Ex...

Page 30: ...om lever for adjustment P P 0 0 0 0 AUTO WB AUTO WB AUTO ISO AUTO ISO 16M 50 50 4 4 NORM 0 00 34 0 00 34 4 3 W side T side Zoom bar Image size Zoom bar 16M Super resolution zoom 1 Optical zoom Other 2...

Page 31: ...h fires automatically in low light or backlight conditions Red eye reduction flash This function allows you to reduce the red eye phenomenon Fill in flash The flash fires regardless of the light condi...

Page 32: ...he camera 1 Press the button F and then press HI for the exposure compensation Choose positive values to make pictures brighter negative values to make pictures darker Negative No compensation 0 Posit...

Page 33: ...gh Speed1 1 2 The images are taken sequentially for up to 60 frames at about 20 frames per second fps while pressing down the shutter button all the way down d High Speed2 1 2 The images are taken seq...

Page 34: ...2 seconds and then the picture is taken YC Custom Self timer After selecting this mode press the button to set the number of frames the time from pressing the shutter button until the picture is take...

Page 35: ...t using FG Press the Fn button again to switch to AF mode Focus Limit You can limit the focus range so as to focus the object easier 1 Press and hold the AFL FOCUS LIMIT button to display the direct m...

Page 36: ...itch Dot Sight 2 Looking through the dot sight from the back align the target mark with the object If looking through at an angle the target mark may be difficult to see Target mark red 3 Confirm comp...

Page 37: ...Setting in Settings Menu 2 and press the A button 3 Select Adjustment Screen and press the A button 4 Align the crossing mark around the center of the back monitor with the object and fix the positio...

Page 38: ...P 39 2 Flash P 39 3 Exposure compensation P 40 4 White balance P 40 5 ISO sensitivity P 40 6 o Y P 41 7 Image Size still images P 41 8 Aspect P 41 9 Image size movies P 42 1 Press A to display the fu...

Page 39: ...amy l Pale Light Color Expresses a comfortable floating feeling by making an image more pale and light m Grainy Film Expresses the strength and roughness of black and white n Pin Hole Expresses the tu...

Page 40: ...Suitable for shooting under white fluorescent lighting One Touch 1 For manually adjusting the white balance according to the light when shooting Set a piece of white paper or other white object so tha...

Page 41: ...to 60 frames at up to 60 frames per second fps while pressing down the shutter button all the way down c Y 12 sec The self timer lamp turns on for approx 10 seconds then blinks for approx 2 seconds an...

Page 42: ...each shooting mode P 92 Examples of image size when the aspect ratio is 4 3 Registering one touch white balance Select One Touch 1 or One Touch 2 face the camera toward a piece of white paper or other...

Page 43: ...43 EN...

Page 44: ...1 P 60 z Reset Compression Shadow Adjust AF Mode ESP n Digital Zoom Image Stabilizer Still images d Memory Format Format Backup Eye Fi USB Connection q Power On Sound Settings Pixel Mapping 2 Camera...

Page 45: ...ce iESP ESP ESP Page tab Off On Normal Auto Face iESP ESP MENU Back Settings Menu 1 Reset Compression Shadow Adjust AF Mode Digital Zoom Image Stabilizer ESP Submenu 1 3 Use FG to select the desired s...

Page 46: ...Set value of M S and A mode Focus Limit Picture Mode Flash Exposure compensation White balance ISO sensitivity o Y Image Size still images Aspect Image Size movies Camera Menu 1 Camera Menu 2 and Movi...

Page 47: ...and focuses automatically Spot The camera focuses on the subject located within the AF target mark AF Tracking The camera tracks the subject movement automatically to focus on it continuously 1 For s...

Page 48: ...ff Disable digital zoom On Enable digital zoom The option selected for Digital Zoom affects the appearance of the zoom bar P 51 Reducing the blur caused by the camera shake when shooting z Image Stabi...

Page 49: ...n to aid focusing When using the dot sight AF illuminator is fixed to Off AF illuminator Viewing the image immediately after shooting z Rec View Submenu 2 Application Off The image being recorded is n...

Page 50: ...s not recorded with images Images shot with the camera in a vertical position are not rotated during playback On Information about the vertical horizontal orientation of the camera during shooting is...

Page 51: ...uper Res Zoom is available only when Image Size is set to Super resolution zoom Digital zoom Image size Zoom bar On Off 16M Super resolution zoom Off On 16M Digital zoom Other 1 On On 16M Super resolu...

Page 52: ...ilizer is activated This function compensates for large amplitude shake such as the slow kind which occurs if you shoot while walking Images may not be stabilized if camera shake is too severe In HS m...

Page 53: ...elects the background music options Start Starts the slideshow During a slideshow press I to advance one frame H to go back one frame Press the button or the A button to stop the slideshow Editing sti...

Page 54: ...se HI to select an image 2 Use FG to select an image size and press the A button The resized image is saved as a separate image Cropping image q P Submenu 1 Submenu 2 Edit P 1 Use HI to select an imag...

Page 55: ...ust volume Brightening areas that are dark due to backlight or other reasons q Shadow Adj Submenu 1 Submenu 2 Edit Shadow Adj 1 Use HI to select an image and press the A button The edited image is sav...

Page 56: ...e Portrait Submenu 1 Submenu 2 Edit e Portrait 1 Use HI to select an image and press the A button Some images cannot be adjusted such as when faces are undetectable The edited image is saved as a sepa...

Page 57: ...ds the trimmed movie as new movie file Overwrite Overwrites the original movie with the trimmed movie 3 Use FGHI to display the frame to start erasing and then press the A button 4 Use FGHI to display...

Page 58: ...Protected images cannot be erased To individually select and erase images q Sel Image 1 Use FG to select Sel Image and press the A button 2 Use FGHI to select the image to be erased and press the A bu...

Page 59: ...you protect the grouped images all images in the group will be protected at once To protect each image in the group expand images g Playing back panorama and grouped images P 17 Setting images to uplo...

Page 60: ...the image data in the internal memory or card including protected images No Cancels formatting Copying images in the internal memory to the card d Backup Submenu 2 Application Yes Backs up image data...

Page 61: ...e supplied software select Storage Refer to Connecting the camera to a computer P 76 for the connection method with a computer Turning on the camera with the q button d q Power On Submenu 2 Applicatio...

Page 62: ...again To adjust the image processing function Press the A button when Start Submenu 2 is displayed The check and adjustment of the image processing function starts d Settings Menu 2 Adjusting the bri...

Page 63: ...y HDMI Control Off Operate with the camera On Operate with the TV remote control For the connection method refer to Viewing camera images on TV P 68 Changing the display language d l Submenu 2 Applica...

Page 64: ...daylight saving time is in effect use FG to turn daylight saving time Summer on 2 When you select a time zone the camera automatically calculates the time difference between the selected zone and the...

Page 65: ...on assigned to the Fn button d Fn Function Picture Mode Assigns the functions listed on the left to the Fn button Press the Fn button to set WB ISO Image Stabilizer Still images Aspect AF Mode ESP n I...

Page 66: ...assign the functions in the list below to use with the control dial The following functions are available P A S M Picture Mode R R R R Exposure Comp R R R WB R R R R ISO R R Aperture value R R Shutte...

Page 67: ...to Start can be selected The camera will not go into sleep mode while connected to Wi Fi Smartphone application is available http oishare olympus imaging com Before use refer to FlashAir Eye Fi card P...

Page 68: ...jack white HDMI cable Connect to the HDMI connector on the TV Multi connector HDMI Micro connector type D 1 Use the cable to connect the camera to the TV Choose the camera video mode before connecting...

Page 69: ...576p HDMI output 576p is used when PAL is selected for TV Out P 63 Using the TV remote control The camera can be operated by a TV remote control when connected to a TV that supports HDMI control 1 Sel...

Page 70: ...nnecting the camera USB port Smaller terminal USB cable Multi connector Use a fully charged battery for printing Movies cannot be printed Easy printing 1 Use HI to display the pictures you want to pri...

Page 71: ...onnection P 61 in the setting menu 2 Follow the operation guide to set a print option Selecting the print mode Select the type of printing print mode The available print modes are as shown below Print...

Page 72: ...le frame reservation or the picture you are displaying can be printed right away NORM NORM 4 30 3456 4608 3456 4608 4 30 14 02 26 14 02 26 12 30 12 30 100 0004 100 0004 Single Print Select Print Print...

Page 73: ...r printing Set the trimming size with the zoom lever T W and set the trimming position with FGHI 3 Once you have set the pictures for printing and printing data select Print then press A To stop and c...

Page 74: ...er device DPOF print reservations can be made for up to 999 images per card Single frame print reservations 1 Display the setup menu Using the setup menu P 45 2 From the playback menu q select Print O...

Page 75: ...reservation data for selected images 1 Follow Steps 1 and 2 in P 74 2 Use FG to select and press the A button 3 Use FG to select Keep and press the A button 4 Use HI to select the image with the print...

Page 76: ...omputer the battery may be exhausted Use a full charged battery If the camera cannot connect to PC disconnect the USB cable and check the setting of USB Connection P 61 before connecting to PC again T...

Page 77: ...refer to your computer s manual 2 The computer recognizes the camera as a new device If your computer is running Windows Vista Windows 7 Windows 8 Windows 8 1 select MTP in USB Connection of the setti...

Page 78: ...Continue 2 Follow the on screen instructions on your computer 3 Register your Olympus product Click the Registration button and follow the on screen instructions 4 Install OLYMPUS Viewer 3 Check the...

Page 79: ...ation Click the OLYMPUS Viewer 3 button and follow the on screen instructions to install the software Operating System Mac OS X v10 5 v10 9 Processor Intel Core Solo Duo 1 5 GHz or better Core 2 Duo 2...

Page 80: ...ressed Cancel sleep mode To save battery power the camera automatically goes into sleep mode and the monitor turns off if there is no operation for 3 minutes when the camera is turned on No picture is...

Page 81: ...in an image with many flash reflections on dust in the air Date and time function Date and time settings return to the default setting If the batteries are removed and left out of the camera for about...

Page 82: ...rmat Power Off Card problem Use FG to select Format and press the A button Next use FG to select Yes and press the A button 2 Memory Setup Memory Format Power Off Power Off Internal memory problem Use...

Page 83: ...l the ink in the printer Jammed Printer problem Remove the jammed paper Settings Changed 3 Printer problem Return to the status where the printer can be used Print Error Printer problem Turn off the c...

Page 84: ...aking a picture of a shadowy subject g P 49 Using the AF illuminator makes focusing easier Taking a picture of subjects where autofocus is difficult In the following cases after focusing on an object...

Page 85: ...even when shot against backlight Shadow Adjust g P 55 E Backlight HDR g P 24 Taking pictures using Face iESP g P 47 Appropriate exposure is obtained for a face against backlight and the face is brigh...

Page 86: ...per resolution zoom Avoid using digital zoom P 48 to take pictures Taking pictures at a low ISO sensitivity g P 40 If the picture is taken with a high ISO sensitivity noise small colored spots and col...

Page 87: ...ow dust off the lens with a commercial blower then wipe gently with a lens cleaner Do not use strong solvents such as benzene or alcohol or a chemically treated cloth Mold may form on the lens surface...

Page 88: ...tely can be used to charge the battery Using your charger and USB AC adapter abroad The charger and USB AC adapter can be used in most home electrical sources within the range of 100 V to 240 V AC 50...

Page 89: ...he country where the camera is used Remove the FlashAir or Eye Fi card from the camera or disable the card functions in airplanes and other locations where use is prohibited The FlashAir Eye Fi card m...

Page 90: ...the card is not completely erased When disposing of the card damage the card to prevent the disclosure of personal data Switching between a card and internal memory is not available When using the in...

Page 91: ...card 4GB With sound Without sound With sound Without sound c 1920 1080 1 9 sec 9 sec 18 min 18 min 1920 1080 1 14 sec 15 sec 27 min 29 min 1280 720 1 27 sec 30 sec 51 min 57 min 640 480 1 min 6 sec 1...

Page 92: ...ge size still images R R R R R Aspect R R R R R Image size movies R 1 1 R R R Shutter speed R R Aperture value R R Compression R R R R R R Shadow Adjust R R R R AF Mode R 1 R R R ESP n R R R R R Digit...

Page 93: ...ession R R R R R R R R R R R R R R R R R Shadow Adjust R R R R R R R R R R R R AF Mode R R 1 R R R R R R R R R ESP n Digital Zoom R R R R R R R R R R R R Image Stabilizer R R R R R R R R R R R R R R R...

Page 94: ...ges R R R R R R R Aspect R R R R R R R Image size movies 1 1 1 1 1 1 1 Shutter speed Aperture value Compression R R R R R R R Shadow Adjust AF Mode R R R R R R R ESP n R R R R R R R Digital Zoom Image...

Page 95: ...95 EN...

Page 96: ...Heat Never use or store this product near any heat source such as a radiator heat register stove or any type of equipment or appliance that generates heat including stereo amplifiers Handling the Cam...

Page 97: ...a low temperature burn may be caused In places subject to extremely cold temperatures the temperature of the camera s body may be lower than the environmental temperature If possible wear gloves when...

Page 98: ...a battery leaks fluid onto your clothing or skin remove the clothing and flush the affected area with clean running cold water immediately If the fluid burns your skin seek medical attention immediat...

Page 99: ...tness may also be found depending on the angle but this is due to the structure of the monitor This is not a malfunction Legal and Other Notices Legal and Other Notices Olympus makes no representation...

Page 100: ...void the user s authority to operate the equipment For customers in North and South For customers in North and South America America For customers in USA Declaration of Conformity Model Number SP 100...

Page 101: ...d software programs e supplies and consumables including but not limited to lamps ink paper film prints negatives cables and batteries and or f Products which do not contain a validly placed and reco...

Page 102: ...WITHIN A PRODUCT RECEIVED BY IT FOR SERVICE NOR SHALL OLYMPUS BE RESPONSIBLE FOR ANY DAMAGES IN THE EVENT ANY IMAGE OR DATA IS LOST OR IMPAIRED WHILE SERVICE IS BEING PERFORMED INCLUDING WITHOUT LIMI...

Page 103: ...uropa SE Co KG as stipulated on the website http www olympus com During the one year period of the World Wide Guarantee the customer may turn the product in at any Olympus service station Please notic...

Page 104: ...list on the web site http www olympus com for the authorized international Olympus service network For customers in Asia For customers in Asia Provisions of warranty 1 lf this product proves to be def...

Page 105: ...oftware and in no event shall be liable for any implied warranty of merchantability or fitness for any particular purpose or for any consequential incidental or indirect damages including but not limi...

Page 106: ...ctive pixels 16 000 000 pixels Image pickup device 1 2 3 CMOS primary color filter Lens Olympus lens 4 3 to 215 0 mm f2 9 to 6 5 Equivalent to 24 to 1200 mm on a 35 mm film Viewfinder Type Electronic...

Page 107: ...hargeable battery Model No LI 92B Standard voltage DC 3 6 V Standard capacity 1350 mAh Battery life Approx 300 full charges varies on usage Operating environment Temperature 0 C to 40 C 32 F to 104 F...

Page 108: ......

Page 109: ...WC370201...

Reviews: