background image

99

EN

6

Fil

e

 m
e

nu

File menu [File Menu]

Bounce [Bounce]

Multiple tracks saved in a multi-track mode 
project can be grouped into a single stereo track.

[

Home

{

 [

Multitrack

]

Press the 

+

 button to select [

Start

].

Press the 

OK

 button.

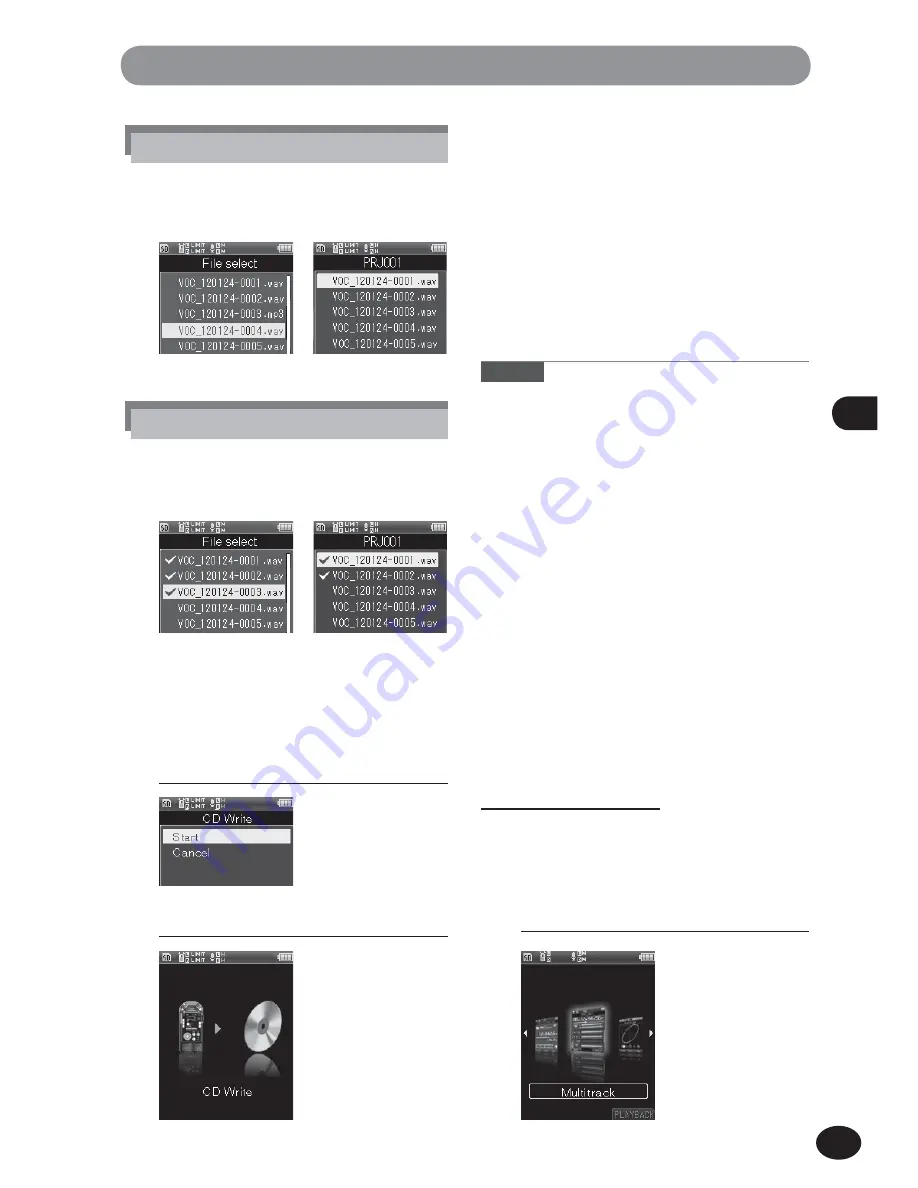
 The animation is displayed on the 

screen, and CD Write starts. When 
[

Done

] is displayed, CD Write is 

finished.

A

• 

When [

CD Write

] (

 P. 107) is set to the 

Fn


button, pressing the allocated button starts the CD 
write.

2

  Repeat step 1 to select other files, 

and press the 

F2

 (

OK

) button.


Notes

  To make the writing more reliable, use the AC 

power supply to power the external CD drive.

  A few minutes may pass before the process 

completes. Avoid conducting the following 
operations in order to prevent damage to data. 
In addition, check the remaining battery level 
beforehand in order to avoid running out of the 
battery during the process.

1

  Disconnecting the USB cable during the 

process.

2

  Removing the battery during the process.

3

  When the recording medium is [

SD card

], 

removing the SD card during processing.

4

  Turning off the external CD drive during 

processing.

5

  Removing the CD during processing.

Setting [

1File

]

1

  Select the file with the +/− button 

and press the 

OK

 button.

Setting [

Selected Files

]

1

  Select a file with the +/− button and 

press the 

OK

 button to mark the file.

Recorder Mode

Multi-Track Mode

Recorder Mode

Multi-Track Mode

Summary of Contents for LS-100

Page 1: ...anual to ensure that you use the product properly and safely Be sure to keep this manual on hand so that you can refer to it at any time To ensure successful recording perform a trial recording beforehand EN MULTI TRACK LINEAR PCM RECORDER LS 100 Multi Track Linear PCM Recorder User s Manual ...

Page 2: ...ission We bear no responsibility for any damage lost earnings or claim from a third party incurred by improper use of the product Trademarks and registered trademarks IBM and PC AT are trademarks or registered trademarks of International Business Machines Corporation Microsoft Windows and Windows Media are registered trademarks of Microsoft Corporation SD SDHC and SDXC are trademarks of SD Card As...

Page 3: ...ce P 2 Overview of Recorder P 11 Startup P 21 Recorder Mode P 32 Multi Track Mode P 53 AbouttheTuner theLissajous andtheMetronome P 66 Menus P 72 About the PC P 117 For Quick Reference P 123 1 2 3 4 5 6 7 8 INDEX ...

Page 4: ...Date 27 How to set the voice guide 28 Inserting and Removing the SD Card 29 Inserting the SD card 29 Removing the SD card 30 Operations on the Home Screen 31 Chapter 3 Recorder Mode What You Can Do in the Recorder Mode 33 Recorder Mode 33 Files and Folders 34 Before Recording 36 Recording 37 Normal Recording Normal 37 Overdubbing Overdub 39 Play Sync Play Sync 41 Voice Sync Recording V Sync Rec 43...

Page 5: ...e Menu 101 Metronome Metronome 101 LCD Sound menu LCD Sound Menu 103 Backlight Backlight 103 LED LED 104 Beep sound Beep 104 Language switch Lang Language Lang 105 Voice guide Voice Guide 105 Intro play Intro Play 106 Device menu Device Menu 107 Fn key setting Fn Setting 107 Memory select Memory Select 108 Sleep Power Save 109 Time setting Time Date 109 USB setting USB Settings 110 Setting reset R...

Page 6: ...oid salt Do not use organic solvent such as alcohol or thinner for cleaning Do not place the product on or near a television set refrigerator or other electric appliance Ensure that no sand or mud gets on the product Sand or mud may cause irreparable damage Do not apply strong vibration or shock to the product Do not use the product where it will get wet Do not put a magnetic card such as bank car...

Page 7: ...heproductwhiledrivinga vehicle such as bicycle motorbike or car Doing so could cause a traffic accident Safety precautions Do not leave the product within the reach of infants or children When using the product near them take extra care and do not carelessly leave the product unattended Children cannot understand warnings and cautions In addition the follow ing accidents could happen Accidentally ...

Page 8: ... not use the AC adapter near flam mable gas or material such as petrol benzin or thinner Doing so could cause an explosion fire or burn Battery fDanger Do not put the battery near fire Do not throw the battery into fire or heat it Doing so could cause a fire blowout or ignition Do not directly solder deform modify or disassemble the battery Do not connect the positive and nega tive terminals Doing...

Page 9: ...dicated supply voltage Do not insert a dusty power supply plug into the outlet Do not use the AC adapter when the power supply plug is not completely inserted into the outlet Do not pull out the power supply plug from the outlet when not in use Do not damage the power supply cord Do not pull the cord to remove the power supply plug from the outlet Do not place a heavy object on the cord Do not pla...

Page 10: ... or damaged Recorder Manual Checking Accessories Strap USB cable USB conversion connector Lithium ion battery LI 50B How to attach the strap USB AC adapter A514 The AC plug is included Contents may vary depending on purchase location Warranty differs depending on purchase location Warranty card may not be included ...

Page 11: ...11 EN Chapter 1 Overview of Recorder ...

Page 12: ...e connector with phantom power supply sup port Phantom power can be deactivated and is capable of operating at both 24V and 48V and designed to reduce noise also when using extension cables Support for a variety of recording formats This recorder supports overdubbing synchronization playing and recording at the same time and voice synchronization recording in addition to the normal mode usual reco...

Page 13: ... n button List MENU button Menu Fn buttons F1 F2 F3 button 0 button OK button Confirm button 9 button REC LEVEL dial These two dials can be used to adjust the recording levels of the left and right channels p button q button REC button STOP button ERASE button PLAY button Built in monaural speaker Tripod hole Recording indicator ...

Page 14: ...ck MIC jack microphone line input XLR Power switch L Power hold switch REMOTE jack Remote control USB terminal XLR Power switch R Lock switch XLR standard phone combo jack L Strap hook XLR standard phone combo jack R Battery slot SD card slot Battery SD card cover ...

Page 15: ...t commercially available external devices suitable for your situation Mixer Stereo Headphone ø3 5 mm ø3 5 mm ø3 5 mm Microphone ø6 3 mm Microphone Instrument XLR connector PC Remote control ToUSB terminal ToREMOTEjack ToEAR jack To XLR standard phone combo jack ToMIC jack CD drive ...

Page 16: ... LS 100 See page 39 for details Band practice Solo practice Concert See page 32 for details Record your singing while listening to a recording of instruments Dub over the previous recording to create a new file Recorder Mode Overdubbing ...

Page 17: ... 1 Track 2 Track 3 Track 4 Track 5 Save as a single file See page 53 for details Control your tempo with the metronome Perform accurate tuning according to the type of instrument Check the Lissajous waveform to determine the best position for microphones See page 66 for details Multi Track Mode Tuner Lissajous Metronome Mode ...

Page 18: ...ecorder slightly away to get a richer sound Wind instrument Position the recorder pointing to the center of the so called bell If breathing noises are audible move the recorder slightly away from the center of the pavillon String instrument When recording the sound of a string instrument such as a violin position the recorder slightly away from the upper part of the instrument pointing to the f ho...

Page 19: ...icro phone Then fix the recorder with a tripod or other tool before starting recording Electric guitar To record sound directly from the speaker of a guitar amplifier position the recorder slightly away from the speaker pointing to the center of the speaker cone paper To record sound from two speakers in stereo position the recorder slightly away from the center between the left and right speakers...

Page 20: ...enser microphone to the XLR standard phone combo jack L or R If the phantom power supply is required slide the XLR Power switch to ON on the XLR standard phone combo jack to which the microphone is connected ConnectionoftheXLR StandardPhoneComboJackandPhantomPowerSupply XLR standard phone combo jack The XLR standard phone combo jacks of the recorder support the XLR type and standard type plugs Sta...

Page 21: ...21 EN Chapter 2 Startup ...

Page 22: ...re not supported 1 Slide the lock switch to OPEN to open the battery cover 2 Insert the battery 3 Close the battery cover After closing the battery cover slide the lock switch to LOCK 1 Connect the USB cable to the USB terminal of the AC adapter 3 Connect the USB cable to the USB terminal of the recorder The PEAK display lamp R lights up in orange and recharging starts Insert the battery so that t...

Page 23: ... the USB cable to the USB port on the PC 3 Connect the USB cable to the USB terminal of the recorder The PEAK display lamp R lights up in orange and recharging starts Battery indicator The battery indicator on the display changes as described below according to the remaining battery level When appears on the display recharge the battery as soon as possible When the battery runs out and Battery low...

Page 24: ...ged to the full level replace it with a new one Securely insert the USB connector all the way in The USB connector must be properly connected to operate normally Recharging 4Discharge Because the lithium ion battery has self discharge characteristics recharge the attached lithium ion battery before using the product for the first time 4Operating temperature The battery is a chemical product Althou...

Page 25: ... minutes or more initial setting the display turns off and the recorder enters the sleep power saving mode P 109 To clear the sleep mode slide the power hold switch in the direction of the arrow to turn the power on again A The existing data or the settings for each mode are retained even after the power is turned off Turning the power off Slide the POWER HOLD switch in the arrow direction and kee...

Page 26: ...mode also prevents the recorder from accidentally stopping during recording Slide the POWER HOLD switch to HOLD HOLD appears on the display Clearing the hold mode Slide the POWER HOLD switch to posi tion A Notes If a button is pressed in the hold mode the PEAK display lamp R flashes in orange but the recorder does not operate If the hold mode is activated during playing or recording the recorder c...

Page 27: ...the 9 0 button and select the current date or time with the button 3 Press the OK button to complete setting The recorder clock starts operating from the set date and time Press the OK button in synchronization with the time signal or other clock Setting the date and time Time Date When the date and time are set the recording time information is automatically recorded for each file Set the date an...

Page 28: ...every time the F2 button is pressed Example March 24 2012 2012 March 24 initial value March 24 2012 24 March 2012 Initial Settings before Using the Recorder How to set the voice guide After the clock is set the message Turn off the voice guide if you do not need it is played and Voice Guide P 105 is displayed Select Off when you do not need the voice guide A The recorder is ready to use when the d...

Page 29: ...stopped and open the SD card cover Insert the SD card with the terminal face facing up as shown in the figure If the SD card is inserted in the wrong direction or at an angle the contact face may be damaged or the SD card may get stuck Recording cannot start unless the SD card is inserted all the way in 4 To record data in the SD card select Yes by pressing the button 5 Press the OK button to comp...

Page 30: ...e recorder recognizes it The processing speed may become lower de pending on the type of SD card The processing performance may deteriorate if the SD card is repeatedly written to or deleted In such a case initialize the SD card again P 114 For the SD cards certified according to our standards refer to the support page on our Web site http olympus europa com Although the manufacturers and types of...

Page 31: ...ormal overdubbing synchronization and voice synchronization recording are supported Multitrack P 54 You can create a file overlaying instruments and voice Tuner P 67 Use this function to tune your instrument Metronome P 71 This recorder has a metronome function Lissajous P 69 Use this function to detect and measure the phase difference between the microphone and the sound source Select a mode Go t...

Page 32: ...32 EN Chapter 3 Recorder Mode ...

Page 33: ...de you can easily dub over a previously recorded file Play Sync This mode allows you to record only the input sound of musical instruments etc that is being played along with the playback of a previously recorded file V Sync Rec In this mode recording starts automatically when a sound louder than the set voice sync level is detected Normal This is the normal mode of recording Usage Example Usage E...

Page 34: ...s or folders directly under the Recorder folder will not be displayed on this recorder Folder E Recorder MTR Folder A Folder B Folder C Folder D 001 001 002 002 003 003 004 004 005 005 006 006 007 007 999 999 LS 100 Files and Folders Selecting folders and files Home Screen Recorder Folder List Screen h 0 File List Screen h 0 ...

Page 35: ...Linear PCM format wav MP3 format mp3 Files and Folders File Screen File name File name Folder Recording format Current file number Total number of files in the folder Recorder status indicator K Recording Recording standby L Stopping Playing back ß Fast forwarding Rewinding Recording level meter Function guide Elapsed recording playback time Remaining time for recording File length Memory status b...

Page 36: ...ording when the level meter is way past the peak may result in noise even if the Rec Level is set to Auto or Limiter On P 82 Make a test recording to see if the recording level is set properly Before Recording To achieve a good recording quality it is important to properly adjust the settings including the Mic Gain of the input source P 81 and the Rec Level P 82 1 Press the REC button to enter the...

Page 37: ...ding 2 Press the REC button to enter the recording standby mode 3 Adjust the recording level Adjust the REC LEVEL dial according to the sound source 4 Press the REC button to start recording K appears on the display and recording starts a Recording folder b Elapsed recording time c Memory status bar d Recording format e Remaining time for recording f Recording level meter 5 Press the STOP button t...

Page 38: ...bring the headphones near the microphone during recording Changing the monitoring volume does not affect the recording level or the mic gain Dividing a file while recording A Be sure to assign the DIVIDE function to the Fn button in advance P 107 Please set in advance the Rec Format to PCM and the recording rate to 48 kHz or 44 1 kHz P 85 Set Rec Mode to Normal P 80 At the position where you want ...

Page 39: ...k over sound sources that have been recorded part by part Therefore this mode lets you enjoy building a song by gradually adding parts such as drums base guitar and vocal A Recording and playback in the Over Dub mode are available only when the PCM 44 1kHz 16bit recording format is used Drums Bass Record the bass while listening to the playback File 1 Playback Play The new file after dubbing File ...

Page 40: ...evel of the input sound to be recorded b Level of the output sound that is being played back c Overdubbing file number d Total number of files in the folder e Recording level meter 8 Press the STOP button to stop recording Notes Dubbed files will be saved with different names By stopping the playback file you will also stop the recording file The file to be dubbed over will be played back through ...

Page 41: ...different part for reference This is ideal for practicing your part since it lets you check the pitch and tempo on the recorded file A Recording and playback in the Play Sync mode are available only when the PCM 44 1kHz 16bit recording format is used Instruments Vocal Record the vocal part in sync with the playback of recorded band performance File 1 Playback Sing A new file recorded in sync with ...

Page 42: ...ing the playback file you will also stop the recording file The file for sync recording will be played back through the EAR jack 3 Selectafileforsyncrecording P 34 45 4 Press the PLAY button to start playback 5 Press the REC button to enter the recording standby mode Playback of the file will continue 6 Adjust the recording level Adjust the recording level to balance it with the playback file 7 Pr...

Page 43: ...voice sync level it automatically starts a recording 5 Voice sync recording stops automatically If Mode setting of the V Sync Rec is set to One time the recorder will close the file after recording and enter the recording stop mode P 80 If Mode setting of the V Sync Rec is set to Continuous the recorder will close the file after recording and enter the recording standby mode Upon detecting a sound...

Page 44: ...50 The performance of the recording medium may decrease after repeated writing and erasing When this occurs try formatting the recording medium P 114 Recording using the metronome You can use the metronome to help you keep accurate tempo during recording 1 Set REC Mode to Normal P 80 2 Set Metronome Menu to On P 101 3 Select Setting and set Display to On P 101 You can change the tempo and pattern ...

Page 45: ...ou can quickly find the file you are looking for 1 Home Recorder 2 Press the OK button Enter the folder list screen 3 Press the F1 SEARCH button Enter the date list screen 4 Select the recording date with the button 5 Press the OK button You will get a list of files that were recorded on the date you specified 6 Select the file with the button ...

Page 46: ... level with the VOLUME dial The higher you set the number on the dial the louder the volume will be 4 Press the STOP button to stop playback L will appear on the display Playback of the file will stop A If you switch to the Home screen during playback you can return to the playback screen by pressing the F3 PLAYBACK button Changing the playback speed The playback speed can be changed between 50 an...

Page 47: ...when it reaches the beginning of a file If you keep pressing the 0 button the recorder continues rewinding from the end of the previous file Skippingtothebeginningofafile Press the 9 button when the record er is in the stop or playback mode It skips to the beginning of the next file Press the 0 button when the record er is playing back a file It skips to the beginning of the current file Press the...

Page 48: ...index marks at other positions by the same procedure Playback 2 During playback select the index mark to be erased with the 9 0 button 3 Press the ERASE button while the index number is being displayed approx 2 seconds The index mark will be erased The index numbers after the erased index mark will be automatically adjusted Notes Each file can contain up to 99 index marks If you try to place more ...

Page 49: ... a Fn Cancel button Pressing the Fn Cancel button will release the segment repeat playback and set the recorder back to the normal playback mode b 0 button Pressing the 0 button will release the segment repeat playback and the recorder will skip to the beginning of the current file c STOP button Pressing the STOP button will release the segment repeat playback and playback will stop d 9 button Pre...

Page 50: ...ted folder 1 Select a file to erase P 34 P 45 2 While the recorder is stopped press the ERASE button 3 Select All in folder or One file with the button 4 Press the OK button 5 Select Start with the button 6 Press the OK button The display switches to Erasing and erasing starts Erased appears when the file is erased ...

Page 51: ...still fast forward or rewind just as in normal playback allowing you to quickly locate the end position If the file reaches the end while the message is flashing the file s end becomes the end position of the partial erase Erasing 3 Press the ERASE button again at the position where you wish to end the partial erase Start point and End point will flash alternately on the display 4 Press the ERASE ...

Page 52: ...les before continuing to record Files that the recorder does not recognize as well as folders containing such files will not be erased To erase them connect the recorder to your computer Check the remaining battery level beforehand in order to avoid running out of the battery during the process Note that the erasing process may take a few tens of seconds Never perform the following operations whil...

Page 53: ...53 EN Chapter 4 Multi Track Mode ...

Page 54: ... be edited separately to adjust the output level or balance which is ideal for creating a demo In this mode you can record over an already recorded track unlike in the recorder mode Edited tracks can be mixed bounced into a single file Project Track1 Track2 Track3 Track4 Track5 Bounce Save as one file You can manage up to 8 tracks under 1 project A Files recorded in Multi Track Mode are automati c...

Page 55: ... Project Files are managed by the project and each project has a number assigned Selecting a project and track Home screen Project screen h m Multi Track screen h n Recorder MTR PRJ001 PRJ002 PRJ003 PRJ999 LS 100 001 001 002 002 003 003 004 004 005 005 006 006 007 007 999 999 Files and Folders ...

Page 56: ...ding playback time Memory status bar Playback position bar Output balance Key shift Track number Mute Level meter Multi Track screen Files and Folders Output scale File list screen under a project Project number Files assigned to tracks Files that have been bounced or are available to be assigned to tracks Function guide Icon display ...

Page 57: ...57 EN 4 Creating a Multi Track Project 3 Select a track 2 Create a project 5 Start recording 1 Select Multitrack Creating a Multi Track Project Continued on next page 4 Adjust the recording level ...

Page 58: ...k Project 6 Stop recording 7 Check the track playback 8 Adjust the track 9 Add tracks Repeat steps 3 to 6 to add more sound sources to empty tracks Creating a Multi Track Project 10 Bounce the tracks See pages 59 to 63 for details ...

Page 59: ...ord up to 8 tracks recording can be 1 track or 2 track recording In 1 track recording input sound from L R is recorded as a mixed monaural signal Input source Input Mode Built in Mic Mono L R MIX External Mic LINE Input XLR Input Mono L Both the L R channels on headphones will emit the same audio Press the F3 2TRKREC button to record on two tracks simultaneously Please choose the two tracks betwee...

Page 60: ...g 4 Creating a Multi Track Project 5 a Elapsed recording time b Level meter c Input level meter 6 1 Press the STOP button To re record record over the same track It will not erase the previously recorded file which will remain within the project 2TRKREC In 2 track recording the odd number track will be assigned to the L channel and the even number track will be assigned to the R channel Input sour...

Page 61: ...gress a Current pitch To listen to a specific track while muting the others set the cursor to the track you wish to play back and press the Fn Solo button Pressing the button again releases the Solo function Be sure to assign the Solo function to the Fn button in advance P 107 To rewind the file press and hold the 0 button when the recorder is in playback mode or stop mode To fast forward the file...

Page 62: ... to select files to assign and target tracks and press the OK button 8 Add tracks You can record additional tracks while playing back a previously recorded track 1 Select an empty track with the button a Empty track 2 Press the REC button to enter the recording standby mode 3 Adjust the recording level with the REC LEVEL dial 4 Press the PLAY button to play back the previously recorded track All f...

Page 63: ...empty tracks create bounce files and assign them to tracks Youcanbounceanyofthefilesthatarecurrently assignedtotracks 1 Press the preassigned Fn Bounce button Be sure to assign the Bounce function to the Fn button in advance P 107 2 Press the OK button An animation will appear on the display and bouncing starts Done appears when the bouncing is complete It will be saved as a new PCM format 44 1kHz...

Page 64: ...s the ERASE button The erase confirmation screen appears 3 Press the button to select Start 4 Press the OK button The display switches to Erasing and erasing starts Erased appears when the project is erased Erase a track Erase unnecessary tracks 1 Select the project that contains the track you wish to erase 2 Press the OK button The Multi Track screen appears ...

Page 65: ...k carefully before erasing them When you have an SD card inserted in the recorder make sure to check if your memory selection is set to Internal memory or SD card P 108 You cannot erase a project that contains a track for which the file lock has been set If you attempt to erase such a project only the locked track remains in the project 3 Select the track to erase with the button 4 Press the ERASE...

Page 66: ...66 EN Chapter 5 About theTuner the Lissajous and the Metronome ...

Page 67: ...ted will appear Setting up the Calibration Setupthecalibrationofthetuner Thefrequency ofthereferencetoneAcanbeadjustedby1Hz incrementsintherangeof435Hzto445Hz 1 Pressthe buttontoselectthe frequency andthenpresstheOK button Setting up the Chromatic Tuner Supports all the musical scales and allows you to tune the pitch of the instrument inserted to the reference pitch 1 Tune the musical instrument b...

Page 68: ... items are basic tuning types for the guitar and the bass 1 Tune the musical instrument by plucking a single note a b a The number of the string to tune b The tuning chord The reference value of the string that has been plucked appears 2 Adjust while looking at the tuning meter and the indicator Tune accurately with the needle pointing to the center of the meter Using the tuner A guitar chords cha...

Page 69: ...Loud amplifier Loud amplifier Loud speaker Loud speaker The fl ow of the reference signal EAR jack XLR standard phone combo jack R L What is a phase difference A slight difference between two sound waves is called a phase difference The sound is equally fed into the left right sides of the microphone if it is directly in front of the sound source However a slight time difference is produced betwee...

Page 70: ...nto the left right channels of the microphone If phase difference arises the line becomes wider At a phase difference of 90 degrees the line forms a circle Examples of the measurement display Phase difference 135 degrees Phase difference 0 degree Phase difference 90 degrees Phase difference 180 degrees About the Lissajous measurement Phase difference 45 degrees ...

Page 71: ...om the MENU to make additional settings for the metronome P 101 Tempo instructions to provide a rough idea of tempo LARGO Widely and slowly 40 59 LARGHETTO A little more slowly 60 65 ADAGIO Slowly 66 75 ANDANTE Walking tempo 76 107 MODERATO Moderately 108 119 ALLEGRO Rapidly 120 167 PRESTO Very fast 168 200 PRESTISSIMO Very very fast 201 208 Tempo Tempo instruction Metronome weight Counter indicat...

Page 72: ...72 EN Chapter 6 Menus ...

Page 73: ...Take the following steps to set each item in the menu How to set the menus 1 Press the MENU button The menu screen opens 2 Press the 9 0 button to select the tab which contains the target item to be set When the cursor in the setting tab is moved the menu screen changes 3 Press the button to select the item to be set 4 Press the OK button The screen shifts to the menu of the selected item ...

Page 74: ...s that the setting is finalized If you press the 0 button without pressing the OK button the setting operation is cancelled and the screen returns to the previous screen 7 Press the MENU button to close the menu screen When the menu screen is opened during recording or playing status pressing the MENU button returns the screen to the previous screen ...

Page 75: ...c Rec Mic gain Mic Gain P 81 Built in Mic HI MID LO External Mic HI MID LO XLR L HI LO XLR R HI LO Recording level Rec Level P 82 Manual You can adjust the limiter compressor settings for each input source Auto Input selection Input Select P 83 Built in Mic External Mic Line XLR Phone Mic power Mic Power P 84 Phantom Power 48V 24V Plug in Power On Off Recording format Rec Format P 85 PCM 44 1kHz 1...

Page 76: ...Skip 10sec 30sec 1min 5min 10min Reverse Skip File Skip 1sec 3sec 5sec 10sec 30sec 1min 5min List of menus File menu File Menu Menu settings that relate to files Set items Choices Operation mode Setting OK Setting NG Stopped Playing Recording Erase Lock File Lock P 91 On Off File Move Copy Move Copy P 92 Copies and moves the files within the memory File Divide File Divide P 95 Divides a file recor...

Page 77: ...roject to one file List of menus In the Multi Track Mode File Divide does not function In the Recorder Mode Bounce does not function Metronome Menu Metronome Menu Menu settings that relate to the metronome Set items Choices Operation mode Setting OK Setting NG Stopped Playing Recording Metronome Metronome P 101 Off On Setting You can set Display Countdown Tempo Sound Beat and Volume In the Multi T...

Page 78: ...sec 10sec 30sec 1min Always on Dim light time 30sec 1min 2min 5min Always on Brightness 01 02 03 LED LED P 104 On Off Beep Beep P 104 00 01 02 03 04 05 Language selection Language Lang P 105 The languages available for display vary depending on the sales region Voice guide Voice Guide P 105 On Off On Off Speed 100 400 The default is 100 Volume 01 02 03 04 05 Intro play Intro Play P 106 10sec 5sec ...

Page 79: ...ction Memory Select P 108 Internal memory SD card Power save Power Save P 109 5min 10min 30min 1hr Off Clock setting Time Date P 109 Hour Minute Year Month Day USB setting USB Settings P 110 USB Connection PC AC Adapter Optional USB Class Storage Class Composite Setting reset Reset Settings P 112 Resets the settings to the default Formatting Format P 114 Formats the selected memory Memory info Mem...

Page 80: ...nd then press the OK button One time After completion of recording the file closes and the device shifts into the recording stop status Continuous After completion of recording the file closes and the device shifts into the recording wait status When any sound is detected the sound is recorded in a new file Recording menu Rec Menu Recording mode Rec Mode This menu sets the recording method of the ...

Page 81: ...setting adjusts the sensitivity of the XLR type microphone that is con nected to the R channel Microphone gain Mic Gain Sensitivity to the input source can be changed in accordance with the application and or the recording environment 1 Menu Rec Menu Mic Gain 4 Press the OK button The sensitivity setting for the selected input source appears 5 Press the button to select the sensitivity For Built i...

Page 82: ...c Level When Manual is selected 1 Select a menu item by pressing the button and then the OK button 5 Press the button to select a menu item Manual The recording level is to be adjusted manually at recording Limiter compressor can be set Auto The recording level is adjusted automatically at recording This setting is convenient when you want to start recording quickly 6 Press the OK button When Manu...

Page 83: ...ct This setting sets the input channel of the audio source 1 Menu Rec Menu Input Select Input source 2 Press the OK button Limiter 2 Compressor 2 Select this setting to equalize the sound strength This setting avoids distortions the sound level will be equalized at a predetermined volume This setting is suitable for voice recordings Limit Comp Off This setting is used when adjusting the input leve...

Page 84: ...wer supply is connected It also sets whether the power is supplied to the external microphone corresponding to the plug in power function 1 Menu Rec Menu Mic Power 2 To enable the setting turn ON the XLR Power switch on the recorder When Phantom Power is selected 1 Select the voltage by pressing the button and then the OK button When Plug in Power is selected 1 By pressing the button select either...

Page 85: ...CDs and to the MP3 format that can record by highly compressing the file 1 Menu Rec Menu Rec Format Rec Format 5 Pressthe buttontoselectthe recordingrate PCM 96 0kHz 24bit to 44 1kHz mono Files saved in the PCM WAV format correspond to BWF Broadcast Wave Format and the date and time that each file is recorded is added to the file MP3 320kbps to 64kbps mono 6 Press the OK button to finish the setti...

Page 86: ...projec tors and so on It is effective when recording indoors Off This setting stops the function Low cut filter Low Cut Filter The recorder has a low cut filter function that eliminates low frequency sound during recording for recording of clearer sound It can diminish air conditioning noise and the noise of the projector 1 Menu Rec Menu Low Cut Filter 4 Press the OK button to finish the setting L...

Page 87: ...rd sings recording starts a maximum of two seconds prior to the bird singing 1 Menu Rec Menu Pre Recording How to use Pre Recording To record sound using Pre Recording set Pre Recording to On 1 While the recorder is in stop mode press the REC button The recorder shifts into the record wait status It constantly records a maximum of two seconds of sound 2 Press the REC button The recorder resumes re...

Page 88: ... button Notes When Rec mode is set to Overdub or Play Sync set Rec Monitor to ON When a speaker with built in amplifier or other device is connected microphone feedback could occur during recording For the recording moni tor use the head phone or set Rec Monitor to Off during recording On The recording monitor functions Off This setting stops the function No sound is output from the EAR jack 4 Pre...

Page 89: ...nish the setting 3 Press the button to select a menu item Skip space Skip Space This function skips forwards or reverse skips reverses by the set time while playing a file It is convenient for moving quickly to the playing position or for playing short phrases repeatedly 1 Menu Play Menu Skip Space Forward Skip Playback starts after the set time is skipped Reverse Skip Playback starts after the se...

Page 90: ... 10 sec 30 sec 1 min 5 min 6 Press the OK button to finish the setting How to play with skipping and reverse skipping 1 Press the PLAY button to start playing 2 Press 9 0 button during playback The set space is skipped or reverse skipped and then playback starts Note If there is an index mark nearer than the skip position the recorder skips or reverse skips to that position ...

Page 91: ...tant files In addition it prevents a file from being deleted even when you conduct a file erase P 50 On This setting locks the file Off This setting releases the file lock 6 Press the OK button to finish the setting 1 Select a file to set the erase lock P 34 P 45 3 Menu File Menu File Lock 4 Press the OK button Recorder Mode Multi Track Mode 2 In stop mode open the menu ...

Page 92: ...ry or the SD card into a different folder in the SD card Copy to SD This menu item copies the files in the built in memory or the SD card into a different folder in the SD card 5 Press the OK button The screen for selecting the number of files to be moved or copied opens File Move Copy Move Copy This setting can move or copy a file saved in the built in memory or the SD card within the memory In a...

Page 93: ...ted files Several files are selected All files All files in the folder are selected 7 Press the OK button The selected menu screen appears One file setting 1 Press the button to select the file to be moved or copied and press the OK button All files setting 1 All files in the current folder are automatically selected and the screen shifts to the Destination screen 8 Press the button to select a de...

Page 94: ...through the process the process is completed for all files that have already been moved or copied For all other files the process is cancelled All files for which File Lock P 91 is set continue to be protected by File Lock after the moving or copying process The moving or copying process cannot be used for files located directly under the Recorder folder Only 44 1kHz 16bit or 44 1kHz mono files re...

Page 95: ...d file division is finished Notes File divide is available only from the file display screen When the number of files in the folder exceeds 999 the dividing process is unavailable Files with the File Lock P 91 cannot be divided After the dividing process the front section is called File name_1 wav and the rear section is called File name_2 wav Even MP3 or PCM files with a very short record ing tim...

Page 96: ...8 kbps MP3 file A large sized WAV file can be downsized Note Files that can be converted are PCM format 44 1kHz 16bit or 44 1kHz mono files only 1 Select a WAV file to be converted P 34 P 45 If a file is selected Name Date Size and Bit Rate are displayed If a folder is selected Name and File are displayed 4 After checking the information press the OK button In the Recorder Mode 1 Press the button ...

Page 97: ...ted files cannot be played in Multi Track Mode To listen to them copy them to the recorder folder A When MP3 Convert P 107 is set to the Fn button pressing the allocated button starts the conversion The time required for conversion is almost the same as the file length of the file to be con verted 2 Menu File Menu MP3 Convert 3 Press the OK button The convert check screen appears In the Multi Trac...

Page 98: ...drive 2 Select a WAV file to be written to the CD P 34 P 45 5 Press the button to select how many files to write to the CD One file A single file will be written to the CD Selected files Multiple files will be written to the CD 6 Press the OK button The screen for your selection will appear In the Recorder Mode 1 Press the button to select the file from the file list screen 2 Press the 9 button to...

Page 99: ... the external CD drive A few minutes may pass before the process completes Avoid conducting the following operations in order to prevent damage to data In addition check the remaining battery level beforehand in order to avoid running out of the battery during the process 1 Disconnecting the USB cable during the process 2 Removing the battery during the process 3 When the recording medium is SD ca...

Page 100: ...le is saved in the project A When Bounce P 107 is set to the Fn button pressing the allocated button starts the bounce process Note Bounce does not function in the recorder mode 2 Press the OK button 3 Press the 9 0 button to select the project for the bounce process 4 Press the OK button The screen shifts to the Multi Track screen 5 Menu File Menu Bounce 7 Press the button to select Start 6 Press...

Page 101: ... In the Multi Track Mode Countdown do not function 3 Press the OK button When Setting is selected the Menu screen opens Display setting This setting sets whether the metronome is displayed on the window or not 1 Select a menu item by pressing the button and then the OK button 2 Press the button to select a menu item Countdown setting This setting sets the count between the time that the metronome ...

Page 102: ...pattern for the metronome between 00 and 09 1 Select a menu item by pressing the button and then the OK button Volume setting The metronome volume can be adjusted between 01 and 10 1 Select the volume by pressing the button and then the OK button Using the metronome function in Multi Track Mode You can use the metronome in Multi Track Mode When the metronome is set to On the metronome starts at th...

Page 103: ...ghting time This setting sets the lighting time of the backlight Dim light time When the lighting time of the back light elapses the backlight changes to the dim light This setting sets the time of the dim light Brightness This setting can adjust the backlight brightness in three levels 5 Press the button to select a menu item 6 Press the OK button to finish the setting 4 Press the OK button The s...

Page 104: ...the OK button to finish the setting Beep sound Beep This recorder outputs a beep sound to indicate that a button is being operated and to warn you in case of erroneous operation You can also set up the recorder so that no beep sound is output 1 Menu LCD Sound Menu Beep 3 Press the button to adjust the volume The volume can be adjusted between 00 and 05 4 Press the OK button to finish the setting 2...

Page 105: ...trol this function this function by setting On Off of the audio guidance and by adjusting the speed and the volume 1 Menu LCD Sound Menu Voice Guide 3 Press the button to select a menu item Select an item to be set from On Off Speed and Volume 4 Press the OK button The selected menu screen appears 2 Press the OK button 3 Press the button to select a menu item The selectable languages differ depend...

Page 106: ...und that are output when the power supply source is turned on off P 25 can be eliminated by setting Voice Guide to Off The volumes of the start up sound and the shutdown sound can be set by setting Volume of Voice Guide While a file is being played the Speed setting of Voice Guide is invalid Intro play Intro Play When the cursor is placed on a file in a folder the first few seconds of the file can...

Page 107: ...n MTR Fn button allocation in the Multi Track Mode 4 Press the OK button The selected menu screen appears 5 Press the button to select a Fn button for allocation 6 Press the OK button The registration window for the selected Fn button 7 Press the button to select a function for registration Fn Recorder setting Off A function cannot be allocated to the Fn button INDEX P 48 A B P 49 Input Select P 8...

Page 108: ...ted to the Fn button Input Select P 83 Metronome P 101 MP3 Convert P 96 CD Write P 98 Bounce P 99 Mute P 61 Key change P 61 Solo P 61 8 Press the OK button To set other Fn buttons repeat steps 5 to 8 Recording medium Memory select Memory Select When an SD card is inserted recording to the built in memory or to the SD card can be selected P 29 1 Menu Device Menu Memory Select 3 Press the button to ...

Page 109: ...eferred time Off Sleep mode does not function If the device is not put into sleep mode the battery runs out fast 4 Press the OK button to finish the setting Device menu Device Menu Time setting Time Date To reset the date and time conduct the following steps 1 Menu Device Menu Time Date 3 Press the 9 0 button to select the setting item From Year Month Day Hour and Minute set the blinking cursor at...

Page 110: ...This menu item is for setting up con nection to the PC USB Class This sets the USB class 4 Press the OK button The selected menu screen appears Following the same steps press the 9 0 button to select a menu item and select the button 5 Press the OK button to finish the setting The device clock starts with the date and time set on the device Press the OK button in sychronization with the time tone ...

Page 111: ...vice by the PC Composite This is the setting when the recorder is used as an external storage device USB speaker or microphone through connection to the PC Notes When the recorder is connected to a PC for the first time as an external storage device the driver of this device is automatically installed to the PC When USB Connection is set to AC Adapter the PC does not recognize the device When the ...

Page 112: ...ting Menu setting after setting reset default setting Recording Menu Menu item Default setting Rec Mode P 80 Normal Mic Gain P 81 Built in Mic Mid Rec Level P 82 Built in Mic Manual Limit Comp Off Input Select P 83 Built in Mic Mic Power P 84 Phantom Power 48V Plug in Power On Rec Format P 85 PCM 44 1 kHz 16 bit Low Cut Filter P 86 Off Pre Recording P 87 Off Rec Monitor P 88 Off Play menu Menu ite...

Page 113: ...ightness setting 02 LED P 104 On Beep P 104 03 Language P 105 English Voice Guide P 105 On Off On Speed 100 Volume 03 Intro Play P 106 Off Device menu Menu item Default setting Fn Setting P 107 Fn Setting Recorder F1 INDEX F2 Input Select F3 Metronome Fn Setting MTR F1 Mute F2 Bounce F3 Off Memory Select P 108 Internal memory Power Save P 109 10min USB Settings P 110 USB Connection PC USB class St...

Page 114: ...s the button to select the recording medium to format 4 Press the OK button The screen shifts to the Format screen 5 Press the button to select Start 6 Press the OK button All data will be erased is displayed for two seconds and Start Cancel light up 7 Press the button to select Start again 8 Press the OK button Formatting is displayed and formatting starts When Format done blinks formatting is co...

Page 115: ...g In addition it may take over 10 seconds to complete formatting Never perform operations such as the following during format ting as such operations may damage the data 1 Disconnect the AC Adapter during format ting 2 Remove the battery during formatting 3 Remove the SD card during formatting when SD card removing the SD card during processing When the SD card is formatted using the recorder the ...

Page 116: ...file The indicated remaining capacity is less than the total capacity of the media due to its characteristic This is not a malfunction System information System Info On the menu screen the device information can be checked 1 Menu Device Menu System Info Model Version Serial No are displayed 2 Press the OK button 2 Press the OK button Remain and Capacity of the recording medium can be displayed Whe...

Page 117: ...117 EN Chapter 7 About the PC ...

Page 118: ...odified PC s Precautions on using the recorder connected to a PC When you are downloading a file from the recorder or uploading a file to the recorder do not remove the USB cable even if the screen is indicating you can Data is still being transferred while the PEAK indicator light R is blinking When removing the USB cable be sure to follow the description on P 120 If the USB cable is removed befo...

Page 119: ... In such cases refrain from using a USB hub Be sure to use the designated USB cable supplied with the recorder If any other company s cable is used it may lead to malfunction of the recorder Also never use the dedicated USB cable with any other company s products A Remote Storage appears on the recorder while the USB cable is being connected When you set up the USB connection on the recorder the r...

Page 120: ...the recorder is charging The USB cable may be removed during the charging operation Using the recorder on your PC 2 Be sure that the recorder PEAK indicator light R is off before disconnecting the USB cable The PEAK indicator light R will light up orange while the recorder is charging The USB cable may be removed during the charging operation Notes NEVER disconnect the USB while the PEAK indicator...

Page 121: ...r name when a PC is connected SD card Drive name Windows Removable Disk Macintosh Folder name Untitled Transferring voice files to your PC There are five recording folders available in the recorder mode which appear on the PC as FOLDER_A through FOLDER_E Files you record will be saved in these folders In addition the folder for the Multi Track Mode appears as PRJ000 Notes During data communication...

Page 122: ... PEAK indicator light R flashes NEVER disconnect the USB while the PEAK indicator light R is flashing If you do the data may be destroyed Windows 1 Connect the recorder to your PC P 119 2 Open the Explorer window When you open My Computer the recorder will be recognized by the drive name While an SD card is inserted it appears as Removable Disk 3 Click on the product name folder 4 Copy the data 5 ...

Page 123: ...123 EN Chapter 8 For Quick Reference ...

Page 124: ...emory Please contact the Olympus Customer Support Center P 136 Card error The SD card is not recognized correctly Remove the SD card and insert it again P 29 to 30 Memory full No remaining memory Erase unnecessary files P 50 SD Card Locked The SD Card is write protected Release the SD card s write protection and then try again P 30 No file No files are found in the folder Select another folder P 3...

Page 125: ...ame folder Please select another folder Same files can t be moved copied A file with the same filename already exists in the destination folder Please select another file This file can t be divided Attempting to split a file other than a PCM or MP3 file recorded in this recorder Please select another file Alarm message list ...

Page 126: ...e headphone is connected Unplug the headphone to use the internal speaker The volume level is set to 0 Adjust the volume level P 46 Recording level too low The recording level has not been adjusted Adjust the recording level and then try recording once more P 82 The microphone sensitivity is too low Set Mic Sense to HI or MID and then try recording once more P 81 This could potentially be because ...

Page 127: ...tteries The battery is not properly inserted Insert the battery properly USB class set to Composite Change the USB class setting to Storage P 110 Connect the recorder via USB while pressing and holding the STOP button to recharge it P 24 Cannot find files Wrong folder Switch to the correct folder P 34 Noise heard during playback The recorder was wiped or shaken during recording The recorder was pl...

Page 128: ...t a PCM format 44 1kHz 16bit file that is enabled for CD writing Cannot be converted to an MP3 file The selected file is not enabled to be converted to an MP3 file Select a PCM format 44 1kHz 16bit or 44 1kHz mono file that is enabled to be converted to an MP3 file Cannot perform bouncing The volume of the track is either completely reduced or muted Check the volume of the track and the On Off of ...

Page 129: ...mote location Monaural tie clip microphone omni directional ME15 Small concealing microphone with a tie clip Windjammer WJ4 Reduces low frequency wind noise by about 20dB Telephone pickup TP8 This earphone type microphone can be plugged into your ear while phoning The voice or conversation over the phone can be clearly recorded Connecting cord KA333 This connecting cord has stereo mini plugs ø3 5 ...

Page 130: ...sion algorithms such as MP3 even if the bit rates are the same Even if the bit rates are the same sound quality varies depending on the digital audio compression algorithm such as MP3 Linear PCM format A linear PCM format is used so that no data gets lost due to compression and original sound stays intact This format is used for music CDs CD DA MP3 format This is one of the most popular digital au...

Page 131: ...mono MP3 MPEG 1 Audio Layer3 format 320kbps 256kbps 128kbps 64kbps mono Recording medium Built in memory 4GB SD card SD card 512MB to 2GB SDHC card 4GB to 32GB SDXC card 64GB Metronome Metronome sound source 4 Beat 0 to 9 Tempo 40 0 to 208 0BPM Tuner Tuner type Chromatic Guitar and Bass Calibration range 435Hz to 445Hz 1Hz steps Data type WAV format Recording Playback Quantization bits 16 24bit Sa...

Page 132: ...hone output 75 mV according to EN 50332 2 Built in speaker Built in ø 28 mm round dynamic speaker 430mW 8Ω Phantom power 48V 24V L R channels less than 20mA in total USB USB2 0High Speed Mass storage operation audio interface operation Input power Olympus lithium ion battery LI 50B External power supply AC adapter A514 DC 5V External dimensions 159 0mm 70 0mm 33 5mm without protrusions Weight 280g...

Page 133: ...n Approx 65h 00min 44 1kHz 16bit Approx 5h 00min Approx 12h 00min Approx 23h 30min Approx 48h 30min Approx 98h 00min 44 1kHz mono Approx 10h 00min Approx 24h 00min Approx 47h 00min Approx 97h 00min Approx 196h 00min General frequency response 4 During recording during playback When recording via the MIC LINE PHONE XLR input Linear PCM format Recording format Frequency response 96 0 kHz 24bit 20 Hz...

Page 134: ...h 00min Specifications Maximum recording time for a single file The maximum capacity for a single file is limited to approx 2GB for the linear PCM format The maximum capacity for a single file is limited to approx 4GB for the MP3 format Notes The values above are for reference only Available recording time may be shorter if many short recordings are made The displayed available recording time and ...

Page 135: ...x 12h 15min Approx 2h 30min Approx 14h 15min 44 1 kHz 24bit Approx 11h 30min Approx 2h 45min Approx 15h 45min 44 1 kHz 16bit Approx 12h 30min Approx 2h 45min Approx 16h 15min 44 1 kHz mono Approx 12h 30min Approx 2h 45min Approx 17h 30min 4 Lithium ion battery MP3 format Recording format Built in stereo microphone During recording mode When recording with phantom power Headphone playback 320 kbps ...

Page 136: ...n the EU countries Please do not throw the batteries into the domestic refuse Please use the return and collection systems available in your country for the disposal of the waste batteries The following are contact information for technical support for Olympus recorders and software only s Technical Hotline Number in the U S and Canada 1 888 553 4448 s User Support E mail address in the U S and Ca...

Page 137: ... 52353 Düren Germany Tel 49 0 40 237730 Letters Postfach 10 49 08 20034 Hamburg Germany http www olympus europa com OLYMPUS IMAGING AUSTRALIA PTY LTD 82 Waterloo Rd North Ryde NSW 2113 Australia TEL 61 2 9886 3999 http www olympus com au OLYMPUS IMAGING SINGAPORE PTE LTD 491B River Valley Road 13 03 Valley Point Office Tower Singapore 248373 TEL 65 1800 OLYMPUS 65 1800 6596787 http www olympus com...

Reviews: