background image


Page 13 from 22  


921316000_09_016 


Configuration  


In the configuration menu the technician can configure the sensors, the relays and the zones. 


 Sensor configuration   


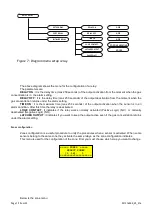
The available options in the configuration sensor menu, are shown below, 


with  Setup  you  can  setup  a  sensor  from  scratch,  with  Copy  you  can  copy  the  setup  from  one  sensor  to 

another and with Delete you can delete the setup of a sensor. 
 

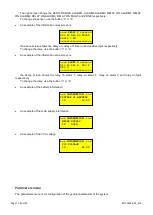
If you choose the setup a sensor the next screen is shown:


                                 where you can choose which sensor you want to setup. 


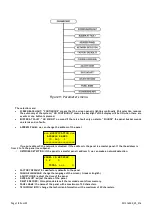
SETUP SENSOR

UNIT

LOAD SETUP SENSOR

NAME

INCREASING

ZERO

RANGE

ALARM2

ALARM3

RELAY ALARM2

RELAY ALARM3

RELAY FAULT

ZONE

SAVE SENSOR?

RELAY ALARM1

ALARM1

ppm, %LEL, %

0...300

0...300

0...300

0...300

0...300

0...17

0...17

0...17

0...17

0...16

Maximun 20 characters

YES, NO


The above picture shows the menu to setup  a sensor. With the help of the first selection “LOAD  SETUP 

SENSOR” the defaults values are loaded to the variables of the sensor. 

===== SENSORS  ===== 
    COPY SENSOR 
    SELECT ENTER      

====================


===== SENSORS  ===== 
    DELETE SENSOR 
    SELECT ENTER      

====================


===== SENSORS  ===== 
    SETUP SENSOR 
    SELECT ENTER      

====================


===== SENSORS  ===== 
    SELECT SENSOR 
   [1..16]:   1     

====================


Figure 10: Menu to setup a sensor  

Summary of Contents for BS-316

Page 1: ...Page 1 from 22 921316000_09_016 BS 304 BS 308 BS 312 BS 316 Gas detection control panel up to 16 inputs Installation operation manual...

Page 2: ...th the mains power supply 230V AC and with the battery 7 2 5 2 Sensor connectivity 8 2 5 3 Output connectivity 10 2 5 4 Other outputs and their use 11 2 6 Network connection 11 3 Technician menu 12 3...

Page 3: ...n about each event i e Alarm sensor 1 that means alarm from sensor 1 Under the display there are 6 buttons for controlling the panel On each button there is a number 1 6 and corresponds to the functio...

Page 4: ...The sensors 4 20mA incorporates the current have the next situations FAULT 1 mA UNDERFLOW from 1 to 3 5 mA NORMAL from 3 5 to 21 mA inside these limits we can do the setup of alarm 1 alarm 2 and alar...

Page 5: ...he battery was disconnected at 11 00 on 18 01 10 The screen on the left shows the panel start operating from 09 00 on 10 01 10 1 4 Access level 2 User access level All the functions of access level 2...

Page 6: ...gas detector anti explosive type BS 393 Ammonia detector anti explosive type On the AUX input we can connect fire detection buttons like the BS 536 BS 7000 IP 65 We can program and work the panel by u...

Page 7: ...t the new battery must be of the same type Two cables with connectors are used to connect the battery to the panel The black cable is connected to the negative pole of the battery marked with or with...

Page 8: ...o and S of the panel as shown in figure 4 The cross section of the cable depends on the length see next table On all sensors with 2 contacts you must connect a coaxial cable The shielding of the cable...

Page 9: ...Up to 500 meters 3 x 1 5 mm Up to 600 meters 3 x 2 5 mm The gas sensors need a preheat time in clear air for about 20 seconds After this time the sensor can sense gases but the maximum sense ability i...

Page 10: ...ween inputs and S of Figure 6 Figure 7 Connection diagram for BS 531 Output connectivity On the panel there are 16 programmable outputs relay Each relay has a triple connector NO NC C For more informa...

Page 11: ...AUX must not be more than 300mA Network connection It is possible to have network of panels In each network each panel has a unique address The central panel has address 1 and sub panels have address...

Page 12: ...ode in entered the operator has access to level 3 functions TECHNICIAN MENU CONFIGURATION INFORMATION PARAMETERS ENABLEMENT DISABLEMENT CHECK SENSORS RELAY ZONES SENSOR RELAY ZONES BATTERY MAINS SUPPL...

Page 13: ...n is shown where you can choose which sensor you want to setup SETUP SENSOR UNIT LOAD SETUP SENSOR NAME INCREASING ZERO RANGE ALARM2 ALARM3 RELAY ALARM2 RELAY ALARM3 RELAY FAULT ZONE SAVE SENSOR RELAY...

Page 14: ...fault at the sensor ZONE the zone of the sensor At next table we can see some typical values Type Gas Zer o Limit Unit Alarm 1 Alarm 2 Alarm 3 BS 380 LPG 0 20 LIE 7 10 20 BS 381 Methane gas 0 20 LIE...

Page 15: ...e relay works normally activated Positive Logic NC or normally deactivated Negative Logic NO LATCHED OUTPUT it indicates if you want to keep the output active even if the gas concentration returns und...

Page 16: ...technician can be informed for all the system The below diagram shows the menu INFORMATION SENSORS ZONES BATTERY MAINS SUPPLY VCC VOLTAGE RELAY An example of the information of a sensor screen are Th...

Page 17: ...on 3 or 4 An example of the information zone screen is the above screen shows the relay on alarm 1 relay on alarm 2 relay on alarm 3 and relay on fault respectively To change the relay use the button...

Page 18: ...ed If the address is the panel is a master panel If the the address is from 2 to 16 the panel is a subpanel NETWORK DETECTION if the panel is a master panel address 1 we can make a network detection F...

Page 19: ...ardware of the pane l CHECK SENSOR LAMP TEST RELAY Figure 15 Check Menu On Check sensors the below screen appears to see the other sensors press 3 or 4 The screen to check the relay is ENABLEMENT ENAB...

Page 20: ...l is restored 6 Leave the panel working for about 20 minutes without cutting off the power supply Check the current of every sensor The current must not be over 4mA If it isn t wait about 1 hour and t...

Page 21: ...rovided or has any repairs or re setting done by a third party unless Olympia Electronics has fully agreed to them in writing Products that have been damaged can be returned to the premises of our com...

Page 22: ...keep them for future reference Title 1 2 3 4 5 6 7 8 9 10 11 12 13 14 15 16 Sensor s Model ZERO RANGE UNIT Alarm 1 OUTPUT 1 Alarm 2 OUTPUT 2 Alarm 3 OUTPUT 3 1 2 3 4 5 6 7 8 9 10 11 12 13 14 15 16 DE...

Reviews: