background image

CHAPTER 7  OPTIONAL EQUIPMENT

7-2

2

1

1

2

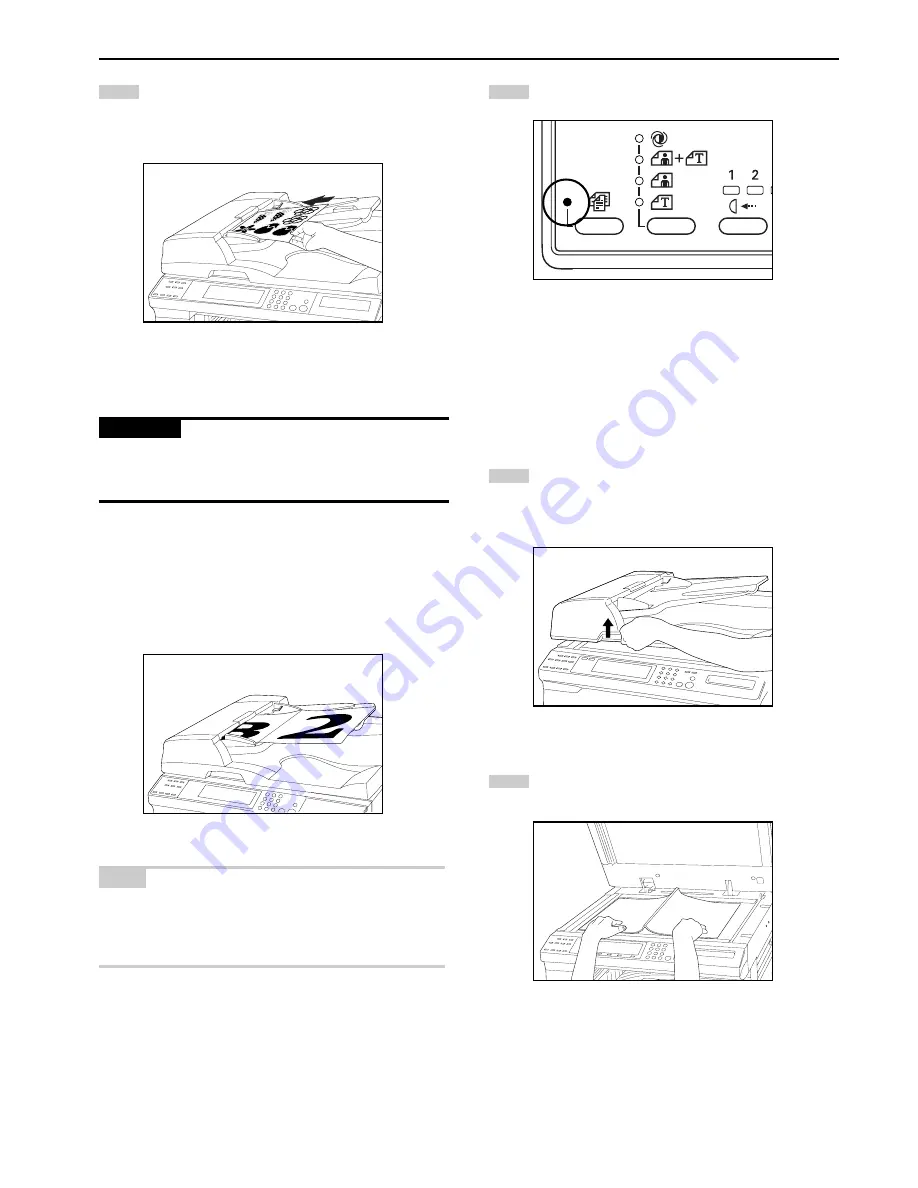
Set the originals on the original table in correct sequence
with the side to be copied facing upward. Securely insert the
leading edge of the originals into the DF as far as they will
go.

IMPORTANT

Do not set originals exceeding the limit indicated on the sticker
attached on the rear original insertion guide. Setting more originals
than specified may cause original misfeed.

5

5

5

5

5

 Auto selection mode

Automatically detects the size and brightness of every original.
Copies are made onto paper of the same size as the originals.
* Optional memory board is required.

NOTE

• Up 50 sheets of paper (75 g/m

2

 - 80 g/m

2

) can be set in the DF for

this mode.

• Originals used in this mode are limited to 11" x 17" and 11" x 8 1/2"

(A3 and A4), and the width of all original must be the same.

Press the Auto Selection key to light the indicator.

6

6

6

6

6

 How to set originals on the platen

When using an original that cannot be set in the DF, such as a book
or magazine, open the DF and place it on the platen.

Hold the DF open/close handle and open the DF.
* Before opening the DF, check that no original is present on

the original table or original eject cover. If present, the
original may fall off when the DF is opened.

Set the original with the side to be copied facing downward.
Be sure to align the original with the original size scales.

Summary of Contents for d-Copia 15

Page 1: ...COPIER OPERATION MANUAL Cod 533348C...

Page 2: ...mark The auto shut off time setting is between 15 and 120 minutes in the areas corresponding to theSwiss Energy 2000 Program area Your attention is drawn to the following actions which could compromi...

Page 3: ...Please read the instruction handbook before using the copier Keep it close to the copier for easy reference d Copia 15 COPIER OPERATION MANUAL...

Page 4: ...attention to or incorrect compliance with the related points Symbols The m symbol indicates that the related section includes safety warnings Specific points of attention are indicated inside the symb...

Page 5: ...y 5 4 2 in 1 5 4 4 in 1 5 4 4 Sort copy 5 6 5 Rotate copy 5 6 CHAPTER 6 COPIER MANAGEMENT 6 1 1 Copy management 6 1 1 Copy management modes 6 1 2 How to set the copy management mode 6 2 3 Making copie...

Page 6: ...rgin mode page 5 1 When the optional memory board is installed Making copies with clean edges Border erase mode page 5 2 When the optional memory board is installed Making one copy from two or four or...

Page 7: ...g toner CAUTION LABELS NOTE DO NOT remove these labels Label 2 High temperature inside Do not touch parts in this area because there is a danger of getting burned Label 1 High voltage inside NEVER tou...

Page 8: ...of situation presents a danger of personal injury or damage to the copier Avoid locations with humidity or dust and dirt If dust or dirt become attached to the power plug clean the plug to avoid the...

Page 9: ...danger of electrical shock from high voltage parts inside the copier DO NOT damage break or attempt to repair the power cord DO NOT place heavy objects on the cord pull it bend it unnecessarily or cau...

Page 10: ...2 1 CHAPTER 2 NAMES OF PARTS 1 Main body...

Page 11: ...es become soiled with toner Front cover Open to replace the toner cartridge or waste toner tank Main switch Turn ON before starting to make copies Copy store section Copied paper is stored here Ejecti...

Page 12: ...respective modes Recall key Press to make copies in the zoom copying mode See page 4 3 Paper Select key Press to select a drawer or the multi bypass A drawer select indicator and a paper size indicato...

Page 13: ...up or when the Reset key is pressed In the initial mode paper of the same size as the original is selected automatically auto paper selection mode the number of copies is set to 1 and copy exposure m...

Page 14: ...ions The drawer can be set to hold paper of any desired size from 11 x 17 to 5 1 2 x 8 1 2 Metric specifications The drawer can be set to hold paper of any desired size from A3 to A5 vertical Pull the...

Page 15: ...drawer Gently push the drawer back in Check that the paper is kept under the claws of the drawer If not reload the paper Before leaving the copier in disuse for a prolonged period of time remove the p...

Page 16: ...the side facing upward when the package is opened If the leading edge of the paper is curled straighten it out before loading the paper in the multi bypass Setting the paper size for the multi bypass...

Page 17: ...can be set in the multi bypass NOTE The types of envelopes that can be used are COM 10 Monarch DL and C5 Up to 6 envelopes can be loaded in the multi bypass at a time Open the multi bypass Align the i...

Page 18: ...s lit CAUTION Do not incinerate toner and toner containers Dangerous sparks may cause burns Open the front cover Turn the toner cartridge release lever to the right as far as it will go The old cartri...

Page 19: ...aste toner tank Close the opening of the waste toner tank with its seal CAUTION Do not incinerate toner and toner containers Dangerous sparks may cause burns While holding the waste toner tank release...

Page 20: ...ection When copying onto paper of the same size as the original check that the APS indicator is lit If not press the auto mode selection key to light the indicator When copying onto paper of a differe...

Page 21: ...e mode To make the copy density darker press the right copy exposure adjustment key to move the exposure indicator to the right to make the copy density lighter press the left copy exposure adjustment...

Page 22: ...specify the paper size The magnification ratio indication flashes and then changes to the indication of the number of copies Copying will start when the Start key is pressed 2 Zoom copy The zoom ratio...

Page 23: ...he auto mode selection key to light the AMS indicator Press the Original key to select the original size The zoom ratio is displayed on the magnification display Press the Paper Select key to change t...

Page 24: ...settings as before after the rush job is finished Press the Interrupt key When interrupt copying is enabled the Interrupt indicator lights Remove the present original s and put it aside Set the new or...

Page 25: ...ically turns the main switch OFF O if no copying operation is preformed for a certain period 15 to 240 minutes To make copies again set the main switch to the ON position Auto shut off function The au...

Page 26: ...ess and hold the Margin key for 3 seconds F17 appears on the copy quantity display and 2 seconds later a margin width appears If you do not wish to change the margin width press Margin key and proceed...

Page 27: ...ng neat copies from thick books The border width can be selected from 6 mm 12 mm and 18 mm a in the illustration is the width of erasing boarder The Sheet Erase mode requires the optional memory board...

Page 28: ...ss either key and proceed to step 4 The number displayed indicates the erasing boarder width as follows 1 6 mm 2 12 mm 3 18 mm Press the Zoom or Zoom key and change the number to select the erasing bo...

Page 29: ...of 1 and 2 4 in 1 Use this mode to copy four originals onto one sheet When setting the originals on the platen originals are arranged in the order of 1 2 3 and then 4 In the 4 in 1 mode available mode...

Page 30: ...ginals on the platen make sure they are in the correct sequence Press the Start key When originals are set in the DF all originals are scanned one by one and copying performed accordingly When setting...

Page 31: ...ey to light the indicator Enter the number of copies to be made and press the Start key When originals are set in the DF all originals are scanned one by one and copying performed accordingly When set...

Page 32: ...h an asterisk d01 Turning copy management ON OFF Turn copy management ON when required to apply the settings made Turn it OFF when not required 1 Copy management ON 2 Copy management OFF d02 Registeri...

Page 33: ...y is pressed Select the desired setting code by referring to the table shown in 1 Copy management modes Press the enter key The display returns to that for step 2 To end the copy management mode setti...

Page 34: ...key The display indication changes from the mode code to the number of copies 3 Making copies when the copier is in the copy management mode When the copier is in the copy management mode will appear...

Page 35: ...e indicated with an asterisk F01 User status report Prints the details of the default settings F02 Exposure mode Selects the image mode at power on 1 Auto Exposure 2 Text Photo 3 Photo 4 Text F03 Expo...

Page 36: ...ether to enlarge reduce the image of the original see Auto magnification selection mode on page 4 3 or copy it at the same size when an original has been set and the Paper Select key pressed 1 Auto ma...

Page 37: ...s that can be made at a time 1 to 250 copies 250 copies F17 Margin width Sets the initial value of the margin width for the margin copy mode see page 5 1 This setting item will not be displayed if the...

Page 38: ...6 is triggered 1 5 minutes 2 10 minutes 3 15 minutes 4 20 minutes 5 25 minutes 6 30 minutes 7 35 minutes 8 40 minutes 9 45 minutes F26 Auto shut off time Selects the length of time from when the copi...

Page 39: ...respective procedures see below To end the making of default settings proceed to step 11 Enter the paper width by pressing the Zoom or Zoom The paper width can be set between 100 mm and 297 mm in 1 m...

Page 40: ...als originals with adhesive tape or glue Originals bundled with a paper clip or staple if inevitable remove the paper clip or staple and straighten out the creases and folds before setting the origina...

Page 41: ...onal memory board is required NOTE Up 50 sheets of paper 75 g m2 80 g m2 can be set in the DF for this mode Originals used in this mode are limited to 11 x 17 and 11 x 8 1 2 A3 and A4 and the width of...

Page 42: ...When using the optional printer function the paper eject point can be changed according to the used function making it easier to sort paper Copies are ejected onto the lower section copy store section...

Page 43: ...originals of a 6 black ratio can be scanned with this board 6 Printer board If the printer board is installed this copier can be used as a printer For details see the printer s instruction handbook 7...

Page 44: ...Toner indicator lights Copying is still possible for some time with the indicator lit but it will eventually be disabled Replace the toner cartridge as soon as possible AP appears on the copy quantity...

Page 45: ...ed use a different drawer E70 appears on the copy quantity display While using the optional DF the last of the ejected originals failed to be copied Set that original back onto the original table and...

Page 46: ...ea as there is a danger of getting burned WARNING High voltage is present in the charger section Take sufficient care when working in this area as there is a danger of electrical shock Do not reuse mi...

Page 47: ...ed off and re load the paper into the multi bypass 2 2 2 2 2 Misfeed in left cover If the misfeed location indicator shown in the illustration below lights a misfeed has occurred in the left cover Rem...

Page 48: ...ient care when working in this area as there is a danger of getting burned Close the left cover and multi bypass 3 3 3 3 3 Misfeed in DF optional If the misfeed location indicator shown in the illustr...

Page 49: ...the misfed paper using the procedure given below Open the left cover of the drawer being used Remove the misfed paper while taking care not to tear it If the paper should be torn remove all the scrap...

Page 50: ...n corresponding to the indication Copies come out blank Are the originals set correctly When setting originals on the platen place them face down When setting originals in the optional DF place them f...

Page 51: ...Clean the platen and or the original cover Open the front cover and pull and push back in the cleaning shaft Copy image is askew Are the originals set correctly When setting originals on the platen a...

Page 52: ...th dampened with alcohol or a mild detergent Never use thinner or other organic solvents for this purpose Cleaning the platen Lift open the original cover Wipe the platen with a soft cloth damp ened w...

Page 53: ...from the drawer 1 drawer capacity 250 sheets 80g m2 standard paper as specified by our company and multi bypass capacity 50 sheets 80g m2 standard paper as specified by our company Copy paper Drawer...

Page 54: ...ion can leak from the machine This machine is classified as Class 1 laser product under IEC 825 CAUTION Performance of procedures other than those specified in this manual may result in hazardous radi...

Page 55: ...only functional switches and are not suitable for isolating the equipment from the power source VORSICHT Der Netzstecker ist die Hauptisoliervorrichtung Die anderen Schalter auf dem Ger t sind nur Fun...

Page 56: ......

Reviews: