background image


12


5.


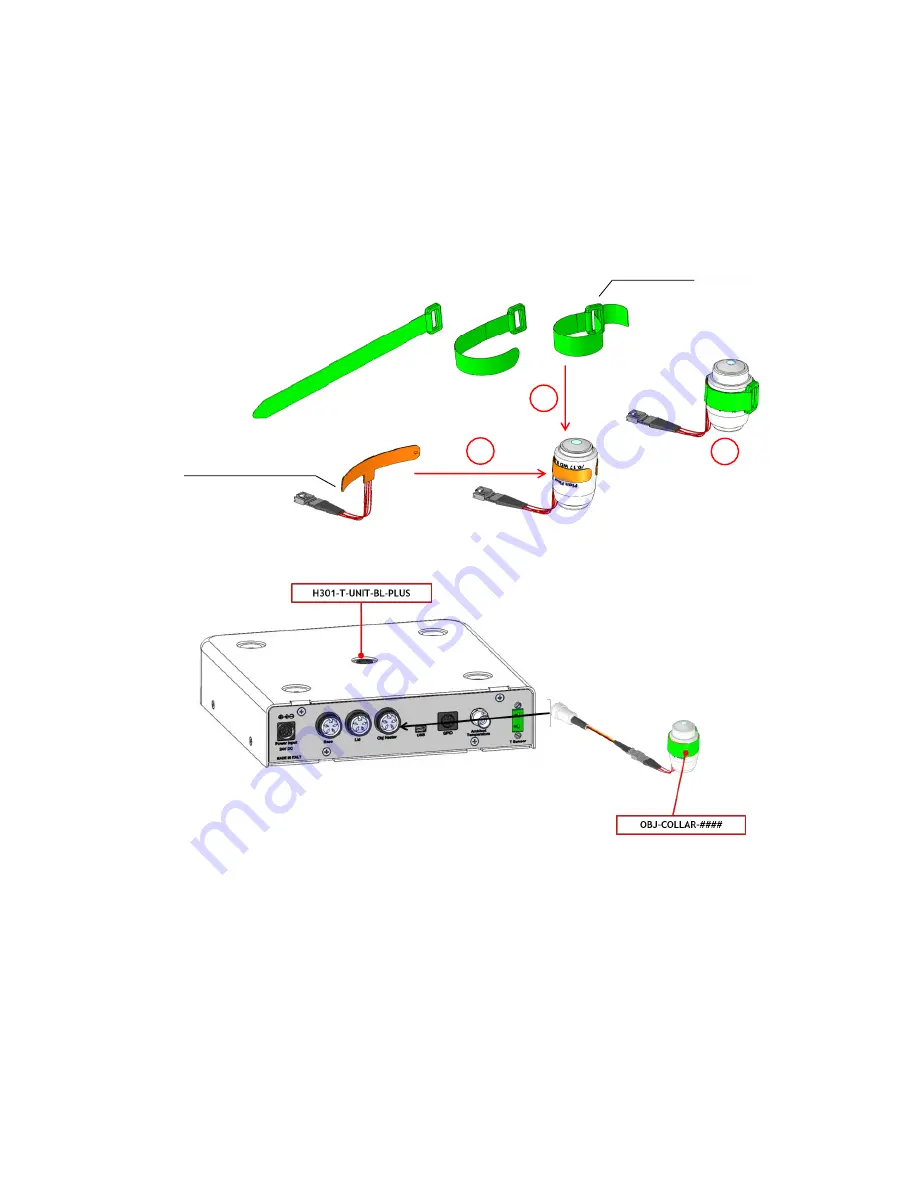
When using oil immersion objectives an Objective Heater should also be purchased. If your system is 

also equipped with the Objective Heater, (OBJ-COLLAR ####, optional) its objective collar should be 

installed before connecting the heater to rear panel of the Temperature Control Unit. Follow the 

steps shown in Figure 3. Once you  have assembled  it, 

plug it into the port labeled  ‘Obj. Heater’ 

located on the rear panel of the Temperature Control Unit (see Figure 4). 


Figure 3.Objective Heater (OBJ-COLLAR ####) Assembly 


Figure 4. OBJ-COLLAR Connection (Optional) 

6.


Connect the touch screen interface OKO-TOUCH to the Temperature Control Unit using the serial 

cable provided (see Figure 5). 

2

1

3

Objective Band Heater

Velcro Tape

Summary of Contents for H301-T-UNIT-BL-PLUS

Page 1: ...1 H301 T UNIT BL PLUS Electric Top Stage Incubation System Manual Vers 01 17 ...

Page 2: ...2 This page was left blank ...

Page 3: ...01 T UNIT BL PLUS Installation guide 10 5 2 How to connect H301 T UNIT BL PLUS to a BOLD LINE Digital Gas Controller 13 6 USER INTERFACE 15 6 1 Home page 15 6 1 1 Colors meaning 15 6 1 2 Changing Set Points 16 6 2 Settings 16 6 2 1 Temperature 16 6 2 1 1 Chamber Adapter 16 6 2 1 2 Control Mode 17 6 2 1 3 Objective Heater 21 6 2 1 4 Thermal Cycles 24 6 2 1 5 Open Incubator 26 6 2 1 6 Ramp Rate 27 6...

Page 4: ...Calibration 34 7 2 Objective Heater Manual Calibration 35 7 3 Objective Heater Self Calibration 37 8 MAINTENANCE 39 9 SUPPORT 40 9 1 QR Codes for Support 40 9 2 Support Contacts 40 9 3 Web Conference For Assistance And Training 40 10 TROUBLESHOOTING 42 11 TECHNICAL SPECIFICATIONS 43 12 FIGURE LIST 44 13 REVISION TABLE 45 ...

Page 5: ...imaging H301 T UNIT BL PLUS controls the temperature of the incubator base and lid and when connected of the Objective Heater To improve accuracy on sample temperature H301 T UNIT BL PLUS is equipped with a flexible fine gauge thermocouple that can be used to provide feedback from the temperature of a reference well located in close proximity to the experimental sample H301 T UNIT BL PLUS is equip...

Page 6: ...h helpful suggestions Note Supplies you with important information to successfully setup and use the instrument CE MARKING This symbol indicates a product s compliance with EU legislation PRODUCT DISPOSAL This symbol indicates that this product must not be disposed as urban solid waste This symbol indicates the product production date This symbol indicates the manufacturer data This symbol indicat...

Page 7: ...and its accessories The products labels can be found on the bottom panel of the Main Unit Do not exceed voltage indicated in this manual and on the product label Avoid excessive induction noise static electricity magnetic fields Do not expose this instrument to rain or moisture Prevent throttling and kinking of tubing Check the cables are well fixed to their own connectors so they cannot slip off ...

Page 8: ...symbol marks this device IMPORTANT read the Safety Notes before installing using and commissioning this device as the notes contain important information relating to safety and EMC Not following these instructions can result in damage or breakdown of the device and its accessories We reserve the right to make technical variations IN NO EVENT SHALL OKOLAB S R L BE LIABLE FOR ANY DIRECT INCIDENTAL O...

Page 9: ... Adapter 4 2 1 Equipment Required Okolab incubating chamber with heated lid and base chamber riser with one or more plate adapters 4 2 2 Optional OKO TOUCH including 1 Touch Screen Interface 2 1 5V DC Power adapter To connect the Touch Screen 3 1 RS232 Serial cable To connect the Touch Screen to the T Unit Objective heater Required ONLY when using immersion or dipping objectives ...

Page 10: ... port 7 General Purpose Input Output GPIO port 8 NTC Thermistor port 9 Gauge Thermocouple port 5 H301 T UNIT BL PLUS INSTALLATION AND USER GUIDE The following paragraphs illustrate how to install and use the Temperature Control Unit The following instructions will guide you through a quick installation For safe operation of the unit it is absolutely necessary to read carefully all the instructions...

Page 11: ...tage Top Chambers for most brands models are available See www oko lab com for details 4 The Fine Gauge Thermocouple green plugs into the green port labeled Reference Temperature located on the rear panel of the Temperature Control Unit see Figure 2 When operating the device in Sample Feedback Mode place this thermocouple in a Reference Well filled with water Make sure that the end of the Fine Gau...

Page 12: ...the Temperature Control Unit Follow the steps shown in Figure 3 Once you have assembled it plug it into the port labeled Obj Heater located on the rear panel of the Temperature Control Unit see Figure 4 Figure 3 Objective Heater OBJ COLLAR Assembly Figure 4 OBJ COLLAR Connection Optional 6 Connect the touch screen interface OKO TOUCH to the Temperature Control Unit using the serial cable provided ...

Page 13: ...e Temperature Control Unit will no longer blink and will be steadily on The OKO TOUCH interface will display its homepage and the indicator light on the temperature tab will be initially yellow When the temperature set point is within the set tolerance range the indicator light will turn green Tip Wait until system has reached the steady state before loading your samples The H301 T UNIT BL PLUS ca...

Page 14: ... units are properly connected the Temperature CO2 and O2 parameters will appear on the OKO TOUCH Touch Screen interface Home page If not all the parameters appear on OKO TOUCH Home Page then the Control Units are not properly connected Please check that the bus ports are properly aligned with each other If you have a Gas Controller and a Temperature Control Unit it is essential to read both this m...

Page 15: ...rds reaching set points NO actions on your part are required The Yellow light will also appear every time you change the Temperature set point The ORANGE indicator means that the current gas concentration is not correct and its value is out of the set tolerance see section ALARMS in paragraph 6 2 2 5 While giving time to the system to recover from this out of range value please double check if the...

Page 16: ...y following the two steps below look at the touching finger Figure 9 Temperature settings 6 2 1 1 Chamber Adapter Figure 10 Here you have to set the model of incubating chamber it depends on your XY stage piezo that you have purchased and the type of sample adapter being inserted into it Depending on these selections the thermal controller will automatically change settings To switch configuration...

Page 17: ...s change when changing the adapter in use Hence every time you change adapter you must input the correct one using the procedure above In case you purchase additional incubating chamber models make sure to input the correct chamber sample insert in the Setting prior to your experiment 6 2 1 2 Control Mode The Temperature Control can run in two different modes please choose which one you want to us...

Page 18: ...Screen will appear Figure 14 Chamber calibration start It states that the system has been calibrated at the factory at a Room Temperature of 23 C In case your Room Temperature measured by the included thermistor is different from 23 C i e 20 3 C you have 3 options 1 Use Current Calibration this means recalling the last saved calibration settings Once you calibrate the system see point 3 below thes...

Page 19: ...is may be not acceptable depending on the sensitivity of your sample 3 Choose to Calibrate the system in your lab at your Room Temperature for maximum of accuracy when using Chamber Feedback Mode To do so follow the instructions on paragraph 7 Chamber Self Calibration and then press the Calibrate button the automatic calibration procedure will start Tip Note please it may take 1 2 hours to complet...

Page 20: ... within 0 1 C from the temperature set point regardless the room temperature variations Tip Advantages of Sample Feedback Control Mode are 1 direct monitoring and active control of sample temperature and 2 independence from room temperature variations The disadvantage is that it requires manual operation for correct placement of the fine gauge thermocouple in a Reference Well The Control Mode page...

Page 21: ...lled around your objective and that it has been correctly connected to the Temperature Control Unit When enabling and saving the Objective Heater the following Screenshot will appear Figure 21 Objective Heater Calibration Page The temperature of the Objective Heater is factory calibrated at room temperature of 23 C with a 3 degrees offset relative to the sample set point temperature of 37 C This o...

Page 22: ...erimental conditions For details on this calibration procedure please follow the instructions on paragraph 7 3 If you are working in Chamber Feedback Mode the starting Self Calibration message will be displayed as in paragraph 7 3 If you are working in Sample Feedback Mode it will be displayed Figure 23 Objective Heater Self Calibration Starting Message in Sample Mode Figure 24 shows the warning m...

Page 23: ...ge Thermocouple is close to the set Point value the Self Calibration start will automatically Figure 25 Self Calibration warning in Sample Mode The calibration procedure typically takes more than one hour When the calibration is in process a reminder icon will appear on the Temperature tab Once the calibration is completed the reminder icon will disappear see Figure 26 Figure 26 Homepage during Ob...

Page 24: ...bration parameters Tip The higher these values therefore the less accurate and precise is the calibration the less time is taken by the calibration procedure to complete Use default values to get the most accurate calibration Once the calibration procedure is completed the following message appears Figure 28 Objective Heater Self Calibration end 6 2 1 4 Thermal Cycles This function allows the incu...

Page 25: ...ches from a higher to a lower temperature by dissipation hence it requires some time the amount of time required depends on several factors such as control mode room temperature and set points Please keep this in mind when setting the time between the two set points Once you have adjusted the settings a Cycle Summary page will be displayed Press Save As if you want to save the Thermal Cycle progra...

Page 26: ...pen the current thermal cycle settings Figure 33 Running Cycle window 6 2 1 5 Open Incubator During the normal operation it could be necessary to open the incubator The picture below shows the procedure to follow when opening incubator 1 Press on Open Incubator before removing the lid Now you can open the incubator 2 Once you are done close the chamber and wait for 2 minutes in order to let the en...

Page 27: ... on the ramp rate icon to access its settings as the picture below shows Figure 35 Ramp rate 6 2 1 7 External Sensors There are two external temperature sensors connected to the Temperature Control Unit A white thermistor is to be placed in air to monitor the Room Temperature A green Fine Gauge Thermocouple to be placed into a reference well if running the Sample Control Mode or to run Chamber or ...

Page 28: ...sking for Okolab technical support Figure 37 Status page 6 2 1 9 Digital Input Digital Input feature is available only for TTL ready optional controller TTL feature allows to change setpoint between two specified values using a TTL signal The TTL is a digital input for our Units and has only two values High and Low The setpoint values for High TTL value and for Low TTL value can be set using OKO T...

Page 29: ...n settings 6 2 2 1 Options In this window you can set the scale of the X axis time duration of the graphs displayed in the main page and the buzzer sound frequency Figure 40 Touch Options Press and slide your finger along the setting bars or simply click to set desired values then press Save Tip Recommended value for the chart history length is 60 or 120 minutes ...

Page 30: ...en pressing the calibration icon the procedure for the calibration of the touch screen will start Figure 42 Touch screen calibration 6 2 2 4 Date Time The first time you turn the system on it is important to set date and time use the and to set correct date time and then press Save Figure 43 Touch screen settings Date and Time Press Home first one on the left menu to go back to the main page ...

Page 31: ...d its stationary state if Temperature Deviation from set point is 1 C or greater i e if set point temperature is 37 C and the temperature reaches a value equal or less than 36 5 C or equal or more than 37 5 C for a period of time equal or longer than 15 minutes Temp time set in this example then the system triggers an Alarm 6 2 2 6 Visual Effects To enter the display visual effects menu press on V...

Page 32: ...ode follow the color coding reported in paragraph 6 1 1 Figure 46 shows an overview of the complete system displaying current values of all controlled parameters Similarly to the Status Page you may have to refer to this window when asking for Okolab technical support Figure 46 Overview page Figure 46 shows the Overview page when your system is equipped with the Objective Heater OBJ COLLAR CO2 O2 ...

Page 33: ...33 Figure 48 Glance Mode with temperature controller CO2 O2 gas controller and active humidity controller ...

Page 34: ...uge Thermocouple in the port labeled Reference Temperature located in the rear panel of the Temperature Control Unit as illustrated in Figure 2 2 Insert the Fine Gauge Thermocouple into the chamber by threading the wire through one of the screw holes on the chamber riser 3 Secure the end of the Fine Gauge Thermocouple to the bottom of a 35mm or similar Petri dish using some tape making sure to avo...

Page 35: ...hours to complete during this time the dialog shown in Figure 15 will be displayed Once the Self Calibration procedure is complete the window shown in Figure 16 will be displayed 8 You can remove the Fine Gauge Thermocouple from the Reference Well petri dish inside the incubating chamber When running in Chamber Feedback Mode the system will use the parameters from the calibration at your Room Temp...

Page 36: ...raph Figure 37 whether you are working in Chamber Feedback Mode or in Sample Feedback Mode If you are working in Chamber Feedback Mode verify that the Chamber Calibration has already been completed Or alternatively that the factory calibration is appropriate for your laboratory room temperature i e that even in Chamber Mode the sample is close to the Set Point temperature If you are unsure it is r...

Page 37: ...rt it in the incubation chamber You can also use SENSOR LID to close the dish see the Tip in paragraph 7 Note Please monitor the room temperature during the calibration and reduce air drafts and forced convection If possible divert any draft coming from the air conditioning system in the room from the incubation system 5 Wait for until the system reaches the steady state temperature indicator turn...

Page 38: ...of the ongoing calibration Once the calibration is completed the icon will no longer appear In the Objective Heater Calibration progress window press Options to access Advanced Calibration Parameters see Figure 27 In this window you can adjust Accuracy and Standard Deviation which will be calculated over 10 minutes or readings This allows setting more stringent parameters to the objective heater c...

Page 39: ...olvents on or near the devices since these could corrode their surfaces To polish the Stage Incubator and the Humidifying Module if it is present you can use distilled water or alcohol Verify the status of all cables and if some cable is damaged contact Okolab to receive assistance Before cleaning the unit pull out the mains plug Water must not be entered in the system ...

Page 40: ... For COMMERCIAL SUPPORT lanzaro oko lab com Phone 39 081 806 2624 Fax 39 081 876 4410 Mobile 39 348 9680717 For TECHNICAL SUPPORT sibillo oko lab com Phone 39 081 806 3470 Mobile 39 348 9680718 Okolab S r l Via A Olivetti 1 80078 Pozzuoli NA Italy In case you requested on line support and or web conference assistance for system assembling and experiment support you received a web cam Please follow...

Page 41: ...41 Contact our technical support sibillo oko lab com by e mail to take an appointment for the web assistance ...

Page 42: ...d Low set point value Change the set point Heater 1 2 and or cable disconnected Connect the cable Heater 1 2 and or cable damaged Contact Okolab to receive assistance Heating elements damaged Contact Okolab to receive assistance Alarm rings for specimen temperature feedback Chamber Base at high temperature for specimen temperature feedback Quickly shoot down the control unit and properly set the s...

Page 43: ...perature range 3 C above ambient temperature to 60 C Step size 0 1 C Accuracy 0 1 C in Sample Mode 0 3 C in Chamber Mode if room temperature remains within 1 C Regime temperature time about 30 min Operating Temperature 0 C 55 C Storage Temperature 5 C 60 C Operating Humidity 0 70 Power Consumption 24 V DC 100 W max Weight 1 6 Kg ...

Page 44: ...ng in Chamber Mode 23 Figure 25 Self Calibration warning in Sample Mode 23 Figure 26 Homepage during Objective Heater Calibration 23 Figure 27 Objective Heater Self Calibration parameters 24 Figure 28 Objective Heater Self Calibration end 24 Figure 29 Thermal Cycles Subpage 24 Figure 30 Thermal cycles settings 25 Figure 31 Thermal cycle Summary 25 Figure 32 Cycle Start Time 26 Figure 33 Running Cy...

Page 45: ...n manual This warranty does not cover or involve any other equipment that may be used along with the Okolab System i e mini incubators any gas tank etc whose usage should be considered independent and performed according to their own operational instructions Okolab S r l warrants only the parts manufactured by it will as specified and free of defects Okolab S r l makes no other warranties or repre...

Reviews: