82
Field procedure
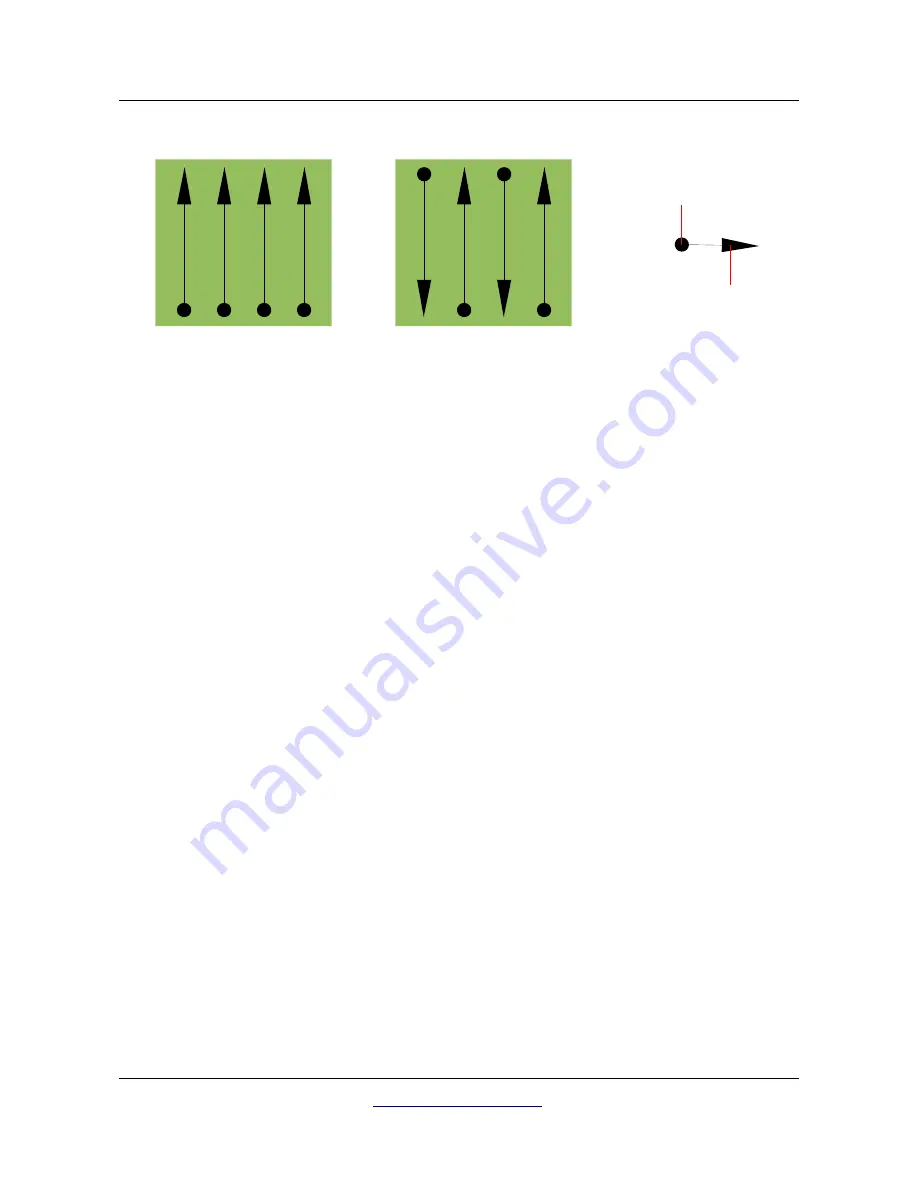
Doing the scan in “Parallel” mode you will start on the bottom right corner of your scan area (point
)
to walk and record a scan path towards the upper right corner of the area. After recording the first line,
you should walk back to the starting point and move to the left of the first scan line to start the scan
path 2 (point
), to start there the second scanning path. In this way all other paths will be scanned,
until you have reached the left side of your measure area.
Doing the scan in “Zig-Zag” mode you will start also from the bottom right side of your measure area
(point
) to walk and record a scanning path towards the right upper corner of the measure area.
Different from the parallel measurement, you should continue recording data while walking back the
second scanning path. So you go to the starting point of the second scanning path (point
) and scan in
the opposite direction. In this way, all other paths will be scanned in the scan mode “Zig-Zag” until you
have reached the left side of your measure area.
The distance between the scanning paths should be consistent during one measurement but can vary
from measure area to measure area. If you mostly look for smaller targets than you should also select a
smaller distance between the lines. A standard rule is: The smaller the distance between the paths, the
more accurate your scans will be. When you are conducting your first scans the lines should not be to
close together to locate possible targets.
8.2.2 Regulation of the number of impulses per scanning path
It is possible to select the distance (number of impulses) before starting the measurement or selecting
the automatic mode (“Auto”) to adjust the number of measure points after finishing the first scanning
path.
When the distance has been configured, the device will stop automatically when this number has been
reached and waits for the start of the new scanning path.
In the automatic mode you should stop the measurement of the first scanning path by yourself, by
pressing the appropriate button, as soon as you have reached the end of the first scanning path. This
effective amount of measure points will be used for all further scanning paths of this measurement.
Starting from the second scanning path, the device now stops automatically after the assumed number
of impulses has been reached.
OKM GmbH
www.okmmetaldetectors.com
Figure 8.2: Scan modes to measure an area
Start of
scanning
path
End of
scanning
path
Parallel scanning
Zig-Zag scanning
1
4
2
3
1
2
3
4
Summary of Contents for eXp 4500
Page 1: ...FS Future Series eXp 4500NT Version 1 5 User s Manual ...
Page 5: ...5 9 2 Control Scans 93 OKM GmbH www okmmetaldetectors com ...
Page 9: ...1 Introduction CHAPTER 1 Introduction ...
Page 14: ......
Page 35: ...3 Technical Specifications CHAPTER 3 Technical Specifications ...
Page 39: ...4 Scope of Delivery CHAPTER 4 Scope of Delivery ...
Page 44: ......
Page 78: ......
Page 88: ......


