User’s Guide> 80
A
PPENDIX
A – D
ISPLAY
P
ANEL
M
ESSAGES
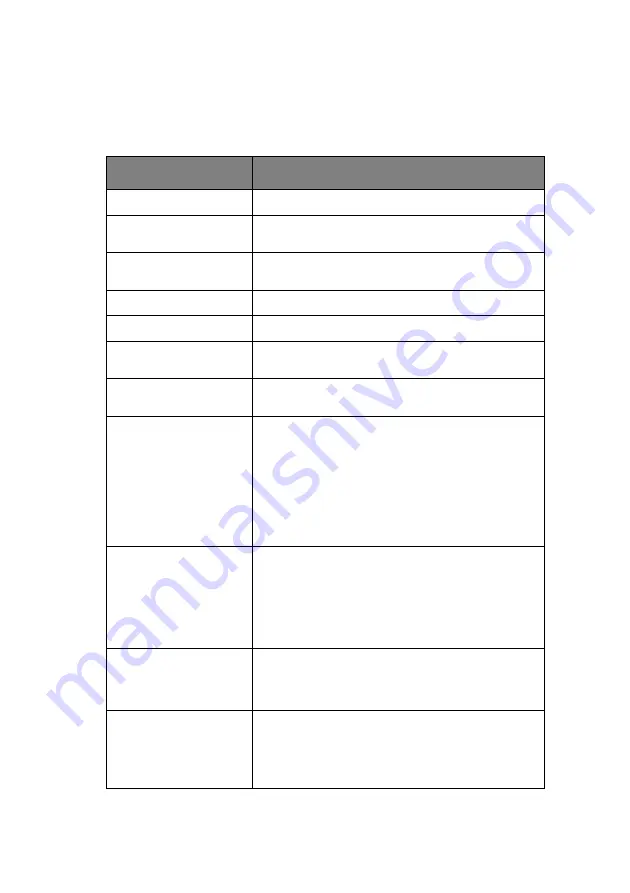
The display panel messages are intended to be self-explanatory.
Representative messages are given as examples below.
MESSAGE
COMMENT
Ready to Print
Your printer is online and ready to print.
Printing tttttt
Your printer is printing and paper is currently being
fed from tttttt, where tttttt identifies a tray.
tttttt Near End
The paper supply in the tray identified by tttttt will
run out soon.
cccccc Toner Low
The remaining toner of color cccccc is running low.
Fuser Unit Near Life
The fuser unit is nearing the end of its working life.
Change Fuser Unit
The fuser unit has reached the end of its working
life and has to be changed.
Invalid Data
Press ONLINE Button
Invalid data has been received by the printer. Press
the ONLINE button to clear this warning.
Change Paper in tttttt
mmmmmm
pppppp
Press ONLINE button
Please see HELP for
details
There is a mismatch between the media in the tray
and print data.
Load media of size mmmmmm and type pppppp
into tray tttttt. The message may remain for some
time after you have closed the tray.
You can have the printer ignore this error for the
current print job by pressing the ONLINE button.
You can access help details by pressing the HELP
button.
Install Paper
tttttt
mmmmmm
Please see HELP for
details
The printer has tried to take paper from an empty
tray.
Load media of size mmmmmm into tray tttttt. The
message may remain for some time after you have
closed the tray.
You can access help details by pressing the HELP
button.
Install Tray
tttttt
The printer has tried to take paper from a tray that
has been removed.
Ensure that tray tttttt is correctly located or put tray
tttttt loaded with paper back into the printer.
Open Cover
Paper Remains
tttttt
Please see HELP for
details
Additional paper has been detected after a paper
jam has been cleared.
Open tttttt side cover to check for additional paper.
You can access help details by pressing the HELP
button.
Summary of Contents for proColor Pro510DW
Page 1: ...p r o 5 1 0 D W U s e r s G u i d e...
Page 2: ......
Page 22: ...User s Guide 22 12 Face up stacker 13 Interface unit 14 Network interface connector 10 11 12...
Page 25: ...User s Guide 25 29 Drum basket 27 28 29...
Page 57: ...User s Guide 57 4 Turn on the printer...
Page 73: ...User s Guide 73 7 Replace the two top covers 8 Raise the front cover of the duplex unit...
Page 74: ...User s Guide 74 9 Push the duplex unit back into position...


