BASIC OPERATION
- 80 -
1
2
3
4
5
6
Memo
•Pressing
adds a meaningful number, such as
date and time, to the file name. The number is
assigned according to the format selected for the
Date Format setting, which is available for the
administrator on TopAccess. For details, refer to the
TopAccess Guide
.
•The trailing characters in a file name (maximum 74)
may be deleted depending on the type of letters
used.
• FILE FORMAT
[PDF]
— Press this button to store your scan as a PDF
file.
[TIFF]
— Press this button to store your scan as a
TIFF file.
[XPS]
— Press this button to store your scan as an
XPS file.
[SLIM PDF]
— Press this button to store your scan as
a slim PDF file. This option is suitable when minimizing
the file size is more important than the image quality.
This option is available only when [FULL COLOR] or
[GRAY SCALE] is selected for the color mode setting.
[JPEG]
— Press this button to store your scan as a
JPEG file. This option is available only when [FULL
COLOR] or [GRAY SCALE] is selected for the color
mode setting.
Memo
•XPS files are supported only by the following
operating systems:
-
Windows Vista
-
Windows 7
-
Windows 8
-
Windows Server 2012
-
Windows Server 2008 SP1 or later versions
-
Windows XP SP2 or later versions with .NET
Framework 3.0 installed
-
Windows Server 2003 SP1 or later versions with
.NET Framework 3.0 installed
•If the forced encryption setting is enabled, PDF is the
only available file format.
• MULTI/SINGLE PAGE
[MULTI]
— Press this button to store your scan as a
multiple page file. When you scan several pages, the
equipment stores all the pages as a single file.
[SINGLE]
— Press this button to store your scan as a
single file for each page. When you scan several
pages, the equipment stores each page as a separate
file.
• SECURITY
When PDF is selected for the file format, you can
decide whether or not to encrypt the PDF file. To
encrypt the PDF file, press [ON]. For further
instructions on how to encrypt PDF files, see the
following Guide:
Advanced Guide
10
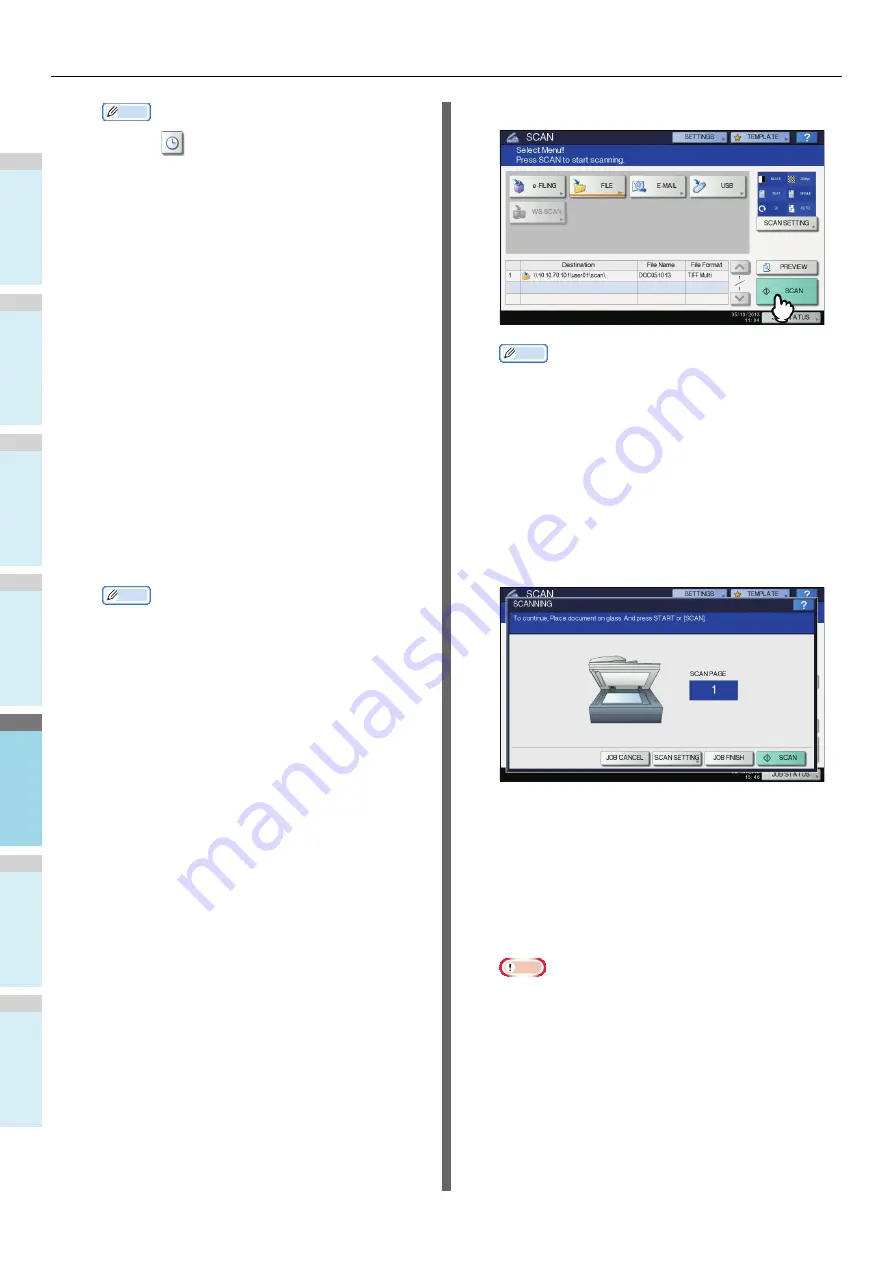
Press [SCAN].
Memo
• To scan 2-sided documents or change settings such as
Color Mode and Resolution, press [SCAN SETTING].
• Press [PREVIEW] and then [SCAN] to preview your
scans.
• You can select and set [e-FILING], [E-MAIL] or [USB]
as another scan function. (Dual Agents)
11
If the screen below appears, place another
original on the original glass and press
[SCAN] or the [START] button to continue
scanning. To finish the job, press [JOB
FINISH], followed by the [RESET] button.
• The above screen is not displayed under the following
conditions:
-
You scan the original from the Reversing
Automatic Document Feeder without pressing
[CONTINUE] to scan additional originals.
-
A scan preview is displayed.
• To cancel the operation, press [JOB CANCEL].
• To change the scan settings, press [SCAN SETTING].
Advanced Guide
Note
• When the equipment has scanned more than 1000
pages in a job, the “The number of originals exceeds
the limits. Will you save stored originals?” message
appears. If you want to save the scans, press [YES].
• When the temporary workspace is full on the
equipment’s hard disk, a message appears and the job
is canceled. The available workspace can be viewed
on the TopAccess [Device] tab.
Summary of Contents for MB760dnfax
Page 27: ...1 2 3 4 5 6 2 Copying HOW TO MAKE COPIES P 28 BASIC COPY MODES P 43...
Page 57: ...1 2 3 4 5 6 3 Fax SENDING RECEIVING A FAX P 58 CHECKING AND CANCELING THE COMMUNICATIONS P 71...
Page 75: ...1 2 3 4 5 6 4 0 Scanning BASIC OPERATION P 76...
Page 89: ...1 2 3 4 5 6 5 Utilities that can be used with this machine List of Utilities P 90...
Page 91: ...1 2 3 4 5 6 6 Index...
Page 94: ...May 2013 45611202EE Rev1...


