background image

BASIC COPY MODES

- 56 -

1

2

3

4

5

6

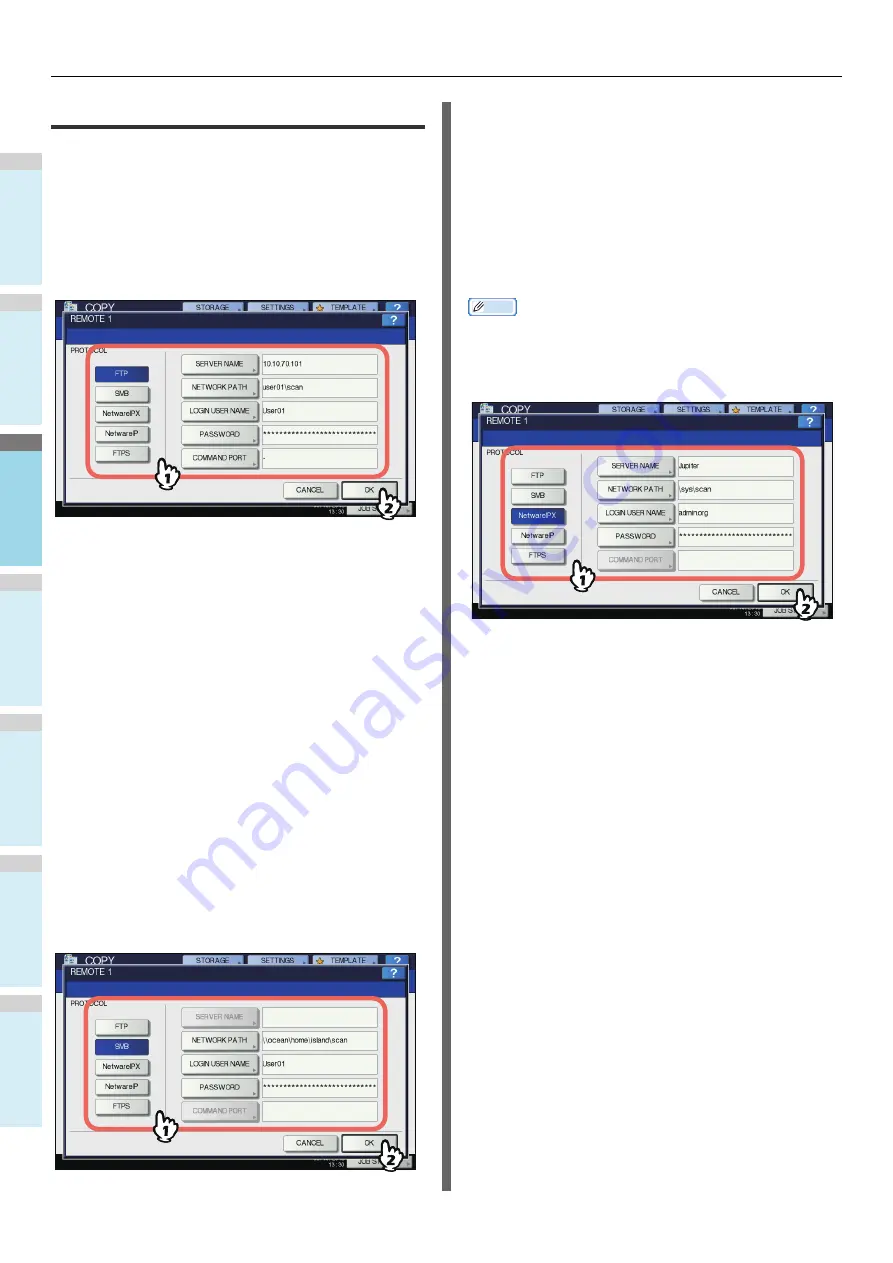
Setting share folder

When a user who has the privilege of setting a share folder has 
pressed [REMOTE 1] or [REMOTE 2], the menu for specifying 
a directory appears.

The setting items differ depending on the file transfer protocol 
to be used. FTP, SMB, NetWare IPX/SPX, NetWare TCP/IP 
and FTPS are selectable for a file transfer protocol.

FTP / FTPS

When you press any of the buttons below, the on-screen 
keyboard appears. Enter with the buttons on the touch panel or 
the digital keys on the control panel. When you finish the entry, 
press [OK].

SERVER NAME:

 Press this to enter the IP address of FTP 

server. For example, if the data should be transferred to an 
FTP folder ftp://10.10.70.101/user01/scan/, key in 
“10.10.70.101”.

NETWORK PATH:

 Press this to enter a network path to an 

FTP folder where the data are to be stored. For example, if 
the data should be transferred to an FTP folder ftp://
10.10.70.101/user01/scan/, enter “user01\scan”.

LOGIN USER NAME:

 Press this to enter a user name to login 

to the FTP server. Enter this as required.

PASSWORD:

 Press this to enter a password to login to the 

FTP server. Enter this as required.

COMMAND PORT:

 Press this to key in a command port 

number for executing commands. Normally “-” is entered in 
this field, which means that a port number set by the 
administrator will be used. Change this only when you want 
to use any other port number.

SMB

When you press any of the buttons below, the on-screen 
keyboard appears. Enter with the buttons on the touch panel or 
the digital keys on the control panel. When you finish the entry, 
press [OK].

NETWORK PATH:

 Press this to enter a network path to the 

folder where the data are to be stored.

LOGIN USER NAME:

 Press this to enter a user name to 

access the network folder. Enter this as required.

PASSWORD:

 Press this to enter a password to access the 

network folder. Enter this as required.

Memo

• If you selected [SMB], the settings for [SERVER NAME] and 

[COMMAND PORT] are not required.

NetWare IPX / NetWare IP

When you press any of the buttons below, the on-screen 
keyboard appears. Enter with the buttons on the touch panel or 
the digital keys on the control panel. When you finish the entry, 
press [OK].

SERVER NAME:

 When you select [NetWare IPX], enter either 

the server name of NetWare server or Tree/Context (if NDS 
is usable). When you select [NetWare IP], enter the IP 
address of NetWare server.

NETWORK PATH:

 Press this to enter a network path to a 

NetWare server folder where the data are to be stored. For 
example, if the data should be transferred to a folder 
“sys\scan” of NetWare server, enter “\sys\scan”.

LOGIN USER NAME:

 Press this to enter a user name to login 

NetWare server. Enter this as required.

PASSWORD:

 Press this to enter a password to login NetWare 

server. Enter this as required.

Summary of Contents for MB760dnfax

Page 1: ...This manual contains cautions on how to use this product safety Before you use this product please make sure that you read this manual User s Manual Basic Guide...

Page 2: ...ods of use In addition we have provided an explanation about how to register data in the address book Read these guides as necessary Advanced Guide 3 Step This guide describes the use of convenient pr...

Page 3: ...nt Tab Page Administration Tab Page My Account Tab Page Functional Setups e Filing OVERVIEW OPERATIONS WITH THIS EQUIPMENT OVERVIEW OF e Filing WEB UTILITY HOW TO MANAGE USER BOXES FOLDERS MANAGING DO...

Page 4: ...Network administrator The person who manages the computer and the network Terms in this document The following terms are used in this manual Note Indicates important information on operations Make su...

Page 5: ...rocedure 31 Scanning the next original during copying 33 Interrupting copying and making other copies 33 Proof copy 33 Selecting face down up stacker 34 Bypass Copying 35 Bypass copying on standard si...

Page 6: ...anning 75 BASIC OPERATION 76 Viewing Touch Panel for Scan Menu 76 Default Settings 76 Scan to e Filing 77 Scan to File 77 Scan to E mail 81 Scan to USB 84 Web Service WS Scan 86 Using Saved Scan Data...

Page 7: ...duplex function or multiple page function allows you to combine several different pages onto a single page For example you can print 16 pages of a document onto just two pages by printing four pages...

Page 8: ...computers or USB memory Scan to Network PC Scan to USB Memory or sent as attachments via email Scan to Email Scan To USB Memory Scan To Network PC Scan To Email USB memory Email Full color scan Scan d...

Page 9: ...ch helps to conserve toner and paper A B A Perform several functions at the same time The machine is capable of performing several functions at the same time including sending a fax while copying a do...

Page 10: ...ed regularly can be stored in TEMPLATE on the touch panel For example the following steps Reduce B4 documents by 81 to A4 size copy and sort them and create five sets can be stored in TEMPLATE and the...

Page 11: ...Printing Installing drivers on your computer P 12 Operating Environment P 13 Preparations to print from Windows P 14 Preparations to print from Mac OS X P 19 PRINTING FROM WINDOWS P 21 PRINTING FROM M...

Page 12: ...ter For Macintosh For Windows Connected via a network Connected via USB Connected via a network Configure the IP address and other settings in Windows Configure the IP address and other settings of th...

Page 13: ...Windows Server 2008 64 bit version Windows XP Windows XP x64 version Windows Server 2003 Windows Server 2003 x64 version Windows Server 2012 Note The machine will not operate under Windows 3 1 NT3 51...

Page 14: ...otherwise noted procedures required when using Windows 7 are listed in the section Set up in Windows Screens and procedures may differ depending on the OS Memo This machine is compatible with network...

Page 15: ...nd DNS server if they are not being used Close Local Area Connection 7 Close Local Area Connection 3 Configure the IP address and other settings of the machine Memo Skip to Step 4 if an IP address and...

Page 16: ...directly 10 Click Finish 11 Click Exit button to finish 4 Select Start Control Panel Devices and Printers Setup is complete when an icon appears in the Devices and Printers folder Setup via USB Window...

Page 17: ...the device you want to use and click Next 6 Read the license agreement and click I Agree 7 Read Environmental Advice for Users and click Next 8 Select the driver you want to install and click the Mult...

Page 18: ...rol Panel Devices and Printers Setup is complete when an icon appears in the Devices and Printers folder Memo To use this machine as a printer install any of PCL driver PS driver or XPS driver To use...

Page 19: ...inter drivers Note Turn OFF any virus protection software 1 Insert the Software DVD ROM into the Macintosh 2 Double click XXXXX pkg within the OKI Drivers OSX OS X 10 7 10 8 folder 3 Enter the adminis...

Page 20: ...u selected in the list is displayed automatically Memo Clicking Device Settings in the control panel and Printer Information Network displays the MAC address 6 Select the option device and click OK No...

Page 21: ...nter drivers In the default setting you can obtain the configuration data of options installed automatically by opening the Device Settings tab menu If SNMP communication between this equipment and yo...

Page 22: ...3 Select the size and type of paper that is loaded in the 3rd tray Tray 4 Select the size and type of paper that is loaded in the 4th tray LCF Select the size and type of paper that is loaded in the...

Page 23: ...error message will be displayed when an invalid department code is entered When SNMP communication is disabled and Invalid Department Code Print Job is set to Store to invalid job list the invalid de...

Page 24: ...application documents may not be properly printed If that happens use the printer driver to set the collation Depending on the application some print options such as the orientation need to be set fro...

Page 25: ...credentials manually option is used When this option is enabled on this equipment you are prompted to enter your user name and password before printing a document When the dialog box below appears ent...

Page 26: ...cations Utilities Directory Utilities Services BSD Flat and NIS To use the user authentication function on Mac OS X 10 6 x to Mac OS X 10 8 x perform the domain settings on Accounts Login Option Netwo...

Page 27: ...1 2 3 4 5 6 2 Copying HOW TO MAKE COPIES P 28 BASIC COPY MODES P 43...

Page 28: ...nals in a landscape direction aligning the guides A maximum of 1000 sheets can be scanned per 1 copy job or up until the embedded memory becomes full Placing originals on the original glass The origin...

Page 29: ...matic Document Feeder When scanning the duplex original with the RADF do not put your hand on the RADF Paper may damage the hand When scanning the duplex original with the RADF do not put an object on...

Page 30: ...raise the sub stopper Note Lower the sub stopper and slightly lift the original stopper to push it back in after you have finished using it Memo When there are too many originals to be scanned at one...

Page 31: ...per is placed in the tray s 2 Place the original s For the types and sizes of originals and how to place them see the following pages P 28 Acceptable originals P 29 Using the RADF Reversing Automatic...

Page 32: ...or NEXT COPY on the touch panel Scanning starts When SADF single feed mode is set to the document feeder an original is fed automatically when it is placed on the RADF 7 Press JOB FINISH on the touch...

Page 33: ...n progress to make other copies interrupt copying When restarting the interrupted job you do not have to reselect copy modes that have been set because they are memorized in this equipment Note The fo...

Page 34: ...you must finish the proof copy first Then change these settings and scan the original again Press MEMORY CLEAR on the touch panel or the RESET button on the control panel to end the proof copy 7 Pres...

Page 35: ...e used See the table below for the operating procedure of each size Memo Bypass copying stops when the paper placed on the multi purpose tray MPT runs out during copying even if the paper of the same...

Page 36: ...he sheets well before placing them on the multi purpose tray Be careful not to cut your fingers when fanning Do not push paper into the entrance of the multi purpose tray MPT This could cause a paper...

Page 37: ...l Note When you copy on sheets of OHP film remove the copied OHP film one sheet at a time as they exit onto the receiving tray If the sheets of OHP film pile up they may get curled and may not be proj...

Page 38: ...ct the paper type 1 Select the paper type 2 Press OK Note If you select a wrong paper type this could cause a paper misfeed or significant image trouble When you select a paper type you can confirm it...

Page 39: ...esive paste or tape 9 Partly opened or perforated envelopes 10 Envelopes with special coating on the surface 11 Envelopes with glue or double sided adhesive tape Note Store envelopes at room temperatu...

Page 40: ...elopes out from the face down up stacker Bypass copying on non standard size paper You can use non standard size paper within the sizes shown on the right 1 Place the original on the original glass 2...

Page 41: ...o MEMORY 4 and then press OK Memo To register dimension data into the memory see the following page P 41 Registering non standard size in the memory 6 Select other copy modes as required and then pres...

Page 42: ...HOW TO MAKE COPIES 42 1 2 3 4 5 6 Using the Offline Stapler You can use the stapler when installing the offline stapler 1 Insert paper deep into the stapler Paper is automatically stapled...

Page 43: ...etting menu will then appear Clearing the set functions If you want to clear any copy function setting press RESET on the corresponding setting menu Clearing all settings changed When you press the RE...

Page 44: ...set at Automatic Paper Selection by default 4 Select other copy modes as required and then press the START button on the control panel Selecting desired paper manually You need to select paper by you...

Page 45: ...guides to the widest original and then align the originals against the side guide on the front side 3 Press ZOOM on the touch panel 4 Press MIXED SIZE 5 Press AMS to make copies on paper in one size T...

Page 46: ...l of the copied image to the optimal one Alternatively you can manually adjust it to the desired level Adjusting automatically automatic density adjustment Press AUTO on the touch panel Memo The autom...

Page 47: ...etect the original size and automatically select the optimal reproduction ratio to the copy paper size This function is available when the size of the originals is as follows Other than North America...

Page 48: ...aper sizes to OTHER size Paper sizes can also be registered by pressing the desired tray button of the equipment status indication area on the BASIC menu 5 Select other copy modes as required and then...

Page 49: ...orth America A4 B5 A5 North America Letter Legal For how to register see the following page P 48 Registering paper sizes to OTHER size Paper sizes can also be registered by pressing the desired tray b...

Page 50: ...he originals This mode is called the sort mode Copies can also be made to exit grouped by page This mode is called the group mode Sort mode Group mode 1 Place paper in the tray s 2 Place the original...

Page 51: ...LEFT is selected Note Special paper such as OHP film or sticker labels is not applicable Copies in different sizes cannot be stapled unless their length is the same 1 Place paper in the tray s When u...

Page 52: ...ADF place them according to the illustration on the previous page When placing the originals on the original glass place them in the following order Magazine sort Place the first page of the original...

Page 53: ...Making a 1 sided copy Memo When you copy 2 sided portrait originals which open to the left right on only 1 side of the paper use the image direction function on the EDIT menu so that all the copied p...

Page 54: ...to 2 sided copy 2 2 DUPLEX 2 sided original to 2 sided copy 5 Select other copy modes as required and then press the START button on the control panel When placing the original on the original glass f...

Page 55: ...FILE NAME Press this to display the on screen keyboard Then enter the file name within 128 letters Note The trailing characters in a file name maximum 74 may be deleted depending on the type of letter...

Page 56: ...number set by the administrator will be used Change this only when you want to use any other port number SMB When you press any of the buttons below the on screen keyboard appears Enter with the butt...

Page 57: ...1 2 3 4 5 6 3 Fax SENDING RECEIVING A FAX P 58 CHECKING AND CANCELING THE COMMUNICATIONS P 71...

Page 58: ...he original glass or RADF Reversing Automatic Document Feeder in the correct direction The illustration above shows the original placed on the original glass P 59 Handling an original 2 Press the FAX...

Page 59: ...ssion conditions vary or if users or departments are different when this equipment is managed under the department management or user management this function is not applied to those reserved jobs Sen...

Page 60: ...ginal against the left inner corner of the glass Different size originals can also be sent in one transmission When an original of any size other than A4 Letter is placed in the direction shown in the...

Page 61: ...ion shown in the lower figure transmission to a recipient is carried out so that the pre entered sender information is printed in position B in the figure The pre entered sender information shows what...

Page 62: ...equipment may reduce that size before sending it To avoid this when the original to be set is B5 size specify A4 size respectively EXPOSURE Set the density at which the original is to be scanned STAND...

Page 63: ...hine Up to 20 digits can be entered Memo To use this function the recipient s fax machine must be capable of setting an ITU T compatible subaddress or password INTERNET FAX This is not used for sendin...

Page 64: ...SPACE To delete all the entered values at once press the CLEAR button on the control panel In the memory transmission mode you can specify multiple recipients to send the same document at once Press M...

Page 65: ...ecify multiple groups to send the same document at once Repeat the recipient selection operation until all the recipients are selected For the multi address transmission you can also specify recipient...

Page 66: ...etails of the operation to enter characters refer to the Setup Guide To cancel the entered keyword press CLEAR You can search for the desired recipient s fax number by specifying multiple keywords Sel...

Page 67: ...ents you must specify the recipient in advance by following the procedures below Specify the recipients and then press MONITOR 5 Specify the recipients P 64 Specifying the recipient Note For direct en...

Page 68: ...ing the call before pressing SEND ask him her to perform operation of the fax reception 7 Replace the handset of the external telephone Displaying the preview Before sending a fax you can check the im...

Page 69: ...llowing conditions faxes cannot be printed If this happens received fax data are stored in the memory and printing is resumed as soon as this equipment is ready As the memory reception function is alw...

Page 70: ...se there is no larger paper available the original is printed with the image divided Paper priority when there is no same size paper When both RX reduction printing and Discard printing are set to ON...

Page 71: ...nsmissions and receptions 1 Press JOB STATUS 2 Select the LOG tab and then press SEND or RECEIVE 3 The list of the communication status is displayed Transmissions or receptions are listed in the rever...

Page 72: ...Canceling the Transmission Canceling the memory transmission You can cancel the memory transmission during scanning When using the original glass This section describes how to cancel the memory transm...

Page 73: ...has been sent 1 Press the STOP button on the control panel while the original is being scanned The scanning and transmission are stopped Canceling reserved transmissions You can display the list of t...

Page 74: ...CHECKING AND CANCELING THE COMMUNICATIONS 74 1 2 3 4 5 6 3 The confirmation screen for the deletion is displayed Press DELETE...

Page 75: ...1 2 3 4 5 6 4 0 Scanning BASIC OPERATION P 76...

Page 76: ...and Time 6 JOB STATUS Press this button when you want to monitor your copy fax scan and or print jobs or view the job logs P 88 Viewing the scan job status P 88 Viewing the scan job log 7 SCAN Press t...

Page 77: ...to set up the user box To prevent loss of data we recommended that you back up the data saved in the equipment s hard disk You can back up the data with the computer using File Downloader or Filing B...

Page 78: ...tting up the remote destination is displayed Proceed to step 6 If the selected remote destination REMOTE 1 or 2 is already defined by the administrator so that the scan is saved in a specified network...

Page 79: ...scanned data to ftps 10 10 70 101 user01 scan enter user01 scan in this box LOGIN USER NAME When you select FTP Enter the log in user name for the FTP server if required When you select SMB Enter the...

Page 80: ...scan as a multiple page file When you scan several pages the equipment stores all the pages as a single file SINGLE Press this button to store your scan as a single file for each page When you scan s...

Page 81: ...tor on TopAccess the AUTHENTICATION screen is displayed In this case proceed to step 4 If the User Authentication for the Scan to E mail setting is disabled by the administrator proceed to step 5 Memo...

Page 82: ...ngful number such as date and time to the subject For details refer to the TopAccess Guide 8 If necessary make the following settings for the attached file 1 Press FILE NAME and change the file name 2...

Page 83: ...administrator on the TopAccess SMTP Client page FROM ADDRESS Press this button to edit the sender s e mail address You cannot edit the box if the administrator sets the sender s e mail address so that...

Page 84: ...d wait a few seconds Note Connect the USB storage device to the USB port 4 When Found USB DEVICE message appears on the touch panel press USB Note When you store scans in a USB storage device never at...

Page 85: ...a multiple page file When you scan several pages the equipment stores all the pages as a single file SINGLE Press this button to store scans as a single file for each page When you scan several pages...

Page 86: ...luded with Windows operating systems such as Windows Vista The WIA Scan Driver is automatically installed to your client computer when you install client software for Web Service Printing Note To inst...

Page 87: ...Setup page by clicking the Save as file submenu For details refer to the TopAccess Guide When scans are sent to a sub folder When the Local Storage Path setting is set to send the scans to a sub fold...

Page 88: ...ng environment To display the previous or next page press or The number of jobs displayed on a page varies depending on the equipment used To delete jobs select one on the list and press DELETE You ca...

Page 89: ...1 2 3 4 5 6 5 Utilities that can be used with this machine List of Utilities P 90...

Page 90: ...ist of Utilities Common Utilities for Windows Macintosh You can use the following utilities For details refer to the Utility Guide AddressBook Viewer Filing Box Backup Restore TWAIN Driver File Downlo...

Page 91: ...1 2 3 4 5 6 6 Index...

Page 92: ...x copying 1 sided original 1 sided copy 52 1 sided original 2 sided copy 53 2 sided original 1 sided copy 53 2 sided original 2 sided copy 53 simplex duplex setting 52 E ECM 63 e Filing 77 87 Enter th...

Page 93: ...cipient s fax number 66 specifying the recipient in the address book 64 Red R 77 Redial function 59 REMOTE 1 78 88 REMOTE 2 78 88 Reproduction ratio 43 47 Reserved transmissions 71 RESET button 35 43...

Page 94: ...May 2013 45611202EE Rev1...

Reviews: