Oki C911dn User Manual Download Page 227

- 227 -

Setting the network from the web browser

5

1

2

4

3

Con

ven

ient print 

functions

Appendix

Index

Checking a

nd 


Cha

nging Printer  

Settings Using 


the Control P

anel

Network 

Setup

Matching 

Colors

Using Utilit

Softw

are

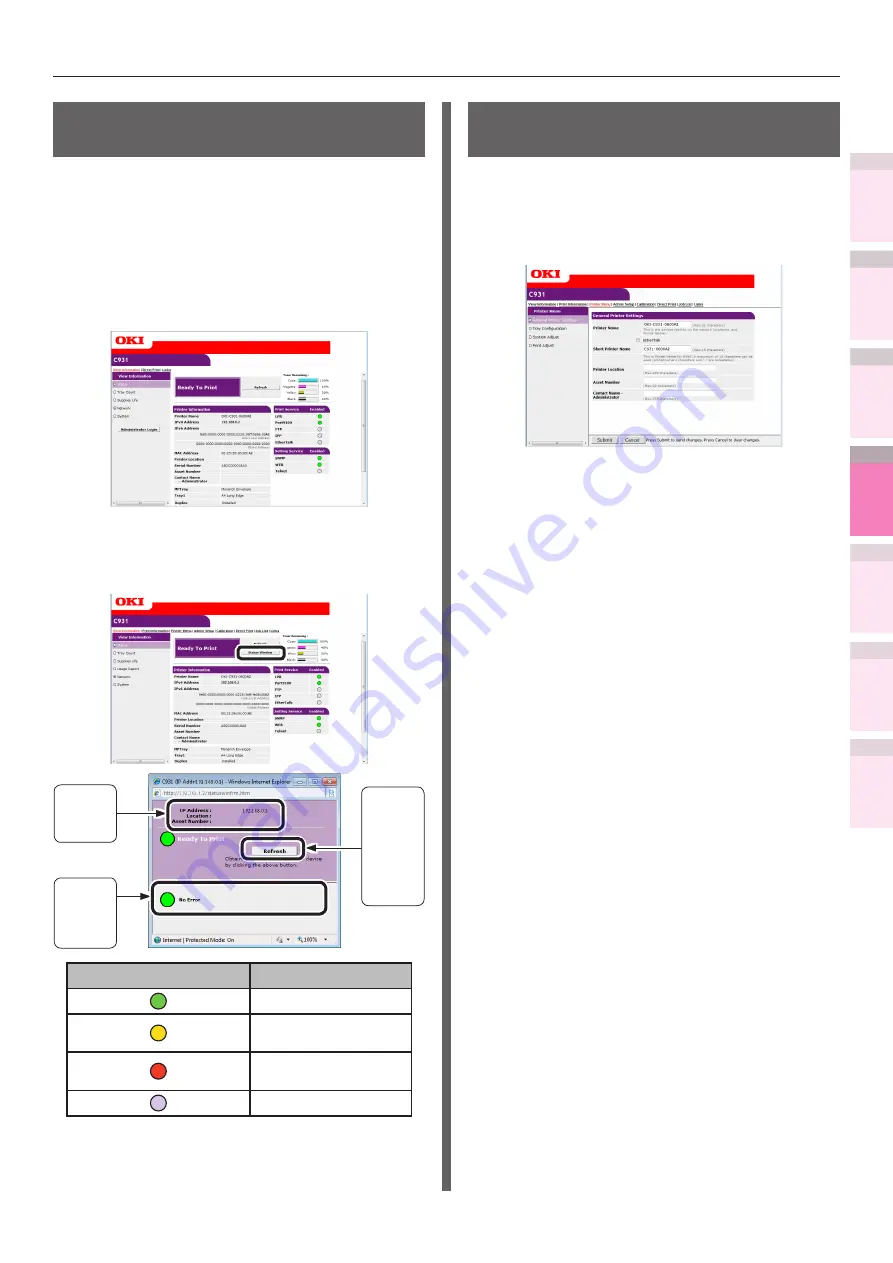
Checking printer status 

from the PC

You can check the status of the device via the 

network from the PC.


„

Checking using the "Status screen"

Start the web browser, and display the 

"Status" screen.


„

Checking the "Status Window"

Click [Status Window] to display the following screen.

The printer 

status 

details  

will be  

displayed.

Clicking 

will up-

date the 

printer 

status to 

the latest 

status.

The printer 

information  

will be  

displayed.

Printer status icon

Advanced

No errors/online
Minor malfunction 

(printing is possible)
Major malfunction 

(printing is not possible)

Offline

Changing printer settings 

from the PC

You can change the device setup.

Access the device web page, and log in 

as an administrator.

Make the necessary changes,and click 

[Submit].

Summary of Contents for C911dn

Page 1: ...functions 1 Convenient print functions 2 3 Using Utility Software 4 Network Setup 5 User s Manual Advanced C911dn C931dn C941dn ES9411dn ES9431dn ES9541dn Matching Colors Checking and Changing Printer...

Page 2: ...Guide Set up Guide Opening the box and installing the printer 1 Step This guide uses illustrations to explain the methods from opening the box to installation For the advanced setup guide see the Basi...

Page 3: ...this display may cause death or serious injury CAUTION z z Mishandling due to ignoring this display may cause personal injury Keys Buttons and Symbols This chapter described the following keys button...

Page 4: ...ons used herein show the C931 model unless otherwise specified Illustrations may differ from the actual product Screens The images of the control panel and PC used herein are examples The images may d...

Page 5: ...dows 7 64 bit Edition operating system version Windows 7 64bit version z z Microsoft Windows 7 operating system version Windows 7 z z Mac OS X10 3 9 or later Mac OS X The manuals enclosed with the dev...

Page 6: ...23 Printing on irregular size envelopes 28 Printing on glossy paper 34 Printing on labels and transparencies 41 Printing on user selected paper sizes custom pages and lengthy printing 47 Economy prin...

Page 7: ...ys 97 Using the printer buffer 100 Outputting to file without printing 101 Downloading PostScript files 102 Printing PostScript errors 103 Changing emulation modes 103 Saving the printer driver settin...

Page 8: ...cintosh 152 Saving color adjustment settings Windows 154 Saving color matching settings Macintosh 155 Importing color matching settings Windows 156 Importing color matching settings Macintosh 158 Dele...

Page 9: ...t Network Printing Utility LPR 186 Operations environment 186 Starting up 186 Downloading files to the printer 187 Checking deleting transferring jobs 187 Checking the printer status 188 Adding printe...

Page 10: ...About IPv6 221 Checking IPv6 addresses 221 Setting the network from the web browser 222 Operations environment 222 Starting up 222 Logging in as an administrator 223 Items table 224 Changing administ...

Page 11: ...Font list 261 Color profile list 261 User media list 262 Test prints 262 Registering custom sizes irregular paper 263 Changing administrator passwords 265 Restricting button operations panel lockout...

Page 12: ...12 Contents Appendix 307 Using Print Job Accounting 308 Number of usable user IDs and logs 308 Character code table 309 PostScript mode 309 PCL mode 312 Index 315...

Page 13: ...65 Printing print results so that people cannot see them 74 Advanced print functions 79 Deleting or updating printer drivers 107 Note z z This section uses WordPad for its Windows explanations and Te...

Page 14: ...Mac OS X PS The functions may differ depending on the printer driver Windows PS printer driver functions Layout tab Item Explanation Orientation Specifies the print orientation Print on Both Sides Spe...

Page 15: ...rmarks Specifies when implementing stamp printing Overlays Specifies when implementing overlay printing Advanced You can make other advanced print setups About Displays the printer driver version info...

Page 16: ...t orientation Color Setting Specifies whether to print in color or monochrome Toner saving Specifies the print density when economizing on toner About Displays the printer driver version information D...

Page 17: ...ngs Memo z z Spot Color is a function for model C941 ES9541dn only For details see the Separate Volume Spot Color Guide Windows XPS printer driver functions Setup Tab Item Explanation Size Specifies t...

Page 18: ...ks Specifies when implementing stamp printing Default Restores the tab settings to the default settings Color tab Item Explanation Color Mode Specifies the color print method Spot Color Specifies when...

Page 19: ...m Explanation ColorSync Specifies the ColorSync function In printer Implements printer color matching Profile Specifies the profile Paper Handling panel Item Explanation Pages to Print Specifies the p...

Page 20: ...Type Specifies the text during printing Billing Info This function cannot be used Spot Color panel z z In white mode z z In clear mode Item Explanation Usage Methods Specifies the range of Spot Color...

Page 21: ...t to color mode when printing in color Print Options panel Item Explanation Print Options Specifies alignment to the items that have been set such as print quality paper type etc Items Setup Specifies...

Page 22: ...ided printing and printing from paper trays are disabled for envelopes z z Print speed will be slowed z z Setting the paper orientation Set the print surface face up Set as a diagram to print the addr...

Page 23: ...Tray 2 Open the face up stacker Set the print surface face up to output Face up stacker 3 Set the paper size using the control panel 1 Press the Fn key The numerical values input screen will be displa...

Page 24: ...age Setup in the File menu 2 Select Nagagata where is the envelope type in Size and Portrait or Landscape in Orientation and click OK 3 Select Print in the File menu 4 Click Advanced or Preferences 5...

Page 25: ...dows PCL printer drivers 1 Select Page Setup in the File menu 2 Select Nagagata where is the envelope type in Size and Portrait or Landscape in Orientation and click OK 3 Select Print in the File menu...

Page 26: ...ng Windows XPS printer drivers 1 Select Page Setup in the File menu 2 Select Nagagata where is the envelope type in Size and Portrait or Landscape in Orientation and click OK 3 Select Print in the Fil...

Page 27: ...Page Setup in the File menu 2 Select the printer model name in Format For and select Envelope where is the envelope type in Paper Size and a suitable orientation in Orientation and click OK 3 Select...

Page 28: ...p to output Face up stacker 3 Set the paper size paper type and paper weight using the control panel 1 Press the Fn key The numerical values input screen will be displayed 2 Press 9 0 and press the OK...

Page 29: ...he left of the selected size and press the BACK button 11 Select Media Type and press the OK button 12 Select Envelope and press the OK button 13 Check that is displayed to the left of Envelope and pr...

Page 30: ...drivers 1 Select Page Setup in the File menu 2 Select the paper size in Size and a suitable orientation in Orientation and click OK 3 Select Print in the File menu 4 Click Advanced or Preferences 5 Cl...

Page 31: ...mpresi n tiles Using Windows PCL printer drivers 1 Select Page Setup in the File menu 2 Select the paper size in Size and a suitable orientation in Orientation and click OK 3 Select Print in the File...

Page 32: ...I product name XPS and select Print Server Properties in the tool bar 3 Enable the Create a new form check box in the Forms tab 4 Enter the name of the irregular size envelope in Form name 5 Enter the...

Page 33: ...Printer Face Up in Output Bin in the Job Options tab and click OK 8 Click Print in the Print screen to print Using Mac OS X printer drivers 1 Select Page Setup in the File menu 2 Select the printer mo...

Page 34: ...panel and select Stacker Face up from Output Bin 8 Click Print to print Printing on glossy paper Memo z z For the Multi Purpose Tray preparations see Setting paper in the Multi Purpose Tray in Basic 1...

Page 35: ...Memo z z You can output to the face down stacker Face up stacker 3 Set the paper size and paper type using the control panel 1 Press the Fn key The numerical values input screen will be displayed 2 En...

Page 36: ...the left of Glossy 7 Press the ON LINE button to return to the standby screen 4 Open the file to be printed 5 Select Size Source and Output Bin in the printer drivers to print Using Windows PS printe...

Page 37: ...ct the paper tray in Paper Source 8 Select Glossy in Media 9 Select the output bin using Output Bin in the Job Options tab and click OK 10Click Print in the Print screen to print Using Windows PCL pri...

Page 38: ...elect the paper tray in Source 7 Select Glossy in Type 8 Select the output bin using Output Bin in the Job Options tab and click OK 9 Click Print in the Print screen to print Using Windows XPS printer...

Page 39: ...tilizando el panel de control Config de red Concordar los colores Utilizaci n de software de utilidades Funciones de impresi n tiles 6 Select the paper tray in Source 7 Select Glossy in Type 8 Select...

Page 40: ...Select the printer model name in Format For and select the paper size in Paper Size and a suitable orientation in Orientation and click OK 3 Select Print in the File menu 4 Check that the printer mode...

Page 41: ...from the Multi Purpose Tray or Tray 1 Memo z z You can print by manually feeding one page at a time from the Multi Purpose Tray For details see Printing single sheets manually P 81 Note z z Printing f...

Page 42: ...s 9 0 and press the OK button z z Using tray 1 Press 1 0 and press the OK button 3 Select A4 and press the OK button 4 Check that is displayed to the left of A4 and press the BACK button 5 Select Medi...

Page 43: ...Select Page Setup in the File menu 2 Select Portrait or Landscape in Orientation and click the OK button 3 Select Print in the File menu 4 Click Advanced or Preferences 5 Click Advanced in the Paper...

Page 44: ...indows PCL printer drivers 1 Select Page Setup in the File menu 2 Select Portrait or Landscape in Orientation and click the OK button 3 Select Print in the File menu 4 Click Advanced or Preferences 5...

Page 45: ...Using Windows XPS printer drivers 1 Select Page Setup in the File menu 2 Select Portrait or Landscape in Orientation and click the OK button 3 Select Print in the File menu 4 Click Advanced or Prefere...

Page 46: ...1 Select Page Setup in the File menu 2 Select the printer model name in Format For and select the paper size in Paper Size and a suitable orientation in Orientation and click OK 3 Select Print in the...

Page 47: ...g from the Multi Purpose Tray support the paper manually for paper lengths that are not fully supported by the paper supporter z z If feeding from the paper trays tray 1 optional trays 2 to 5 press th...

Page 48: ...d press the OK button z z Using tray 1 Press 1 0 and press the OK button 3 Select Custom and press the OK button 4 Check that is displayed to the left of Custom and press the BACK button 5 Select X Di...

Page 49: ...printers 2 Right click the OKI product name PS icon and select Printing Preferences OKI product name PS 3 Click Advanced in the Layout tab 4 Select PostScript Custom Page Size in Paper Size 5 Enter t...

Page 50: ...d printers 2 Right click the OKI product name PCL6 icon and select Printing Preferences OKI product name PCL6 3 Click Paper Feed Options in the Setup tab 4 Click Custom Size in the Paper Feed Options...

Page 51: ...6 Click Close 7 Open the file to be printed 8 Specify the registered paper size to print Using Mac OS X printer drivers Note z z Custom sizes exceeding the printable range can be entered using Mac OS...

Page 52: ...enter of the paper may not be accurately aligned z z Bind width can also be set using Windows PCL XPS printer drivers z z Not usable with some applications Using Windows PS printer drivers 1 Open the...

Page 53: ...inted on 1 sheet in Finishing Mode in the Setup tab 5 Click Options and set Page Borders Page layout and Bind Margin as necessary The bind width can be set from 0 to 30mm left and right 6 Printing wil...

Page 54: ...ded Printing You can print on both sides of the paper 1 1 2 2 For the types of paper thicknesses and sizes that can be used in 2 sided printing see Usable paper types in Basic For the range of widths...

Page 55: ...s PCL printer drivers 1 Open the file to be printed 2 Select Print in the File menu 3 Click Advanced or Preferences 4 Select Long Edge or Short Edge in 2 Sided Printing in the Setup tab 5 Printing wil...

Page 56: ...n print by economizing the toner consumption amount by reducing the page print density Separately set whether to enable or disable toner economy mode over 100 black Memo z z You can suppress the amoun...

Page 57: ...Windows PS printer drivers 1 Open the file to be printed 2 Select Print in the File menu 3 Click Advanced or Preferences 4 Select the toner save amount from Toner Saving in the Color tab 5 Printing wi...

Page 58: ...s XPS printer drivers 1 Open the file to be printed 2 Select Print in the File menu 3 Click Advanced or Preferences 4 Select the toner save amount from Toner Saving in Job Options tab 5 Printing will...

Page 59: ...an print on different paper sizes without changing the print data A4 A6 Note z z Not normally operable with some applications Using Windows PS printer drivers 1 Open the file to be printed 2 Select Pr...

Page 60: ...eferences 4 Select the paper size to be edited in Size in the Setup tab 5 Enable the Resize document to fit printer page check box and select the paper size to be printed 6 Printing will be implemente...

Page 61: ...ble the Scale to fit paper size in the Paper Handing panel and select the paper size to be edited using Destination Paper Size 6 Printing will be implemented Enlarging and printing multiple sheets pos...

Page 62: ...nt in the File menu 3 Click Advanced or Preferences 4 Select Poster Print in Finishing Mode in the Setup tab 5 Click Options and set Enlarge Add Registrationg Marks and Add Overlap as necessary 6 Prin...

Page 63: ...box in the advanced setup for the print dialog box to implement pamphlet printing normally z z If Pamphlets is not printing right click the OKI printer name PS in the Devices and Printers folder and...

Page 64: ...Open the file to be printed 2 Select Print in the File menu 3 Click Advanced or Preferences 4 Select Booklet in Finishing Mode in the Setup tab and click Options 5 Set Signature 2 pages Right to Left...

Page 65: ...int using the highest printer quality Select Normal 600x600 to print at low resolution This mode prioritizes print speed Fine Detail 1200x1200 is an intermediate mode between ProQ High Quality and Nor...

Page 66: ...presi n tiles Using Windows XPS printer drivers 1 Open the file to be printed 2 Select Print in the File menu 3 Click Advanced or Preferences 4 Change Print Quality in the Job Options tab 5 Printing w...

Page 67: ...OS X printer drivers Using Windows PCL printer drivers 1 Open the file to be printed 2 Select Print in the File menu 3 Click Advanced or Preferences 4 Select Photo Enhance in Quality in the Job Optio...

Page 68: ...PCL printer drivers 1 Open the file to be printed 2 Select Print in the File menu 3 Click Advanced or Preferences 4 Select the Optimize color thin line in the Job Options tab and click OK 5 Printing...

Page 69: ...4 Printing will be implemented Compensating fine lines You can prevent misaligned lines being printed when ultra fine lines are specified from the application This function is normally ON Memo z z Dep...

Page 70: ...rs 1 Open the file to be printed 2 Select Print in the File menu 3 Click Advanced or Preferences 4 Click Advanced in the Job Options tab 5 Select Adjust ultra fine lines and then select ON in Settings...

Page 71: ...ers cannot use the font replacement function easily z z If using Windows PS printer drivers PC administrator privileges are required z z Cannot be used with Windows XPS and Mac OS X printer drivers Us...

Page 72: ...ware de utilidades Funciones de impresi n tiles Using Windows PCL printer drivers 1 Open the file to be printed 2 Select Print in the File menu 3 Click Advanced or Preferences 4 Click Fonts in the Ext...

Page 73: ...PS printer drivers 1 Open the file to be printed 2 Select Print in the File menu 3 Click Advanced or Preferences 4 Click Advanced in the Layout tab 5 Select Download as Softfont in TrueType Font 6 Pri...

Page 74: ...unction it is necessary to mount the optional HDD to the device Note z z If there is insufficient space on the option built in HDD storing the print jobs File system is full will be displayed and prin...

Page 75: ...Job Name for each print job is enabled enter the Job Name in the Enter Job Name screen and click OK Note z z If the user who started the secure print job has forgotten that the job exists or has forg...

Page 76: ...rom the HDD or the device communications process Further to strengthen security even more print jobs spooled on the HDD are either printed or deleted after a fixed period of time has elapsed To print...

Page 77: ...displayed Note z z This check box is disabled in Windows 8 Windows 7 Windows Vista Windows Server 2012 Windows Server 2008 R2 Windows Server 2008 Enter the password in the JOB PIN screen displayed wh...

Page 78: ...If the password is entered incorrectly press the BACK button and reset z z Press the CANCEL button to cancel the search 5 Select Print and press the OK button Print Secure Job Encrypted Job Stored Jo...

Page 79: ...nts are output face down 1 Open the document to be printed 2 Specify the face down stacker as the Output Bin to print Note z z For paper weights with GSM 320 to 360g m2 ream weight 275 to 310kg custom...

Page 80: ...lock position Supplementary supporter Using Windows PS printer drivers 1 Open the file to be printed 2 Select Print in the File menu 3 Click Advanced or Preferences 4 Select Stacker Face up in Output...

Page 81: ...implemented Printing single sheets manually You can print single pages individually by setting the paper in the Multi Purpose Tray A message to set the paper in the Multi Purpose Tray will be display...

Page 82: ...a single sheet and press the OK button When printing multiple page documents the same message will be displayed for each page Using Windows PCL printer drivers 1 Open the file to be printed 2 Select...

Page 83: ...When a message to set the paper in the Multi Purpose Tray is displayed in the control panel LCD set a single sheet and press the OK button When printing multiple page documents the same message will b...

Page 84: ...lly for printing Note z z Set the paper size and paper type for tray 1 optional trays 2 to 5 and the Multi Purpose Tray using the control panel For detailed see Setting paper in Basic Using Windows PS...

Page 85: ...nciones de impresi n tiles Using Windows XPS printer drivers 1 Open the file to be printed 2 Select Print in the File menu 3 Click Advanced or Preferences 4 Select Auto in Source in the Setup tab 5 Pr...

Page 86: ...1 Open the file to be printed 2 Select Print in the File menu 3 Click Advanced or Preferences 4 Click Paper Feed Options in the Setup tab 5 Enable the Use different source for first page in Cover Prin...

Page 87: ...ails to be printed from the application can be independently printed overlaying Samples Confidential etc Samples Note z z Cannot be used with Mac OS X printer drivers z z Watermarks cannot be printed...

Page 88: ...tiles 4 If using PS or XPS printer drivers click Watermarks in the Job Options tab If using PCL printer drivers select Watermarks in Extend tab Windows 7 PS printer driver screen Windows 7 PCL printe...

Page 89: ...ote z z Not usable with some applications Using Windows printer drivers Note z z If using PS printer drivers turn OFF the batch printing function in the application 1 Open the file to be printed 2 Sel...

Page 90: ...n tiles Using Mac OS X printer drivers 1 Open the file to be printed 2 Select Print in the File menu 3 Disable Collate pages in the Paper Handing panel or print dialog box and enter the print quantity...

Page 91: ...DD to the device z z Prepare the paper for portrait and landscape in the paper feed tray beforehand z z The usable paper sizes are described below A4Wide A4 A5 B5 letter 16K 184 x 260mm 16K 195 x 270m...

Page 92: ...ted 2 Select Print in the File menu 3 Click Advanced or Preferences 4 Enter the print quantity in Copies in Job Options and enable the Collate check box 5 Enable the Rotate Sort check box 6 Printing w...

Page 93: ...z z Cannot be used with Windows XPS and Mac OS X printer drivers 1 Save the job to the printer 1 Open the file to be printed 2 Select Print in the File menu 3 Click Advanced or Preferences 4 If using...

Page 94: ...button 3 Select Stored Job and press the OK button 4 Use the 10 key pad to enter the 4 digit password for the job to be printed to start the search Memo z z If the password is entered incorrectly pres...

Page 95: ...printer drivers 1 Create and register the form to the device For details see Registering forms form overlay P 177 2 Register the form to the printer drivers to print 1 Click Start and then select Devi...

Page 96: ...pen the file to be printed 2 Select Print in the File menu 3 Click Advanced or Preferences 4 Click Overlays in the Advanced tab 5 Enable Print Using Active Overlays in the Overlays screen and click De...

Page 97: ...e current print tray runs out Note z z Match the paper tray paper weight paper type and the Multi Purpose Tray paper size paper weight and paper type using the control panel For detailed see Setting P...

Page 98: ...1 Open the file to be printed 2 Select Print in the File menu 3 Click Advanced or Preferences 4 Click Advanced Options in the Layout tab 5 Select ON in Tray Switch 6 Printing will be implemented Usin...

Page 99: ...PS printer drivers 1 Open the file to be printed 2 Select Print from the File menu 3 Click Advanced or Preferences 4 Click Options in the Settings tab 5 Enable Auto in the Paper feed options check box...

Page 100: ...there is insufficient space on the option built in HDD storing the print jobs File system is full will be displayed and printing will be disabled z z The time to print completion will be slower than i...

Page 101: ...5 Select Job Spool and then select ON to change the settings and click OK 6 Printing will be implemented Outputting to file without printing You can write and save to a file without printing the print...

Page 102: ...he File menu 3 Click PDF and select the save method 4 Enter the file name to be saved in Name and select the save destination and click Save 5 Printing will be implemented Downloading PostScript files...

Page 103: ...ivers 1 Open the file to be printed 2 Select Print in the File menu 3 Click Advanced or Preferences 4 Click Advanced in the Layout tab 5 Select Yes in PostScript Options Send PostScript Error Handler...

Page 104: ...the printer driver settings You can save the details set using the printer drivers When details that change multiple settings are saved the settings for multiple locations will be changed automatical...

Page 105: ...name for the settings in Save settings as and click OK Memo z z Enable the Form information is kept check box to also save the paper settings in the Setup tab z z You can save up to 14 settings max 6...

Page 106: ...g Windows printer drivers 1 Click Start and then select Devices and Printers 2 Right click the OKI product name icon describes the printer driver type PS PCL6 or XPS and select Printing Preferences OK...

Page 107: ...s in use restart the PC and implement Steps 1 and 2 again 4 Select one of the icons in Devices and Printers and click Print Server Properties in the top bar 5 Select the Drivers tab 6 Click if Change...

Page 108: ...il the uninstaller closes 6 Click Finish 7 Remove the Software DVD ROM from the computer Updating the printer drivers Using Windows Note z z PC administrator privileges are required z z When Windows s...

Page 109: ...printer drivers and printer icons and then install the new printer drivers Note z z If multiple printer drivers have been installed delete all the printer drivers If installing multiple printer driver...

Page 110: ...drivers z z Deleting obsolete drivers and installing new drivers Delete the obsolete printer drivers and printer icons and then install the new printer drivers Note z z If multiple printer drivers hav...

Page 111: ...hecking and Changing Printer Settings Using the Control Panel Network Setup Matching Colors Using Utility Software 2 Matching Colors Matching colors using the control panel 112 Matching Colors Using t...

Page 112: ...ly 1 Press the Fn key The numerical values input screen will be displayed 2 Press 3 0 1 and then press the OK button 3 Check that Execute has been selected and press the OK button 4 The display will r...

Page 113: ...printer can implement compensation periodically using auto density compensation mode but if the print density is a nuisance it can also be compensated manually Memo z z The density compensation adjus...

Page 114: ...hat you wish to adjust z z Increasing cyan after checking the print results 1 Press the Fn key The numerical values input screen will be displayed 2 Press 3 1 0 and press the OK button Memo z z The pr...

Page 115: ...ervals where auto density compensation is insufficient Note z z The densities of each color are mutually dependent so it is necessary to repeat the adjustments several times until the correct color ba...

Page 116: ...jacent CMY mixed colors part and single color K part from among the patterns distributed in the Highlight Mid Tone or Dark areas Memo z z If the pattern that seems most similar to the adjacent CMY mix...

Page 117: ...Y color balance watermarks manually using Color Balance Watermark Tuning For color balance watermark adjustments see Adjusting the color balance watermarks P 118 z z If the overall tone is still too b...

Page 118: ...es input screen will be displayed 2 Press 3 0 2 and press the OK button 3 Check that Execute has been selected and press the OK button 4 The color matching pattern will be printed 2 Use the print resu...

Page 119: ...ss the OK button 6 Specify a larger value than the current set value and press the OK button Check that is displayed to the left of the specified value Memo z z To slightly increase the darkness selec...

Page 120: ...reproduced colors unless consideration is given to the individual printer characteristics To maintain color consistency from data creation to output it is necessary to consider the color differences...

Page 121: ...nter drivers 1 Open the file to be printed 2 Select Print from the File menu 3 Click Advanced or Preferences 4 Click Detail in the Setup tab and select Automatic and click OK 5 Printing will be implem...

Page 122: ...resentation software Color matching is implemented for printers using the colors expressed using RGB colors which are used with these software applications Color matching is implemented using a specia...

Page 123: ...temperature 6500K z z Monitor light During color matching represents the color by the method emphasizing the gradation suiting the natural image of photograph and compatibility with the monitor color...

Page 124: ...t in the File menu 3 Click Advanced or Preferences 4 Click Detail in the Setup tab and select Automatic or Office Color and click OK 5 Printing will be implemented Using Windows XPS printer drivers 1...

Page 125: ...atching GraphicPro If using DTP software Graphic Pro is optimum You can specify simulation printing for a user selected CMYK output device If using an ICC profile for a user selected I O device for co...

Page 126: ...er drivers 1 Open the file to be printed 2 Select Print from the File menu 3 Click Advanced or Preferences 4 Select Graphic Pro in Color Mode in the Color tab and then click OK 5 Printing will be impl...

Page 127: ...t Graphic Pro in the Color panel 4 Printing will be implemented Color matching color matching OFF Implements printing using the specified colors as is without implementing color matching using the pri...

Page 128: ...n the file to be printed 2 Select Print from the File menu 3 Click Advanced or Preferences 4 Click Detail in the Setup tab and select No Color Matching and click OK 5 Printing will be implemented Usin...

Page 129: ...ing to the document to be printed This setting can be selected when the color mode is set to Office Color z z Composite Black CMYK Synthesizes black using cyan magenta yellow and black toner The black...

Page 130: ...n Color Mode in the Color tab and then click Advanced 5 Select the black finish method from Black Finish Further turn ON or OFF Pure Black Text Graphics in Graphic Pro mode and click OK 6 Printing wil...

Page 131: ...menu 3 Click Advanced or Preferences 4 Select Advanced Color in Color Mode in the Color tab 5 Select the black finish method from Black Finish and click OK 6 Printing will be implemented Using Mac OS...

Page 132: ...olor printing after printing by specifying Monochrome a delay may occur depending on the temperature adjustment of the fixing unit Using Windows PS printer drivers 1 Open the file to be printed 2 Sele...

Page 133: ...ity Software Using Windows XPS printer drivers 1 Open the file to be printed 2 Select Print in the File menu 3 Click Advanced or Preferences 4 Select Grayscale in Color Mode in the Color tab and then...

Page 134: ...2003 and printing large text using True Type fonts black overprint is disabled as the text is replaced with graphics images by the application z z If the background color is dark the toner layer thic...

Page 135: ...lick Quality 1 in the Print Options panel and enable the Black Overprint check box 4 Printing will be implemented Calibrating plate misalignment trapping Use if there are white or colored lines betwee...

Page 136: ...he File menu 3 Click Advanced or Preferences 4 Click Advanced in the Job Options tab 5 Select Trapping and then select the print misalignment calibration method using Settings and click OK 6 Printing...

Page 137: ...tion method using Trapping 4 Printing will be implemented Simulating print effects The ink characteristics used in offset printing etc by adjusting the CMYK color data is simulated by the device The I...

Page 138: ...lect the ink characteristics to be simulated using Simulation Target Profile Memo z z For business documents etc you can select Office Color in the Color tab in Steps 4 and 5 and then click Advanced a...

Page 139: ...the File menu 3 Select Graphic Pro in the Color panel 4 Select Printer Simulation in Select Mode 5 Click the Input button and select the ink characteristics to be simulated using Simulation Target Pro...

Page 140: ...et the printer driver settings to No Color Matching Memo z z The Separations function is for creating under the print Use black toner to print each specified primary color There is no function for pri...

Page 141: ...rinters z z If color matching using the Color Correct Utility computer administrator privileges are required z z If job restrictions mod is enabled encrypted jobs only sample printing and test printin...

Page 142: ...printed PALETTE COLOR SAMPLE Note z z Colors marked with an X cannot be matched 7 Compare the palette in the Office Palette Tuning window screen colors and the Palette color sample that have been pri...

Page 143: ...g window using the COLOR SELECTION SAMPLE and check the values X and Y values for the X axis hue and Y axis brightness 11 Click the colors to be matched screen colors in the Office Palette Tuning wind...

Page 144: ...ct and print the settings name using the printer drivers Using Windows PS printer drivers 1 Open the file to be printed 2 Select Print in the File menu 3 Click Advanced or Preferences 4 Select Office...

Page 145: ...ing palette colors Macintosh You can use the Color Correct Utility to specify the palette colors selected using Microsoft Excel and Word etc within the matching range Note z z For how to set up the Co...

Page 146: ...ing Utility Software 4 The Office Palette Tuning screen will be displayed Select the setup from the list box and click Print Swatches COLOR SELECTION SAMPLE will be printed 5 Click Next 6 Click Print...

Page 147: ...ow 8 Click the colors to be matched screen colors in the Office Palette Tuning window The Adjustment values input screen will be displayed 9 Check the adjustable range using the X and Y values popup b...

Page 148: ...n the PALETTE COLOR SAMPLE after the changes are close to the color samples for the set values To adjust any other colors repeat Steps 8 to 13 14 Enter a name for your Color Settings and click Save 15...

Page 149: ...t Utility computer administrator privileges are required z z If job restrictions mod is enabled encrypted jobs only test printing functions cannot be used For job restrictions mode see Administrator m...

Page 150: ...ter s unadjusted color adjusts so that the 100 of the primary toner colors are used Enable this check box to anchor the Hue slider bar for the relevant color and adjust so that printing arranges the t...

Page 151: ...gs in the Office Color Details window and then select the settings created using the Color Correct Utility and click OK 6 Printing will be implemented Note z z If updating or reinstalling the printer...

Page 152: ...ck Gamma Hue Saturation Tuning 4 The Gamma Hue Saturation Tuning screen will be displayed Select the basic mode from the list box and click Next 5 Use the slide bars to change and adjust the Gamma Hue...

Page 153: ...lette TEST PRINTING SAMPLE will be printed 7 Check the adjusted results If the desired match results have not been obtained repeat Steps 5 and 6 8 Enter a name for your Color Settings and click Save 9...

Page 154: ...t up the Color Correct Utility see Installing utilities P 170 z z Set up each printer driver z z Cannot be used with shared printers z z If using the Color Correct Utility computer administrator privi...

Page 155: ...settings folder name and click Save 4 Click OK 5 Click Finish to finish the Color Correct Utility Saving color matching settings Macintosh You can save the details set using the Color Correct Utility...

Page 156: ...stination and enter the settings folder name and click Save 4 Close the Color Correct Utility Importing color matching settings Windows The color matching settings can be read from the file Note z z F...

Page 157: ...and click Next The Import Export Color Settings screen will be displayed 2 Read the settings 1 Click Import 2 Select the CCM file in the folder to which the settings to be read have been saved and cli...

Page 158: ...ect Utility see Installing utilities P 170 z z Set up each PPD file z z Cannot be used with shared printers 1 Start the Color Correct Utility 1 Start the Color Correct Utility 2 Select the target prin...

Page 159: ...e Shift key when selecting to select multiple settings 4 Check that the settings have been read using the Office Palette Tuning and Gamma Hue Saturation Tuning screens and close the Color Correct Util...

Page 160: ...st and click Delete 5 Click Yes to delete the settings 6 Check that the settings have been deleted and click Finish Deleting color matching settings Macintosh You can delete unnecessary color matches...

Page 161: ...sing this function may make printing slower To prioritize speed in Windows disable Use printer halftone and in Macintosh select No settings in Halftone adjustment z z If using Windows the Halftone adj...

Page 162: ...dd 7 Click Apply The dialog box will be displayed 8 Click OK 9 Click Finish to close the PS Gamma Adjuster Registering gamma Macintosh 1 Start the PS Gamma Adjuster 2 Click Define new halftone adjustm...

Page 163: ...s 0 to 255 of the R red G green and B blue colors in the color block 5 Select the color to be printed from the printed color samples and note down the printed RGB value Memo z z If there are no colors...

Page 164: ...n use the same printer driver settings as the settings used to print the color samples Profile assistant This section explains the profile assistant utility You can match the colors using the printer...

Page 165: ...d and click Select Note z z Not compatible with USB2 0 If using this utility with USB set the device USB baud rate to 12Mbps to connect using USB1 1 4 Click Add in the main window 5 Select the profile...

Page 166: ...Matching Colors Using Utilities 4 3 5 1 2 Convenient print functions Appendix Index Checking and Changing Printer Settings Using the Control Panel Network Setup Matching Colors Using Utility Software...

Page 167: ...x Index Checking and Changing Printer Settings Using the Control Panel Network Setup Matching Colors Using Utility Software 3 Using Utility Software Utility software that can be used with the printer...

Page 168: ...installed Page 222 Print jobs Accounting client 1 Sets the user name and user ID in the printer drivers z z Windows 8 Windows 7 Windows Vista Windows Server 2012 Windows Server 2008 R2 Windows Server...

Page 169: ...r Installer 1 This application displayed the devices and printer connected to the network downloads the printer driver installation modules and installs to the client PC Windows 8 Windows 7 Windows Vi...

Page 170: ...and menus Mac OS X 10 3 9 to 10 8 Page 197 NIC settings tool Enables the network setup Mac OS X 10 3 9 to 10 8 Page 200 1 Not included on the Software DVD ROM Download from the OKI Data homepage Inst...

Page 171: ...e installed and click Install 10Check the software and click Start 11 When the installation has finished click the Exit button 12Click the Exit button in the menu window to finish Macintosh Use the fo...

Page 172: ...ges saved jobs z z Formats partitions z z Changes HDD partition sizes z z Initializes flash memory z z Sets printer networks Operations environment PCs running Windows 8 Windows 7 Windows Vista Window...

Page 173: ...and printer and displays web pages Added to the plug in menu when installed For details see Network Setting plug in P 175 z z Storage Manager plug in Includes functions such as ICC profile registrati...

Page 174: ...ion Tool 1 Select Start All programs OKI Data Configuration Tool Configuration Tool to start the Configuration Tool 2 Select Register Device in the Tools menu to search for OKI devices that can be reg...

Page 175: ...mation Note z z The device status will be displayed if an OKI device is connected to the network Network Setting plug in The network can be set using the Configuration Tool Before making the settings...

Page 176: ...click OK The factory set password is the last six alphanumeric characters of the MAC address 6 Click OK to restart the device Storage Manager plug in Storage Manager plug in can manage jobs saved on...

Page 177: ...in the Comments field 8 Click the OK button to apply the changes 9 Select the printer from the device list at the bottom of the window 10Click to send the project associated to the ICC profile that ha...

Page 178: ...space 1 Click the printer name from the device selection area below the Storage Manager plug in screen to display the resource window for the selected printer 2 Communications with the printer will d...

Page 179: ...PDF files that the viewer is not authorized to print specify the master password z z If job restrictions mod is enabled encrypted jobs only printing using this utility is disabled For job restrictions...

Page 180: ...b Accounting client This utility sets the user name and user ID in the printer drivers Operations environment PCs running Windows 8 Windows 7 Windows Vista Windows XP Windows Server 2012 Windows Serve...

Page 181: ...without user ID being implemented The log retains the user name as the login user name to Windows and the user ID as 0 Use if user ID is not necessary Note z z If updating and reinstalling the printer...

Page 182: ...licked the user name is blank and user ID remains as 0 in the log The print job is not canceled Using in non display mode Using by switching user ID for each user in non display mode 1 Create the ID f...

Page 183: ...xit in the File menu 10Print from the applications Note z z If logging into Windows to print using a login user name that is not registered the user name will be the current login user name and the us...

Page 184: ...z If the user name is omitted the login user name is used as the user name 8 Select Exit in the File menu 9 Print from the applications Using in incompatible mode 1 Select Start All programs OKI Data...

Page 185: ...device power supply 2 Set the Software DVD ROM The setup program will start 3 Read the Software License Agreement and click Agree 4 Read the environment advice and click Next 5 Select the printer to b...

Page 186: ...Utility LPR Operations environment PCs running Windows 8 Windows 7 Windows Vista Windows XP Windows Server 2012 Windows Server 2008 R2 Windows Server 2008 Windows Server 2003 Versions PCs operating us...

Page 187: ...cannot print as the printer is in use offline or there is no paper you can send the print job to another printer Note z z You cannot send to printers manufactured by other companies z z Forward to the...

Page 188: ...u can change the printer destination port to OKI LPR port Note z z You cannot set a printer that is already registered in the Direct Network Printing Utility LPR To change the port select Reset printe...

Page 189: ...he Remote Print menu 3 Click Details 4 Enable the Automatic Job Redirect Used check box To forward only if a printer error such as Offline or Paper out occurs also enable the Forward only during an er...

Page 190: ...1 Select the printers 2 Select Confirm Connections from the Remote Print menu 3 Click Details 4 Enable the Print to more than one printer at a time check box and click Options 5 Click Add and set the...

Page 191: ...enus using the Direct Network Printing Utility LPR Memo z z For how to set up the settings see the Basic 1 Select the device 2 Select Web Setting from the Remote Print menu Memo z z If the web port nu...

Page 192: ...stallations 1 Select the printers 2 Select Confirm Connections from the Remote Print menu 3 Enter the comments in Comment and click OK 4 Select Show comments in the Option menu Setting IP addresses au...

Page 193: ...e optional device configurations from the printer drivers Reference z z Network Extension is installed together with the printer drivers Operations environment PCs running Windows 8 Windows 7 Windows...

Page 194: ...ton Windows 7 PCL drivers window The setup details for the device will be displayed in the Device Settings 5 Click OK Memo z z Click the Web Setting button to start the Web browser automatically and d...

Page 195: ...PrintSuperVision on a PC and then use the web browser from another PC to access PrintSuperVision MultiPlatform Edition remotely Note z z PrintSuperVision MultiPlatform Edition is not included on the S...

Page 196: ...t is safe to disable the cache functions for the browser used z z PSV ME uses ports 25 SMTP 110 POP3 995 POP3S 161 SNMP 162 SNMP Trap 8080 HTTP 1043 HTTPS and 50702 PrintSuperVisor Daemon to communica...

Page 197: ...address using the menu map output in Step 1 4 Click OK 5 Check that the value of the Language Format in the menu map and the value of the language version displayed in the window match the following...

Page 198: ...Installing 1 Double click the file downloaded from the OKI Data homepage A disk icon will be displayed on the desktop 2 Copy the print job accounting client in the disk icon to the application folder...

Page 199: ...e 1 Enter the Mac OS X login name user ID and user name for each user in the fields Note z z Enter the user ID in single byte numbers 2 Save in CSV format 2 Register using the client software 1 Start...

Page 200: ...software Network Card Setup Utility The network can be set using the Network Card Setup Utility TCP IP must be enabled to use the Network Card Setup Utility Note z z Set the TCP IP Setting IP address...

Page 201: ...Enable and click Setup 3 Enter the password in Input password and click OK The factory set password is the last six alphanumeric characters of the MAC address The password is case sensitive 4 Click OK...

Page 202: ...202 Macintosh utilities 4 5 1 3 2 Convenient print functions Appendix Index Checking and Changing Printer Settings Using the Control Panel Network Setup Matching Colors Using Utility Software Memo...

Page 203: ...Changing Printer Settings Using the Control Panel Network Setup Matching Colors Using Utility Software 4 Network Setup Network setting items 204 Initializing network settings 216 Using DHCP 217 Using...

Page 204: ...rd Setup Utility Mac OS X Administrator contacts None Specify the system administrator contact details using 255 single byte characters max Printer name OKI Product name Last 6 digits of MAC address S...

Page 205: ...if specifying the STMP server using the domain name Dynamic DNS Disable Specifies whether to register the information to the DNS server when the settings have changed Domain name None Sets the domain...

Page 206: ...ault Settings Explanation Web Page Configuration Tool Network Setting Plug in Network Card Setup Utility Mac OS X SMTP sending Disable Sets whether to use the SMTP e mail send protocols SMTP Server na...

Page 207: ...AC address in the printer information described in the outgoing mail Additional information Setup Short printer name Disable Sets whether to include the device short printer name in the printer inform...

Page 208: ...rrors fixer units belt units etc Enabled only if periodic notifications are selected Refill paper warning 0H 15M Sets whether to notify you of paper warnings Enabled only if notify upon occurrence is...

Page 209: ...abled only if periodic notifications are selected Security Disable Sets whether to notify you of warnings occurring in the security functions Enabled only if notify upon occurrence is selected Securit...

Page 210: ...rap in TCP numbers 1 to 5 Printer restart 1 to 5 Disable Specifies whether to send SNMP messages when the printer is restarted Illegal trap receipt 1 to 5 Disable Specifies whether to use the trap whe...

Page 211: ...Mac OS X SNTP Manual Sets whether to use or not use SNTP protocols NTP server Primary None Sets the IP address of the primary NTP server that acquires the time NTP server Secondary None Sets the IP a...

Page 212: ...ord Change password Last 6 digits of MAC address Sets a new administrator password using 15 single byte characters max The password is case sensitive This password is used only when changing the setup...

Page 213: ...y server Encryption SSL TLS Item Factory Default Settings Explanation Web Page Configuration Tool Network Setting Plug in Network Card Setup Utility Mac OS X Select the type of certificate used Using...

Page 214: ...whether to use Key PFS Perfect Forward Secrecy Diffie Hellman group when Key PFS is enabled None Specifies the Diffie Hellman group used by Key PFS ESP encryption Algorithm AES CBC 128 Specifies the...

Page 215: ...tility Mac OS X Paper feed tray Auto selection Specifies the tray used in the print job Copies 1 Specifies the copies Batch printing Disable Specifies whether to sort the output Align to paper size En...

Page 216: ...Setup and press the OK button Admin Setup 1 3 Page Network Setup Print Setup PS Setup PCL Setup XPS Setup Use Online button to return to standby screen USB Setup 5 Select Network Factory Defaults and...

Page 217: ...ver 2008 Windows Server 2003 z z The following procedure uses Windows Server 2008 R2 as an example Depending on the OS descriptions may differ 1 Click Start and select Admin tools Server manager If DH...

Page 218: ...strator password and press the OK button 4 Select Network Setup and press the OK button Admin Setup 1 3 Page Network Setup Print Setup PS Setup PCL Setup XPS Setup Use Online button to return to stand...

Page 219: ...rk Setup Matching Colors Using Utility Software Using on a BOOTP environment To use the device on a BOOTP environment set the IP address setup method to BOOTP 1 Access the device web page and log in a...

Page 220: ...ss the device web page and log in as an administrator 2 Select Admin Setup 3 Select Network Setup SNMP Setup 4 Implement advanced setup by following the on screen instructions 5 Click Submit 6 The net...

Page 221: ...g protocols z z Print LPR IPP RAW Port9100 FTP z z Setup HTTP SNMPv1 v3 Telnet Checking IPv6 addresses IPv6 addresses are allocated automatically 1 Access the device web page and select Device informa...

Page 222: ...the web browser security is set to medium The following explanation uses the following environments as examples z z Printer name C931 z z Printer IP address 192 168 0 2 z z MAC Address 00 80 87 84 9C...

Page 223: ...og in as a device administrator 1 Click Administrator Login 2 Enter root in Username and the current password in Password and click OK Memo z z The password is the same as for the Administrator passwo...

Page 224: ...ation Item Explanation Information Print You can print and check the information set in the printer such as the networks and want lists etc Printer Menu Item Explanation General Printer Settings You c...

Page 225: ...ensation and color misalignment compensation Direct Print Item Explanation Web Printing You can print by specifying a user selected PDF file Reference See Printing PDF files P 254 Job List Item Explan...

Page 226: ...en reenter the new password in Verify Password Note z z When entering a password will be displayed on screen z z Enter an alphanumeric password from 6 to 12 characters z z If entering alphanumerics in...

Page 227: ...r and display the Status screen Checking the Status Window Click Status Window to display the following screen The printer status details will be displayed Clicking will up date the printer status to...

Page 228: ...z z If the device IP address is changed after the certificate has been created that certificate will become invalid Do not change the device IP address after the certificate has been created 1 Log in...

Page 229: ...gned certificate creation The settings will be save in the printer and the network functions will restart 7 Follow Steps 1 to 3 to display the encrypted SSL TLS setup screen and set the protocols to e...

Page 230: ...k functions will restart 9 Follow Steps 1 to 3 to display the encrypted SSL TLS setup screen and set the protocols to enable the encryption 10Click Submit Usage methods 1 Start the web browser and ent...

Page 231: ...the computer 8 Enter the following values in Copy manufacturer s files from and click Find z z PCL drivers D Drivers PCLXL z z PS drivers D Drivers PS z z XPS drivers D Drivers XPS Memo z z The descr...

Page 232: ...tup Use the web and follow the procedure to enable IPSec 1 Log in as an administrator Reference z z See Logging in as an administrator P 223 2 Click Admin Setup Network Setup Security tab 3 Click the...

Page 233: ...ion Algorithm 2 Select from SHA 1 and MD5 and set in IKE Hash Algorithm 3 Select from Group 2 and Group 1 and set in the Diffie Hellman Group 4 Enter the range from 600 s to 86400 s in LifeTime to set...

Page 234: ...t from AES CBC 256 AES CBC 192 AES CBC 128 3DES CBC DES CBC and set in ESP Encryption Algorithm 2 Select from SHA 1 MD5 and OFF and set in ESP Authentication Algorithm If OFF is selected the ESP authe...

Page 235: ...setup 1 Click Start and select Control Panel System and Security 2 Click Administrative Tools Connection security regulations 3 Double click Local Security Policy 4 Right click Windows Firewall with A...

Page 236: ...ware 7 Enable the Require authentication for inbound connections and request authentication for outbound connections check box and click Next 8 Select Advanced and click the Customize button 9 Click t...

Page 237: ...he local security policy in the management tools 16Select Windows Firewall with Advanced Security right click and select Properties 17Select the IPSec Settings tab and click the Customize button in IP...

Page 238: ...r the desired value and click OK Note z z Only the time is supported as the key enabled time Set the maximum value to disable the conditions using the session IPSec communications data size 22Select A...

Page 239: ...n Setup Network Setup Security tab 3 Click IP Filtering 4 Enable the IP Filtering in STEP1 Note z z Enable IP filtering to disable all access from IP address hosts outside the range set in STEP2 5 Set...

Page 240: ...sequently the Your host IP address displayed in your host address may differ z z If nothing is registered as the administrator IP address access to the device may be completely disabled depending on t...

Page 241: ...ministrator s MAC Address setting in STEP3 Even if the incorrect settings were made in STEP2 by entering the administrator MAC address in Administrator s MAC Address setting the administrator can rese...

Page 242: ...in STEP3 5 Set the address required to send in STEP2 1 Set the mail server domain name or IP address in SMTP Server 2 Set the mail address allocated to the printer in Printer Email Address Note z z If...

Page 243: ...he password to connect to the mail server in Password 10Click Configure attached information 11 Select or enter the information to be added to the end of the e mail message to be sent 12Click OK 13Cli...

Page 244: ...n administrator P 223 2 Click Admin Setup Network Setup 3 Click Email Alert Settings 4 Enter the mail address of the malfunction notice recipient 5 Click the Setting button for the e mail address that...

Page 245: ...tails of the malfunction notifications conditions z z Displaying tables 1 Click the Show current settings table button 2 Check the set details and close the window z z Comparing the set conditions for...

Page 246: ...mo z z Click the Copy button to copy the malfunction notice information settings to another address It is convenient to set the same malfunction notification conditions in multiple addresses 4 Enable...

Page 247: ...addresses 1 Use the list box to select each address to be compared 2 Check the settings details that are displayed Memo z z You can change the notification condition settings by clicking the set cond...

Page 248: ...bled If SNMPv3 v1 is selected both SNMPv1 and SNMPv3 can be used for referencing but only NMPv3 can be set 5 Enter the SNMPv3 user name in User Name in STEP2 6 Enter the authentication password in Pas...

Page 249: ...leting the IEEE802 1X setup connect the device to the authentication switch 1 Connect the printer and PC 2 Set the IP address for setup in the PC 3 Set the IP address for setup in the printer For how...

Page 250: ...e Server is enabled disable whether or not to connect to the correct authentication server The Import of CA Certificate screen will be displayed 10Enter the CA certificate file name and click OK Memo...

Page 251: ...of Client Certificate The Import of Client Certificate screen will be displayed 9 Enter the client certificate file name Memo z z The importable certificate file format is PKCS 12 10Enter the client c...

Page 252: ...gs will be save in the printer and the network functions will restart If the standby screen is displayed in the control panel turn OFF the device power supply Reference z z For how to turn OFF the pow...

Page 253: ...Setup Network Setup EtherTalk tab 3 Enter a new name in EtherTalk Printer Name and click Submit Note z z Settable printer names are 32 single byte alphanumeric characters max z z Do not use symbols e...

Page 254: ...b browser to send to the device Note z z Some PDF files may not print correctly If printing is incorrect print from an application such as Acrobat Reader z z If printing by specifying the print page d...

Page 255: ...ol Panel Network Setup Matching Colors Using Utility Software 5 Checking and Changing Printer Settings Using the Control Panel Printing printer information 256 Checking print quantities 268 Checking r...

Page 256: ...he file system Page 259 PS font list Prints the PS font samples Page 261 PCL font list Prints the PCL font samples Page 261 Total print results Prints the total print results Page 260 Error log Prints...

Page 257: ...details Print the device information Print to see the remaining quantity of consumables and other set values such as IP addresses and MAC addresses and to check whether the device print unit is operat...

Page 258: ...ing printer information lists Network information Print the device network information How to print 1 Press the Fn key The numerical values input screen will be displayed 2 Press functions numbers 1 0...

Page 259: ...the scroll button or 2 Select Print Information and press the OK button 3 Select File List and press the OK button 4 Check that Execute has been selected and press the OK button Demo pages Prints dem...

Page 260: ...ey The numerical values input screen will be displayed 2 Press functions numbers 1 0 3 and press the OK button 3 Check that Execute has been selected and press the OK button Total print results Prints...

Page 261: ...print 1 Press the scroll button or 2 Select Print Information and press the OK button 3 Select PCL Font List or PS Font List and press the OK button 4 Check that Execute has been selected and press t...

Page 262: ...edia List and press the OK button 4 Check that Execute has been selected and press the OK button Test prints Prints the print quality lists z z Test print 1 Prints the patterns for analyzing the print...

Page 263: ...length of the paper using the control panel 1 Press the Fn key The numerical input screen will be displayed 2 Enter a function number according to the paper feed tray to be set z z Multi purpose tray...

Page 264: ...and width 1 Select Y Dimension and press the OK button 2 Use the 10 key pad or the scroll buttons to enter the length 3 After entering the length press the OK button Check that is displayed to the lef...

Page 265: ...ministrator password The default factory setting is aaaaaa 1 Press the scroll button or 2 Select Admin Setup and press the OK button 3 Enter the administrator password and press the OK button 4 Select...

Page 266: ...K button 3 Enter the password and press the OK button Memo z z This is the same as the administrator password The default factory setting is aaaaaa 4 Select Panel Lockout and press the OK button 5 Spe...

Page 267: ...ot changed unintentionally 1 Press and hold the OK button and press the power switch 2 Check that Boot Menu has been selected and press the OK button 3 Enter the password and press the OK button Memo...

Page 268: ...ities You can check the quantity of printed paper to date You can also check the quantities printed fed from each tray 1 Press the scroll button or 2 Select Configuration and press the OK button 3 Sel...

Page 269: ...nfiguration and press the OK button 3 Select Supplies Life and press the OK button 4 Select the consumable or maintenance unit to be checked Toner image drum belt unit fixer unit or waste toner box 5...

Page 270: ...printer information You can print the device configuration information font list error log etc Authentication print You can save print jobs to the device HDD and enter a password to print Displayed wh...

Page 271: ...ck toner n nK Remainder nnn White Toner n nK 2 2 Displayed with C941 ES9541dn only Remainder nnn Clear Toner n nK 2 2 Displayed with C941 ES9541dn only Remainder nnn Cyan drum Remainder nnn Displays t...

Page 272: ...xxx xxx Displays the gateway address Displays the control panel Administrator menu Network setup Gateway address setup when TCP IP is enabled MAC Address xx xx xx xx xx xx Displays the MAC address Net...

Page 273: ...xxx Displays the asset number of the printer manager CU version xx xx Displays the control unit firmware version PU version xx xx xx Displays the print unit firmware version RAM information xxMB Displ...

Page 274: ...ting Prints the PostScript font samples PCL font list Implement printing Prints the PCL font samples Total print results Implement printing Prints the total print results Error log Implement printing...

Page 275: ...Details Encrypted job No job This message is displayed when there is no encrypted secure print job allocated to the password that has been entered Implement printing Prints the encrypted secure print...

Page 276: ...Paper size A3NOBI A3Wide A3 A4 A4 A5 A5 A6 B4 B5 B5 B6 Legal14 Legal13 5 Legal13 Tabloid extra Tabloid Letter Letter Executive 16K 184x260mm 16K 195x270mm 16K 197x273mm 16K 184x260mm 16K 195x270mm 16K...

Page 277: ...stom paper width for the Multi Purpose Tray 64mm to 210mm to 330mm Paper length 1 1 Displayed when Paper size is set to Custom on the control panel 3 5 to 11 7 to 52 0 Sets the custom paper length for...

Page 278: ...ay selection switching Use as regular tray Paper errors If the output tray paper size or paper type is different from the print data print from the Multi Purpose Tray Do not use Auto tray selection an...

Page 279: ...RTYPE12 USERTYPE13 USERTYPE14 USERTYPE15 USERTYPE16 USERTYPE17 USERTYPE18 USERTYPE19 USERTYPE20 Sets the paper type for tray 1 Paper weight Auto Ultra light paper Light paper Plain paper Somewhat card...

Page 280: ...m 8K 260x368mm 8K 270x390mm 8K 273x394mm Specifies other fixed paper sizes in tray 1 Tray 2 1 Tray 3 1 Tray 4 1 Tray 5 1 1 The optional expansion tray unit is displayed when mounted Paper size Cassett...

Page 281: ...YPE20 Sets the paper type for trays 2 to 5 Paper weight Auto Ultra light paper Light paper Plain paper Somewhat card stock Card stock Greater card stock Ultra card stock 1 Ultra card stock 2 Ultra car...

Page 282: ...s Final page of Duplex Skip Blank Page Always Print Skip Blank Page Prints the final page as 1 sided when using 2 sided printing on odd numbered data pages Always Print Implements regular 2 sided prin...

Page 283: ...150s 180s 210s 240s 270s 300s Sets the time from loss of the receipt of data until force printing With PS the job is canceled without printing being implemented Toner low print Continue Stop Sets the...

Page 284: ...Y adjust 1 1 Displayed with C941 ES9541dn only 0 00 to 2 00mm Adjusts the overall image print position perpendicularly vertically over the direction of paper travel 0 25mm intervals during spot color...

Page 285: ...el 0 25mm intervals during spot color overprinting Spot color overprint Y adjust 2 2 Displayed with C941 ES9541dn only 0 00 to 2 00mm Adjusts the overall image print position perpendicularly verticall...

Page 286: ...the value if the underlay is dark Drum cleaning ON OFF Sets whether to implement drum cleaning before printing The image quality may be improved Transfer roller cleaning Implement Implements cleaning...

Page 287: ...xxx xxx xxx xxx Sets the subnet mask Gateway address Displayed if TCP IP in the control panel is set to Enable xxx xxx xxx xxx Sets the gateway address Web Displayed if TCP IP in the control panel is...

Page 288: ...ores the settings such as network mail server LDAP server and secure protocol server etc to their default values USB settings z z Shaded areas are factory set values Item Details USB Enable Disable En...

Page 289: ...ay Resolution 600dpi 1200dpi 1200x600dpi multi levels Sets the resolution Toner save Toner save quantity OFF Less Considerable More Sets the toner ave quantity Specifies OFF when toner save mode is di...

Page 290: ...al13 5 Legal13 Tabloid extra Tabloid Letter Letter Executive 16K 184x260mm 16K 195x270mm 16K 197x273mm 16K 184x260mm 16K 195x270mm 16K 197x273mm 8K 260x368mm 8K 270x390mm 8K 273x394mm Statement Sets t...

Page 291: ...mmunications protocol mode for data from the network USB protocols ASCII RAW Sets the PS communications protocol mode for data from the USB PCL settings z z Shaded areas are factory set values Item De...

Page 292: ...WIN3 1J PC 8 PC 8 Dan Nor PC 8 Grk PC 8 TK PC 775 PC 850 PC 851 Grk PC 852 PC 855 PC 857 TK PC 858 PC 862 Heb PC 864 L A PC 866 PC 866 Ukr PC 869 PC 1004 Pi Font Plska Mazvia PS Math PS Text Roman 8...

Page 293: ...man Greek 437 Greek 437 Cy Greek 737 Greek 8 Greek 928 Hebrew NC Hebrew OC Hebrew 7 Hebrew 8 IBM 437 IBM 850 IBM 860 IBM 863 IBM 865 ISO Dutch ISO L1 ISO L2 ISO L4 ISO L5 ISO L6 ISO L9 ISO Swedish1 IS...

Page 294: ...lines are visible Tray ID MPT 1 to 4 to 59 Specifies the number of the Multi Purpose Tray specification using the output specification command in the PCL commands Tray 1 1 to 5 to 59 Specifies the nu...

Page 295: ...on Auto Mode is switched automatically according to the file Speed prioritization Print speed is prioritized and partial Unzip functions are not used Print prioritization Print processing is prioritiz...

Page 296: ...tness is applied after the panel backlight timer time has eplased from the last operation Panel Backlight Timer 10 to 30 to 300 Adjusts the time s from the last operation to when the panel brightness...

Page 297: ...Enable Auto Setting Disable Sets auto power OFF mode Others Setup z z Shaded areas are factory set values Item Details RAM Setup Incoming buffer size Auto 0 5 MB 1 MB 2 MB 4 MB 8 MB 16 MB 32 MB Sets t...

Page 298: ...Implement Recovers defective sector information on the HDD and file system nonconformances Initialization implementation possible No Yes Sets whether or not to authorize setup changes concomitant wit...

Page 299: ...FF Sets whether to display the enquiry screen when a job is canceled Focus Position Yes No Sets whether to apply Yes or No focus for selection in the job cancellation enquiry screen Display Timeout 60...

Page 300: ...n function Consumables counter Enable Disable Sets whether or not to display the number of consumables replacements Main counter reset 1 1 Displayed if Totalization function in the control panel is se...

Page 301: ...en the device is in standby mode Color misalignment compensation Implement Implements auto color misalignment compensation operations Implement when the device is in standby mode Fixing speed compensa...

Page 302: ...ar in the highlight area of the printed color matching pattern The matching results are reflected in the highlight matching values for cyan magenta and yellow matching Mid Tone A 1 A 2 B 1 B 2 to O 1...

Page 303: ...4 Matches the highlights light areas of the magenta shade characteristics Mid Tone 4 to 0 to 4 Matches the intermediate areas of the magenta shading characteristics Dark 4 to 0 to 4 Matches the dark d...

Page 304: ...z Shaded areas are factory set values Item Details Reset Color Tuning Implement Resets the CMYK color matching White Tuning 1 1 Displayed with C941 ES9541dn only Highlight 3 to 0 to 3 Matches the hig...

Page 305: ...itialization HDD Setup 1 1 Displayed when the HDD is mounted Enable HDD No Yes Sets whether to start the printer viewing the HDD is not mounted when the HDD is actually mounted Storage Common Setup 1...

Page 306: ...setting items in the device setup screen 1 2 3 5 4 Convenient print functions Appendix Index Checking and Changing Printer Settings Using the Control Panel Network Setup Matching Colors Using Utility...

Page 307: ...enient print functions Appendix Index Checking and Changing Printer Settings Using the Control Panel Network Setup Matching colors Using Utility Software Appendix Using Print Job Accounting 308 Charac...

Page 308: ...iptions from the text herein z z If print job accounting has been added to the device print by enabling JobAccounting ON in the device setup print z z See Settings details P 257 Number of usable user...

Page 309: ...2 3 4 5 Convenient print functions Appendix Index Checking and Changing Printer Settings Using the Control Panel Network Setup Matching Colors Using Utility Software z z Character code table PostScrip...

Page 310: ...acter code table 1 2 3 4 5 Convenient print functions Appendix Index Checking and Changing Printer Settings Using the Control Panel Network Setup Matching Colors Using Utility Software Symbol Wingding...

Page 311: ...code table 1 2 3 4 5 Convenient print functions Appendix Index Checking and Changing Printer Settings Using the Control Panel Network Setup Matching Colors Using Utility Software ZapfDingbats Hoefler...

Page 312: ...3 0 Win 3 1 Arb Win 3 1 L G Win 3 1 Blt Win 3 1 Cyr Win 3 1 Grk Win 3 1 Heb Win 3 1 L1 Win 3 1 L2 Win 3 1 L5 Wingdings Dingbats MS Symbol OCR A OCR B OCRB Subset2 HP ZIP USPSFIM USPSSTP USPSZIP Arabic...

Page 313: ...Character code table 1 2 3 4 5 Convenient print functions Appendix Index Checking and Changing Printer Settings Using the Control Panel Network Setup Matching Colors Using Utility Software Symbol Wing...

Page 314: ...314 Character code table 1 2 3 4 5 Convenient print functions Appendix Index Checking and Changing Printer Settings Using the Control Panel Network Setup Matching Colors Using Utility Software Memo...

Page 315: ...315 1 2 3 4 5 Convenient print functions Appendix Index Checking and Changing Printer Settings Using the Control Panel Network Setup Matching Colors Using Utility Software Index...

Page 316: ...50 153 Color matching Automatic 120 Graphic Pro 125 No Color Matching 127 Office colors 122 Color misalignment compensation manual 112 Color Swatch Utility 163 Consumables and maintenance unit 269 Con...

Page 317: ...inting 82 83 Multi Purpose Tray 75 Multipurpose tray is handled as manual feed 23 28 34 41 47 N NetBIOS over TCP 206 Not printing underlines or shading 65 O Orientation Printing on face down print sur...

Page 318: ...ist 261 262 Printing separations in CMYK 140 Printing using registered forms 95 Printing using shades of black and white 132 Prioritizing print speed using low resolution 65 Profile assistant 165 R Re...

Page 319: ...204 222 Items table 224 Login 223 Web printing 215 Windows utilities Change the Printer Display Language 185 Configuration Tool 172 204 Direct Network Printing Utility LPR 186 Network Extension 193 P...

Page 320: ...www okiprintingsolutions com Oki Data Corporation 4 11 22 Shibaura Minato ku Tokyo 108 8551 Japan 45582202EE Rev1...

Reviews: