OHAUS Skipper 5000 User Manual Download Page 32

4.2 Menu description

4.2.1 Overview

In the menu, you can set up the scale to handle your special sales and back office tasks. Specific
functions and groups are only accessible if you have a license. Ask your sales representative for this.

The menu features are organized in the following menu tree:
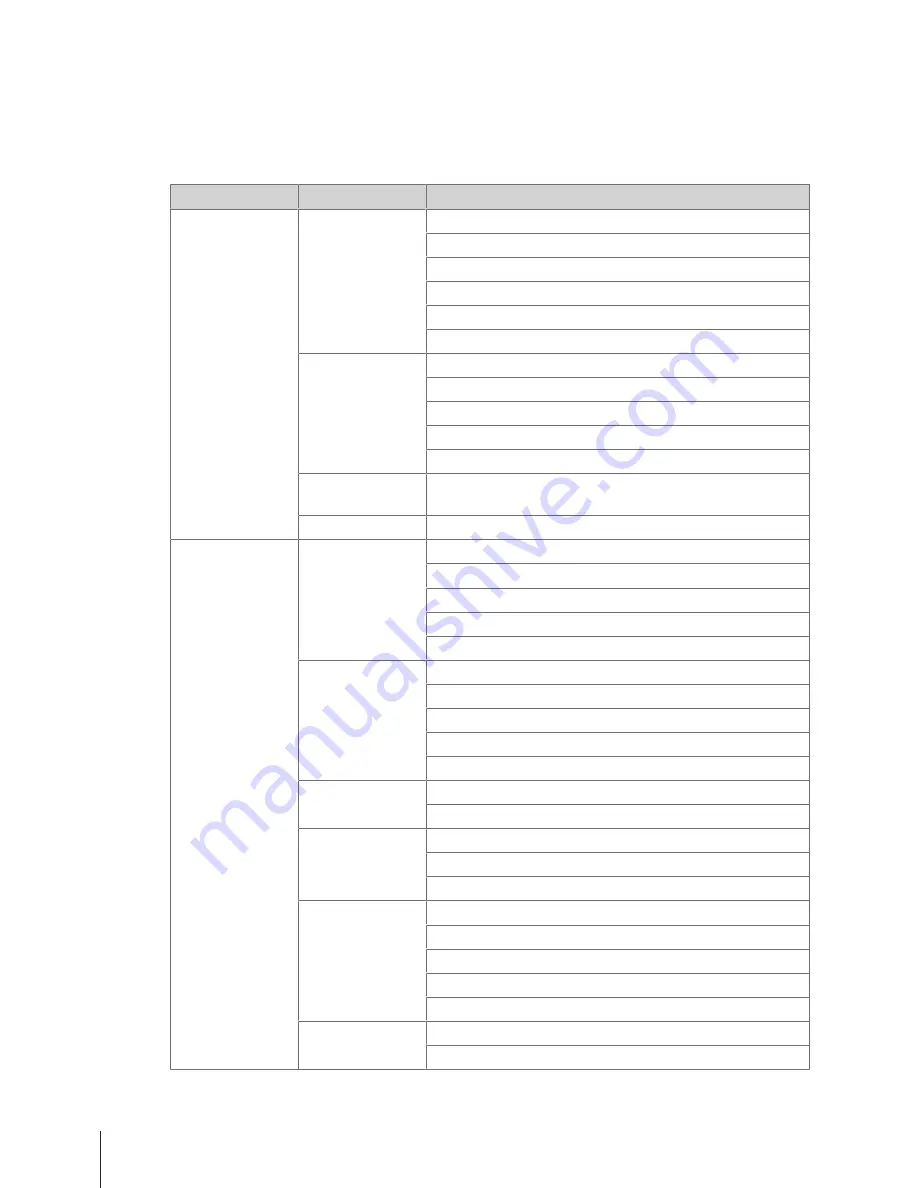
Menu group

Menu

Sub-menus

F1 Data

F11 Item Data

F111 PLU Database/ Edit

F113 Group

F115 Preset Tare

F116 Barcode

F117 VAT

PLU List Printout

F12 Data
Warehouse

F121 Vendor

F122 Scale

F123 Store

F126 Description text by Type

F128 Running Message

F13 Price
Management

F131 Discount

F14 Payment

F141 Payment Method

F2 Configuration

F21 Operation
Center

F211 Item Recall

F212 Item Registration

F215 Price

F217 Discount

F218 Payment

F23 General
Settings

F231 PLU Editing Fields

F232 Function Key

F233 Vendor

F235 Licenses

Training

F24 Printing

F245 Ticket Configuration

F246 Ticket Content

F25 Connectivity

F251 Network

F256 Transaction Log Server

F257 Data Server

F27 Control Panel

F271 Display

F272 Sound

F273 Power Management

F274 Date and Time

F275 Language

F28 System

F282 Reset

Printout System Info

Menu

30

Skippper 5000

Summary of Contents for Skipper 5000

Page 1: ...Skipper 5000 User Guide...

Page 2: ......

Page 3: ...to mains power 11 2 6 Turning on 12 2 7 Turning off 12 2 8 Restarting 12 2 9 Cleaning 12 2 10 Disposal 13 3 Fast and easy operation 14 3 1 Log in log out 14 3 2 Free input 14 3 3 Working with PLUs 15...

Page 4: ...menu 28 4 1 2 Key functions in the menu 28 4 1 3 Navigating in the menu 28 4 1 4 Ending the menu 29 4 1 5 Text input 29 4 2 Menu description 30 4 2 1 Overview 30 4 2 2 Data menu 32 4 2 3 Configuratio...

Page 5: ...Do not open the scale Always unplug the scale before cleaning and maintenance Safety instructions for battery operation The battery must not come into contact with chemical solvents oil or water Keep...

Page 6: ...Configuration requirements and tips Precondition for an action Individual action that must be carried out Action sequence that must be carried out in the order stated Result of an action or an action...

Page 7: ...llowing status messages and indicators can be displayed 0 Gross weight is zero NET Net weight X Quantity mode PLU PLU number is displayed ST Refund mode LS Large sale mode Connected to mains power sup...

Page 8: ...unction keys Key Name Function Menu Menu key Enter the menu Press and hold or double click to quickly return to the weighing mode Back Back key Go back to previous screen or clear booking and PLU call...

Page 9: ...r a legally controlled application it must be set up verified and sealed in accordance with local weights and measures regulations It is the responsibility of the purchaser to ensure that all pertinen...

Page 10: ...rations No excessive temperature fluctuations No direct sunlight No strong drafts Select a stable vibration free and preferably horizontal location for your scale 2 2 2 Levelling the scale Only a perf...

Page 11: ...move the 2 screws 2 under the display and take off the display 4 Remove screw 3 and take off the adapter 5 Pass the cable through the tower 6 Mount the adapter on the tower with screw 3 7 Close the di...

Page 12: ...d not be less than 48 g m2 the paper weight recommended is 55 g m2 Do not slam the printer door as this will damage the printer 2 3 2 Inserting the ticket roll To open the printer door press the butto...

Page 13: ...f use and decreases with age The battery s operating time is reduced when the battery has not been used over a longer period of time two months It is recommended that the battery is charged at least e...

Page 14: ...more time than usually 2 8 Restarting Press the switch at the right bottom of the scale until the message System is restarting appears 2 9 Cleaning CAUTION Damage to the device 1 Turn off and unplug...

Page 15: ...Should you have any questions please contact the corresponding authorities or the dealer from whom this device was purchased If this device is passed on for example for further private or commercial i...

Page 16: ...Free input You can immediately use your scale for weighing and selling without prior configuration With the factory settings the scale can total several entries and calculate the customer change 1 If...

Page 17: ...the entry with the Vendor key you can clear it with the Clear key and then enter the correct PLU 3 3 2 Calling up a PLU with preset keys You can save the most important PLUs to the keys in the keyboa...

Page 18: ...the PLU number of the item The unit price and the item name appear in the display 3 Press the X key to call up the multiplication function 4 Enter the number of items 5 Confirm the entry with the Vend...

Page 19: ...as described in section Free input Page 14 V 0 9 PLU T 3 4 2 Manual tare This function depends on the metrological limitation of the scale If you know the weight of the container you can enter the tar...

Page 20: ...are weight is saved A ticket with the number and weight of the container is printed Save Cus Tare 0 432 kg 123 0 000 kg NET 0 432 kg T Recalling customer tare weights 1 Place the full container on the...

Page 21: ...eral vendors on one scale the following settings must be made Define up to 16 vendors in sub menu F121 Select Vendor Mode Multi Vendor in sub menu F233 Either assign additional Vendor keys in F232 or...

Page 22: ...he entry with the Vendor key V2 4 For more items repeat steps 2 to 3 with any scale in the network e g scale B 5 Complete the transaction on any scale in the network as described in section Free input...

Page 23: ...0 Reopening a ticket You have finished the transaction with the Star key and the ticket was printed Now the customer would like to return an item In this case you can reopen the ticket To reopen a tic...

Page 24: ...90 kg Overwrite Price PLU 20 00 kg 0 9 3 11 2 Overwriting a price permanently To be able to change a PLU price permanently the following settings must be made Overwrite Price enabled or set to Up to P...

Page 25: ...iscount key 4 Enter the discount value 5 Confirm the discount with the Vendor key The reduced price is displayed 6 For more items repeat steps 1 to 5 7 Complete the transaction as described in section...

Page 26: ...he list 5 Confirm the discount with the Vendor key The reduced price is displayed 6 For more items repeat steps 1 to 5 7 Complete the transaction as described in section Free input Page 14 V 25 90 Dis...

Page 27: ...eques and vouchers the following settings must be made Payments defined in sub menu F141 Multiple Payment enabled in sub menu F218 1 Book the customer s items and confirm each item with your Vendor ke...

Page 28: ...when the PLU VAT rate has not been defined To be able to allocate a group VAT to a free price item or PLU the following settings must be made A VAT rate assigned to the group in sub menu F113 The grou...

Page 29: ...the USB connector at the bottom of the scale 2 Use the Arrow up Arrow down keys to select Backup data to USB respectively Restore data from USB and confirm with the OK key 3 Use the Arrow up Arrow dow...

Page 30: ...OK OK key Confirm selection Back Back key Go to previous level 4 1 3 Navigating in the menu 1 Enter the menu 2 Use the Arrow up Arrow down keys to select a menu on the highest level e g F 1 Data 3 Con...

Page 31: ...the scale works like on a mobile phone Example Entering article name Apple Key Action Display 8 Press once A 1 Press once Ap 1 Press once App 5 Press three times Appl 9 Press twice Apple The entered...

Page 32: ...Vendor F122 Scale F123 Store F126 Description text by Type F128 Running Message F13 Price Management F131 Discount F14 Payment F141 Payment Method F2 Configuration F21 Operation Center F211 Item Recal...

Page 33: ...s F311 Sales Report F312 PLU Report F313 VAT Report F314 Vendor Report F316 Group Report F32 Advanced Reports F321 Cash Report F322 Customer Tare Report F33 Combination Report F34 Delete Report Delete...

Page 34: ...Allow discount for this PLU Enable disable Price Overwriting Allow overwriting the price for this PLU Enable disable Group Select a PLU group 1 None Existing groups New refer to F113 Preset Tare Sele...

Page 35: ...U List Printout Print out a list of the PLUs entered Start PLU Number Enter start PLU number 1 99 999 999 End PLU Number Enter end PLU number 1 99 999 999 No Display Description Possible values F12 Da...

Page 36: ...ttom line Max 300 characters No Display Description Possible values F13 Price Management F131 Discount Define discounts Create New Existing discounts Discount ID Enter discount ID 1 99 Discount Name E...

Page 37: ...arge Sales Enable disable large sales mode Enable Disable Void Enable disable voiding Enable Disable Refund Enable disable refund mode Enable Disable Fix Option Fix tare or both tare and PLU 1 Tare on...

Page 38: ...ired preset key until a second beep is heard When the function is mapped the coordinates of the preset key are displayed e g L3 C1 Line 3 Column 1 The key mapping list items depend on the scale config...

Page 39: ...ect a header text to print on the ticket 1 99 999 999 Footer Text Select a footer text to print on the ticket 1 99 999 999 VAT Select VAT to print on the ticket Barcode Select a barcode to print on th...

Page 40: ...e beeper during start up 1 1976 Hz 2 1760 Hz 3 1568 Hz 4 Shutdown Sound Select frequency of the beeper during shut down 1 988 Hz 2 880 Hz 3 784 Hz 4 F273 Power Management Set up power management Scree...

Page 41: ...ish 2 French Fran ais 3 German Deutsch No Display Description Possible values F28 System F282 Reset Resetting the scale Clear Database Delete database Yes No Factory Default Reset scale to factory set...

Page 42: ...2 Detailed F313 VAT Report Create a VAT report Period Filter Define the period of the report Refer to F311 Sort by Define sorting method Refer to F312 F314 Vendor Report Create a vendor report Period...

Page 43: ...play Description Possible values F35 Sales Journal Sales Journal status Enable disable sales journal Enable disable Report Format Select format of the sales journal 1 Detailed 2 Simple Menu 41 Skipppe...

Page 44: ...Price Unit of Measures Customized Unit Discount Price Overwriting Group Preset Tare VAT Step 2 Organizing your products The scale offers groups to organize your products If desired go to the followin...

Page 45: ...e arrow keys to step through the configured PLU items 7 Use the OK key to edit an item 8 Enter numerical values e g price and confirm with the OK key 9 Use the arrow keys to select from a list e g uni...

Page 46: ...m with the OK key 7 Define a name as reference with the keyboard for this barcode and confirm with the OK key 8 Select Barcode Type and confirm with the OK key 9 Use the arrow keys to select the desir...

Page 47: ...BBBC Barcode EAN 13 with flag fix identifier 21 Item Number Total price 21AAAAABBBBBC Assigning a barcode to a ticket Once the barcode is defined it needs to be assigned to the ticket Only 1 barcode c...

Page 48: ...g a PLU Page 43 1 Enter the menu and navigate to sub menu F111 PLU Database Edit 2 Press the OK key 3 Use the arrow keys to select an existing PLU or Recall PLU number The unit price per kg and item n...

Page 49: ...played e g L3 C1 Line 3 Column 1 F232 14 Fix Key 1 L3 C4 or 2 L3 C4 Setting up menu items on preset keys You can assign shortcuts for the most frequently used menu items to the keys on the keypad 1 En...

Page 50: ...d navigate to sub menu F251 Network 2 Ensure that IP Mode is set to Automatic The scales are in the same network and can communicate with each other 3 Navigate to sub menu F257 Data Server 4 Define th...

Page 51: ...ll 6 Ensure that Source of PLU is set to Remote Local 7 Ensure that Data Synch at Start up is set to Enable 8 Navigate to sub menu F233 Vendor 9 Set Vendor Mode to Floating Vendor 10 Restart the clien...

Page 52: ...ning at the same time Example 1 Enter the menu and navigate to sub menu F31 Basic Reports 2 Select the report you would like to set up print out e g F311 Sales Report 3 Set Period Filter to Today 4 Pr...

Page 53: ...nfirm with the OK key 4 To add mor report types repeat steps 2 3 All reports set to Yes will be part of the combination report 5 To print the combination report press the Star key or Define a preset k...

Page 54: ...11 Vendor not active Login When the vendor was working on another device which is not reachable anymore go back to this device 12 Negative weight The displayed weight must not be less than 0 000 kg w...

Page 55: ...Enter a smaller or bigger value 42 Old tare deleted There have been too many tare values recorded The oldest tare value was deleted to store the most recent tare value 46 Close cash drawer Cash drawe...

Page 56: ...d Enter a valid date in the displayed format 68 Time is invalid Enter a valid time in the displayed format 69 Vendor not found The vendor with the entered ID does not exist 70 Vendor login other key V...

Page 57: ...inal voltage Installation category II Degree of pollution 2 6 2 Compliance Compliance to the following standards is indicated by the corresponding mark on the product This product conforms to the EMC...

Page 58: ...Technical data and accessories 56 Skippper 5000...

Page 59: ......

Page 60: ...e Suite 310 Parsippany NJ 07054 USA OHAUS Europe GmbH Im Langacher 44 8606 Greifensee Switzerland With offices worldwide www ohaus com 30217561 Subject to technical changes Ohaus Corporation all right...

Reviews: